Reduce internal help desk times and unnecessary questions concerning the status of reporting data. Use SAP NetWeaver BW statistics and logon screen technology to provide information to users as soon as they log on to SAP NetWeaver BW.
Key Concept
Part of technical content, BW statistics allow you to evaluate data from the data warehouse as well as the OLAP processor. You can use BW statistics to see how the system is using InfoProviders, InfoObjects, InfoSources, source systems, queries, and aggregates to ensure that your system is running at optimum performance levels.
Have you ever received a call from an SAP NetWeaver BW user asking about the status of specific data within SAP NetWeaver BW? Did someone ever call you complaining that data does not seem to be updated? Most of you will definitely answer “yes” to one of these questions. I can show you how to banish those unnecessary calls.
To avoid these interrupting questions, you can share the SAP NetWeaver BW status directly when users log on to the system. For example, Figure 1 shows the regular logon screen, which tells you nothing about SAP NetWeaver BW loads. Users log on to SAP NetWeaver BW, run a report, and find out that the data is not yet updated. This often leads to additional calls and frustration while waiting for the results of a query.
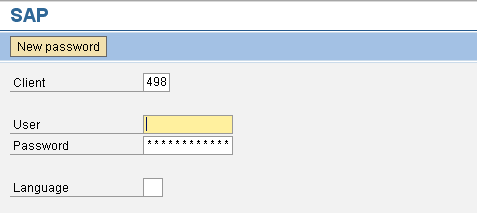
Figure 1
Default SAP logon screen
My idea is to display the data status directly on the logon screen (Figure 2). This helps you avoid additional calls because users can easily see the status of the individual areas — you can specify as much detail as you like (up to 16 lines).

Figure 2
Modified logon screen
How do you define such a modified screen? The answer is described in SAP Note 205487 “Own text on SAPGui logon screen,” which I would like to explain in detail. The note itself just describes how to define textual information such as welcome messages. I take this process a step further and show you how to define status messages driven by SAP statistical content.
Note
Before you can use the functionality described in this article, you need to activate BW statistics for SAP NetWeaver BW 7.x. Check the “
BW Statistics” page in SAP Help to find out how to enable the statistics for SAP NetWeaver BW. This content is helpful in many areas to spot problems within SAP NetWeaver BW, as well as optimize performance. I presented sessions about the proper use of statistical content and SAP NetWeaver BW auditing at
SAP NetWeaver BI & Portals using that content information. You can also find lots of tips on SAPexperts.com, for example in the article “
SAP NetWeaver BI 7.0: Improve Query Performance and Visibility With BI Statistics” by Muke Abdelnaby.
Add Text and Icons to the Logon Screen
Step 1. In transaction SE61, select General Text for the Document Class (if not already selected) and select the language you would like to use for the customized logon screen (Figure 3). Enter ZLOGIN_SCREEN_INFO for the document name. Then click the Display button to make sure the document is not already defined by another person. If this document is not available, click the Create button to define your document.
Note
You need to define the steps for each language individually. I just describe the procedure using the English language settings.
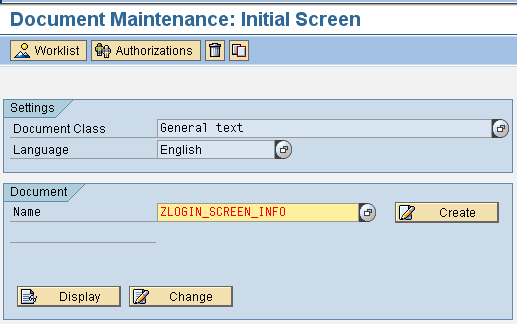
Figure 3
Select the Document Class and Language
Step 2. Set up the text and icons. Microsoft Word appears as your editorial tool in the upcoming screen. (I use Word 2007, as shown in Figure 4, but all recent versions [Office 97 through 2010] will work.) You have up to 16 lines and up to 45 fixed font characters for displaying individual messages.

Figure 4
Edit your document
In my example, I use the traffic light symbols to display the data status. Green means the load is fine, yellow means the load is (still) active, and red means the load is not available due to errors. If you’d like to use these standard icons, you can find the display and code (two characters) between the leading @ and the trailing @ character used in my example by running report RSTXICON in transaction SE38. Executing this report displays all available icons and the access code as shown in the highlighted area of Figure 5.
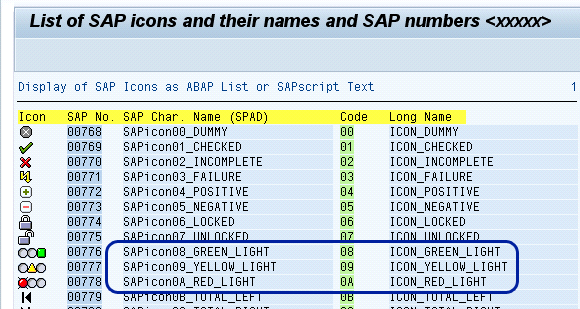
Figure 5
Report RSTXICON access codes
You can enter the text you want to display in your logon area as plain text in Word. To display an icon before your text (i.e., to display a green traffic light) use the @ symbol followed by the access code 08 (from Figure 5) followed by another @ symbol. For example, I entered @08@ CO Data in Figure 4. At runtime, the SAP GUI renders this textual information into the selected icon.
Tip!
If you want to work with icons as I describe in this article, you have to place the icons at the beginning of each line. Use of icons within or at the end of text does not work — the system just displays the @xx@ characters instead of the icon itself.
Step 3. Save and activate the document you created to view the new modified logon screen, as shown in Figure 2. At this point, the screen just shows a static text that does not adapt to changes provided by technical content about the SAP NetWeaver BW load status. Next I’ll show you how to influence this text.
Make the Static Text Dynamic
The document you set up with the text and icon is stored in an SAP table, as is almost all information within the SAP system. Table DOKTL stores the information and keeps a record of your changes by using versioning (field DOKVERSION).
Use transaction SE11 or SE16 to display the DOKTL table content. Access your document by entering the name ZLOGIN_SCREEN_INFO into the object entry field of the selection dialog of transaction SE11 or SE16 field to display the entered information (Figure 6).
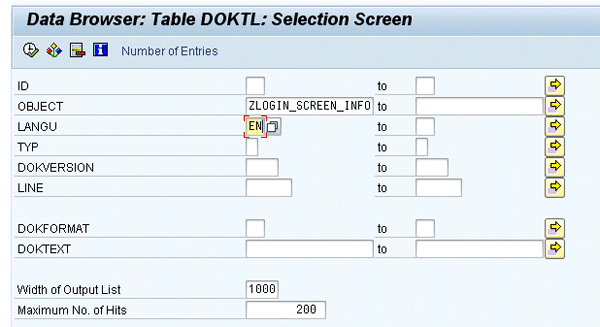
Figure 6
Entries in the transaction SE11/SE16 selection screen of table DOKTL
The content of table DOKTL shows that SAP NetWeaver BW will translate the entered textual information into traffic light icons automatically (Figure 7). In other words, the system translates the code for the traffic light status and displays the icon instead of the @xx@ information.
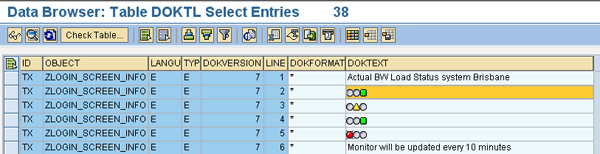
Figure 7
Entries in the DOKTL table showing the traffic light icons
The highest version number represents the latest version you created (version 7 in my example). Knowing where the SAP system has stored the document makes it easy to redefine the values dynamically. The missing link is to define a little ABAP program to schedule the execution of your program to acquire the technical content information. For example, you could set the program to execute every 10 minutes.
The system monitors the load status with the help of a BW technical content InfoProvider. To adapt the SAP NetWeaver BW status to changes in your load status, the system needs to obtain the technical information from technical content InfoProvider 0TCT_VC12 (a virtual InfoCube), which reads data directly from SAP NetWeaver BW status tables.
To dynamically read the status, I will share another hidden feature of SAP NetWeaver BW. SAP offers a bunch of programs that read InfoCubes with the help of ABAP code. I use function RSISD_GET_INFOPROV_DATA to read the actual status and change the document table content in reference to SAP NetWeaver BW load status.
InfoProvider 0TCT_VC12 allows you to display the actual status for all types of SAP NetWeaver BW warehouse management actions, such as process chains, triggers, indices, and individual loads. I focus on the process chain (type CHAIN) and its process status, but you can filter for all desired parts of your process chain (Figure 8). Alternatively, instead of using the InfoProvider, you could directly read table RSPCPROCESSLOG that contains the status of your process chains.
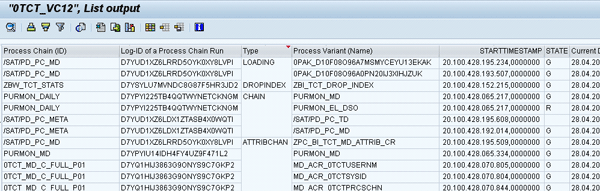
Figure 8
0TCT_VC12 data
InfoProvider 0TCT_VC12 displays the executed and active processes without any need to load data. You can display the updated status information for your reporting users.
If you look at the STATE column on the right side of Figure 8, you can see that multiple statuses are available for your SAP NetWeaver BW system to use. Figure 9 explains the different status information. Depending on your needs, you can combine several statuses in one graphical status (e.g., for aborted [type R and type X] processes).
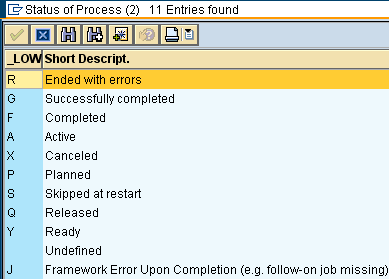
Figure 9
Types of process statuses
You can use the same restriction you use for the desired status (e.g., G for Successfully completed) for the types of processes. InfoObject 0TCTPRCTYP displays all the available process types within your SAP NetWeaver BW system (Figure 10). My example just uses type CHAIN.
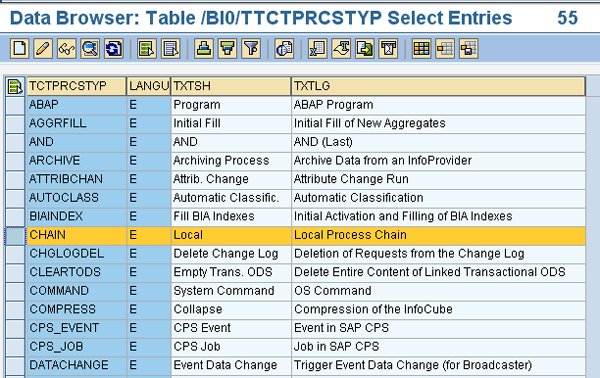
Figure 10
Process types
Next, you need to combine this information (e.g., process type = chain and status = Successfully completed) within an ABAP program to provide the information to your logon screen display. You can decide only to display broken, still active, or completed process chain tasks. The detail level for the display is up to you. I explain the major parts of the coding.
Three Major Codes for the Functionality
Code A. Access the InfoProvider. The system populates the name of the InfoProvider (e.g., 0TCT_VC12) in the variable p_cube. The code in Figure 11 defines the filter range (lt_range) you want to evaluate (e.g., May 16, 2010). Alternatively, you can just use the sy-datum system fields for the actual day or the actual day -1 (previous day). In the code in Figure 11, I am calling the function RSISD_GET_INFOPROV_DATA with a defined filter range and the function will return its value in lt_data, an internal table to be defined.
You can download Code A from Figure 11 via this link.
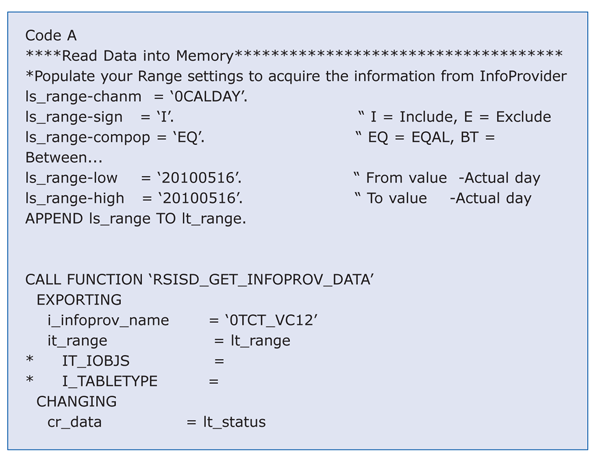
Figure 11
Populate your range settings to acquire the information from InfoProvider
Code B. After reading the available data from InfoProvider, you need to filter the desired process type and status as described above. Your final code needs to loop at the returned data and find the desired process type, such as Chain, and process status, such as G (Successfully completed). In my example in Figure 12, I want to display the purchase data status. The code looks for the type (tctprcstyp =CHAIN) and the name of a specific process chain (technical name of your process chain) (tctprcschn = PURMON_DAILY) as displayed previously in Figure 8.
You can download Code B from Figure 12 via this link.
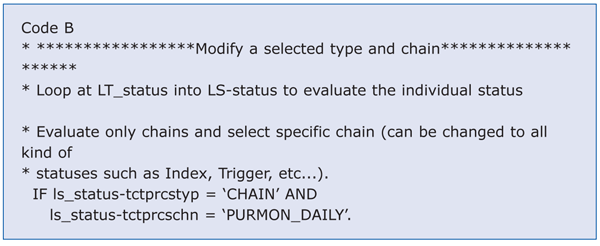
Figure 12
Display the purchase data status
Code C. You are almost done. After the code in Figure 11 finds your data, you need to update the actual status of the new entry in table DOKTL (Figure 6). Select the object, language, version, and line you want to update. Then concatenate your new status and update (modify) table DOKTL with the code in Figure 13. With this modification, your users will immediately see the newly updated status in the logon screen.
You can download Code C from Figure 13 via this link.
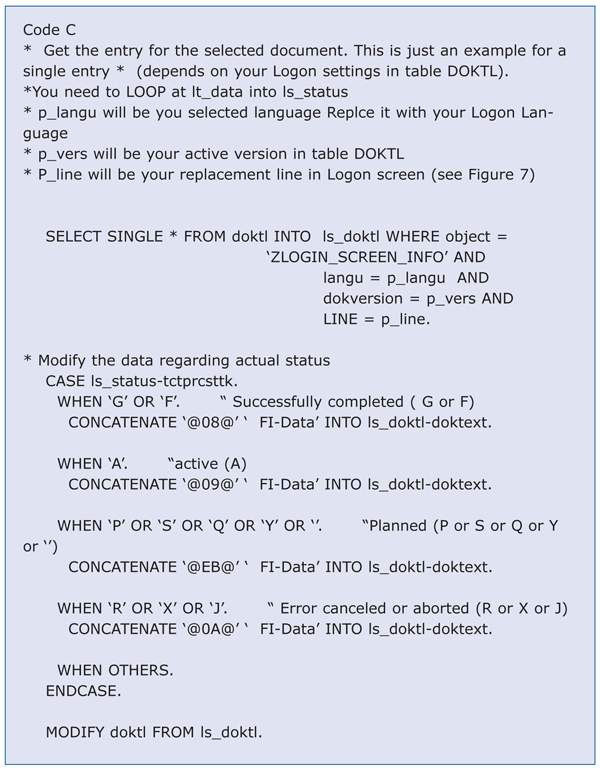
Figure 13
Send the purchase data status to table DOKTL
You are done! Just copy this code for each individual process or process chain you want to display (up to 16 different values due to restriction of logon screen text). Depending on the actual status (Figure 2), users will be informed when trying to log on to SAP NetWeaver BW if data for their responsible areas is already available or if the system is still processing it.
If your users access SAP NetWeaver BW via SAP NetWeaver Portal, refer to “Modifying the Logon Page” for information on how you can apply this process via the portal. Basically, you create a Business Server Page (BSP) with the logic I described in this article and integrate the BSP within the customized portal page.
Joerg Boeke
Joerg Boeke is an SAP NetWeaver BW solution architect and senior consultant working with BIAnalyst GmbH & Co.KG, with 19 years experience in SAP NetWeaver BW, having worked on it since SAP BW 1.2A. He offers significant expertise in the SAP NetWeaver BW reporting area, including design, data integration, data visualization, performance optimization, and the cleanup of existing SAP NetWeaver BW systems. He is the author of SAP BW 7.x Reporting - Visualize your data.
You may contact the author at Joerg.boeke@bianalyst.de.
If you have comments about this article or publication, or would like to submit an article idea, please contact the editor.