You can enhance the bookmark functionality of your BW Web reports to obtain your preferred report layout without the need for additional drill-down or filtering. By adding JavaScript code to the bookmark properties, you can create a pop-up selection screen where you can choose the variables to display in your bookmarked BW Web report. Sample code is included.
Key Concept
Command URLs allow you to perform specific tasks. The system executes command URLs coded in the HTML template or within an object tag via different methods, including the JavaScript method described in this article. The BOOKMARK_DATA command executes on the Web Application Server (Web AS) to bookmark-enable a Web application. When the system calls this command URL, it generates a bookmark with <SAP_BW_URL CMD=‘BOOKMARK’>.
Have you ever reviewed a Web report only to find that the published report does not meet your reporting needs and requires adjustment every time to your preferred navigation? By adding an enhanced bookmark to your report, you can include a selection screen that permits you to manipulate the variables in the report so that you can see exactly the data and report format you want.
For example, say you are a sales manager who wants to know how many personal computer orders the sales force entered in the system between January 2002 and May 2002. Currently you refer to a standard BW report ZDEV_SALES_REPORT (Figure 1) published on your company’s portal via SAP NetWeaver Portal. Your BW team typically publishes the report with the drill-down used by a majority of users, in this case a drill-down by month that includes January 2002 to March 2002. Because you need to know sales for April and May, it would be easier if you could use a personalized BW Web report that would allow you to manipulate the variables.
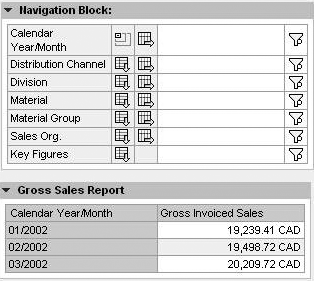
Figure 1
Standard BW report ZDEV_SALES_REPORT
You could add an enhanced bookmark to the Web report to create customized reports with different drill-downs, such as gross invoiced sales by week, or you could drill down by Sales Org. and Material Group and drill across by Calendar Year/Month. When you execute the bookmarked Web report, you receive a selection screen in which you can change the variables (e.g., a different time frame for the report) while keeping the navigation state of the report
We will explain how to add an enhanced bookmark with a selection screen to a Web report. We will then show you how you can manipulate variables with the enhanced bookmark selection screen. The process involves appending the bookmark URL with a code string for the variable selection screen, saving the bookmark URL, and adding JavaScript code in the Web templates (the BW server stores most of the JavaScript code).
This functionality works when you execute BW Web reports directly from SAP Web Application Server (Web AS) or SAP NetWeaver Portal. The JavaScript code looks at the URL generated after the BW server returns the bookmark. You then append the URL with an additional code string for the variable selection screen. The location of the bookmark URL can vary depending on whether you run the report on a BW server or via SAP NetWeaver Portal.
Tip
You can also send bookmark URLs via email. If the recipient has the necessary authorization and security access, you can both execute the bookmark URL and see the same navigation. This reduces the number of queries or Web templates required to produce the desired navigational status of the reports.
Before implementing the steps for an enhanced bookmark, you should be able to edit JavaScript code in Web templates and know how to use JavaScript at the back end (on the server). You may need to work with a developer if you are unfamiliar with JavaScript. You should also be familiar with the Add To Favorites functionality in Internet Explorer.
Tip
If you are unfamiliar with using the Add To Favorites functionality, refer to the article, “Make BW’s Bookmark Functionality a One-Step Process,” by Mukunda Krishnaswamy and Adrian Gawdiak. This article provides an efficient method for creating bookmarks for BW reports.
No additional settings are required to use the bookmark functionality. This enhancement assumes that you have the required settings for publishing Web reports already in place. We tested this enhancement with Internet Explorer 6.0.
Set Up the Enhanced Bookmark
SAP-delivered functionality in Web Application Designer (Web AD) provides an option to use bookmarks. You can use the settings Bookmark or Bookmark with Displayed Data in Web AD as shown in Figure 2. Selecting the Always Display option allows display of the bookmark on the context menu (the menu that appears when you right-click on an item) of the BW Web report. However, bookmarks created with this option do not allow you to display the selection screen by default. Therefore, make sure that the settings for bookmarks in Web AD are set to No Display.
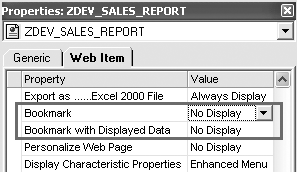
Figure 2
Set the Bookmark and Bookmark with Displayed Data values to No Display
To create the bookmark, we used the command URL functionality. We used the following command URL in the Web template: <SAP_BW_URL CMD=‘BOOKMARK’>
When you add a bookmark to your favorites, the system calls this command URL, which generates a bookmark on the BW server. First, you add JavaScript code to the Web template HTML code to show the Add To Favorites option on the context menu. Then, you add the command URL <SAP_BW_URL CMD= ‘BOOKMARK’> to the bookmark code shown in Figure 3. Each of the bookmarks generated on the BW server has a unique ID, such as the one shown in Figure 4.
You can download the JavaScript code in Figure 3 by clicking here.
|
<!-- Create Bookmark Code -->
<SCRIPT LANGUAGE="JavaScript1.2"
SRC="/sap/bw/Mime/BEx/JavaScript/JSBookmark.js"
TYPE='text/javascript'></SCRIPT>
<SCRIPT LANGUAGE="JavaScript1.2"> function myMenuProcessor(parameter, cell_type, filter, parameter1, parameter2,item,
dataprovider, x, y) {
switch(parameter)
{ case "1":
var bwUrl= ("<SAP_BW_URL CMD='BOOKMARK'>" );
bookmark_url(bwUrl) ;
break;
}
}
</SCRIPT>
|
|
Figure 3
|
JavaScript code inserts the Add To Favorites option on the context menu
|
You then take the URL generated with the bookmark and add a parameter for the selection screen using the JavaScript code in Figure 5. This suffix works for all bookmarks; the JavaScript code is common to all BW reports. When you execute the bookmark, you receive a pop-up selection screen that allows you to change the variables in the report. The resulting URL looks like Figure 6.
|
&CMD=PROCESS_VARIABLES&VARIABLE_SCREEN=X&SUBCMD=VAR_ALL
|
|
Figure 5
|
Add the selection screen coding to the end of the bookmark URL
|
|
https://hostname.mycompany.com:1443/sap/bw/BEx?SAP-
LANGUAGE=E&BOOKMARK_ID=3XDW26X8VXAD2Z4NRLUAVB11L&CMD=PROCESS_
VARIABLES&VARIABLE_SCREEN=XSUBCMD=VAR_ALL
|
|
Figure 6
|
Edited bookmark URL
|
Apply the JavaScript code described in Figure 7 to the Web template for ZDEV_SALES_REPORT to set up the selection screen. This JavaScript code checks if the BW server generated the BOOKMARK_ID and, if so, adds the variable screen parameters to the end of the bookmark URL in Figure 6.
You can download the JavaScript code in Figure 7 by clicking here.
|
//comment: This function generates a command URL for bookmark within the self window.
function bookmark_url(bwUrl)
{
child1=window.open(bwUrl,target="_self","height=200,width=400,status=yes,toolbar=no,menubar=no,location=yes","true");
window.focus();
}
//Comment:
function getBookmarkID(url)
{
var xVar = "BOOKMARK_ID";
var subQueryStr = url.search.substring(1).split("&");
for (var i=0;i< subQueryStr.length;i++)
{
var subQueryStrPairs = subQueryStr [i].split("=");
if (subQueryStrPairs [0] == xVar )
{
return true ;
}
}
}
// Comment: This function checks if there is BOOKMARK_ID in the window.location url
// and if there is no BOOKMARK_ID in the url, generates the pop up for IE to store the
//bookmark.
function loadFunc()
{
var xlocation = "";
var bwUrl1;
if (getQS("BOOKMARK_ID" ) )
{
if (getQS("VARIABLE_SCREEN" ) )
{
//
}
else
{
pageTitle=document.title;
var parentURL = window.parent.location;
var childURL = window.location;
if (getBookmarkID( parentURL ))
{
bwUrl1=(parentURL +"&CMD=PROCESS_VARIABLES&VARIABLE_SCREEN=XSUBCMD=VAR_ALL" );
}
else
{
bwUrl1=(childURL +"&CMD=PROCESS_VARIABLES&VARIABLE_SCREEN=XSUBCMD=VAR_ALL" );
}
external.AddFavorite(bwUrl1,pageTitle);
}
}//End check for VARIABLE_SCREEN
}//End check for Bookmark_ID
//Comment: This function is called in function loadFunc() to check if the BOOKMARK_ID
//string exists in window.location URL.
function getQS(val) //Search both the Child and Parent URL for the variable parameter to determine if passed Value(val) appears in the String
{
var parentURL = window.parent.location; //Retrieve Parent URL Location
var parentQSVars = parentURL.search.substring(1).split("&"); //Split Parent URL location to separate Query String Variables and store in array
for (var i=0;i<parentQSVars.length;i++) //Loop array
{
var parentSubQSVars = parentQSVars[i].split("="); // Split array further where "=" appears and store in another array
if (parentSubQSVars[0] == val) //Evaluate if the passed value (val) is equal to the current array value
{
return true ;
}
}
//****************************************************************************
//If Parent does not exist check the child or immediate window.location.
//This is being done to handle two scenarios (One inside the portal and the other outside)
//****************************************************************************
var childURL = window location; //Retrieve URL Location
var childQSVars = childURL.search.substring(1).split("&"); //Split Child URL location to separate Query String Variables and store in array
for (var i=0;i<childQSVars.length;i++) //Loop array
{
var childSubQSVars = childQSVars[i].split("="); // Split array further where "=" appears and store in another array
if (childSubQSVars[0] == val) //Evaluate if the passed value (val) is equal to the current array value
{
return true ;
}
}
}
|
|
Figure 7
|
JavaScript code to set up the selection screen
|
In the JavaScript code in Figure 7, you need to identify whether the BOOKMARK_ID string exists as part of the URL. To check this, first split the query string (the part of the URL that appears after the “?” in Figure 6). Next, split each sub-variable that appears in the query string separated by an ampersand (&). The third split separates the parameter-value pairs. You can rename the variables or functions as required.
Note that we made a provision in this code so that it works from the SAP Web AS or SAP NetWeaver Portal. In this code, we differentiated between the parent URL and child URL so that when you execute the Web report from SAP NetWeaver Portal, the parent URL represents the Web URL. When you execute the Web report from Web AS, the child URL represents the Web URL.
Tip
You can store the JavaScript code in Figure 7 on the BW server by uploading it in the Multipurpose Internet Mail Extensions (MIME) directory. This allows you to save minimal JavaScript code in the Web template.
Note
Ensure that the protocol for HTTP or HTTPS is consistent between SAP Web AS and SAP NetWeaver Portal. If they are not the same, the JavaScript code does not work.
Note
You can manage bookmarks with Reporting Agent by navigating to the Bookmarks area. For more information on this, go to https://help.sap.com and search for “Reporting Agent.” Refer to the document “Reporting Agent - highlight.” Reporting Agent allows the administrator to view bookmarks generated in the system and to delete unwanted bookmarks.
Apply the Enhanced Bookmark
Once you have updated the JavaScript code for the ZDEV_SALES_REPORT Web template, follow these steps to set up the desired navigation status of the report. Then, bookmark the report and use the Add To Favorites option to save the Web report with a bookmark enhanced with a selection screen.
Step 1. Execute the Web Report
You can deploy Web reports in several different ways. The following methods are the most common:
- Roles deployment -- assignment of reports based on user roles
- Company intranet
- SAP NetWeaver Portal
Select a Web report that you are authorized to use and execute the report. In the selection screen that follows, enter the desired selection parameters and execute the report (Figure 8). Note that the selection screen displays pre-selected values resulting from the edited Web template code.

Figure 8
Web report variable selection screen
When you execute the report, the system displays the Web report shown in Figure 1. With the enhancement, you can make changes to the navigation status of the report such as drill-down, drill-across, and filter (Figure 9).

Figure 9
Desired navigation status
Step 2. Add the Web report to Your Favorites
Keep your cursor on the Web report and right-click to access the context menu. Select Add To Favorites (Figure 10). Enter a name for the bookmark (e.g., Gross Sales Reporting -- USA) and select the folder in which you want to store the bookmark (Figure 11). Click on the OK button. This creates a bookmark in BW and adds a URL to your Internet Explorer Favorites list.

Figure 10
Select Add To Favorites from the menu
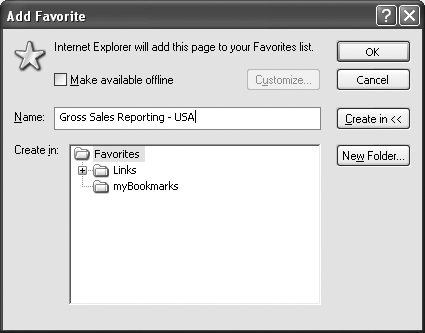
Figure 11
Add the Gross Sales Reporting – USA bookmark to your Favorites list
Step 3. Execute the Bookmark
Open Internet Explorer and select Favorites. Go to the location where you saved the bookmark URL and select the bookmark for the report (Figure 12).
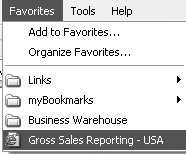
Figure 12
Select the bookmark from the Favorites menu
When you open the saved bookmark (Gross Sales Reporting -- USA in our example), the system executes a URL on the BW server and prompts you with a selection screen in a pop-up window. Note that the selection screen displays the selection parameters that you entered when you created the bookmark.
Step 4. Modify the Selection Parameters
Change the variables for the desired report. For example, you can opt to view several months at a time by changing the Calendar Month/Year to field from 03/2002 to 05/2002 (Figure 13). Click on the Execute button in the selection screen to run the report with the updated variable. Figure 14 shows the resulting report. Note that this method retains the navigation state and the data now shows up with the months that you chose in the selection screen.

Figure 13
Change the Calendar Month/Year to variable in the bookmarked report

Figure 14
Gross Sales Report with five-month view
Jay Dixit
Jay Dixit is a senior IT analyst with Halliburton. He has more than 10 years of configuration and development experience with SAP and the BW environment. For the past five years, Jay has been working on the implementation of BW as the team lead and architect. He was actively involved in four full life cycle BW deployments in technology, manufacturing, and oil and gas industries. His special interests include data modeling, performance tuning, Web reporting, and development of BI Analytics.
You may contact the author at Jay.Dixit@Halliburton.com.
If you have comments about this article or publication, or would like to submit an article idea, please contact the editor.

Sathish Janardhanan
Sathish Janardhanan is a senior IT analyst with Halliburton. He has more than eight years of design, development, and implementation experience with Microsoft's and Sun's Web application architectures and various SAP BI applications. He has extensive experience in interfacing BW with third-party BI reporting tools and Web applications. He has also worked at length on custom development and integration of BW Web reporting and SAP Enterprise Portal at Halliburton.
You may contact the author at Satish.Janardhanan@Halliburton.com.
If you have comments about this article or publication, or would like to submit an article idea, please contact the editor.