Learn how to use the rules-based availability check method along with product interchangeability in SAP Advanced Planning and Optimization (SAP APO) Global Available-To-Promise (Global ATP). It allows you to substitute one product with another by following a list of rules for substitution at different product location combinations.
Key Concept
In product interchangeability, one product is replaced by another from a specific date – a process also known as a supersession chain. A rules-based availability check in SAP Advanced Planning and Optimization (SAP APO) Global Available-To-Promise (Global ATP) is an iterative process in which a set of rules is processed sequentially until valid results are obtained. For example, replacement of one product by another can be due to a new product that is a more advanced version of an existing product. Before using product interchangeability, you need to decide how to use existing stocks and how to carry out future planning.
SAP Advanced Planning and Optimization (SAP APO) provides a suite of options that controls the replacement of one product by another. This entire process is known as product interchangeability. In this article, I focus on how product interchangeability can be used and integrated in SAP APO Global Available-To-Promise (Global ATP) by using rules-based availability checks. Using rules-based availability checks helps to optimize the decision making process between different substitutions using list of defined rules. Different rules can be defined as per business requirements that control how product interchangeability can be carried out smoothly across locations.
Consider an example of a simple supply chain network of a manufacturer consisting of single plant and multiple distribution centers. Figure 1 diagrams the supply chain network that has been considered for discussion in this article. Products are manufactured at PLANTA and shipped to the distribution centers DC01 and DC02 based on demand and corresponding supply. Product B1 is an old product that is sold by a manufacturer and product B2 is a superior, advanced version of the same product. You need to plan to phase out Product B1, plan for Product B2, and determine a proper planning strategy.

Figure 1
An example of a supply chain network
Configure Master Data Objects Needed in SAP APO
Before using the product interchangeability, you need to have the master data configured in the system. The master data needs to be configured for the following objects:
Note
I assume readers know how master data is set up and configured in SAP APO. For this article I include only the screenprints of the master data used in the article.
Locations
To configure the master data for locations, execute transaction code /SAPAPO/LOC3. For my example, create Location PLANTA of location type (1001) and DC01 and DC02 of location type (1002) as shown in Figures 2, 3, and 4. Steps to create the location are not included as it is assumed that readers know how to set up master data in SAP APO. These screenprints just display the location and location type via transaction code /SAPAPO/LOC3.

Figure 2
Location PLANT A

Figure 3
Location DC01

Figure 4
Location DC02
Products
To configure master data for products, execute transaction code /SAPAPO/MAT1. For my example, create products (e.g., PROD-B1 and PROD-B2) at locations PLANTA, DC01, and DC02. Figure 5 shows one of the products PROD-B1 at DC01.

Figure 5
PROD-B1 at DC01
Note
Product view is a common step that is used throughout the article for demonstration and is described in the next section.
Product View
To see the requirements, receipts, and stock of a product available at particular location, execute transaction /SAPAPO/RRP3. In the screen that appears, populate the Plng Version (planning version), Product, and Location fields as shown in Figure 6. Press Enter to save your entries.
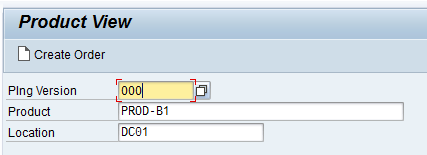
Figure 6
Product View
Configure Interchangeability-Specific Master Data in Global ATP
In this section I explain the steps to configure interchangeability-specific master data in Global ATP. These steps are creating an interchangeability master data location list, creating an interchangeability master data location determination procedure, creating a supersession chain, and creating interchangeability master data for the product substitution procedure.
Location List
Locations are grouped together in a location list and are used to combine a set of locations. To create an interchangeability master data location list, execute transaction /INCMD/UI. In the screen that appears, click the create icon highlighted in Figure 7.

Figure 7
Location list
In the same screen, select Group Type as Location List from the drop-down list of options. Enter a name in the Group field and Group Description fields (e.g., LL1). Click the add icon highlighted in Figure 8.

Figure 8
Location List header
In the new row that is created, enter the name of the External Desc. Plant (e.g., DC01) and press Enter. After the Description field is autopopulated, click the add icon again (Figure 9).

Figure 9
Add items to the location list
In the row that is created, enter the name External Desc. Plant (e.g., DC02) and press Enter. The description is autopopulated. After you enter the details, click the release flag icon and then click the Model Assignment button (Figure 10).

Figure 10
Save the location list
In the next screen, select Model 000 on the right side and click the arrow icon to move it to the left side as shown in Figure 11.
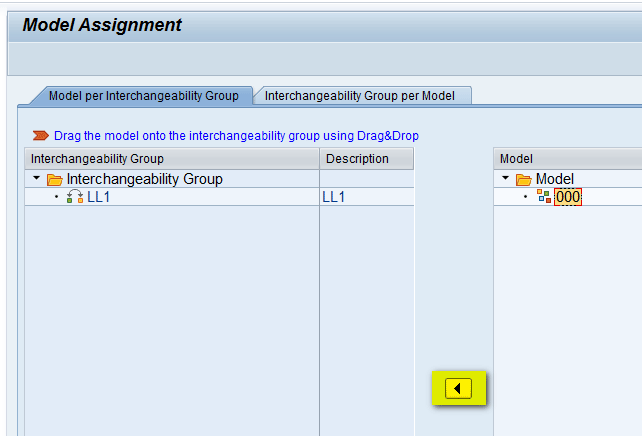
Figure 11
Assign the model to the location list
In Figure 12, you can see that Model 000 is now assigned and present under Interchangeability Group LL1. Click the save icon to save the changes.

Figure 12
Model assigned to the location list
Location Determination Procedure
An interchangeability group is for location substitution (i.e., Location List is combined in the Location Determination procedure). To create an interchangeability master data location determination procedure, execute transaction code /INCMD/UI. In the screen that appears, click the create icon highlighted in Figure 13.

Figure 13
Location determination procedure
In the same screen, go to the Group Type field and select Location Determination Procedure from the drop-down list of options (Figure 14). Enter a name in the Group and Group Description fields (e.g., LP1) and then click the add icon.

Figure 14
Header for the location determination procedure
In the new row that is created, enter the name of the subgroup that you created in the above section in the Subgroup column (e.g., LL1) and press Enter. The Subgroup Description field is autopopulated. After you enter the details, click the release flag icon and then click the Model Assignment button as shown in Figure 15.
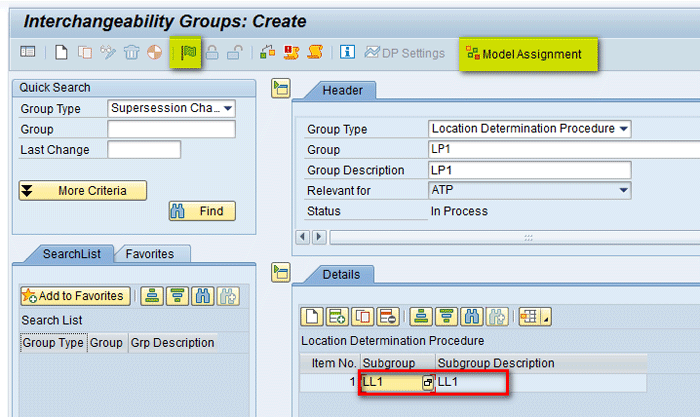
Figure 15
Save the location determination procedure
Similar to the step in which you created the Location List, assign Model 000 to the Interchangeability Group LP1. Click the save icon to save the changes as shown in Figure 16.

Figure 16
Model assigned to the location determination procedure
Supersession Chain
Creation of a supersession chain is described in detail in the first part of the article on product interchangeability in SNP. Figure 17 is an example of the supersession chain. In the Header tab, you can see that the name of the supersession chain is SC1. In the Location-Independent Attributes section, the field in the Pre. Prod (predecessor product) column is Product-B1, and the Suc. Prod. (successor product) column is Product-B2. The field in the Valid-from column is 12/01/2015, and the field in the Use-up column is No (Figure 17).

Figure 17
Supersession chain header
In the Location tab, you can see this supersession chain is assigned to two locations: DC02 and DC01 (Figure 18).

Figure 18
Supersession chain locations
Finally, the supersession chain is saved and assigned to Model 000 as shown in the previous section for Location List and Location Determination procedure.
Product Substitution Procedure
The interchangeability group for product substitution (i.e., supersession chain) is combined in the product determination procedure. To create interchangeability master data for the product substitution procedure, execute transaction /INCMD/UI. In the screen that appears, click the create icon highlighted in Figure 19.
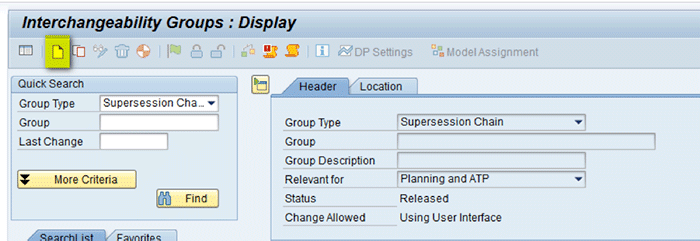
Figure 19
The product substitution procedure
In the same screen, select Product Substitution Procedure from the drop-down list of options in the Group Type field. Enter a name in the Group and Group Description fields (e.g., PS1) and then click the add icon highlighted in Figure 20.

Figure 20
The product substitution procedure Header tab
In the new row that is created, enter the name of the subgroup that you created in the above section on supersession chain in the field in the Subgroup column (e.g. SC1). Press Enter. The Subgroup Description is autopopulated. After you enter the details, click the release flag icon and then click the Model Assignment button as shown in Figure 21.

Figure 21
Save the product substitution procedure
Just as you did in the steps in the above sections, assign Model 000 to the Interchangeability Group PS1. Click the save icon to save the changes (Figure 22).
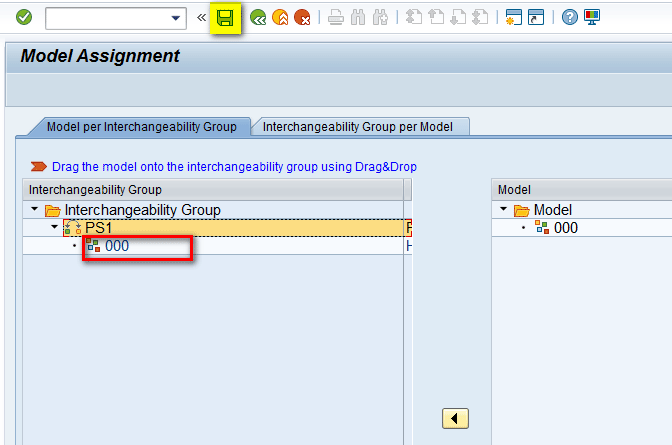
Figure 22
Model assigned to the product substitution procedure
Execute Rules-Based Simulation to Carry Out Product Interchangeability
In the above section you learned how to define master data to use product interchangeability. Rules-based simulation helps you to visualize how this master data can be used using a set of rules.
Rule Control
Rule control strategies (product strategy and location strategy) control check processing in a single list. To create a rule control, execute transaction /SAPAPO/RBA04. In the screen that appears, select the maintain rule control icon (highlighted in yellow below Overview), and then click the create icon. A new row is populated. In the field under the Control column, enter the name of the control (e.g., RC1), enter a description (e.g., Rule Control) in the field under the Description column, and press Enter (Figure 23).

Figure 23
Rule control header
In the same screen, on the right side you can see Rule Control RC1 is populated. Enter data for the other required fields. For example, in the Product and Location fields, select Start from top of list in the drop-down list of options. In the Qualified Product and Qualified location fields, select No Restriction from the drop-down list of options. Select the radio button named Combine qualified product with all locations, then qualified loc. W. all prods. In the Combination field, select Union from the drop-down list of options. After you click the save icon, click the Rules & substitutions button as shown in Figure 24.

Figure 24
Maintain rule control settings
Rule
After you click the Rules and substitutions button in Figure 24, select the maintain rule icon (highlighted in yellow below Overview in Figure 25), and then click the create icon. A new row is now populated. In the field in the Rule column, enter a name (e.g., RULE1) and enter a description (e.g., Rule) in the field in the Description column. Press Enter.

Figure 25
Rule header
In the same screen, on the right side you can see Rule RULE1 is populated. In the Rule Type field, select Inclusive from the drop-down list of options as shown in Figure 26. Leave the default settings in the other fields and select the Prod. + Loc. Subst. (InC MD) tab.
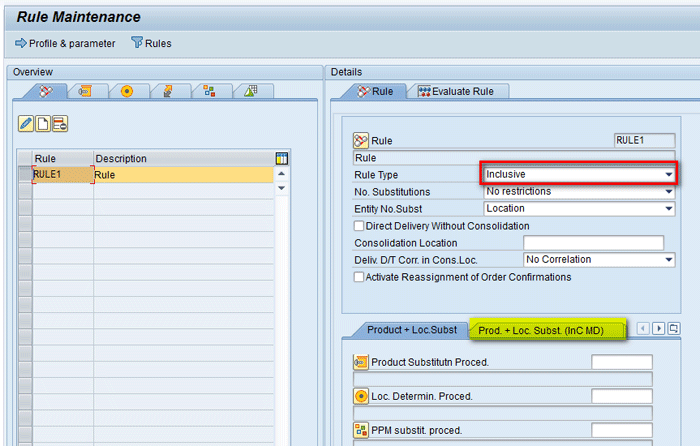
Figure 26
Rule details
In the refreshed screen, enter a name in the Product Substitutn. Proced. (product substitution procedure) field (e.g., PS1). In the Loc. Determin. Proced. (location determination procedure) field, enter a name (e.g., LP1). In the Rule Control section enter RC1 in the Rule Ctrl. Key (rule control key) field. These names are the names of the procedures you created in the above sections. Now click the Evaluate Rule tab as shown in Figure 27.
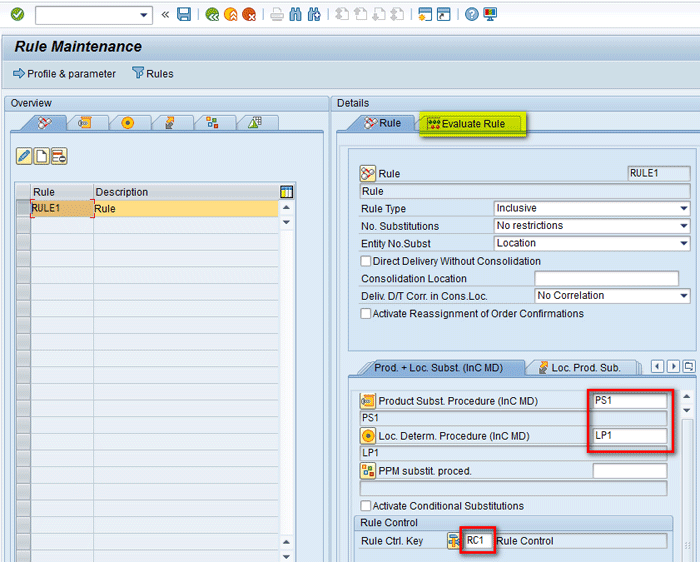
Figure 27
Assign master data to the rule
In the Evaluate Rule tab, enter the name of the product and the location that are to be simulated (e.g., PROD-B1 and DC01, respectively). Click the Start Evaluation button as shown in Figure 28.

Figure 28
Rule simulation
In the same screen, you see results of the evaluation and how the system tries to search using the interchangeability master data defined in above steps. Initially, the system searches for PROD-B1 at DC01, followed by DC02.
Note
The To date for PROD-B1 at both locations is 1 Dec 2015 as you defined the Valid From Date as 1 Dec 2015 while defining the substitution chain in Figure 17. The Valid from Date in Figure 17 suggests that PROD-B1 will be replaced by PROD-B2 from December 1, so in Figure 29 you can see that the To Date (i.e., end date for PROD-B1) is December 1, 2015, and the From Date for PROD-B2 is also December 1, 2015. Similarly, for PROD-B2, the From Date is December 1, 2015 as it is valid from that date. After searching PROD-B1 at DC01 and DC02, the system searches for PROD-B2 at DC01 and DC02, respectively. Finally, click the save icon to save the changes made as shown in Figure 29.

Figure 29
Results of rule simulation
Configure Rules-Based Availability Check to Use Product Interchangeability
I assume readers know the basics of an availability check and how it is set up in the SAP system. Therefore, I do not go into details of each object, but show the configuration made for each object that is used in rule determination.
To define the objects and configurations related to rules-based availability, execute transaction code SPRO and follow menu path Advanced Planning and Optimization > Global Available-to-Promise (Global ATP). In this section, I describe several steps to define and maintain various processes.
Step 1. Define the Check Mode
To define the check mode, execute transaction code SPRO and follow menu path Advanced Planning and Optimization > Global Available-to-Promise (Global ATP) > General Settings> Maintain Check Mode. Click the execute icon beside Maintain Check Mode.
In the screen that appears, you define a new check mode (W50). Populate the fields as shown in Figure 30 and then click the save icon to save your entries.
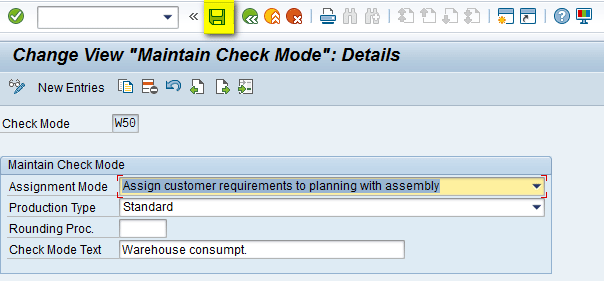
Figure 30
Check mode saved
Step 2. Maintain the ATP Group
To define the ATP Group, execute transaction code SPRO and follow menu path Advanced Planning and Optimization > Global Available-to-Promise (Global ATP) > Product Availability Check > Maintain ATP Group. Click the execute icon beside Maintain ATP Group. In the screen that appears, define enter T1 in the ATP Group field and populate the other fields as shown in Figure 31. Click the save icon to save your data. Both are default entries that are populated when new the ATP group is defined and is not used in this article.

Figure 31
Maintain details for the ATP group
Step 3. Define the Condition Table
To define the condition table, execute transaction code SPRO and follow menu path Advanced Planning and Optimization > Global Available-to-Promise (Global ATP) > Rules-Based Availability Check > Define Condition Table. Click the execute icon beside Define Condition Table. In the screen that appears, enter 400 (Product/Plant) in the Table field with the Product Number and Plant fields created as shown in Figure 32.

Figure 32
Define the condition table
Step 4. Maintain the Access Sequence
To define the access sequence, execute transaction code SPRO and follow menu path Advanced Planning and Optimization > Global Available-to-Promise (Global ATP) > Rules-Based Availability Check > Maintain Access Sequences. Click the execute icon beside Maintain Access Sequences.
In the screen that appears, enter AS01 in the Access field to create this access sequence. In the Table field enter 400 to assign condition table 400 that you created in step 3 to access sequence AS01. After the assignment you can see the fields Product Number and Plant as shown in Figure 33.

Figure 33
Access sequence defined
Step 5. Maintain the Condition Type
To define the condition type, execute transaction code SPRO and follow menu path Advanced Planning and Optimization > Global Available-to-Promise (Global ATP) > Rules-Based Availability Check > Maintain Condition Type. Click the execute icon beside Maintain Condition Type.
In the screen that appears (Figure 34), enter CT01 in the field in the CTyp (condition type) column and also enter a description in the field under Short Text. In the field in the AcSq column, enter AS01 to assign the access sequence AS01 created in step 4 to condition type CT01. Enter a description under Short Text and press Enter to save your data.

Figure 34
Define the condition type
Step 6. Maintain the Rule Strategy
To define the rule strategy, execute transaction code SPRO and follow menu path Advanced Planning and Optimization > Global Available-to-Promise (Global ATP) > Rules-Based Availability Check > Maintain Rule Strategy. Click the execute icon beside Maintain Rule Strategy.
In the screen that appears (Figure 35), select the Control Data folder and enter RS01 in the Rule Strategy field. In the field in the CTyp (control type) column, enter CT01 (the name of the condition type created in step 5) to assign this condition type to rule strategy RS01. Press Enter to save your entries.

Figure 35
Define the rule strategy
Step 7. Maintain the Rule Strategy Sequence
To define the rule strategy sequence, execute transaction code SPRO and follow menu path Advanced Planning and Optimization > Global Available-to-Promise (Global ATP) > Rules-Based Availability Check > Maintain Rule Strategy Sequence. Click the execute icon beside Maintain Rule Strategy Sequence.
This action displays the screen shown in Figure 36. Select the Control folder and in the Rule Strat. Seq. (rule strategy sequence) field, enter RSS. In the field in the Strategy column, enter RS01 (the name of the rule strategy created in step 6) to assign this rule strategy to the RSS rule strategy sequence and then click the save icon (not shown) to save your data.

Figure 36
Define the rule strategy sequence
Step 8. Assign Rule Strategy Sequence
To assign the rule strategy sequence, execute transaction code SPRO and follow menu path Advanced Planning and Optimization > Global Available-to-Promise (Global ATP) > Rules-Based Availability Check > Assign Rule Strategy or Rule Strategy Sequence.
In the screen that appears (Figure 37), enter AA in the Tech. Scenario (technical scenario) field, AAAA in the Business Trans. (business transaction) field, and A in the Action Type field. In the Assign Rule Strategy or Rule Strategy Sequence section, enter RSS (the name of the rule strategy sequence RSS created in step 7) in the Rule Strat. Seq. (rule strategy sequence) field as shown in Figure 37.

Figure 37
Assign the rule strategy sequence
Step 9. Create a Rule Determination
To create a Rule Determination, execute transaction /SAPCND/AO11. In the screen that appears (Figure 38), enter the name of the Condition Type created in step 5 (CT01) in the Condition Type field. Press Enter.
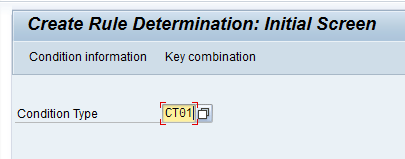
Figure 38
Rule determination
In the next screen (Figure 39), enter a name in the Product Number field (e.g., PROD-B1). Make the validity period to be valid from 11/01/2015 to 11/30/2015 and create two rows for plants DC01 and DC02. In the Rule column, assign the Rule created in above section (e.g., RULE1) to plants DC01 and DC02. After you enter all these details, click the save icon.

Figure 39
Rule determination for PROD-B1
In the same screen, follow the same steps to create an entry for PROD-B2 valid from Dec-2015 at DC01 and DC02 and save the changes as shown in Figure 40.

Figure 40
Rule determination for PROD-B2
Execute ATP Simulation in SAP APO Using Rules-Based Availability and Product Interchangeability Directly
There are two ways to use interchangeability master data: using product interchangeability directly and using product interchangeability via rules. In this section, I explain how to use interchangeability master data directly. When you use product interchangeability directly, rules are not used, the system directly uses the interchangeability master data to carry out substitution, and only product substitutions are allowed.
Check Instruction Settings to Use Product Interchangeability Directly
Based on the combination of check mode and business event, check instructions are defined. To complete this step execute transaction code SPRO and follow menu path Advanced Planning and Optimization > Global Available-to-Promise (Global ATP) > General Settings > Maintain Check Instructions. Click the execute icon beside Maintain Check Instructions.
In the screen that appears (Figure 41), make a new entry in the Check Mode field (e.g., W50) and Business Event field (e.g., A). The other fields are default entries that you do not change. In the Rules-Based ATP Check section, define the important configuration related to using rules-based availability and product interchangeability directly.

Figure 41
Check instruction settings to use product interchangeability directly
In the product view, you can see PROD-B1 at DC01 has stock of 250 while PROD-B2 at DC01 has no stock as shown in Figures 42 and 43. (To access the product view, read the instructions in the “Product View” section.)

Figure 42
Initial scenario for product B1 at DC01

Figure 43
Initial scenario for product B2 at DC01
Note
The supersession chain used in the simulation that I use in this section has Use-up as No as shown in Figure 17.
To run ATP simulation, execute transaction code /SAPAPO/AC04. In the screen that appears (Figure 44), enter parameters in the following fields:
- Product (e.g., PROD-B1)
- Location (e.g., DC01)
- Check Mode (e.g., W50)
- Business event (e.g., A)
- Date (e.g., 11/30/2015)
- Requirement Quantity (e.g., 200)
- Unit (e.g., ST)
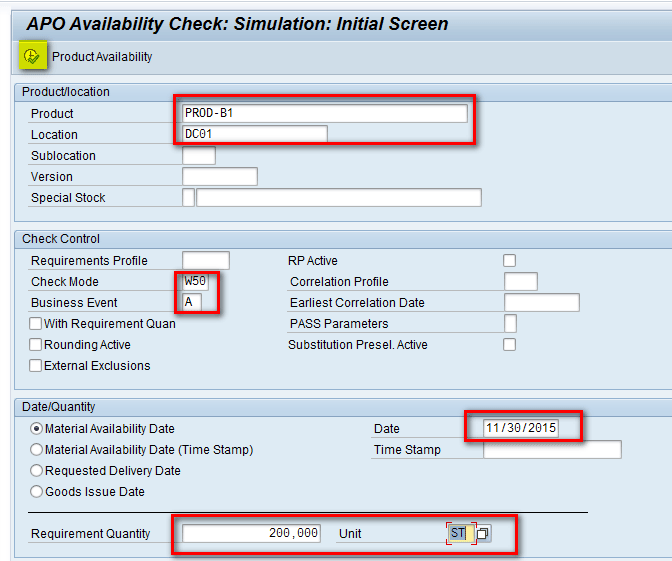
Figure 44
Run an ATP simulation
After you have entered your data, click the execute icon.
In the pop-up screen that appears, enter the parameters as highlighted in Figure 45 and click the execute icon.

Figure 45
Enter parameters for rules-based check execution
In the next screen (Figure 46), you can see the requirement of 200 is confirmed as PROD-B1 at DC01 had stock of 250 as shown in Figure 42. Close the screen.

Figure 46
ATP simulation results
In the main screen, change the material available date to Dec 30 and click the execute icon as shown in Figure 47.

Figure 47
Run ATP simulation
In the next screen (Figure 48), you can see that requirement of 200 is not confirmed because in the supersession chain you have defined the Use-up strategy as No and the Valid Date is 1 Dec 2015. Therefore, PROD-B1 is no longer valid after 1-Dec-2015 and with Use-up as No, it can’t use the existing stock of 100 after 1-Dec-2015. In the above scenario, the requirement of 200 was on 12/30/2015 and since PROD-B1 is no longer valid on that date and can’t be used, its stock requirement was shifted to PROD-B2 at DC01. However, since PROD-B2 at DC01 does not have any stock as shown in Figure 43, the quantity of 200 quantity was not confirmed here either.

Figure 48
ATP simulation results
In the supersession chain defined in Figure 17, Use-up is changed to Yes and saved as shown in Figure 49.
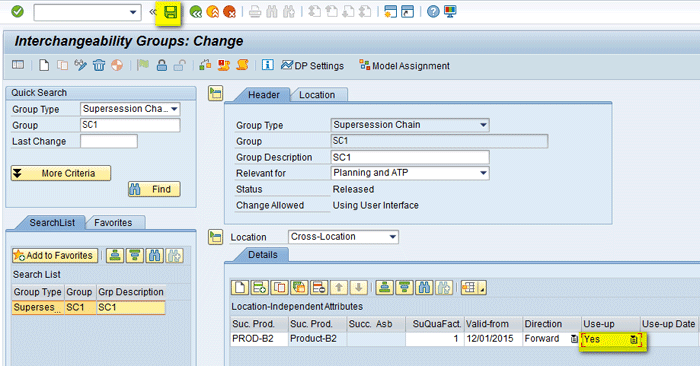
Figure 49
Supersession chain with Use-up as Yes
Note
To change the supersession chain, you need to use same process that was used while creation and just change the Use-up and save.
Now run the simulation via transaction code /SAPAPO/AC04 again as shown in Figure 47. In the next screen you can see that the quantity of 200 is now confirmed as you have changed Use-up to Yes, so even after 1-Dec-2015 any requirement for PROD-B1 at DC01 can use the existing stock of 200 as shown in Figure 50.

Figure 50
ATP simulation results
Now run the simulation by changing the Requirement Quantity to 300 and click the execute icon as shown in Figure 51.

Figure 51
Run the ATP simulation after changing the Requirement Quantity
In the next screen (Figure 52), you can see that out of the requirement of 300, 250 is confirmed at DC01. After that the system tried to confirm the remaining 50 for PROD-B2 at DC01 as per the supersession chain, but since PROD-B2 at DC01 has no stock, it was not confirmed.

Figure 52
ATP simulation results
Note
In this section you saw while running ATP simulation that only product substitution happened (i.e., PROD-B1 was initially searched at DC01 and if not fulfilled it searched for PROD-B2 at DC01). There was no location substitution because using product interchangeability master data directly does not support location substitution.
Execute ATP Simulation in APO Using Rules-Based Availability and Product Interchangeability Using Rules
This is the second option to use interchangeability master data using rules. In this case, the system applies condition records to determine rules processes in rules-based ATP. So here rules are read from the product substitution and location determination procedure.
Check Instruction Settings to Use Product Interchangeability using Rules
In order to use this option, you need to modify the Check Instruction defined in Figure 41 to a new setting as shown in Figure 53. Importantly, the section highlighted in green is the major difference in the configuration. Click the save icon to save the changes made.

Figure 53
Check instruction to use product interchangeability with rules
In the product view, you can see PROD-B1 at DC01 has stock of 250; PROD-B1 at DC02 has stock of 100, while PROD-B2 at DC01 and DC02 has no stock as shown in Figures 54 to 57.
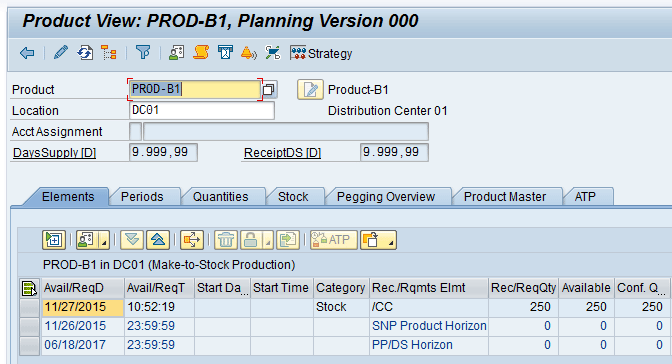
Figure 54
Initial scenario for product B1 at DC01

Figure 55
Initial scenario for product B1 at DC02

Figure 56
Initial scenario for product B2 at DC01

Figure 57
Initial scenario for product B2 at DC02
To run ATP simulation, execute transaction code /SAPAPO/AC04. In the screen that appears (Figure 58), enter parameters in the following fields:
- Product (e.g., PROD-B1)
- Location (e.g., DC01)
- Check Mode (e.g., W50)
- Business event (e.g., A)
- Date (e.g., 11/30/2015)
- Requirement quantity (e.g., 350)
- Unit (e.g., ST)
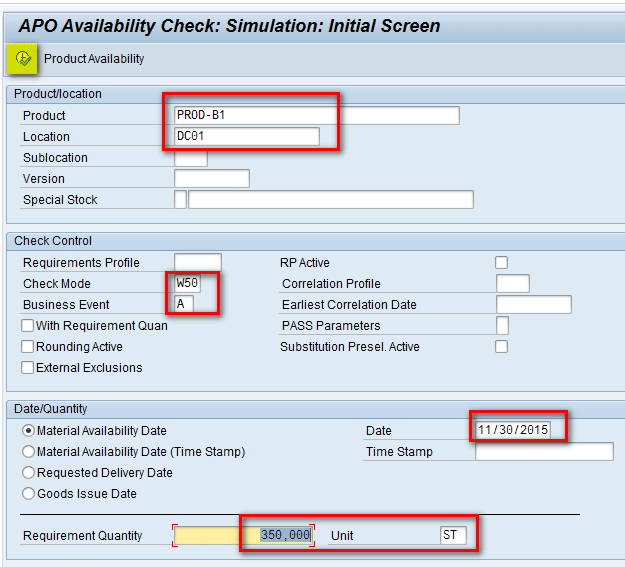
Figure 58
Run ATP simulation
Click the execute icon.
In the next screen, you can see that out of the requirement of 350 quantity, 250 are confirmed for PROD-B1 at DC01, while the remaining 100 are confirmed at DC02 as shown in Figure 59.

Figure 59
ATP simulation results
Now again run the simulation for requirement of 450 quantity as shown in Figure 60.

Figure 60
Run ATP simulation
In the next screen (Figure 61), you can see that out of the requirement of 450 quantity, 250 are confirmed for PROD-B1 at DC01, and 100 are confirmed at DC02. For the remaining 100, the system tried to check for PROD-B2 at DC01 and DC02, but since both have zero stock, it was not able to confirm as shown in Figure 61.

Figure 61
ATP simulation results
Note
In this section you saw that while running ATP simulation both product and location substitution is allowed. PROD-B1 was initially searched at DC01 and if not fulfilled, the system searched for PROD-B1 at DC02. Then the system searched for PROD-B2 at DC01 and then DC02 as shown in Figure 61.
Alok Jaiswal
Alok Jaiswal is a consultant at Infosys Limited.
He has more than six years of experience in IT and ERP consulting and in supply chain management (SCM). He has worked on various SAP Advanced Planning and Optimization (APO) modules such as Demand Planning (DP), Production Planning/Detailed Scheduling (PP/DS), Supply Network Planning (SNP), and Core Interface (CIF) at various stages of the project life cycle.
He is also an APICS-certified CSCP (Certified Supply Chain Planner) consultant, with exposure in functional areas of demand planning, lean management, value stream mapping, and inventory management across manufacturing, healthcare, and textile sectors.
If you have comments about this article or publication, or would like to submit an article idea, please contact the
editor.


