With a little ABAP code, optimize your data loads with efficient update rules.
Key Concept
Update rules connect InfoSources to data targets. They allow you to filter, transform, aggregate, and integrate the data passing through them.
In the BW world, tables often occupy much of developers’ time, as they analyze dimensional design, key fields versus data fields, compounding keys, and line-item dimensions, just to name a few. But what about all those generated programs that connect all the tables and dramatically affect data loads? These programs — update rules and transfer rules — are often swept under the rug and given less attention with little consideration to performance as long as they function properly.
With some BW knowledge and a few lines of code, I can show you how to create efficient update rules that optimize your loads using only limited ABAP code. Using these tricks, you can create update rules that perform optimally. This can increase the chances of meeting service-level agreements (SLAs) and allow greater windows of time for other activities, such as information broadcasting, aggregate rollups, index rebuilding, statistics updates, and InfoCube compressions.
Though I am not an ABAP expert, I know that a few bad lines of code can cripple the way that a data warehouse loads. Having acquired a few tips from experienced coders, I’ll show you that creating great update rules is now possible for everyone.
First, I’ll discuss the DATA_PACKAGE internal table and global declarations, and then I’ll show you how to put this knowledge to use with three steps to help you create optimized update rules. I’ll also point you in the direction of the best resources available on the topic of update rules in the sidebar, “Related Tips in Other Resources.”
The DATA_PACKAGE Internal Table
Imperative to performance tuning your update rules is understanding their mechanics. A load from one object to another, such as an operational data store (ODS) or DataStore object to an InfoCube, is broken down into data packets. A default value in the system (RSCUSTV6) determines the data packet size (Figure 1). You can override this with an InfoPackage setting in the InfoPackage change screen through the Scheduler menu (Figure 2). Behind the menu item, you can set the data package size according to number of rows or physical size in KB.
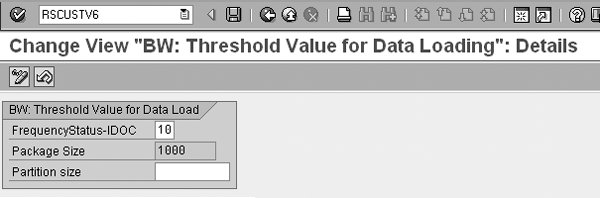
Figure 1
Transaction RSCUSTV6 lets you maintain various thresholds for data loading
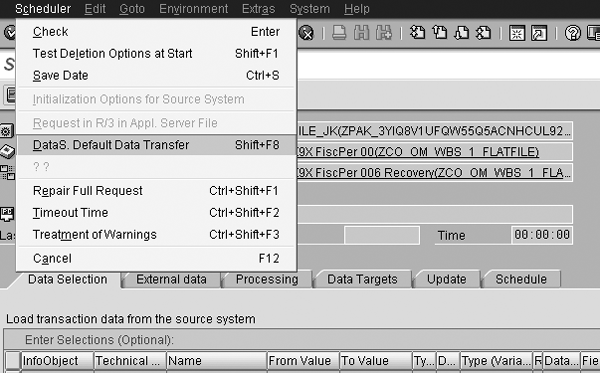
Figure 2
Data package settings menu item on the InfoPackage screen
Note
The start routine allows for packet-by-packet processing, which means that you can process as many records at once as determined by the packet size. This is a good area to do a mass processing such as filtering or aggregation. Technically, you could perform all your update rule processing in the start routine and not have any InfoObject routines. You could do this by looping over the data package and putting in all your InfoObject routines inside the loop. The drawback would be that it might be difficult to decipher where the system manipulates individual fields should there be a considerable amount of processing.
When you want to perform an operation which occurs at the field level, BW allows programmers to write individual routines for characteristics and key figures. Separating these routines allows developers to isolate a transformation and write specific rules for each field. This is generally common practice across BW implementations.
You need to define the package size of R/3 sourced information in R/3. The settings mentioned apply to flat files and BW-generated DataSources.
During the update rule processing, the system reads all records from the data packet into an internal table called DATA_PACKAGE. You can see this internal table and its associated type when you are in any of the routine screens in the update rules maintenance windows under the DATA: statement (Figure 3). I’ve provided a tutorial about how to access your update rules, which you can download by clicking this link. You also can find all of the code in this article there.
TYPES:
  BEGIN OF DATA_PACKAGE_STRUCTURE.
     INCLUDE STRUCTURE /BIC/CS0CO_OM_CCA_1.
TYPES:
     RECNO   LIKE sy-tabix,
  END OF DATA_PACKAGE_STRUCTURE.
DATA:
  DATA_PACKAGE TYPE STANDARD TABLE OF DATA_PACKAGE_STRUCTURE
       WITH HEADER LINE
       WITH NON-UNIQUE DEFAULT KEY INITIAL SIZE 0.
|
| Figure 3 |
How BW automatically defines the DATA_PACKAGE internal table |
In Figure 3, BW begins with creating a structure for the internal table. The structure that BW uses is based on the communication structure. This is the INCLUDE STRUCTURE /BIC/CS0CO_OM_CCA1 line. This structure is appended with a counter for each line in the table based on the ABAP system variable sy-tabix. Finally, BW takes the structure and creates a standard table without a header line without a unique key. The line INITIAL SIZE 0 means that the system dynamically determines how much memory to allocate.
For each data packet, the system processes the start routine once. When the start routine has finished, each record exiting the start routine then undergoes a series of characteristic update routines for each field in the data target. You can manipulate these characteristics routines with ABAP as well.
Global Declarations
You can share objects across the start routine and characteristic routines. To share objects across routines, you need to use the global declaration space. You can see this in Figure 4 — it is the top portion of ABAP code in both the start routine and all characteristic routines, hence the name global. In this space, you define the structure of the internal tables you plan to build. That way, you can read them from memory instead of issuing database hits for each record.
PROGRAM UPDATE_ROUTINE
*$*$ begin of global - insert your declaration only below this line *-* TYPES: BEGIN of ty_material,
material TYPE /bi0/oimaterial,
matl_cat TYPE /bi0/oimatl_cat,
matl_group TYPE /bi0/oimatl_group,
matl_type TYPE /bi0/oimatl_type,
indicator TYPE /bi0/oihc_impmind,
END of ty_material. TYPES: BEGIN of ty_odslookup,
doc_num TYPE /bi0/oidoc_num,
doc_item TYPE /bi0/oidoc_item,
doctype TYPE /bi0/oidoctype,
entry_date TYPE /bi0/oientry_date,
material TYPE /bi0/oimaterial,
END OF ty_odslookup. DATA:
itab_material TYPE STANDARD TABLE OF ty_material WITH KEY material,
wa_material LIKE LINE OF itab_material. DATA:
itab_odslookup TYPE HASHED TABLE OF ty_odslookup WITH UNIQUE KEY
doc_num doc_item,
wa_odslookup LIKE LINE OF itab_odslookup. *$*$ end of global - insert your declaration only before this line *-*
|
| Figure 4 |
Global declarations portion of the update rules where I have defined the structure of my tables, the types of tables, and a work area for each table |
Take this analogy: You wouldn’t make 20 round trips to the grocery store to get 20 different items — to save time and effort, you would make one trip to the grocery store, fill your shopping cart, then return the groceries to your refrigerator where you could access them with higher speed and convenience. The concept for using internal tables is exactly the same. You want to go to the database level as few times as possible, collect your necessary records, and then return the goods back to the refrigerator of data: internal memory. I’ll continue the grocery store analogy in a moment, but for now, consider the global declarations portion as your shopping list.
To optimize my update rules, I follow these three steps.
- Step 1. Delete unnecessary records that BW cannot filter with InfoPackage selection criteria.
- Step 2. Build internal tables for frequently accessed data.
- Step 3. Read internal tables in update rule characteristic routines.
Step 1. Delete unnecessary records that BW cannot filter with InfoPackage selection criteria. Below the global declarations, you can perform ABAP statements to manipulate your data. The first operation you should execute within the start routine is to delete unnecessary records. The best way to do this is through the InfoPackage selection criteria, but often times this is not always possible depending on the configuration of the DataSource and if you have checked the fields for Selection. When your only option is to filter in the update rules, you’ll always want to process your deletes first to minimize the amount of processing to unused records. Simply put, you don’t want to clean anything that you plan to throw into the garbage.
Deleting records is quite simple: Enter the line of code shown in Figure 5, right below the lines of code that indicate *$*$ begin of routine.
*$*$ begin of routine - insert your code only below this line *-*
* fill the internal tables "MONITOR" and/or "MONITOR_RECNO",
* to make monitor entries Delete DATA_PACKAGE where AC_DOC_TYPE eq 'AA'.
|
| Figure 5 |
Statement to delete data records in the DATA_PACKAGE internal table |
Note
You can use other operands and conditions here as well. Refer to logical expressions such as not equal to, greater than, less than, and more in ABAP help. You can access ABAP help by pressing F1 on any ABAP statement in the routine editor or by going to transaction ABAPHELP and searching for a particular keyword. You can obtain the field names by double- clicking on the communication structure as seen in Figure 3 underneath the begin of: data declaration for DATA_PACKAGE).
In that last statement, I deleted all the records within the DATA_PACKAGE where the document type was equal to AA. By using the Delete statement, you utilize the most efficient way of removing records from an internal table. Avoid looping over DATA_PACKAGE to process deletes; this method is time consuming and less efficient.
Step 2. Build internal tables for frequently accessed data. Once the system processes the deletes, populate your internal tables to be read in the characteristic routine portion of the update rule. My grocery store analogy applies to this situation. See Figure 4 as reference for the ensuing explanation.
First, you must ensure that your internal table has only the fields you need. Include any field that would be the result in the characteristic routine portion of the update rule and any field that you require for a conditional statement (e.g., a WHERE statement). It is important to do this so you avoid using a SELECT *, which is detrimental to performance. To return to the grocery store analogy, you don’t want to buy an entire shelf, just the items you want. If you need further guidance, consult your Basis team or ABAP team.
Next, consider what type of internal table you want to use: standard, sorted, or hashed. No one specific internal table type is always best, but here are some guidelines based on the size of the table and how you access it:
- If your internal table is large (say, more than 10,000 records) and you’ll only access it using the entire table key, choose a hashed table.
- If your internal table is small, and accessed with varying keys, then use a standard table. Keep in mind that when using standard tables you always should perform a sort after modifying the table (e.g., after populating via a SELECT statement in this case). Then you can read that table WITH BINARY SEARCH, which boosts the performance of reading that table. Avoid using ORDER BY in the SELECT statement, to reduce the strain of database processing.
- Sorted tables fall somewhere in the middle between standard and hashed — I recommend using them only if you are skilled at ABAP.
You’ll want to define your internal table structures and types in the global declarations space in Figure 4 prior to executing your SELECT statements in the start routine as seen in Figure 6.
*$*$ begin of routine - insert your code only below this line *-*
* fill the internal tables "MONITOR" and/or "MONITOR_RECNO",
* to make monitor entries **Delete Records with specific company code
Delete DATA_PACKAGE WHERE COMP_CODE eq 'US01'. IF DATA_PACKAGE[] is not initial.
**Build Internal Table for Material
SELECT material matl_cat matl_group matl_type
INTO TABLE itab_material
FROM /bi0/pmaterial
FOR ALL ENTRIES IN DATA_PACKAGE
WHERE material = DATA_PACKAGE-material
AND objvers = 'A'. **Sort Standard internal table for Binary Search
SORT itab_material BY material. **Build Internal Table for ODS Lookup
SELECT doc_num doc_item doctype entry_date material
INTO TABLE itab_odslookup
FROM /bic/az02itm00
FOR ALL ENTRIES IN DATA_PACKAGE
WHERE doc_num = DATA_PACKAGE-doc_num
AND doc_item = DATA_PACKAGE-doc_item. endif.
|
| Figure 6 |
The start routine portion of my update rules where I have populated internal table examples for a master data object and transaction data from an ODS object |
It is important to limit the amount of data brought into the start routine when building your internal tables. Large tables take up more memory and take longer to process. You can limit the amount of data selected and returned by adding FOR ALL ENTRIES in DATA_PACKAGE to the SELECT statement. To explore this in plain terms, let’s return to the grocery analogy. Say your data package had three materials among the 1,000 records — apple, banana, and carrot — and your material master table has six materials — apple, banana, carrot, date, eggplant, and fig.
If you used a FOR ALL ENTRIES in DATA_PACKAGE statement, then the resulting internal table would contain only the values found in the DATA_PACKAGE. In this example, it would be apple, banana, and carrot — the internal table would not contain date, eggplant, and fig. This eliminates unnecessary records.
Your start routine now should look like the one in Figure 6. To summarize, the basic flow should now run as follows: Perform deletes, check if data package is empty, execute SELECT using FOR ALL ENTRIES, sort internal table if using a standard table.
Tip!
First check if the data package has records, otherwise FOR ALL ENTRIES selects all records rather than a select few. This can be accomplished by the ABAP statement IF DATA_PACKAGE[] is not initial. You can put this statement in after you perform the necessary deletes.
When selecting from master data tables, always include WHERE objvers = 'A' since object version is part of the key of master data tables and you would want to select only active versions of master data.
Step 3. Read internal tables in update rule characteristic routines. After completing the start routine you now should have a data package with only relevant records and compact, sorted internal tables. At this point, the characteristic update routines should be very simple. If you need to fetch information from your internal table, all you need to do is execute a simple READ statement.
I recommend that you create a work area into which you can read data in the global declarations portion. I created a work area because when I read my internal table, I need somewhere in memory to store the result of that read. By simply mirroring the structure of the internal table, my work area is a one-record slice of the internal table. I can then use that work area for additional processing if need be, or simply point the result of the routine to the field I am interested in.
As seen in the global declarations, the work area has the same structure as the internal table. It is imperative to clear the work area in every InfoObject routine before using it again. If you do not clear the work area, the value will remain in memory and can incorrectly populate other records performing the same lookup.
In Figure 7, the flow of my characteristic routine is as follows. Clear the work area and read your material master data internal table matching the material value from the data record into your work area. If there are no errors reading the table, return the material group as the result; otherwise return an error message to the monitor.
*$*$ begin of routine - insert your code only below this line *-*
* fill the internal table "MONITOR", to make monitor entries CLEAR wa_material. READ TABLE itab_material INTO wa_material
WITH KEY material = COMM_STRUCTURE-material BINARY SEARCH. IF sy-subrc = 0.
* result value of the routine
RESULT = wa_material-matl_group.
ELSE.
MONITOR-msgid = 'Z_MSG'.
MONITOR-msgty = 'E'.
MONITOR-msgno = '04'.
MONITOR-msgv1 = 'Error - Material Group not found'.
APPEND MONITOR.
Abort = 1.
ENDIF. *if the returncode does not equal zero, the result will not be updated.
RETURNCODE = 0
*if abort does not equal zero, the update process will be
cancelled.
ABORT = 0 *$*$ end of routine - insert your declaration only before this line *-*
*
ENDFORM. "compute_key_field
|
| Figure 7 |
An example of one characteristic routine populating material group from my internal table |
Related Tips in Other Resources
I recommend you also refer to these three related tips, which are well documented elsewhere — building aggregated records, utilizing transaction RTTI to use many fields from one table, and adding error messaging when determining specific values of characteristics.
Build Aggregated Records
Once you have populated your deletes and internal tables, you should consider some other performance tweaks that users implement elsewhere in the BW community. The first of these is aggregating records in the start routine. If you are changing granularity from detailed to summarized, it may be a good idea to aggregate in the start routine to limit the amount of records written as output and speed the processing. If your update rules do not aggregate many records or if you don’t have many lookups, this tip may not provide as much value.
The basic concept of the process is that you can use an ABAP COLLECT statement with the DATA_PACKAGE internal table to summarize a unique list of records while aggregating numeric fields. The result is that BW processes the same update rule characteristic routines only once. This process is well documented:
Use Run Time Type Information (RTTI) if You Need Many Fields from the Same Table
If you are applying the same logic for various fields, it might be easier to use run time type information (transaction code RTTI) whenever possible. In short, you can dynamically determine the field types and corresponding InfoObject at runtime. RTTI adds a little overhead during the load, but can ease implementation and maintenance if you apply the same logic in many areas.
The full process is beyond the scope of this article and well-documented elsewhere.
Add Error Messaging When Determining Specific Values of Characteristics
If you would like to receive an alert if incorrect or blank values are present in your update rules, it’s a good idea to send these messages to the monitor. This way, you don’t have to sift through a mountain of records attempting to determine where the errors are.
For a full description, see “Send Error Messages to the Monitor in Update and Transfer Rules” by Gary Nolan for the necessary ABAP code for both transfer and update rules.
John Kurgan
John Kurgan is an SAP BI consultant at JK Global Consulting, Inc. He has been fortunate enough to work as a consultant for clients in the US, Japan, Australia, the Netherlands, Puerto Rico, and Great Britain. John is an avid Washington, DC, sports fan, where he is from originally.
You may contact the author at jkurgan@yahoo.com.
If you have comments about this article or publication, or would like to submit an article idea, please contact the editor.