Leads that are created in SAP CRM can be scored automatically using criteria that you configure in the system. In addition, you can allow users to manually score your company’s leads to give better insights into your most viable growth opportunities.
Key Concept
Leads are sales opportunities that have not been fully evaluated and qualified. If your company is using SAP CRM sales functionality effectively, you are probably generating leads from a variety of sources. For example, leads might be entered into the system manually by users in the sales force as they learn of a customer’s interest in a new product or service. Often, a marketing campaign generates leads as recipients respond to the campaign. In addition, your company Web site might be integrated with SAP CRM or you may use the Email Response Management System to process inbound emails and create leads.
Leads contain information that is often critical to your organization’s success. Regardless of its source, a lead should contain information about the products or services in which your customer is interested, the level of interest, any potential sales associated with the lead, the customer’s time frame for making a purchase decision, and other pertinent information about the opportunity. Although leads can be generated from different sources, you need a consistent way to measure the value of each one so that your company can devote the appropriate resources to lead follow-up and nurturing. You probably cannot afford to have call center agents calling customers to follow up on low-value leads while more viable ones are snatched up by your competitors. Lead scoring can help in this area. By creating a questionnaire to collect information about each lead and then applying weighting factors to the responses on the questionnaire, you can score leads in a consistent, objective way. Your company can then use these scores to ensure that the “hottest” leads are the ones that are being pursued and won.
Creating the Lead Questionnaire
The process of automatically scoring leads starts with creating a lead questionnaire. This is done as configuration in the CRM Survey Suite, which is accessible in transaction CRM_SURVEY_SUITE. Alternatively, in the configuration transaction SPRO, follow menu path Customer Relationship Management > Transactions > Settings for Leads > Questionnaires for Leads > Define Questionnaires to access the CRM Survey Suite.
When you enter the transaction, you will notice that several applications are listed, including activities, Interaction Center, service, and telesales. Setting up a survey questionnaire and scoring transactions in these applications is similar to the process outlined in this article, but our example focuses solely on leads. To create a lead questionnaire, select the Leads application and then choose Survey > Create from the menu. Next, specify a name for the survey form. We used Z_LEAD_EVAL in this example. Immediately after you enter the name, you are taken into the Survey Builder screen (Figure 1).
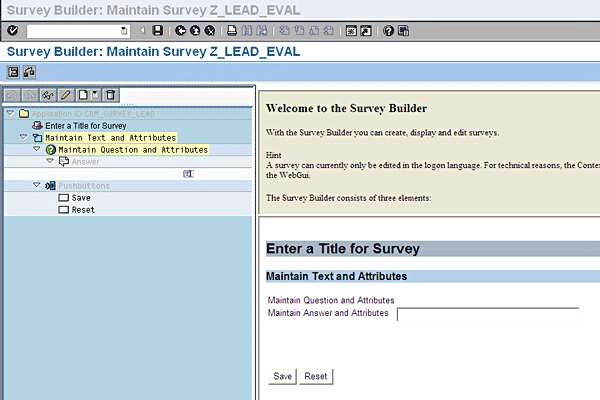
Figure 1
The Survey Builder screen with its default values for a new form
To use this screen, it is important that you understand each of the elements on the survey form:
- The title appears at the top of the survey
- Each section of the form has a text element and attributes
- A question has a text element and a rating factor
- For each question, you should have one or more answers, and an answer can have a rating
- Optional buttons at the bottom of the form make it easy to save or reset the data on the questionnaire
Now let’s build a sample questionnaire and explore each of these elements in further detail.
Building the Lead Survey
For this example, we will create a sample form that scores the lead based on the four criteria mentioned in the introductory paragraph: products or services of interest, the customer’s interest level, potential sales, and the customer’s time frame. First, double-click the title to customize it. Here, we used Lead Scoring. Next, click the subsection text and replace Maintain Text and Attributes with Please rate the lead using these criteria: (Figure 2).
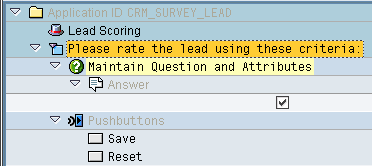
Figure 2
The updated title appears in the Survey Builder
The real functionality behind the survey form lies within the questions and answers that you include. In this example, the survey form will have a maximum possible score of 10 points. As you follow the steps for building the form, play close attention to the rating factor and rating values that are applied to each question and answer. These values establish each question’s weight in relation to the other questions and determine the maximum total score of the form.
First we want to know if the product/service related to the lead has been clearly identified. Double-click the default question on the form, change the text to Has the product/service been defined?, and give this question a rating factor of 1 (Figure 3). To create an answer that is formatted as a check box, double-click the answer beneath the question and specify 3 Checkbox as the Answer Category. The Text Position controls whether the text appears on the right or left side of the checkbox when the form is displayed. You can leave this set to Text: Right, which is the default (Figure 4).

Figure 3
Change the text for a question and its rating factor
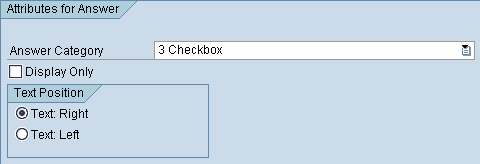
Figure 4
Configure an answer as a checkbox
Continue by double-clicking the attributes for the answer, which is found just beneath the answer. The text will be Yes for this option, and the rating will be 1 (Figure 5). At this point your survey form should contain a title, section header, one question, and a checkbox answer that is labeled Yes (Figure 6). The lead score is based on points that are accumulated from each answer. The possible number of points for each answer is derived by multiplying the question’s rating factor times the rating. This question has a possible value of one, because the rating factor is one and the rating is also one.

Figure 5
Specify the answer option and apply a rating
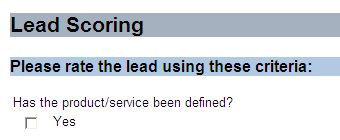
Figure 6
The survey form with a title, section header, and question with checkbox answer option
Next, add a field in which the user can enter the names of the products and services related to the lead. To do this, right-click the question you just created and select Insert Question from the menu that appears. Enter Specify the products and services: as the question text. Since this field is for reference purposes only, you can leave the rating factor blank. Now right-click the question and choose Insert Answer from the menu that appears. Select Text as the answer category, Text: Right as the text position, and 3 lines and 60 columns for the field size. The answer option for this answer will have Leave blank if products/services are not defined as its text and no answer preassignment, which is the default value for the field. Again, note that this answer option has no rating because it is for reference purposes only.
At this point, your survey form should contain two questions, each with one answer and one answer option. Because we inserted the second question after the first, it is listed first on the form. You can rearrange the order of your questions by simply clicking the bottom one and dragging it to the top (Figure 7).
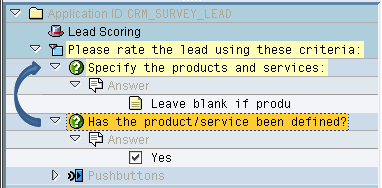
Figure 7
You can rearrange elements on the survey form to get them in the proper order
The third question captures the potential size of the lead. Start by inserting a new question with Potential sales in first 12 months: as the text and 3 as the rating factor, since you want to give this question more weighting in the final score. Insert an answer specifying Selection Button Group (‘radio button’) as the category. This category is useful when you want the user to choose one option among two to three possible choices. In this example, the answer has three answer options. The first one has Product/service unknown as its text and 0 in its rating. Click the Selected checkbox to specify this option as the default response. The second option has Less than $250,000 as its text and 1 as its rating. The third option has More than $250,000 as its text and a rating of 2. The possible value for this question is six, which is the rating factor of three times the highest rating of the answer options. The total possible score for the survey is now seven because the first question had a possible score of one and this question has a potential value of six. As before, you need to rearrange your questions to list them in the correct order.
The final question on the survey will capture lead timing. Insert a new question with Customer’s time frame for decision: as the text and a rating factor of 1. Insert an answer with a category of List Box with Single Selection. This category is used whenever the user must select one response from a list of several choices. The first answer option should have a text of Less than 3 months and a rating of 3. Click the Selected checkbox to specify this option as the default (if this is not checked for one of the list items, the first response will be the default). The second option will have a text of 3-6 months and a rating of 2. The third answer option has 6-12 months as its text and 1 as its rating. The last option is More than 12 months and it has 0 in its rating.
By including this question and these answer options, you can increase the overall lead score based on the time frame in which the lead is likely to close. The possible score for this question is three, because the rating factor is one and the highest rating is three. When added to the previous possible score of seven, the total for the survey form is now 10.
The completed survey should contain your title, section heading, and four questions with different answer options, including a checkbox, text input field, radio buttons, and a drop-down list. The form also has a pushbutton to save the responses and one to reset the form (Figure 8). Be sure to activate the survey form before you exit the CRM_SURVEY_SUITE transaction. To activate the survey form, click the green Back (F3) button, select your survey form from the list on the right, and click the Activate (Ctrl+F1) icon.
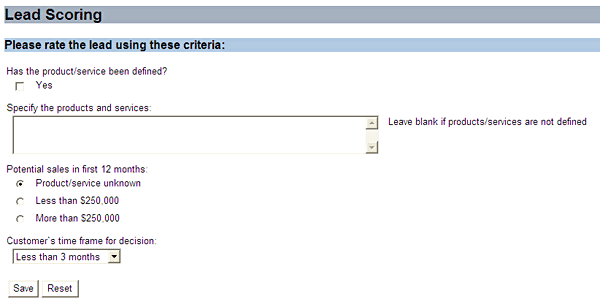
Figure 8
The completed survey form with four questions and various answer options
The CRM Survey Suite allows you to test your form. Select Extras > Test from the menu to use this feature. You can select different answers and then save your work to see the number of points reached depending on your selected answers. The test mode also shows you the total number of points possible and the current score as a percentage of the total possible. Be sure that the scores you see in testing properly reflect the rating factors and the ratings you built into the form. Also, pay close attention to the percentages that are displayed for each score. This value is important in the next step.
Qualifying the Lead Based on the Score
To complete the process of automatically qualifying the lead based on the survey responses, you need to configure qualification levels for ranges of survey scores. To do this, go back to transaction SPRO and select Questionnaires for Leads > Assign Qualification Levels to Questionnaires. When the transaction opens, click the New Entries button to begin. Select the questionnaire named Z_LEAD_EVAL from the drop-down menu and double-click Qualification Level to continue. You’ll once again need to click the New Entries button to configure your qualification levels. In this step, it is important to note that qualification levels are assigned to a minimum percentage of the total possible survey score. To keep this example simple, we made the maximum score 10 so the percentages are easy to calculate and understand. We started by specifying that an Unqualified lead is any lead with a minimum percentage of 20 or less (two or less points in the lead score). A lead is qualified as Low if the minimum percentage is 40 and Medium if the percentage is 60. A High rating is applied to any lead that gets eight to 10 points, as the minimum percentage for that level is 80 (Figure 9).
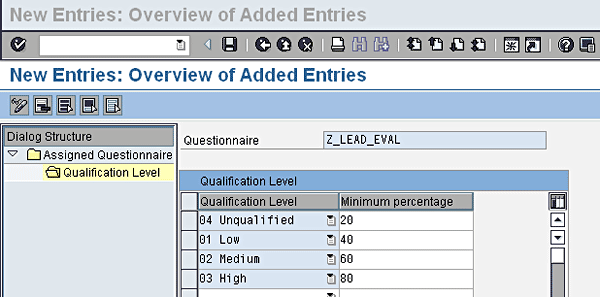
Figure 9
Qualification levels are assigned to minimum percentages of the total possible score
In addition to the default lead-qualification levels delivered in the SAP CRM system, you can also configure your own custom lead-qualification levels (e.g., Hot, Warm, Cold). To do this, follow IMG path Customer Relationship Management > Transactions > Settings for Leads > Define Lead Qualification Levels. Click the New Entries button and enter a Qualification Level (e.g., Z1), description (e.g., Hot), and short description (e.g., Hot). Note that the short description and description field can be the same or you can enter a more detailed, longer description in the descripton field. Repeat for each additional desired lead-qualification level (e.g., Warm, Cold) that you want to create.
This is a highly simplified example to illustrate the concept of tying qualification levels to varying percentiles of the total lead score. When you create lead questionnaires, you will need to give careful consideration to the rating factors you apply to each question because these control the relative weight of each one. You should also carefully consider the rating for each answer option so the appropriate score is applied to each response. Finally, you can define your own qualification levels to make the final ranking as granular as necessary. In this example, we have used the four default qualification levels (Unqualified, Low, Medium, and High), but you can configure additional entries if required.
Adding the Survey Form to a Lead
To test your lead questionnaire form, you need to assign it to your lead transaction. To do this, go back into transaction SPRO and select Questionnaires for Leads > Define Determination for Questionnaires. When the transaction opens, click the New Entries button and then enter a determination ID. This field can contain any value that begins with Z, so you can enter Z000000001, for example. Next, enter a description, such as Lead Evaluation. You can apply validity dates to your entry if you choose, or you can leave these fields blank to make the survey form appear indefinitely. Specify the transaction type for which the form will be active. In most implementations, this value will be LEAD. You may also choose to restrict the form to leads of a certain item category. To display the form for all leads, leave this field blank. In the questionnaire ID column, select Z_LEAD_EVAL from the drop-down list. Check the appropriate box to indicate that the assignment is active and save your new record before exiting the transaction.
Processing Leads Using Surveys
Now that you have created your lead questionnaire (survey), created your own lead-qualification levels (optional), and assigned your desired lead-qualification levels to your questionnaire, you are ready to create some leads and take advantage of the automatic lead scoring.
In older versions of SAP CRM (4.0 and 2005), leads are created by business users in SAP GUI via transaction CRMD_BUS2000126 (or menu path Activities > Maintain Activities). When you create a new lead using this SAP GUI transaction, you now see a tab labeled Evaluation. When you go into this tab, you can see the survey form that you built. You can test the form by selecting various responses and clicking the Save button. Keep in mind the rating factors and ratings that were applied to each response. If your responses accumulate zero to three points, you will see an automatic qualification level of Unqualified. If the total is four to five, the rating will be Low, and it will be Medium if the total points are six to seven. A lead is qualified as High if the total score is eight or higher.
In more recent versions of SAP CRM (2006s/2007, 7.0, and future releases) where SAP GUI is no longer supported for business users, you create a new lead using the CRM WebClient UI (technically the old SAP GUI transaction is still available in the system, but it is no longer being enhanced and SAP doesn’t officially support it). The Lead screen is available in both the marketing pro (professional) and sales pro roles (Figure 10). There are some slight differences between the Lead screen in the new CRM WebClient UI and the old SAP GUI screen. For example, instead of the Evaluation tab in SAP GUI, the CRM WebClient UI provides an Assessments assignment block where you can see the name of the linked survey.
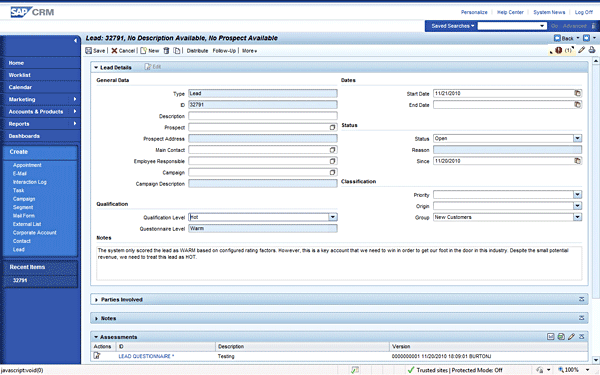
Figure 10
Leads in the CRM WebClient UI
Clicking the name of the assessment (survey) takes you to a separate screen where you can maintain the survey (Figure 11).
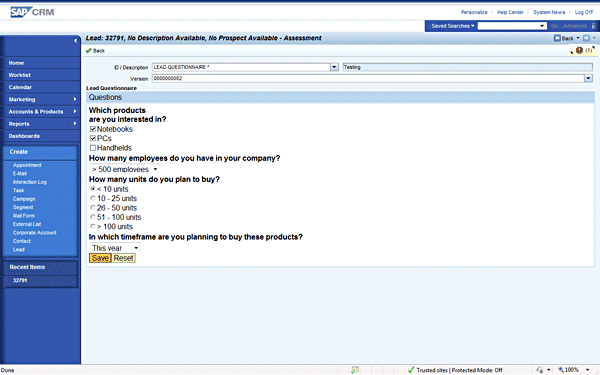
Figure 11
Edit your survey within the CRM WebClient UI
In Figure 10, you’ll also notice that there are two separate fields under the Qualification section that can be used to score the lead. The first field, labeled Qualification Level, can be manually selected by the user. The second field, labeled Questionnaire level, is automatically scored by the system based on the response to the survey and the underlying rating factors that you have configured. Both fields are saved as part of the Lead, allowing you to later create business rules to route the lead to the most appropriate salesperson using either automated or manual scoring (or both).
Processing Leads Using Surveys from the Interaction Center
So far, we have focused on the ability of sales professionals to create and score leads using the sales pro business role. However, many companies also create leads directly from their call center/contact center. For example, companies often rent or purchase so-called “lead lists” containing the names and contact information of potential prospects. Companies then use these leads to create outbound telephone or email campaigns. In some cases, the agents might use call lists to place outbound calls to prospective customers. In other cases, prospective customers may be calling into the contact center in response to an email offer that they received as part of an outbound email campaign. In both scenarios, the contact center agents need the ability to create a lead and have the system automatically score the lead using pre-defined criteria.
The SAP CRM Interaction Center provides the ability for contact center agents to create leads and to score the leads either manually or automatically in a process almost identical to how it’s done in the sales pro or marketing pro roles. There are a few minor differences in the screen layout based on the unique usability requirements of contact center agents. For example, you’ll notice that the screen layout of the Interaction Center is optimized to avoid vertical scrolling, placing the link to the Questionnaire directly on the top right-hand part of the screen so that it is easily accessible without any scrolling. Note also that there is a slight terminology difference in the Interaction Center — the term questionnaire is used to refer to survey, while the sales pro and marketing pro roles use the term assessment.
Despite the UI layout and terminology differences, the functionality is exactly the same. In both the Interaction Center and the CRM WebClient UI sales and marketing pro roles, the user is able to supplement the automated scoring process performed by the system with an additional user-selected score (Figure 12). (Note that this capability is not supported in the SAP GUI transaction used in SAP CRM 4.0 and 2005). Both scores — the automated scoring and the manual scoring — are saved as part of the lead. This information can then be later used to route the lead to the most appropriate salesperson for follow up.
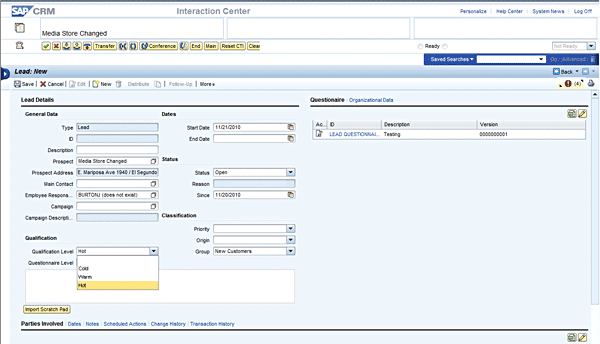
Figure 12
Option to add a user-selected score
John Burton
John Burton is a director of product management at SAP and is responsible for the SAP CRM Interaction Center (including ERMS) and social CRM topic areas. John has 13 years of experience at SAP and has been involved with SAP CRM and the Interaction Center since 1999. He is also the author of Maximizing Your SAP CRM Interaction Center, available at the SAPinsider Store. John is an alumnus of the University of Michigan and Central Michigan University. John can be found on LinkedIn at www.linkedin.com/in/sapjohnburton.
You may contact the author at john.burton@sap.com.
If you have comments about this article or publication, or would like to submit an article idea, please contact the editor.

William R. Pritchett
William (Bill) Pritchett has more than 25 years of IT industry experience and has worked at Dow Corning Corporation for the past 16 years. Over the past eight years he has focused on the company’s CRM systems and processes. His current responsibilities include expanding the capabilities of Dow Corning’s SAP CRM 7.0 system.
You may contact the author at bill.pritchett@dowcorning.com.
If you have comments about this article or publication, or would like to submit an article idea, please contact the editor.


