Migrating content from one SAP Solution Manager system to another is a ubiquitous need. Learn how to encapsulate and transfer all the content of a Solution Manager project from one Solution Manager system to another.
Key Concept
SAP Solution Manager uses the transport of copies functionality to package all the Business Process Hierarchy structure and Knowledge Warehouse content of a project into a single transportable package.
SAP solution owners often need to deliver content from their Solution Manager development system to other Solution Manager systems due to a variety of circumstances. These circumstances may include:
- divestiture of a business unit to become its own legal entity
- Acquisition of a company running SAP systems and using Solution Manager
- The desire to have development or training Solution Manager environments with content that accurately represents the production environment. This provides trainees with a better training experience and more confidence in test results when developing new reports.
- The desire to have multiple Solution Manager versions running to test the waters before performing an upgrade
When these circumstances arise, the ability to migrate whole projects between Solution Manager systems is a real advantage. I’ll show you how to do this, first taking you through the preparation for it before moving to the actual procedure.
Preparation
Before you can package up a project for migration via a transport, you must consider the following:
- The project cannot be assigned to package $TMP. These projects are not transportable and must be moved to a named package before migrating.
- Only the current version of documents is transferred.
- No document history is included in the transfer.
If your project is assigned as a local object (i.e., assigned to package $TMP) there are two ways to get it ready to transport:
- Change all the object directory entries for the structure tables and all the documents to a new package. This can be time consuming and the chance of missing something is high.
- Copy the project to a new project assigned to a package. This is quick and makes sure everything is included, but it doubles the space required for the project as it duplicates everything in both the Business Process Hierarchy (BPH) structure and the Knowledge Warehouse. For more, see my quick tip “Copying a Project in SAP Solution Manager.”
Now that you’ve gotten your project ready to migrate, it’s time to package it up in a transport. Execute transaction SOLAR_PROJECT_ADMIN and select the project you want to migrate (Figure 1).
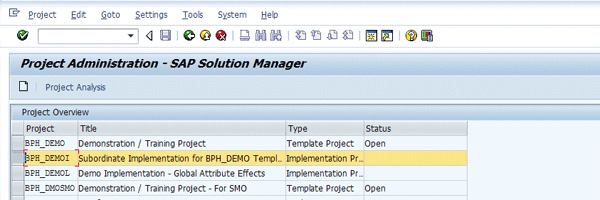
Figure 1
Project BPH_DEMOI selected in transaction SOLAR_PROJECT_ADMIN
At the bottom of the screen, there is a collection of icons that includes the transport  icon. Click it to generate a transport for your project. The Transport Project pop-up appears (Figure 2). If you choose the All Languages option, you may see warnings or errors on the receiving end of the migration if the Solution Manager system to which you send the project has fewer languages installed than are used in your project. Likewise, if you select the Current Language by default, the target Solution Manager system must have the language installed that is used in the project being transferred.

Figure 2
Transport project pop-up
Leave the default for With Notes and select the Fill Transport Request in Background option as the process of encapsulating a project into a transport can be a lengthy one. Press Enter and you’re prompted to create or assign the transport (Figure 3).

Figure 3
Assign the transport request number to the project
Click the create  icon to create a new transport or choose the Own Requests button to assign a pre-existing transport that belongs to you. When you create a request, note the Target field in the bottom-right corner (Figure 4). This is the target system or system ID (SID) that receives the project. It is common that this system is not set up in your Solution Manager STMS pathways, so you can use the source SID as the Target.

Figure 4
Create Request pop-up with request for the target system
Click the save icon and the system begins the transport build as a background job (Figure 5).
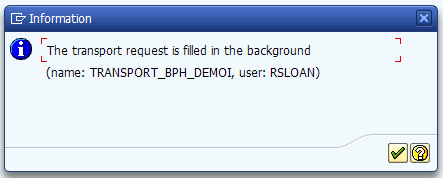
Figure 5
Start of background job to populate the transport of copies with project data
When the background job is complete, the project and all the content is encapsulated in a transport of copies. This is a special type of transport that allows you to take a copy of the content without locking it like a regular transport, but also keeping a record of the content in the transport such as a baseline.
Release the Transport
Using transaction SE10, you can find the transport request and release it. Figure 6 shows the input parameters used in transaction SE10 to find the transport of copies for release.

Figure 6
Input parameters for transaction SE10 to find and release transport of copies
Click the Display button and the system displays the list of modifiable and release transports (Figure 7).

Figure 7
List of modifiable and released transports of copies
Select the modifiable transport and click the release icon (which looks the same as the transport icon above). This packages the content into the data and cofiles (standard SAP correction and transport files) at the operating system level so that you can deliver them to the target Solution Manager system.
Note
There are various ways to get the data and control files of the transport to the target Solution Manager system, but they are beyond the scope of this article.
When the release process is complete, the Overview of All Transport Logs screen is displayed (Figure 8). Be sure that there are no error codes higher than four. Codes higher than four indicate a failure in the packaging process. Any failures need to be corrected and the transport needs to be released before proceeding. The techniques and procedures for resolving transport failures are beyond the scope of this article.
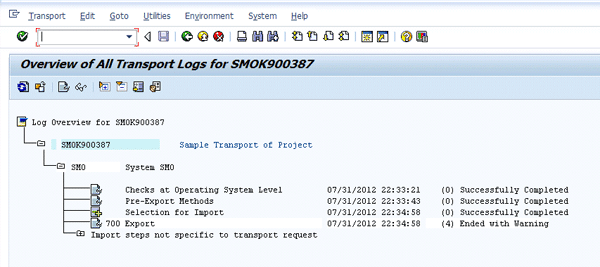
Figure 8
Overall status of the released transport
Import the Project
Once the data and control files are loaded into the proper folders on the operating system of the target Solution Manager system, you can begin the import process. (Typically, the default location for these files is /usr/sap/trans/data and /usr/sap/trans/cofiles, respectively).
In the target Solution Manager system, execute transaction STMS. Make sure that you enter the system for Solution Manager (Figure 9).
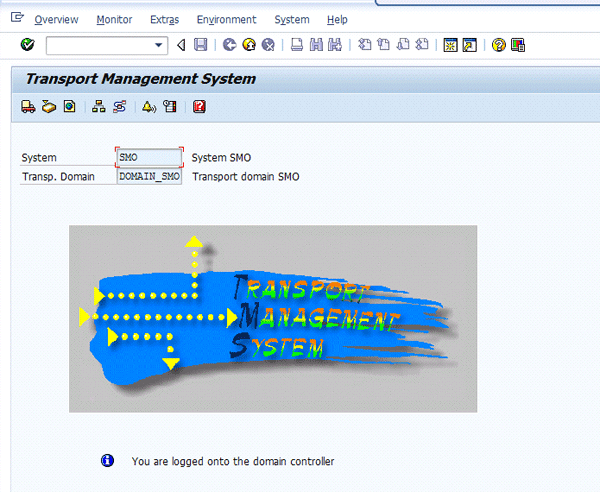
Figure 9
Enter the system information
Click the import overview icon, which looks the same as the release icon referenced earlier, to open the systems overview (Figure 10).

Figure 10
Import overview for the Solution Manager system
Note
The list of systems displayed in the screen in Figure 10 depends on your Transport Management configuration.
Double-click your Solution Manager system to get to the Import Queue (Figure 11).

Figure 11
Import Queue for the target Solution Manager system
Follow menu path Extras > Other Requests > Add to bring up the pop-up screen in which you add the transport from the source Solution Manager system to the Import Queue of the target Solution Manager system (Figure 12).

Figure 12
Add the transport from the source system to the target Import Queue
Once the transport is added to the queue, select the transport and click the import request  icon to set the import parameters.
Set the date field values based on when you wish for the transport to occur (Figure 13). Set the Execution to Asynchronous (default) if you wish to have the dialog session released while the import function runs (Figure 14).
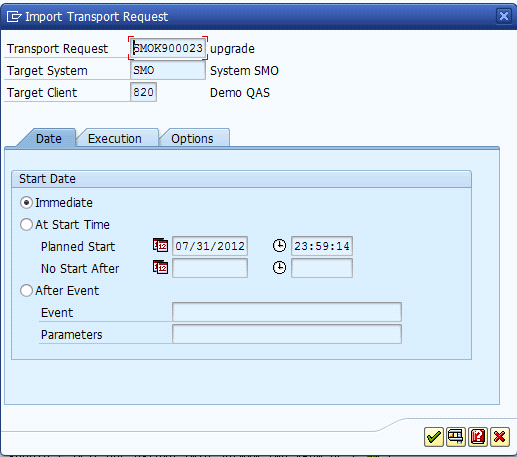
Figure 13
Import options — date of execution settings

Figure 14
Asynchronous import mode
In the screen in Figure 15, I selected the Ignore valid component version option because the source Solution Manager system was a 7.0 system while the target is a 7.1 system. Figure 16 shows an example of the log screen data you would see if you needed to use this import option.

Figure 15
Import option use
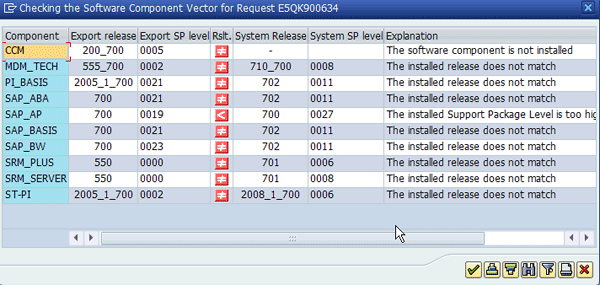
Figure 16
Log screen indicating version variance
Press Enter to begin the import. Like the export, the import should complete with no error codes higher than four. When the import is complete, you have the project in your target Solution Manager system.
Key Consideration
Because the transport of project function in transaction SOLAR_PROJECT_ADMIN uses transport of copies rather than a relocation transport, the objects come into the target system while still being owned by the source system.
Consequently, when in transaction SOLAR01 or SOLAR02 you can get the message Edit objects separately since they belong to different original systems (TK 112) if you are making changes to BPH structure edits. The error message only has the options to Display or Cancel, so you cannot save your changes.
To change the original system for the project, use transaction SE38 to run program RSOLAR_PROJSTRUCT_SET_SRCSYSTM. Enter the project you wish to correct and the SID of your Solution Manager system (Figure 17).

Figure 17
Program RSOLAR_PROJSTRUCT_SET_SRCSYSTM execution parameters
When the program completes, you get a completion message indicating the successful reassignment of the original system (Figure 18).
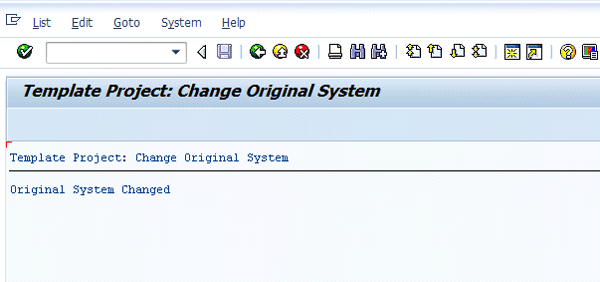
Figure 18
Completion message from update of the original system
For more information on changing the original system, see SAP Note 1304462.
D. Russell Sloan
D. Russell Sloan is a specialist in project and program governance for IBM. He focuses on the use of SAP Solution Manager for global rollout projects for IBM’s largest customers, having worked with SAP software since 1996. Russell has degrees in accounting and information systems and has been a team and project leader for SAP projects for more than 14 years. He has been developing and deploying software systems for over 30 years.
You may contact the author at solmanruss@gmail.com.
If you have comments about this article or publication, or would like to submit an article idea, please contact the editor.


