Learn how to migrate an SAP BusinessObjects Data Services’ source data center to a target data center environment by following these step-by-step instructions. In this scenario, both the source and target systems are Windows-based servers.
Key Concept
The SAP BusinessObjects Data Services application delivers a single enterprise solution for data integration, data quality, data profiling, and analysis, which allows integration, transformation, improvement to, and delivery of trusted data that supports critical business processes and solid decision-making.
Migrating SAP BusinessObjects Data Services (also referred to informally as BODS) from one data center to another data center is a big task. Despite this, there is not much available documentation for how to do this. Although there are a few SAP Notes, there is no one-stop resource with details for how to move SAP BusinessObjects Data Services. As a result, I created this guide for users who would like more detail about this kind of data migration.
SAP BusinessObjects Data Services consists of three types of software that are installed on the same server, each with its own discrete purpose and tasks. They are: SAP BusinessObjects Data Services, SAP Information Steward, and SAP Information Platform Services. (In this article, the focus is primarily on SAP BusinessObjects Data Services.) By following the steps outlined in this article, you learn how to easily migrate SAP BusinessObjects Data Services from a source data center to a target data center. All the steps outlined are according to SAP’s best practices. Reasons for moving data centers include making changes to a company’s policy, requiring a change of the data center’s location from A to B, or outsourcing business data management to a third-party data center. Sometimes it could just even be the result of a change in the hostnames for the systems. These are just some examples for making this change, depending on the company’s requirements.
I show how to migrate SAP BusinessObjects Data Services to another database (in this example, an Oracle database) and discuss the different SAP tools to do the migration. In this scenario, the Oracle database’s schema users are exported from the source system using Oracle tools, and then transferred and imported into the target SAP Business Warehouse (BW) system. The method details are explained, along with the codes.
Before beginning, you first have to check the source and target versions of SAP BusinessObjects Data Services, SAP Data Steward, and Information Platform Services in the Product Availability Matrix (PAM).
What Is PAM?
PAM is used for checking to see which source and target versions are supported for various SAP components, such as SAP BW. PAM can be accessed at:
https://sap.service.com/PAM. PAM provides:
- A central access point for all SAP software product versions
- Reduction of the risks of late problem discovery
- Direct links to guides and further information
A Brief Explanation of the SAP Tools
SAP BusinessObjects Data Services is used for data integration and transformation. With it, users can develop and execute workflows that take data from predefined sources, called data stores (e.g., applications, web services, flat-files, databases, and so so). Users can then combine, transform, and refine that data, and output the results back to the same or different data stores.
SAP Information Steward monitors, analyzes, and improves data integrity. The solution combines data-profiling and metadata-management tools to provide users with continuous insight into the quality of their enterprise information.
SAP Information Platform Services is a small version of the Business Intelligence (BI) platform that is required for standalone SAP BusinessObjects Data Services from 4.x releases. It only makes the Central Management Console (CMC) portion of BusinessObjects available to the data services. CMC is a web-based tool used to perform day-to-day administrative and user tasks, including user management, content management, and server management.
Migrating SAP BusinessObjects Data Services with Different Source and Target System Versions
In my example scenario, the target environment’s Windows operating system (OS) version at the new data center is Windows 12. However, the Windows OS of the source environment is Windows 8.1 R2, so from the outset I knew that the SAP BusinessObjects Data Services versions were different. This type of migration is possible and is supported by SAP. Here are some tasks you have to complete, and tips to follow before you start your migration project.
- Do your research
- Check all relevant SAP Notes
- Check SAP documentation related to installation of SAP BusinessObjects Data Services, such as the Master Guide, installation guides, and upgrade guides, at: https://help.sap.com/bods.
Do Your Research
The first step is to look for existing documentation about how to migrate data centers. In this case, I found two SAP Notes in the SAP Service portal, SAP Note 1603393 (Installation Scenarios – Data Services 4.x) and SAP Note 1740516 (SAP BusinessObjects Data Services 4.x and SAP Information Steward 4.x compatibility with SAP Business Intelligence platform and Information Platform Services for active releases), that provided important details for how to do this kind of migration. From reading SAP Note 1740516, I was able to determine which version was required. Table 1 shows the details about the versions of the source and target systems.
| Source system version (environment) SID (BDD) |
Target system version (environment) SID (BDD) |
| Windows OS server 8.1 R2 |
Windows OS Server 12
|
SAP Information Platform Services 4.0 Support Package 6 (SP6) Update
|
Install SAP Information Platform Services 4.1 SP3 and then apply the SAP Information Platform Services 4.1 SP4 Patch 6 (Information Platform Services 4.1 SP4 Patch 6 available for download).
|
SAP BusinessObjects Data Services 4.1 SP1 Patch 3
|
SAP BusinessObjects Data Services 4.2 SP4 (no Patch level)
|
SAP Information Steward 4.1 SP1 Patch 1
|
SAP Information Steward 4.2 SP4 (no Patch level)
|
Table 1
The version details for the source system and target system
The Source System and Target Server Exports
A schema is owned by a database user and has the same name as the user. Each user owns a single schema. Schema objects can be created and manipulated with SQL code. Schema objects are different types of objects, including tables, index-organized tables, and views. In this example, I had user IDs ABC and DEF, and I wanted to export them to the Oracle database.
In this example scenario, I show how to export a user named ABC using an Oracle tool, named exp. This tool exports Oracle tables, schemas, and indexes of the user/owner ABC and then dumps the file to the S drive. To do this, use the code in Figures 2 and 3.
exp USERID=ABC/*****(password) OWNER=ABC FILE=S:oracledump_filesexp_ABC.dmp
Figure 2
Code to export user schema ABC
exp USERID=BDD_REPO/*****(password) OWNER=BDD_REPO FILE=S:oracledump_filesexp_BDD_REPO.dmp
Figure 3
Code to export user schema BDD_REPO
In Figure 3, the USERID and OWNER are same for the schema user. FILE is where the file <exp_ABC.dmp> is available after the schema users have been exported (in this case, system schema user BDD_REPO).
Note
The only difference between schema database users and schema database system users is the storage container. A user schema has its own tablespace and a schema database system user uses a tablespace called SYSTEM. A database is comprised of one or more logical storage units called tablespaces. Each tablespace in an Oracle database is comprised of one or more OS files called datafiles.
Similarly, export the following system schema users as well, and transfer the dump files from the source server to the target server:
DS_BDD_datam_repo
DS_BDD_prof_repo
DS_BDD_STAGING
That means the following have to be installed, in sequence, before the schema users can be migrated from the source system environment:
- Oracle 11.2
- SAP BusinessObjects Data Services 4.2 SP4
- SAP Information Steward SP4
- IPS 4.1 SP4 Patch 6
Once SAP BusinessObjects Data Services and the other components are installed, you can drop the following system schema users:
<SID>_REPO
DS_<SID>_cntrl_repo
DS_<SID>_datam_repo
DS_<SID>_prof_repo
DS_<SID>_STAGING
Once this is done, you can import all the users’ schemas, one by one. In this example, I assume that all the dump files are already transferred to the target server, so you need to import the following schema database users, using the code in Figure 4.
imp USERID=ABC/***(password) OWNER=ABC FILE= N:oracledump_filesABC.dmp
 imp USERID=<SID>_REPO/***(password) OWNER=<SID>_REPO FILE= N:oracledump_filesexp_<SID>_REPO.dmp
Figure 4
Code to import schema database users to the target system
In the code in Figure 4, imp is the command to import the Oracle tables, schemas, and database. The USERID and OWNER are same (or similar) as the name of the schema user. FILE is where the file <imp_ABC.dmp> should be available in the target destination (after being copied over from the source system to the target system).
After the schema database users and systems schema users have been imported into the target server/environment user, you do the following.
Step 1. Update the SAP Data Service Repository Manager
In this step, I show how to upgrade the local repository. Search for repoman in the SAP Data Service Repository Manager using the Windows search. Once found, click repoman to upgrade the repository version for the system/user schema (Figure 5). You will have to do this step for each and every system/user schema, one by one.

Figure 4
Execute the repoman file
In the screen that opens (Figure 6), enter the User name and Password, and select the Use TNS name check box. Then click the Get Version button to find out the version of the old repository. This opens a pop-up window (not shown) that lists the repository version—in this case, 14.1.1.0. Close the pop-up and, back in the screen in Figure 6, click the Upgrade button to execute the repository upgrade.
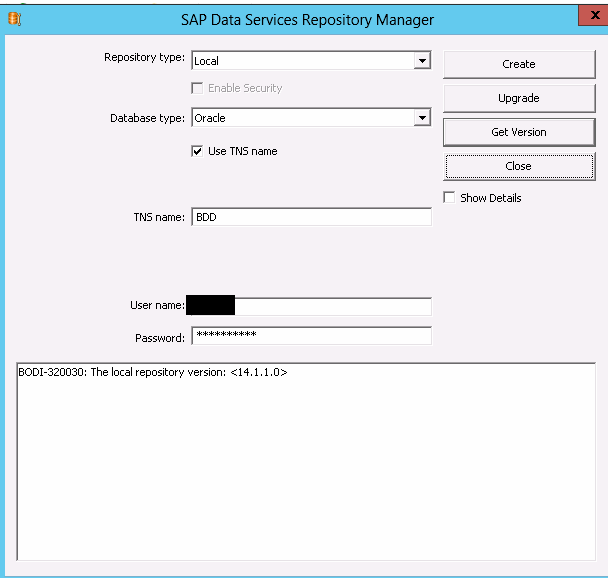
Figure 5
The repository version that needs to be upgraded
The screen in Figure 7 opens and shows that the repository is successfully upgraded.
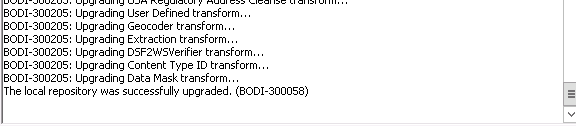
Figure 6
The local repository is upgraded successfully
Exit the screen in Figure 7 and click the Get Version button again in Figure 6. Now you see that the repository version has been upgraded to version 14.2.4.0 (Figure 8).

Figure 7
The local repository version is upgraded from 14.1.1.0 to 14.2.4.0
Repeat each of these steps to update the repository versions for all the schema database users and schema database system users.
Step 2. Assign the Schemas in SAP BusinessObjects Data Services Server Manager
In this step, I show how to assign the schema users and system schema users to the job server, in this example, named Jobserver_BDD. A job server is used to schedule jobs, and all schema users should have the ability to do this.
In Windows, find the SAP BusinessObjects Data Services Server Manager (e.g., AWServerConfig) and click it to execute (strong>Figure 9). (This can be easily searched in the Windows system where SAP BusinessObjects Data Services is installed).

Figure 8
Select the AWServerConfig option
In the screen that opens (Figure 10), go to the Job Server tab, select the configured job server (jobServer_BDD in this example), and click the Configuration Editor… button. This opens the screen in Figure 11, where you select the server name (JobServer_BDD) and click the Edit button. This adds Jobserver_BDD to the schema user.

Figure 9
Select JobServer_BDD

Figure 10
Add JobServer_BDD to the schema user
This opens the properties window for the job server (Figure 12). Enter the Username and Password, and BDD as the TNS name. Click the Apply button and then the OK button.
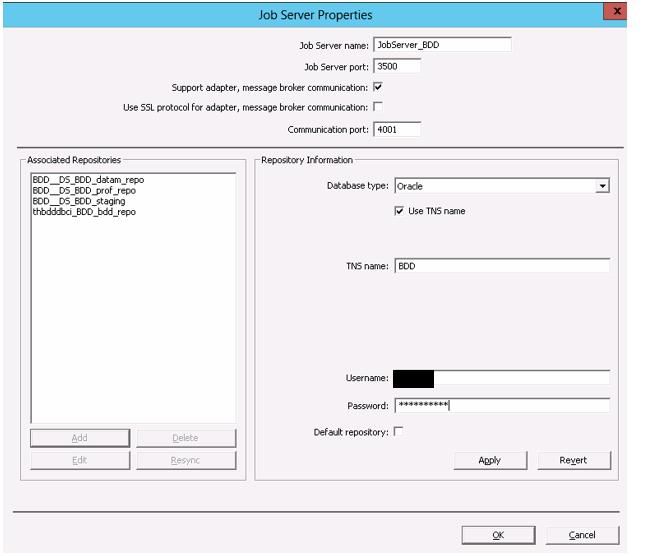
Figure 11
The properties of the job server
This re-opens the SAP BusinessObjects Data Services Server Manager screen (Figure 13). Go to the SSL [Secure Sockets Layer] tab and click the Close and Restart button to restart SAP BusinessObjects Data Services. You see a confirmation pop-up with the details (Figure 14). Click the OK button.

Figure 12
Restart SAP BusinessObjects Data Services

Figure 13
Confirm the SAP BusinessObjects Data Services details
The screen in Figure 10 opens again, where you repeat these steps for all the schema users (ABC and DEF), and for the system schema users.
Step 3. Add the New Repositories to the Central Management Server (CMS)
The next step is to add the repositories to CMS in the CMC. You need to do this for all the system/schema users.
What Are the CMS and the CMC?
The CMS is used to store BI platform information, such as user, server, document, configuration, folder, and authentication details. The CMS database is a central and critical component of the architecture of the BI platform.
The CMC is a web-based tool used to perform day-to-day administrative and user tasks, including user management, content management, and server management.
Log on to the CMC (https://<hostname>:8080/BOE/CMC) via Internet Explorer and follow menu path Data Services > Configure Repository, and the screen shown in Figure 15 opens.

Figure 14
Make the entries for the system schema user in the CMC
In the screen in Figure 15, make the following entries:
Repository Name: DS_BDD_staging
Description: DS_BDD_staging
Database Type: Oracle
Use Oracle RAC: No
Database Server Name: Hostname where database resides
Port: 1521
SID or Service Name: BDD
Username: DS_BDD_staging
Password: Enter your password
Is Profiler Repository: No
Use TNS Name: Yes
TNS Name: BDD
Once you’ve made your entries, click the Text Connection button. This opens up a Test Connection confirmation pop-up window (not shown). Click the OK button and, back in the screen in Figure 15, click the Save button to save your new repository configuration.
Take these same steps for the DEF schema (this time entering DEF as the User Name). Then, do the same for all the user schemas and systems user schemas:
<SID>_REPO
DS_<SID>_cntrl_repo
DS_<SID>_datam_repo
DS_<SID>_prof_repo
DS_<SID>_STAGING
Now, when you go to the CMC, you see the new system repositories that have been added (Figure 16).

Figure 15
The new system repositories that are added to the CMC
After all the above schema database users and schema database system users have been added to the CMS using CMC, stop and restart SAP BusinessObjects Data Services. After this step, ensure that SAP BusinessObjects Data Services is up and running.
Step 4. Housekeeping
The next step is to clean up the old hostname entries. First, log into each database user and system user schema, one at a time. After logging in, remove the old hostname entries from table AL_MACHINE_INFO.
Since in my example I’m switching from an Oracle system to an SAP BW system, I need to log on to the Oracle database. (The details for this are beyond the scope of this article, but if you want instructions and code for Oracle, click here: Oracle download.)
The next step is to connect the new SAP BusinessObjects Data Services environment to the SAP BW system.
Log on to the new target SAP BusinessObjects Data Services server (https://localhost:8080/DataServices/) and in the screen that opens (not shown) choose Administrator. Enter the administrator name and password and click the SAP Connections button to create a new connection. This opens a screen like the one in Figure 17, where you configure a new connection to the new server (RFC Server).

Figure 16
Add a new connection to the SAP BW system
Enter the following details:
RFC ProgramID: DI_Source
Username: SAP_DS (can be any RFC user ID).
Password: User password
SAP Application Server Name: The hostname where the SAP system resides, in this case, the SAP BW system (<Hostname_BW_Application_Server>)
Client Number: Enter the SAP client number (any number from 100 to 999). (In my example, I use client 100).
System Number: Any number from 00 to 99
SAP Gateway Hostname: This is the same as SAP Application Server Name (<Hostname_BW_Application_Server>)
SAP Gateway Service name: SAPGW00
SAP Gateway Connection count: This should be greater than 1; in this example, it’s 2.
After you’ve made your entries, click the Apply button.
Next, back in the screen in Figure 17, make the following entries to establish a connection between SAP BusinessObjects Data Services and the SAP BW system.
RFC ProgramID: BDD_Source
Username: SAP_BDD
Password: User password
SAP Application Server Name: The hostname where the SAP system resides, in this case, the SAP BW system (<Hostname_BW_Application_Server>)
Client Number: Enter the SAP client number (any number from 100 to 999). (In my example, I use client 100).
System Number: Any number from 00 to 99
SAP Gateway Hostname: This is the same as SAP Application Server Name hostname <Hostname_BW_Application_Server>
SAP Gateway: SAPGW00
After you’ve made your entries, click the Apply button again.
Step 6. Authenticate SAP BusinessObjects Data Services to the SAP BW System
The final step is to provide authentication of SAP BusinessObjects Data Services to SAP BW system. Without taking this step, the data cannot be pulled from SAP BW system to SAP BusinessObjects Data Services. Log on to the CMC and follow menu path Authentication > SAP. This opens the screen in Figure 18.
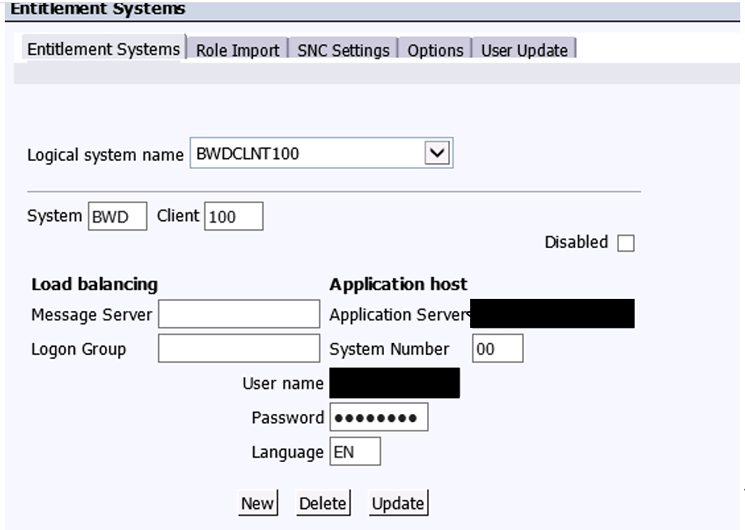
Figure 17
The SAP BW system to be added in the CMC of SAP BusinessObjects Data Services
Here you can see the Logical system name, System, Client, Application Server, User name, and Password that need to be updated. Make the appropriate entries and click the Update button.
Note
The only difference between schema database users and schema database system users is the storage container. A user schema has its own tablespace and a schema database system user uses a tablespace called SYSTEM. A database is comprised of one or more logical storage units called tablespaces. Each tablespace in an Oracle database is comprised of one or more operating system files called datafiles.
Ramesh Kannan
Ramesh Kannan has over 20 years of information technology experience in SAP consulting, and specializes in SAP Cyber Security, SAP NetWeaver, SAP BusinessObjects, SAP BI, and SAP Data Services products. He also has extensive experience in migration, upgrades, and Unicode conversions. Ramesh has worked with clients such as Shell in Europe (The Netherlands and France) and the UK, and other oil & gas companies in the US. Ramesh has a bachelor's degree in engineering (computer science) and a post-graduate diploma in business management.
You may contact the author at ramesh_kannan@hotmail.com.
If you have comments about this article or publication, or would like to submit an article idea, please contact the editor.