Manager
Ensure your automatic testing is working properly by integrating Solution Manager 7.1 with Worksoft Certify.
Key Concept
Integrating SAP Solution Manager with Worksoft Certify allows you to create, edit, and execute the Worksoft Certify processes (test scripts) from SAP Solution Manager. SAP Solution Manager contains test assets and links to business processes. If you integrate SAP Solution Manager with Worksoft Certify, Worksoft Certify test processes are linked to the business processes in SAP Solution Manager. From Solution Manager, you can create and edit Worksoft Certify test processes, execute Worksoft Certify processes, and review the results. You can store all results in a single repository in SAP Solution Manager.
For any business it has always been a great challenge to test end-to-end business scenarios. Changes happen in both process and functionality, either during production support or new implementations. To keep up with these changes, systems must be thoroughly tested. Automated tests take much less time and effort to execute by comparison with manual testing.
Solution Manager 7.1 provisions end-to-end test management and acts as a central point of access to SAP and other third-party test capabilities to get the maximum benefit. However, the default test management capabilities only support SAP systems, so to test non-SAP systems you need a third-party tool as well. There are many solutions you can use for end-to-end automation, including HP QuickTest Professional, Micro Focus, and IBM Rational. Another is Worksoft Certify, positioned for business users looking to perform testing without any coding experience. Worksoft Certify integrates with SAP Solution Manager 7.1 to perform testing across your entire SAP ecosystem, multiple upgrades and enhancements, system changes, and legacy tools, while providing error reporting and documentation functionality. It is licensed separately, but has an SAP-certified interface (integration with SAP NetWeaver), so you don’t need an additional adapter to integrate.
Solution Manager 7.1’s Test Automation Framework (TAF) then allows you to create, edit, execute, and view the results of Worksoft Certify automated processes from within Solution Manager in the perspective of the Business Process Hierarchy (BPH). You can also link Worksoft Certify processes to Solution Manager.
I’ll show you how to integrate Solution Manager 7.1 and Worksoft Certify to improve your end-to-end testing and ensure that changes are properly tracked. First, here are some prerequisites:
- Solution Manager 7.1
- Worksoft Certify 8.5.1 or higher
- SAP GUI 7.02 or later
- Logical components for managed systems deliberated for testing in the Solution Manager system landscape
- Lean solution documentation for business processes
I’ll take you through the following procedure:
- Step 1. Set up SAP extended Computer Aided Test Tool (eCATT)
- Step 2. Install Worksoft Certify
- Step 3. Establish the connection between the database and Worksoft Certify
- Step 4. Register Worksoft Certify as an external tool in Solution Manager
- Step 5. Define the test case type for automated tests
- Step 6. Create or edit a Worksoft Certify test process from Solution Manager
- Step 7. Link existing Worksoft Certify processes to Solution Manager
Step 1. Set Up SAP eCATT
eCATT is SAP’s document interface for communication between SAP and any other third-party testing tools. The system uses eCATT functionality when you are creating or executing automated test scripts using any third-party test tools. If you use a different testing tool, you can still use the directions for this step.
Allow eCATT and CATT for the clients that run automated tests in both systems. From Solution Manager, use transaction SCC4 and press Enter. The Display View “Clients”: Overview screen appears. Click the display/change  icon and select the client for which you want to enable eCATT and CATT. Click the details icon or double-click the relevant client number.
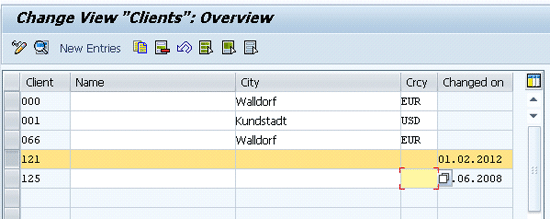
Figure 1
Client administration
The Change View “Clients”: Details screen appears. In the CATT and eCATT Restrictions block, select eCATT and CATT Allowed and then click the save icon (Figure 2).
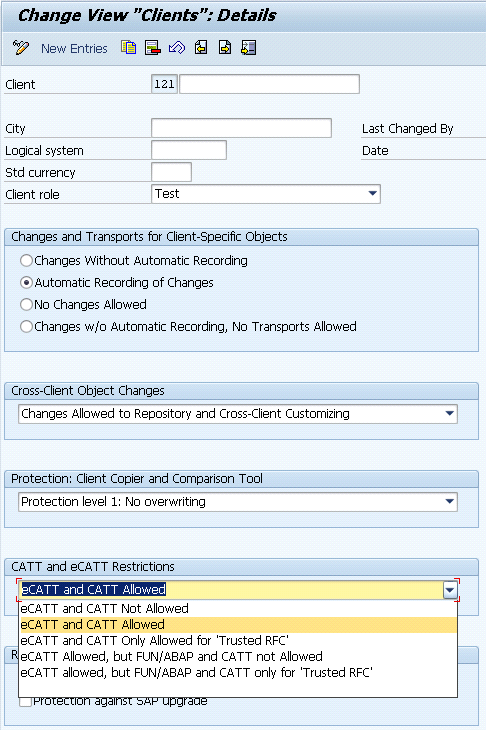
Figure 1
Explicit permission for the client
Repeat the same steps for all managed test systems for which you would like to run automation scripts.
Enable SAP GUI Scripting
To record transactions with controls using the SAP GUI driver, scripting must be enabled in both the Solution Manager system and the managed test systems.
From the Solution Manager system, use transaction RZ11 and press Enter. The Maintain Profile Parameters screen appears (Figure 3). In the Param. Name field, type sapgui/user_scripting and click the Display button.
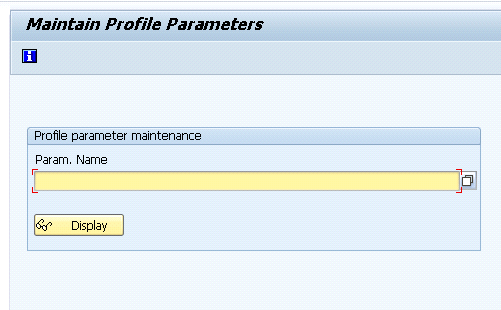
Figure 3
Profile parameter maintenance
The Display Profile Parameter Attributes screen appears (Figure 4). Click the Change Value button.
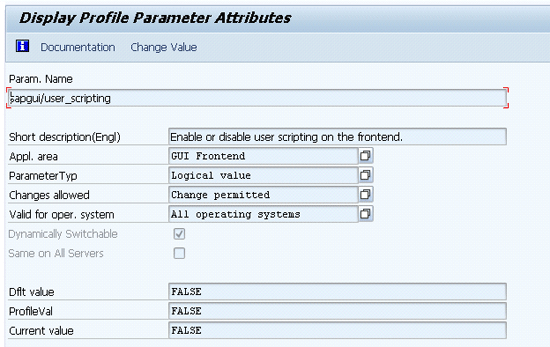
Figure 4
Profile parameter attributes
The system displays the Change Parameter Value pop-up. Type TRUE in the New Value field (Figure 5). Click the save icon.

Figure 5
Change the parameter value
Note
Note that scripting will be disabled again after system restart. To make the changes permanent, the parameter should be changed in the instance profile (transaction RZ10).
Once scripting is enabled, GUI scripting must be activated on the front-end computer. To activate, click the customize local layout icon and select Options… (Figure 6).
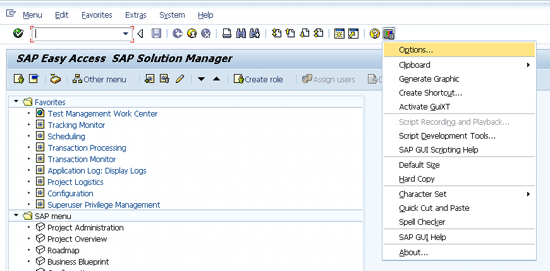
Figure 6
Customize the local layout
Select the Enable scripting check box, but leave the other options unchecked (Figure 7). Click the OK button.

Figure 7
Enable GUI scripting
You then need to remove existing parameter pre-assignments. If the pre-assignments are changed between recording and processing the script, the changed assignment can produce errors. Also, if the script is processed by a different user, then errors can occur. From Solution Manager, execute the transaction SU3 and press Enter. Then the Maintain User Profile screen appears (Figure 8).
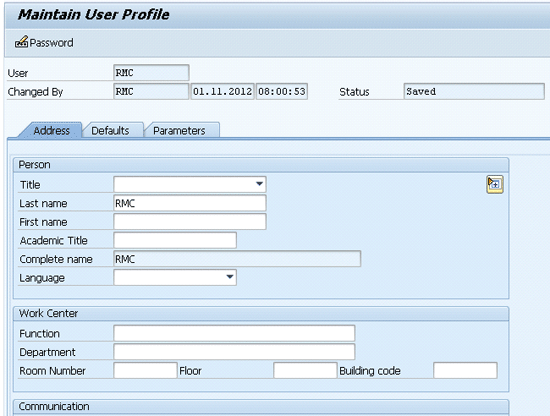
Figure 8
Maintain user data
Click the Parameters tab (Figure 9). Remove any pre-defined parameter values. Click the save icon to save changes.
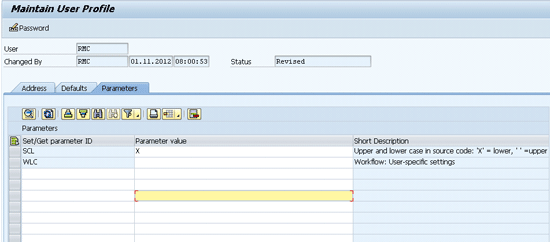
Figure 9
Remove pre-defined parameter values
Note
To ensure that no user-specific parameters are predefined, create a new user and use it exclusively for recording.
Create an eCATT User Account
To benefit from SAP eCATT using Worksoft Certify, you need to generate a standard user in Solution Manager. This user enables communication between SAP eCATT and Worksoft Certify. For this example, let’s create the user ECATT_ET_USR with the password ECATT_ET (the password is mandatory). To generate an ECATT_ET_USR, use transaction SE38. Enter ECATT_GENERATE_ET_USER in the Program field and click the execute icon (Figure 10). Then ECATT_ET_USR is created (Figure 11).
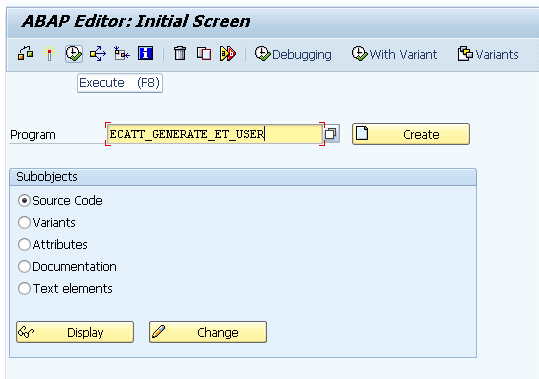
Figure 10
ABAP Editor screen
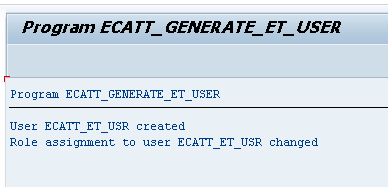
Figure 11
Automatically generated user (ECATT_ET_USR)
Assign the Role SAP_ECET to ECATT_ET_USR
For the ECATT_ET_USR user, the role SAP_ECET needs to be assigned. To do this, use transaction SU01, enter ECATT_ET_USR in the User field, and click the change  icon (Figure 12).
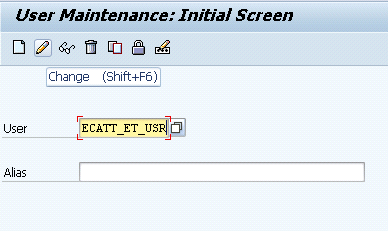
Figure 12
User maintenance screen
Reset the password for this user to ECATT_ET in Solution Manager.
Go to Roles tab, assign the role SAP_ECET, and click the save icon (Figure 13).
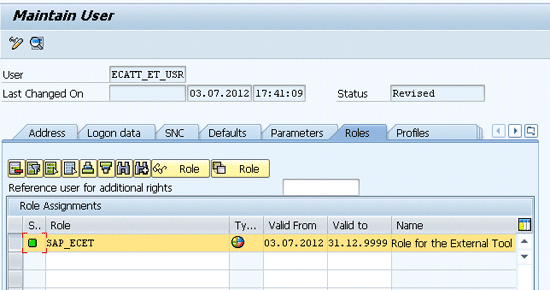
Figure 13
Assign the role
Repeat the same steps for all managed test systems.
Step 2. Install Worksoft Certify
To install the Worksoft Certify client copy the Worksoft installation files from the CD and double-click the CertifySetup.exe file (Figure 14). An installation wizard appears (Figure 15). When it finishes, another wizard pop-up appears (Figure 16). Click the Next button.

Figure 14
Select the Worksoft .exe file
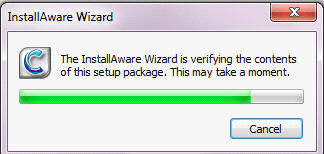
Figure 15
Worksoft installation verification
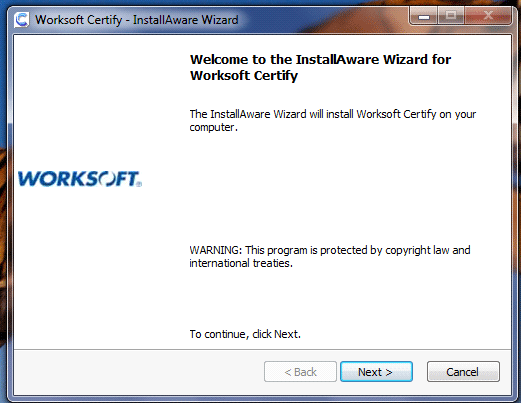
Figure 16
Click Next through the wizard
The destination folder pop-up appears (Figure 17). If you want to install in the default directory, click Next. If you want to use a different directory, click Change… and select a different folder, and then click Next. In the following pop-up, click the Next button (Figure 18).
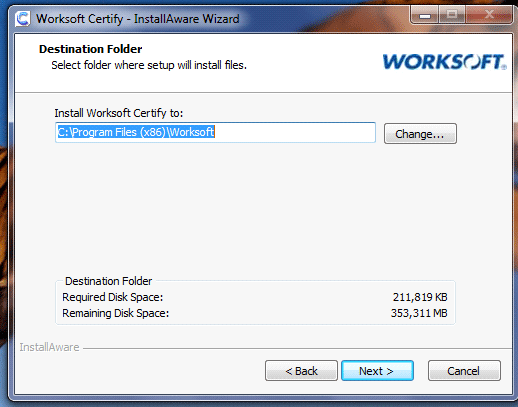
Figure 17
Set the destination folder

Figure 18
Complete the maintenance wizard
The installation completes and the setup complete page appears. If you don’t have the latest version of Worksoft Certify, you can download and apply the latest patch by referring to the Readme file included with the patch to upgrade. If there are no patches to be installed and you want to open Worksoft Certify, select the Run Certify option and click the Finish button.
Step 3. Establish the Connection Between the Database and Worksoft Certify
Once you install the Worksoft Certify client, it is necessary to maintain the connection between the Worksoft Certify client and the database. The license server does not require its own server and is typically run on either the SQL server machine or any available server. The license server must be accessible to all Worksoft Certify clients over UDP port 5093. The TCP Port 1433 is the default listen port for the SQL server. However, the port number may be different in your environment. The SQL server instance must be accessible to all Worksoft Certify clients.
Here I am assuming a SQL server database is already installed. Figure 19 illustrates the typical Worksoft Certify deployment.
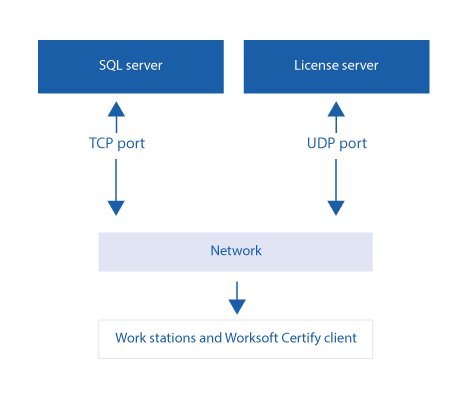
Figure 19
Worksoft Certify deployment
Log on to Worksoft Certify and follow Tools > Change Configuration. The configuration tool appears (Figure 20). Enter the appropriate values in the Server Name and Database Name fields and then select a security option. To test the database connection, click the Test Database Connection button. After the connection is successful, click the Save button.

Figure 20
Worksoft Certify database connection setup
Step 4. Register Worksoft Certify as an External Tool in Solution Manager
To enable the integration with Worksoft Certify, you need to register it to create and execute automated scripts from Solution Manager. To register Worksoft Certify as a test tool, follow IMG menu path SAP Solution Manager > Capabilities (Optional) > Test Management > External Integration > External Test Tool with eCATT > Register Test Tool (Figure 21). Alternatively, you can use the Test Management work center.

Figure 21
Register Worksoft Certify as a test tool
Click the New Entries button to add Worksoft Certify as a test tool. Enter the relevant details in the screen in Figure 22:
- Tool Name: External test tool name (e.g., WORKSOFT CERTIFY)
- COM Program ID: Program ID of external tool. This is provided by Worksoft (the COM program ID value must be in all uppercase letters).
- Tool Desc.: Description of external test tool
- Maintain DB: NONE (because Worksoft Certify has its own SQL database)
- TestExecutionDB: EXECUTE (because you’re executing the Worksoft Certify script in Solution Manager and storing the results in Solution Manager)
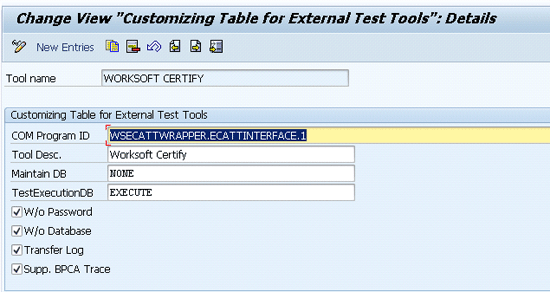
Figure 22
Added entries screen for the external tool
Select the check boxes W/o Password and W/o Database. Selecting W/o Password helps you log on to Worksoft Certify without a logon procedure when executing from Solution Manager to Worksoft Certify. Select Transfer Log to create a log that stores any errors that occur between Worksoft Certify and Solution Manager. Select the Supp. BPCA Trade check box to support Business Process Change Analyzer tracing.
Step 5. Define the Test Case Type for Automated Tests
To define test case types, follow IMG menu path SAP Solution Manager > Capabilities (Optional) > Test Management > Extended Configuration > Test Cases > Specify Test Case Types (Figure 23). Alternatively, you can use the Test Management work center. Activate the Test Configuration entry for the 3rd Party Test Tool option.
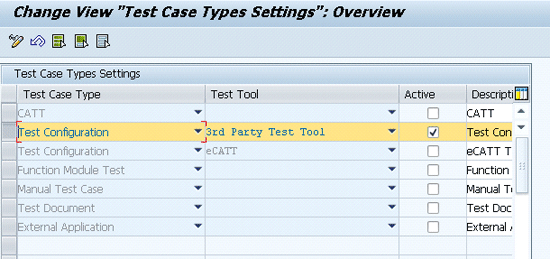
Figure 23
Test case type settings
After you activate the test case type, use transaction SOLAR02 and in the Test Case Type tab you can see that it shows only activated external tools (Figure 24).

Figure 24
Solution Manager project configuration screen
Step 7. Log On to Worksoft Certify Without a Logon Procedure from Solution Manager
To set up the logon automatically in the background when you are constructing calls from Solution Manager to Worksoft Certify, you have to set up a static Worksoft Certify user. This static user must have the name ECATTUser (the same name as in Solution Manager) and full authorizations in Worksoft Certify and authorizations to the respective project (Figure 25).
Note
If you plan to use lights-out testing (i.e., scheduling testing for times without human interference) then the Worksoft Certify user ID and password must both be ECATTUser and you need to select the Password Never Expires check box. The Worksoft Certify project name would be Integrated SAP.
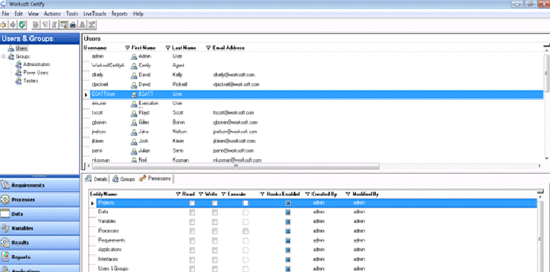
Figure 25
Worksoft Certify users and groups window
Assign Read, Write, and Execute authorizations by selecting the appropriate check boxes and click OK (Figure 26).
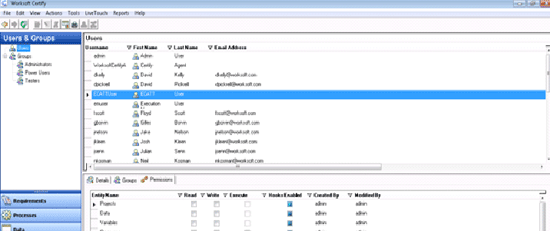
Figure 26
Assigning permissions
Step 6. Create or Edit a Worksoft Certify Test Process from Solution Manager
To create the test case, select the project in transaction code SOLAR02 and go to the Test Cases tab (Figure 27). Select the relevant business process in the configuration structure and click the change  icon (Figure 28).

Figure 27
Create the test case

Figure 28
Test Cases tab
Select the Test Case Type, enter the test case name, and click the create  icon or press Enter (Figure 29).

Figure 29
Project configuration screen
The Create Test Configuration screen appears (Figure 30). Enter a Title and an Application Component.
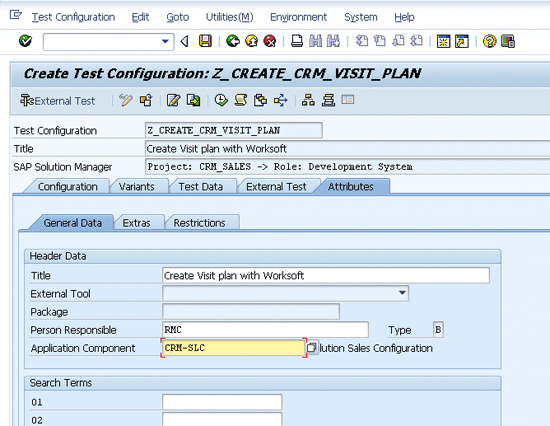
Figure 30
External test configuration editor
Go to the Configuration tab. Enter the system data container (System Data Cont.) and Target System (Figure 31). The script name is defaulted with the same value as in the Test Configuration field.

Figure 31
External test configuration editor
Click the External Test button. Worksoft Certify is automatically launched from Solution Manager without providing logon details. The initial screen launches and is ready to record a script (Figure 32).

Figure 32
Worksoft Certify edit process window
Link Existing Worksoft Certify Processes to Solution Manager
To link an existing Worksoft Certify process to Solution Manager, open an existing certify process in the certify process window (Figure 33). In the menu bar, follow SAP > Save to SAP (Initially).
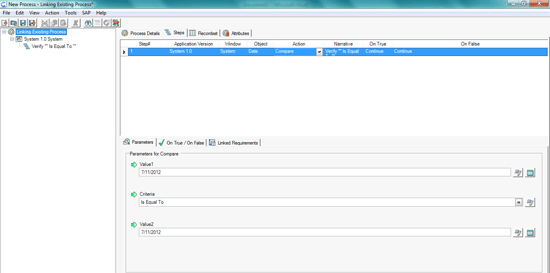
Figure 33
Process and data editor window
The Save Test Script dialog box appears (Figure 34). Enter the Test Script name and Version.

Figure 34
Save the test script
Click the Change RFC Parameters button and the RFC parameters dialog box appears (Figure 35). Enter the relevant information for the Solution Manager system for Username, Password, AS Host, Client, System Number, and Language. Click the OK button the test script saves in Solution Manager (Figure 36).
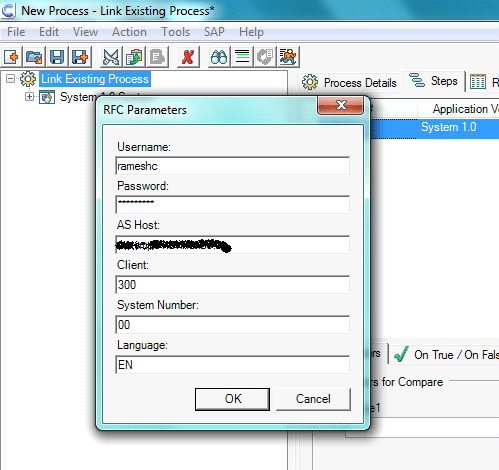
Figure 35
RFC parameters dialog box
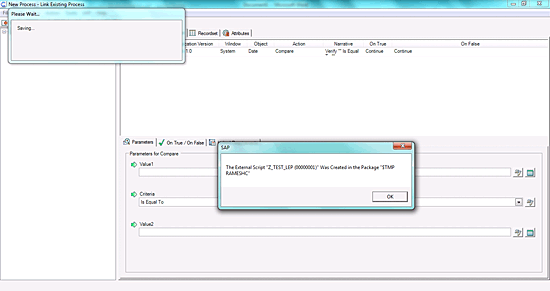
Figure 36
Save to Solution Manager
To find the saved test script in Solution Manager, go to transaction SECATT and enter the Test Script Name, Version, and External Tool (Figure 37).
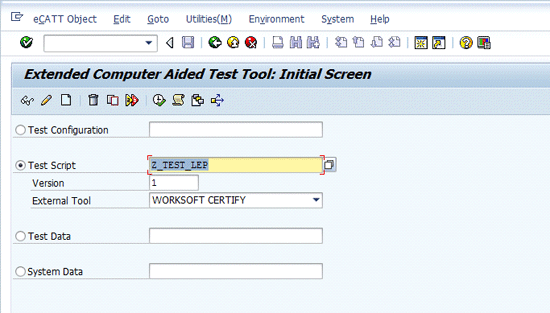
Figure 37
eCATT
Click the Display button, and the system displays the test script you saved from Worksoft Certify (Figure 38).
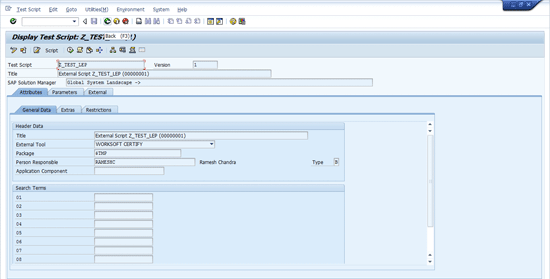
Figure 38
Test script screen
Ramesh Chandra
Ramesh Chandra is a senior SAP Solution Manager and CRM consultant with HBO Consulting, a South African and Indian-based company focused on delivering cloud-based test and validation services. He is a postgraduate in management MBA (marketing and systems) from Anna University, India. He has more than seven years of experience in SAP project implementations and upgrades in both SAP CRM and Solution Manager, including Service Desk, ChaRM, test management, and Business Process Change Analyzer (BPCA).
You may contact the author at rameshc@hboconsulting.com.
If you have comments about this article or publication, or would like to submit an article idea, please contact the editor.


