Learn some useful tips on how to better organize your customizing requests and how to release a customizing request for transportation from a development server to a quality assurance or production server.
Key Concept
SAP provides a customizing request so that changes in standard SAP software customization or settings can be recorded and moved to other target servers by a transport program. The customizing request records user-specific changes (i.e., changes made by the SAP software user) that are usually generated by the customization tasks of SAP functional consultants.
A misappropriation of a customizing request can cause unnecessary issues and wasted time during an SAP implementation or support service. On my first SAP implementation project, although I knew how to create customizing requests, I lacked the know-how to properly manage them. My entire customizing task was generated under a single customizing request. Although part of my work scope was to release my customizing requests for transport from the development system, I initially did not know how to do the release. Now as a senior SAP functional consultant, I have observed that some new SAP professionals experience this same challenge during their first project or support service.
I give you insight on how to better organize customizing requests to avoid mistakes and how to release a customizing request for transport (move the customizing request to other targeted servers).
I provide tips and recommendations with a step-by-step procedure on how to:
- Organize a customizing request and rename it
- Update an already generated transport request
- Carry out quality assurance as a lead consultant on customizing done by new junior functional consultants by having their customizing requests assigned to your user account
- Release a customizing request for transport in two steps
- Set the display customizing request change date in the Transport Organizer
- Merge and reassign a customizing request
How to Organize Your Customizing Request
Organizing your customizing request consists of two steps:
1. Save your customizing task by sets or individually. This step provides easy navigation to locate your customizing requests. For example, you could save all customizing tasks for price IMG activities under one customizing request description named Pricing, or you could be more specific by saving a single IMG activity such as document type under a customizing request named Sales Order.
During my experience at my first SAP implementation, the Basis consultant had issues with easily locating my various customizing tasks because they were all under one customizing request and the consultant had to transport all my customizing tasks any time there was a need for transporting my request.
2. When generating a customizing request, use descriptions that relate to the customizing task. This step makes it easy to identify the customizing request by team members and Basis experts. For instance, you could use Sales Order as a description to generate the customizing request for defining sales document type customizing tasks.
For my example, use the IMG activity Define Sales Document Type. To define a sales document type use transaction code VOV8 or follow IMG menu path Sales and Distribution > Sales > Sales Documents > Sales Document Header > Define Sales Document Types. The screen in
Figure 1 shows a newly created Sales Order Type Standard Order (ZS) that I already defined via the Define Sales Document Type IMG Activity to demonstrate how a customizing request should be named (Description).
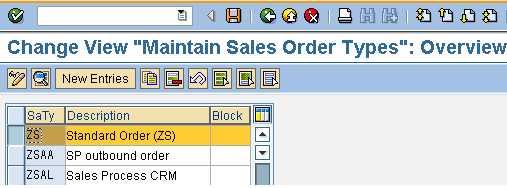
Figure 1
Overview screen for defining the sales document type
If you have defined a new Sales Document Type ZS - Standard Order (ZS), as you click the save icon

to save the change, the system prompts you with a customizing request. If it is your first customizing request, note that the Request and Short Description fields are blank (
Figure 2).
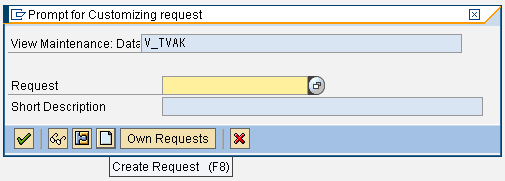
Figure 2
Customizing request with blank fields
If you click the continue icon

to save the customizing request with the blank Request and Description fields, the system prompts you to specify a request.
If the customizing request is not your first request, note that the Request and Short Description fields are automatically populated with the last generated Request number and Short Description, respectively (
Figure 3).
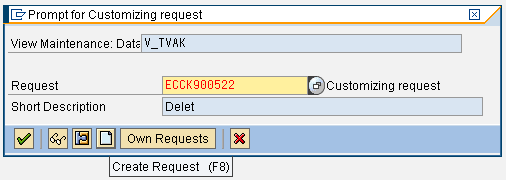
Figure 3
Customizing request with populated data from a previous request
If you click the continue icon to save the customizing request in
Figure 3, the customizing task is saved under the same customizing request in
Figure 3. To create a new customizing request, click the create icon

shown in
Figure 3. This action opens the screen in
Figure 4.
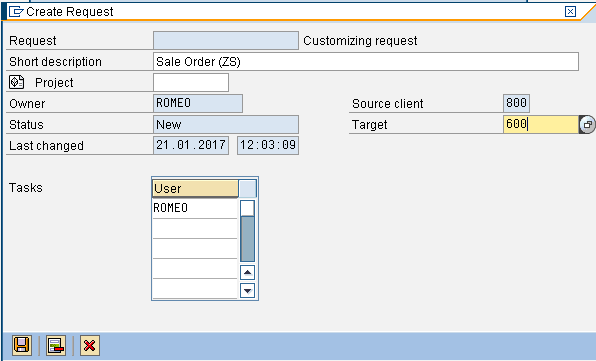
Figure 4
Create a new request
After populating the Short Description field (ensure your description relates with the customizing task for easy identification), click the save icon at the bottom of the screen. The system then generates a request number that is displayed in the Request field (
Figure 5).
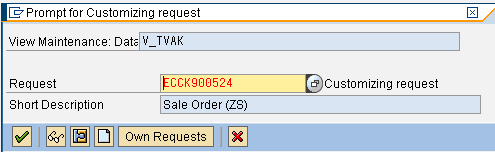
Figure 5
New customizing request for Sales Order (ZS)
Click the continue icon to save your change.
Tip on How to Assign a Customizing Request to Multiple Users
SAP has provided a way for the owner of a customizing request to assign a customizing request to multiple users and still remain the owner of the customizing request unless otherwise changed. The functionality of assigning a customizing request to multiple users is relevant when there is a need to share a customizing request with other team members, especially on implementation projects. This shared customizing request enables collaboration of work, and it can be used to note customizing changes already done by other team members. As team lead in an SAP implementation project, I particularly use the functionality to carry out quality assurance on the customization settings done by my team members before the customizing requests are transported to the quality assurance server for testing.
During the creation of a new customizing request (
Figures 1 and
2), if you want to share a customizing request with other users, all you need to do is to add the user names of those other users in the list provided under User in
Figure 6.
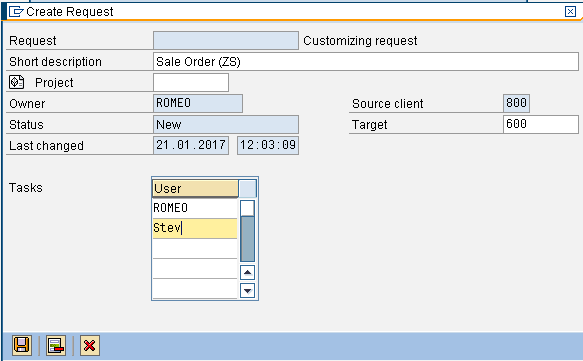
Figure 6
Assign a customizing request to multiple users
In this example, I use a user account ROMEO and also assigned a customization request to a new user Stev (
Figure 6).
After assigning the additional user, follow the steps for creating a new customizing request (
Figures 4 and
5).
With this method, during an SAP implementation you can see and evaluate in real time what your team members are doing. Let’s now see the customizing request for the user names Romeo (owner of the customizing request) and Stev (the newly added user) to check the impact of the above customizing request, Sales Order (ZS).
Use the Transport Organizer to check the customizing request. To go to the Transport Organizer use transaction code SE10 or follow SAP menu path Tools > Customizing > IMG > Transport Organizer (Extended View). When you click the Transport Organizer (Extended View) node, the system takes you to the Transport Organizer initial screen (
Figure 7).

Figure 7
The Transport Organizer initial screen
Input the user name for the person who should see the transport request, and in the Request Type section, select the Customizing Requests check box. In the Request Status section, select the Modifiable check box and click the Display button. This action displays the screen in
Figure 8.
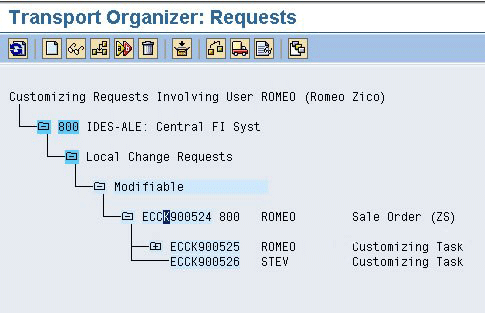
Figure 8
Customizing request for user name ROMEO
To display the customizing request for the user name STEV, follow the same steps to display user name ROMEO. The customizing request for user name STEV is then displayed in
Figure 9.
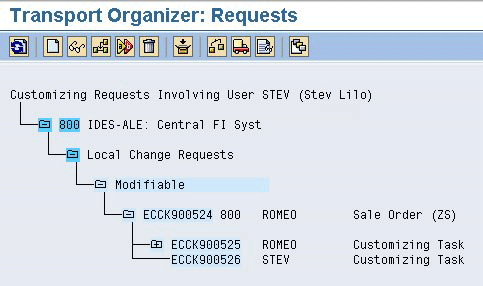
Figure 9
Customizing request for user name STEV
From the STEV user account, you can link back to the IMG activity of the customizing request by double-clicking the IMG activity in the Transport Organizer as shown in
Figure 10.
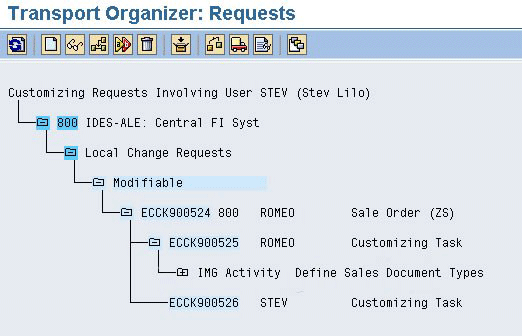
Figure 10
Click the IMG activity in the Transport Organizer
After you double-click the IMG activity in
Figure 10, the system links you back to the IMG activity where you can review the configuration and even make changes. I recommend that if you want to use this tip, do not make changes except in very exceptional cases in which the customizing request owner is not available or the task needs a more advanced skill that the owner may not be able to handle.
When there is a need for a correction or update, this is how I handle the situation. I request that the junior consultants make the required changes or corrections via their own user accounts. This procedure helps to avoid confusion and make the work uniform (so that every team member can take full responsibility for their customizing tasks).
Note
When a change is made via the added user account as in the case of user name STEV, ensure you save the change under the same customizing request. On the prompt for the customizing request, click the Own Requests button and select the customizing request number by clicking it. This action generates another customizing task number for STEV and during the customizing request release, both the customizing task number for ROMEO and the new one for STEV have to be released. This is what I have experienced, and it is logical.
How to Change the Description of an Already Generated Customizing Request
This step may be necessary when you use a non-relevant description for a customizing request and there is a need to change the description. (Note that this can be done only when the request has not been released for transport.)
To change the description of an already generated customizing request, go to the Transport Organizer following the procedure for checking a customizing request in the Transport Organizer (
Figures 7 and
8). For my example, change the description of the customizing request from Sale Order (ZS) to Sale Order (Trade Fair). The reason for changing the customizing request description could be that it was later realized that the user preferred to label the document types based on the purpose the document serves.
In the Transport Organizer screen, go to the Edit option and click Choose as shown in
Figure 11.
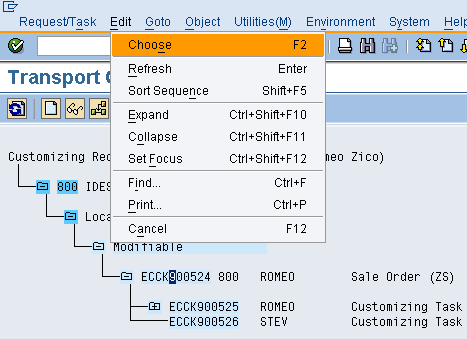
Figure 11
The process for changing the customizing request description
In the next screen (
Figure 12), under the Properties tab, click the change icon

.

Figure 12
Change the customizing request description
This action displays the screen in
Figure 13 in which you can then edit or change the description as required.
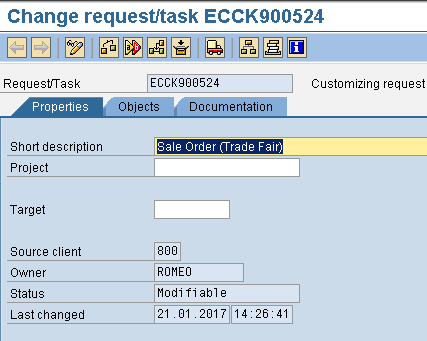
Figure 13
Changed customizing request description
After changing the description of the customizing request, click the save icon to save your changes. The system then displays the following message on the status bar: Changes were saved.
To see the changed description, click the back icon to return to the Transport Organizer screen (
Figure 14). You can then see that the description has been changed.
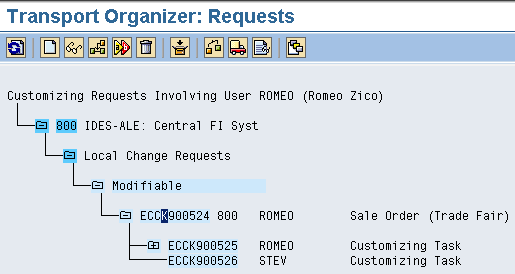
Figure 14
The changed customizing request description in the Transport Organizer
How to Release a Customizing Request
Releasing a customizing request is done in the Transport Organizer application. Follow the procedure to get to the Transport Organizer in the “Tip on How to Assign a Customizing Request to Multiple Users” section (
Figures 7 and
8).
There are two steps to release a request for transport. First, you release the customizing task to the customizing request, and then you release the customizing request for transport. Note that if you try to release the customizing request when you have not released the customizing task to it, the system displays a message (for example, Referencing task ECCK900525 not yet released) on the status bar and it won’t be released.
To release the customizing task, ensure you select it by clicking the node ECCK900525 Customizing Task, and in the screen that appears (
Figure 15), click the transport icon

to release it directly, or choose Request/Task – Release – Directly from the menu bar. The customizing task is then released to the customizing request and the system generates the following message on the status bar: Task ECCK900525 has been released to request ECCK900524. (This message is not shown in
Figure 15.)

Figure 15
Released customizing task
Now you release the customizing request for transport. Select the customizing request and then click the transport icon to release it directly or choose Request/Task – Release – Directly from the menu bar. The customizing request is finally released for transport. You can refresh your screen to be sure (
Figure 16).
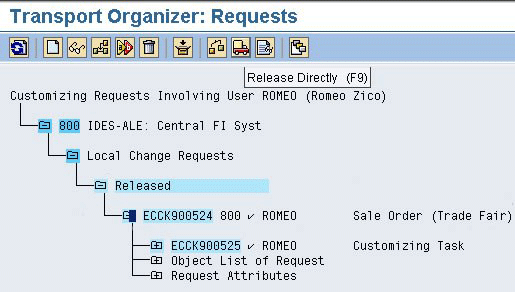
Figure 16
Released customizing request for transport
The system displays the following message on the status bar to indicate the customizing request has been successfully released for transport: Local Request ECCK900524 released (object no longer locked).
From this point the Basis expert can take over. I recommend that the Basis user should not be the one releasing the customizing requests; rather, let the SAP functional users be responsible for releasing the customizing request to avoid unnecessary mistakes, such as releasing a customizing request when the customizing has not been completed properly.
How to Display a Customizing Request Change Date
On the SAP Transport Organizer (for the menu path to SAP Transport Organizer see
Figures 7 and
8), go to Utilities (M) > Settings… on the menu bar as shown in
Figure 17. (In this case new customizing requests have been generated.)
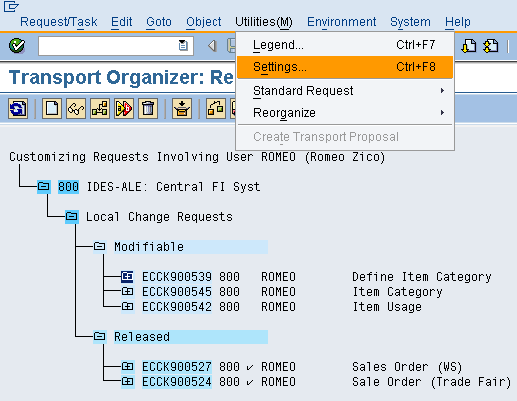
Figure 17
Select Utilities (M) and Settings .. as the first step to display a customizing request change date
This action takes you to the screen in
Figure 18.
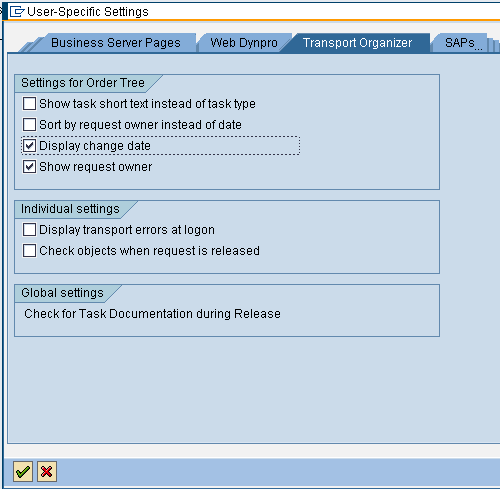
Figure 18
Select the Display change date check box
In the User-Specific Settings screen, select the Display change date check box (
Figure 18). (Note that the Show request owner check box is already selected.)
After you select the Display change date check box, click the continue icon and the Change date is then displayed for each customizing request in the Transport Organizer (
Figure 19).
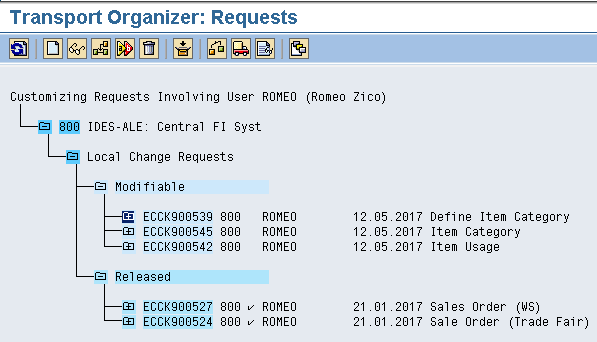
Figure 19
Displayed customizing request change date
How to Merge and Reassign a Customizing Request
Merging a customizing request is relevant if there is a need to move or merge a customizing task of one customizing request to another customizing request, and the former customizing request was deleted because it has been merged.
Consider this example: In the SAP Transport Organizer, place the cursor on the task to be moved, and go to Utilities (M) > Reorganize > Merge Requests… (
Figure 20).
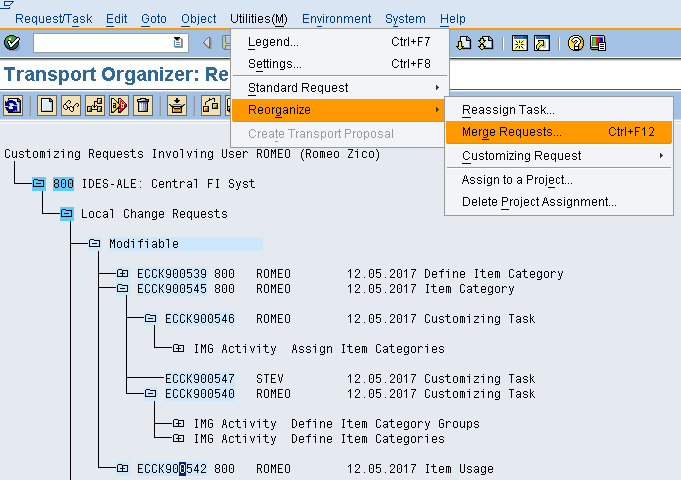
Figure 20
Select a merge request
In my example the customizing task Item Usage is moved to customizing request Item Category (the target customizing request). When you click Merge Requests… as shown in
Figure 20, the SAP system displays the screen in
Figure 21.

Figure 21
Assign requests to be merged
In the Merge Requests screen, select the target customizing request as the second request because the first or top request is merged with the second or bottom request (
Figure 21).
Then click the continue icon and the customizing request Item Usage is then merged with the customizing request Item Category. The following message is displayed on the status bar: Requests have been merged (remaining request: ECCK900545).
At the Transport Organizer, the customizing task Item Usage has been moved to the customizing request Item Category and the customizing request has been deleted because it was merged (
Figure 22).
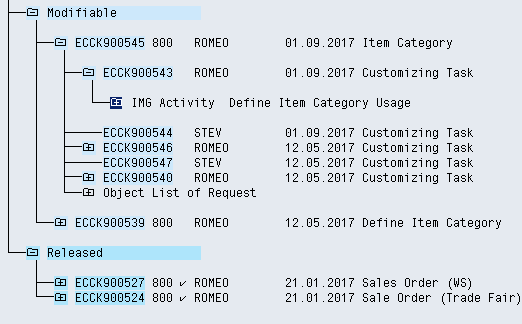
Figure 22
Displayed merged customizing request Item Category
Reassigning a customizing task is relevant if the task is in a customizing request with several other tasks that do not need to be moved; otherwise, customizing request merging is relevant in the scenario in which all the customizing tasks are required to be moved.
Consider this example: In the Transport Organizer, place the cursor on the customizing task to be reassigned. Go to Utilities > Reorganize > Reassign Task… (
Figure 23). In my example, the customizing task ECCK900540 under the customizing request Item Category is reassigned to the customizing request Define Item Category (the target customizing request).
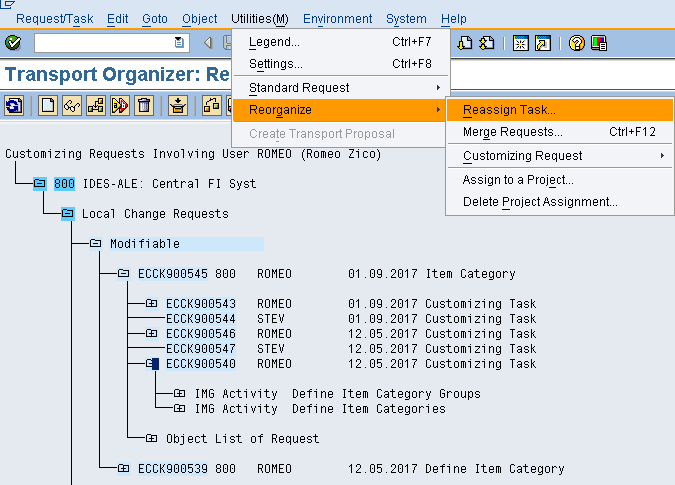
Figure 23
Select Reassign Task… to reassign customizing task ECCK900540
In the Reassign Task screen, select the target customizing request as the second or bottom request (
Figure 24).
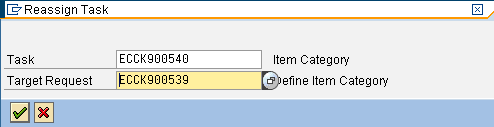
Figure 24
Assign the customizing task with the target customizing request
Click the continue icon and the customizing task ECCK90040, which has the IMG Activity Define Item Category Groups and IMG Activity Define Item Categories, is reassigned to customizing request Define Item Category. The following message is displayed on the status bar: Task ECCK900540 successfully reassigned.
At the Transport Organizer, the customizing task ECCK90040, which has the IMG Activity Define Item Category Groups and IMG Activity Define Item Categories, is moved to customizing request Define Item Category, but the source customizing request is still active with the other customizing tasks (
Figure 25).
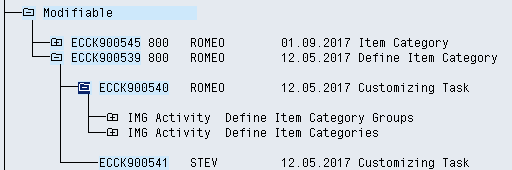
Figure 25
The reassigned customizing task ECCK900540
Patrick Imhen
Patrick Imhen is a business analyst and a certified SAP ERP consultant with proficient knowledge, skills, and experience in Materials Management (MM), Sales and Distribution (SD) and Plant Maintenance (PM) gathered from successful SAP implementations projects, support, training, business process analysis, modeling, unit testing, and integration testing. He has profound understanding of the supply chain process across industries and helps organizations cut the cost of operation and improve process optimization. He has more than 10 years’ experience in the business environment and six years’ experience in the SAP domain.
You may contact the author at
patrick.imhen@zocoderesources.com.
If you have comments about this article or publication, or would like to submit an article idea, please contact the
editor.