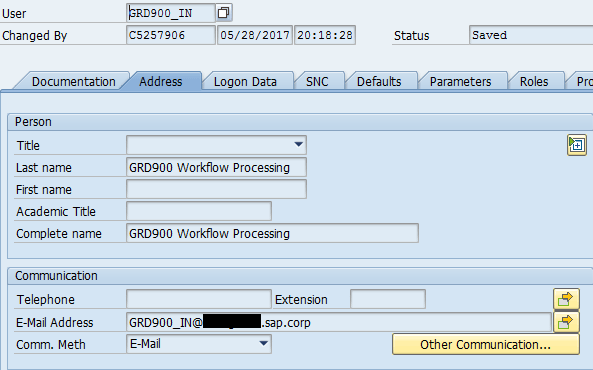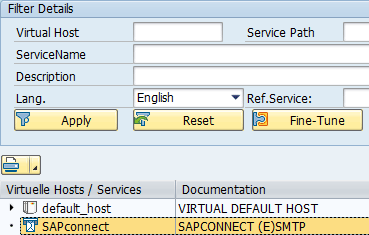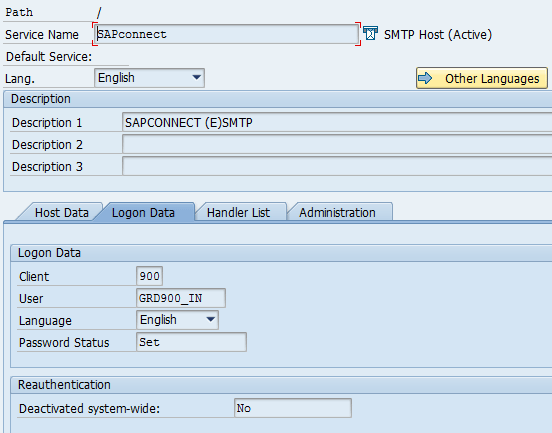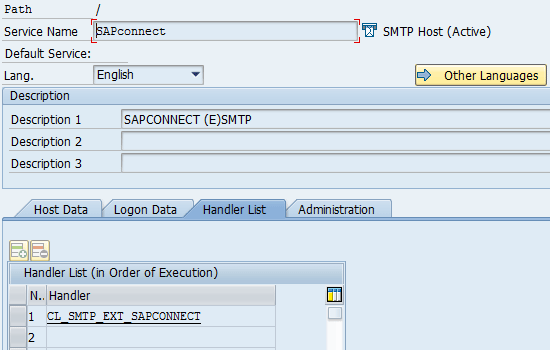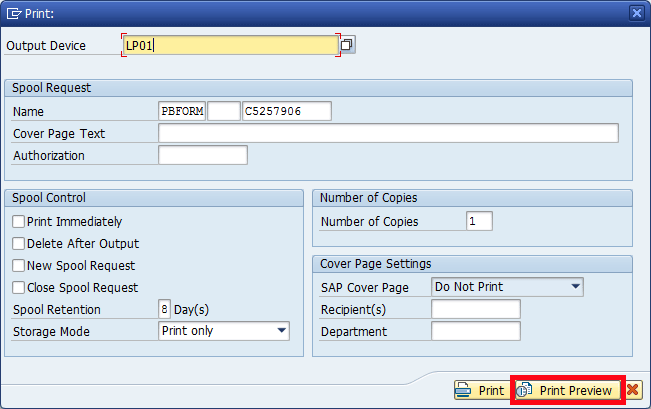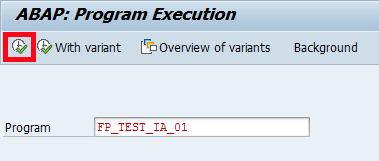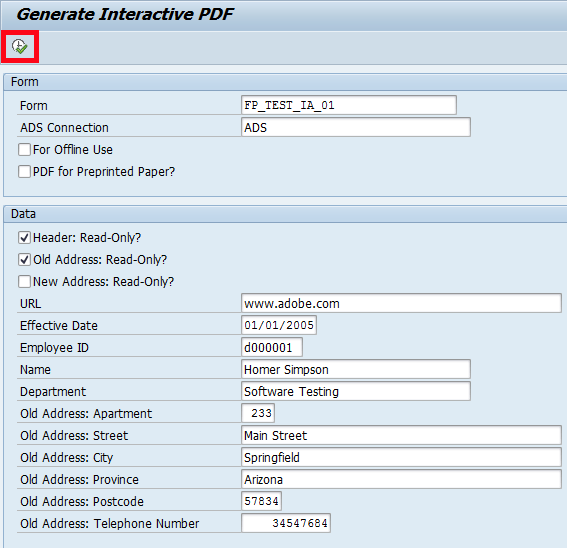
Figure 19
SAP default values used to generate the interactive PDF (these values can be changed)
Figure 20 shows the interactive PDF was successfully generated based on the default values provided.

Figure 20
The interactive PDF is successfully displayed. The form for Kwantlen University College is displayed with default SAP input parmeters.
The last test is to run any SAP Process Control report and export the content to PDF. In this example, the Evaluation Results by Organization report was exported to PDF. The report content should export to PDF without error as shown in
Figure 21.

Figure 21
Process Control report content exported to PDF
Activate OWP Business Scenarios
To activate OWP business scenarios, follow IMG menu path Governance, Risk and Compliance > Process Control > Offline Workflow Process > Configure OWP Business Scenario (
Figure 22).
OWP currently supports 23 business scenarios. Individual scenarios can be activated by selecting the Enable check box for a specific line item. See the fifth column from the left in
Figure 22. OWP support of Automated Monitoring was added in SAP Process Control 10.1 Support Package 14. The following business scenarios are NOT supported at this time:
- Ad hoc issues (online only)
- Remediation with Corrective Action Preventative Action (CAPA) (online only)
- Manual control performance (SAP Fiori only)
- Sign-off (online only)
- Aggregation of deficiencies (online only)
Use of custom forms is supported although most SAP Process Control customers do not use them. If the names of a custom form and Handler Class are maintained for a business scenario, the custom form is used; if not, the standard SAP-delivered form is used by default. Refer to SAP Note 1633989 for information on how to customize Adobe forms.

Figure 22
Supported OWP Business Scenarios
Note
In some cases, modification of the SAP-delivered forms or creation of custom forms requires the purchase of an additional license, so you may want to verify your license status before making modifications.
Maintain End-User Email Addresses
The most common cause of OWP Sender job failure is that end users do not have their email addresses maintained in the GRC system. If the email address is not maintained, the OWP job associated with that user short dumps because the system is attempting to send an email to a null address. Prior to executing planner activity for OWP-enabled business scenarios, ensure that OWP users have their email addresses maintained.
Note
As of SAP Process Control 10.1 Support Package 16, this behavior has changed. See SAP Note 2340935. Post-Support Package 16, if a user does not have an email address maintained, the child job will now complete and show a successful status in transaction code SM37. To identify users who did not receive their Adobe forms due to a missing email address, review application log entries in transaction code SLG1 instead as shown in Figures 23 and 24.

Figure 23
Application log filtered for OWP entries

Figure 24
OWP application log entry identifying user with missing email address
Schedule a Job to Deliver an Adobe Form via Email
To schedule the job to deliver the OWP Adobe forms via email, follow IMG menu path Governance, Risk and Compliance > Process Control > Offline Workflow Process > Set Up Job to Deliver PDF through E-mail.
GRFN_OWP_JOB_SENDER is a parent job that manages the send process for OWP-enabled business scenarios. This job spawns a number of child jobs that run concurrently. The default value is five, but a variant can be created for program GRFN_OWP_SENDER to change that number. Each child job (one per pending work item) generates an Adobe form and emails it to the end user. The parent job executes first and keeps running until all child jobs are complete. When the last child job completes, the parent job completes. Child jobs have the work Item number in the job name and occur in blocks after the parent job (transaction code SM37) as shown in
Figure 25. If more than five pending work items are waiting to be processed, they will queue and automatically release, maintaining the five active child jobs, until all pending work items are processed.

Figure 25
One parent job with its eight child jobs
The GRFN_OWP_JOB_SENDER job checks all changed work items in between the previous job and current job that are in a state of Ready or Started. OWP-enabled work items can be processed online (My Work Inbox) or offline (OWP) at any time. The job detects which work items are eligible to be processed for OWP since the last time the job ran.
To activate OWP functionality, schedule this job per the IMG documentation. The next time planner activity is executed for an OWP-enabled business scenario, it can be performed via OWP.
OWP Process Overview
The OWP process for a completed Control Design Assessment (CDA) is illustrated by the SM37 entries in
Figure 26. Separate IDs are used for outbound and inbound email processing to provide additional clarity for the overall process.
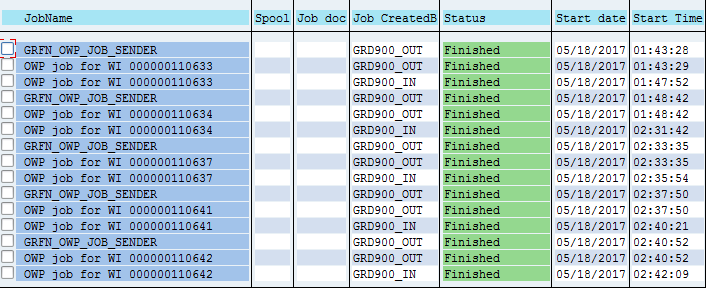
Figure 26
Separate IDs provided for outbound and inbound email processing
Each work item corresponds to a single stage in the overall CDA workflow process as configured in the IMG. The entries in
Figure 26 correspond as follows:
1. 110633: CDA is processed
2. 110634: CDA review is performed
3. 110637: Issue is processed
4. 110641: Remediation plan is processed
5. 110642: Remediation plan reviewed; issue closed
This is a clean, sequential depiction of all individual work items that make-up a completed CDA. Making the same determination in a production system, however, requires a little investigation because there can be many work items in various stages of different workflow processes moving in and out of the system at any given point in time.
End-User Experience
Once the configuration is in place and the OWP process is up and running, what is the end-user experience like? The OWP process greatly simplifies and streamlines the end user’s interaction with the system. End users simply receive an email from the GRC system as shown in
Figure 27.

Figure 27
The end user receives an email with an attachment from the GRC system
The end user opens the email and the attachment as shown in
Figures 28 and
29.
Note
For information on how to customize this email, see the “Useful SAP Notes and Links” section at the end of the article.

Figure 28
System email with the OWP form for a CDA attached
The end user opens the attachment, completes the form, and clicks the Submit button (
Figure 29).
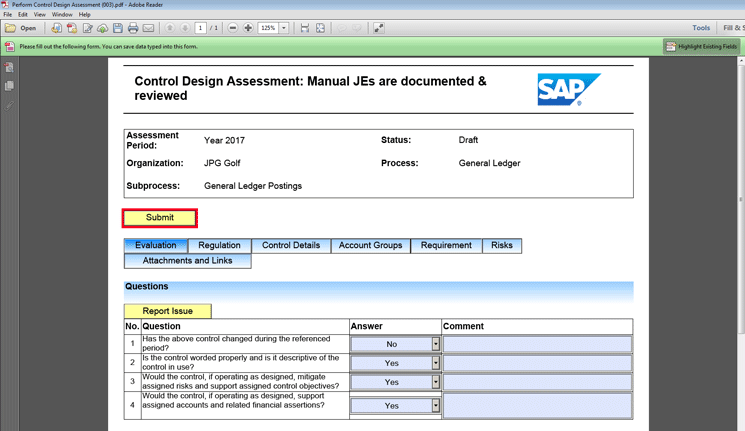
Figure 29
Completed OWP form
An email is automatically created with the completed form attached and it is automatically addressed to the inbound email processing ID defined in step 2. The user then clicks the Send button in
Figure 30 to send the attachment back to the GRC system.
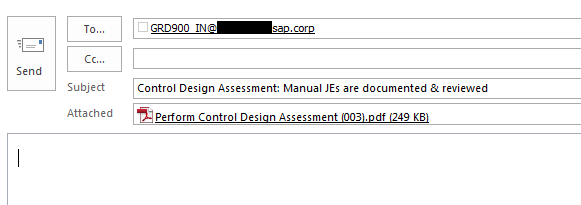
Figure 30
Auto-generated email ready for submission to the GRC system
The content of the Adobe form successfully updates the GRC system and the user receives a confirmation email (optional) as shown in
Figure 31. As far as the system is concerned, there is no difference whether the workflow was performed online or offline.
Note
The confirmation email was introduced in SAP Process Control 10.1 Support Package 14 (SAP Note 2371279).
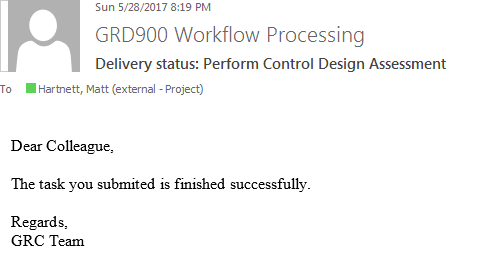
Figure 31
Confirmation email of successful form submission
Troubleshooting Errors
OWP errors can occur with both outbound and inbound processing. The transactions in
Table 8 are helpful for troubleshooting errors.
| Transaction code |
Transaction text |
Purpose |
| SLG1 |
Application Log: Display Logs |
Detailed error information (very useful) |
| ST22 |
ABAP Dump Analysis |
Review unexpected program termination |
| SM37 |
Job Overview |
Review inbound/outbound OWP Job status and logs |
| SOST |
SAPconnect Send Requests |
Review outbound email status |
| SOIN |
BCS: Inbound Send Requests (SMTP) |
Review inbound email status |
Table 8
Transactions useful for troubleshooting errors
Known errors are listed in the next sections. However, the list is by no means comprehensive as new and unanticipated system activity can cause OWP errors. The application log is a great source of information when troubleshooting OWP errors. If a short dump exists, carefully check transaction code ST22 for clues about the failure. When all else fails, enlist the assistance of an SAP support representative to debug the problem.
Outbound Errors
The parent job GRFN_OWP_JOB_SENDER rarely fails. When the child jobs fail, it is usually due to a missing dependency required to generate the Adobe form and email it to end users. Although there can be several possible causes for the failure of a child job, they all usually result in the same ASSERTION FAILED short dump shown in
Figure 32.

Figure 32
OWP Sender job short dump
Use transaction code SOST to determine the status of outbound email as shown in
Figure 33. Red is a hard error, meaning the system did not send the email. Yellow means the email was placed in the outbound queue and the system will send it the next time the SAPCONNECT_ALL_SEND job runs. Green indicates a successful email transmission from the GRC system.

Figure 33
Outbound email queue
Common causes of outbound job failures are listed below in the order of frequency:
1. The email address is not maintained. If the end user’s email address is not maintained in the GRC system, all child jobs associated with pending work items for that user will fail. Once the email address is maintained, the child jobs will successfully complete the next time the GRFN_OWP_JOB_SENDER job runs. A clue for this type of problem is that some child jobs complete from the original block of work items while others fail (
Figure 34). This points to a problem with an individual user or work item.

Figure 34
Individual child job fails until the end user’s email address is maintained
Details within the short dump indicate a problem with the email address (
Figure 35).

Figure 35
Short dump shows an issue with user’s email ID
Note
As of SAP Process Control 10.1 Support Package 16, this behavior has changed. The child job will no longer fail due to an unmaintained email address; an entry will be created in the application log instead, as shown in Figure 24. See SAP Note 2340935.
2. ADS is inaccessible. If there is a problem with the ADS RFC or if the ADS system is down, the parent job will complete, but all child jobs will fail as shown in
Figure 36. If this happens, confirm connectivity to ADS per the “Test ADS” step above. Once ADS is accessible, all child jobs will complete for pending work items the next time GRFN_OWP_JOB_SENDER runs.
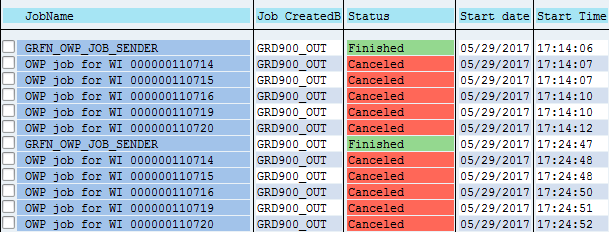
Figure 36
Child job failures when ADS is not accessible
3. There are problems with the outbound email processing ID. The ID executing the GRFN_OWP_JOB_SENDER job must be unlocked, valid, and have the appropriate authorization. If not, the parent job will fail and it will not create any child jobs. When the parent job fails (
Figure 37), check the outbound email processing ID.

Figure 37
OWP parent job failure
4. An 0 KB attachment size was uploaded. There have been instances in which an attachment with a size of 0 KB was uploaded into the GRC system causing child jobs to fail. In both cases, clues to the cause were found in the short dump.
- An attachment with a size of 0 KB was uploaded to the Attachments and Links tab of a local control, which caused the child job to fail the next time it was planned. The solution was to delete the attachment.
- Another attachment with a size of 0 KB was uploaded into the OWP form as an attachment for a work item. The attachment successfully posted to the system on the inbound email. However, it caused the child job to fail when the CDA was sent for review. The solution was to delete the case and workflow, then replan the work item.
Inbound Errors
Transaction code SOIN shows inbound email received by the system. When you troubleshoot problems, the first step is to ensure the system received the email. Each entry in SOIN should be completely populated, including the Internal Recipients field shown in
Figure 38. If Internal Recipients is not populated, there is a problem that prevented the form content from posting. Even if the SOIN entries are fully populated, there can still be other downstream problems that prevent the form content from posting.

Figure 38
Inbound email list
To view the content of Adobe forms submitted to the system, double-click the line item, and then click the attachment link in
Figure 39.
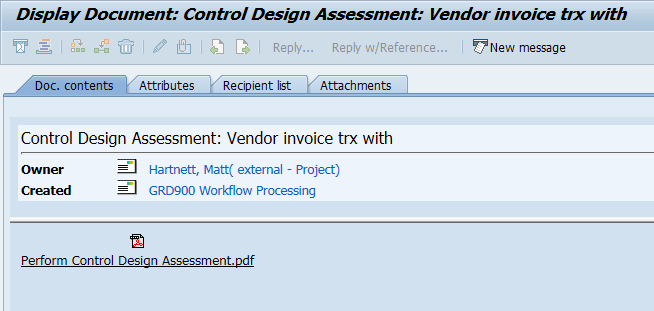
Figure 39
Inbound email received by the GRC system with the OWP form attached
Common causes of inbound email failures are as follows.
1. Problems with the inbound email processing ID include a locked or invalid ID. If the inbound email processing ID is locked or invalid, transaction code SOIN does not record an entry. The end user receives an email with the subject Undelivered Mail Returned to Sender (
Figure 40).
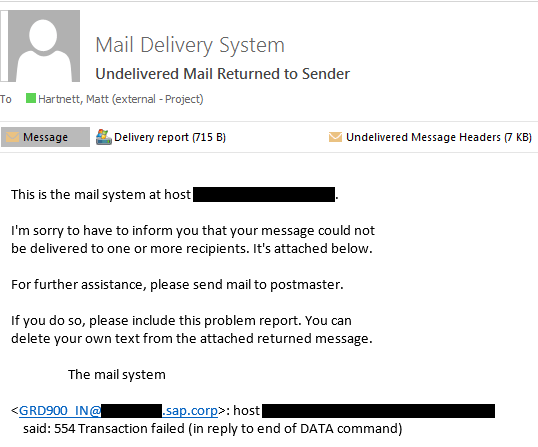
Figure 40
System-generated email for undeliverable email
Another issue with the inbound email processing ID is a security error. If the inbound email processing ID encounters a security error, transaction code SOIN shows an entry for receiving the email, but the Internal Recipients field is blank (
Figure 41). The inbound email background job does not execute, and the form contents will not post to the system.

Figure 41
Security error prevents the OWP form from posting to the system
2. Problems with the end user’s ID include a locked or invalid ID. If the ID of the OWP user is locked or invalid, transaction code SOIN shows a successful entry for receiving the email, but the inbound email processing job fails (
Figure 42). The SM37 log entry for the canceled job indicates there is a problem with the end user’s ID (
Figure 43).

Figure 42
Inbound failure due to a locked or invalid end user ID

Figure 43
SM37 log entry for the inbound failure
The end user’s ID could also have a security error. If the end user’s ID encounters an authorization error, all entries in transaction codes SOIN, SM37, and SLG1 appear successful, but the content of the form will not post to the system.
3. ADS is inaccessible. If ADS is inaccessible, transaction code SOIN shows an entry for receiving the email, but the field for Internal Recipients is blank (
Figure 44). In addition, the content of the form will not post to the system and the inbound email processing job will not execute.

Figure 44
When ADS is down, internal recipients are not identified
Upon further investigation of the application log there is an error message referring to ADS (
Figure 45).
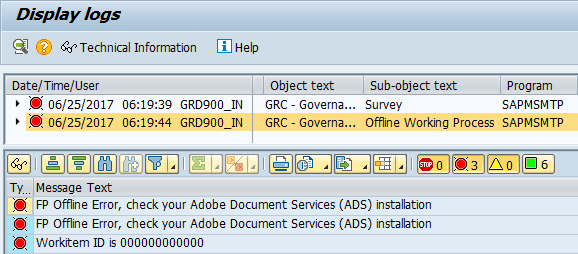
Figure 45
Application log entries identify a problem with ADS
4. There is a form or email problem. Under certain circumstances, transaction codes SOIN, SM37, and SLG1 all show successful entries, but the form will not post to the system. When this happens, look at the inbound email in transaction code SOIN. This type of problem can happen when:
- The end user manually adds an additional attachment to the inbound email.
- The end user manually creates and submits the email to the system instead of using the Submit button in the form. As of SAP Process Control 10.1 Support Package 16, the user receives an automated email response if a manually created email is submitted to the system.
5. The date format does not match. The date format of the OWP end user must match the date format of the ID that generated the Adobe form. If not, the inbound email processing job will fail. The SM37 log for the cancelled job indicates there is a problem with the date format (
Figure 46).

Figure 46
SM37 log entry identifies a problem with the date format
Note
This issue was resolved as of SAP Process Control 10.1 Support Package 16 (SAP Note 546147).
Automated System Messages for Inbound Email Processing
Automated email responses are sent by the system under certain circumstances. Some responses are error messages; others are notifications.
1. The task you submit has already been finished by XXXX (
Figure 47). Your result will be ignored.

Figure 47
A system-generated email that the task is already finished
Cause: Depending on security structure and role assignments, a work item can have more than one potential processor. When the system processes work items online, the Work Inbox is based on a “first-come, first-serve” principle that allows a user to reserve a work item so it’s not accessible to other potential processors. Reserving work items is not possible for OWP because work items are processed offline.
Solution: No action is required.
2. This form should be submitted by the user who has received the original task (
Figure 48).

Figure 48
A system-generated email that the originating user must submit the form
Cause 1: User A forwarded the email to user B for processing. User B submitted the form to the GRC system.
Solution 1: User B sends the email back to user A for submission to the GRC system.
Cause 2: Users can have more than one valid corporate email address. The email address maintained in the GRC system must match the end user’s default corporate email address (the user’s default From address when sending email) or the GRC system will not associate the inbound email with the end user to whom it was sent.
Solution 2: Change the user’s GRC email address to match the default corporate email address.
3. The following error exists in the back end. Please contact your system administrator. Work item XXXXX is not in the users work inbox (
Figure 49).

Figure 49
A system-generated email for submitter when delegated authority is active
Cause: Delegated access is active for the user submitting the Adobe form.
Solution: Log on to the GRC system, undelegate access, and resubmit the form.
4. The following error exists in back end. Please contact your system administrator. Error in inbound handling of PDF form (Figure 50).
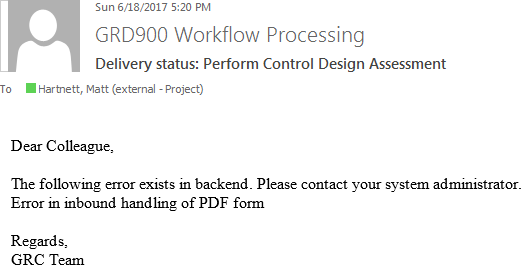
Figure 50
A system-generated email for improper form submission
Cause: The user manually created the email to submit the form instead of using the SUBMIT button in the form.
Solution: Resubmit the form using the SUBMIT button in the form.
Note: This notification was introduced in SAP Process Control 10.1 Support Package 16.
Tips and Tricks
The following tips and tricks are useful when working with OWP.
1. Use separate IDs for outbound and inbound email processing. The use of separate IDs for outbound and inbound email processing is helpful when troubleshooting errors. The direction of the work item is known by looking at the ID associated with the entry.
2. Add the Work Item ID column to your Work Inbox. Go to your Work Inbox, click the settings icon, and add Work Item ID to the displayed columns (
Figure 51). This step is helpful when delegating access and troubleshooting errors.

Figure 51
Process Control Work Inbox with the Work Item ID field
3. Make the email address a required field. The end user’s email address drives the OWP process, so it is critical that it is consistently maintained in the GRC system. By far, the most frequent cause of OWP sender job failure is that end users have a blank email address in the GRC system. To reduce these errors, find a way to make email address maintenance required. Ideally, an automated solution such as Identity Management (IDM) or SAP Access Control will automatically maintain the email address upon user creation. If end-user administration is more of a manual process, consider creating a standard screen variant in transaction code SHD0 to make maintenance of email address fields required. This step ensures that whenever a security administrator maintains the end user’s information in transaction code SU01, email-relevant fields must be maintained as well.
4. Maintain the attachment size limit. Just as attachments are uploaded into work items from My Work Inbox in the GRC system, attachments can also be added to the OWP form; however, the size of the attachment can be limited. Use transaction code SM30 to maintain table view GRFNV_OWPALSIZE to maintain the maximum size limit for OWP attachments (
Figure 52). Attachments over the limit will not be accepted by the Adobe form. The limit should be less than the maximum attachment size allowed by corporate email servers. This step ensures that GRC system-bound emails are not intercepted for exceeding the corporate size limit.

Figure 52
Specify an OWP email attachment size limit
5. Resend Adobe forms to end users. End users sometimes delete or lose the OWP email and need it to be sent again. This can be done either with transaction code SOST or with program GRFN_OWP_SENDER_TEST. Transaction code SOST can be used to resend the original email with the Adobe form as originally generated. Program GRFN_OWP_SENDER_TEST will regenerate the Adobe form and resend the email.
a. Execute transaction code SOST (
Figure 53). Locate the original email and select the line item. Go to Send Request > Repeat Send.

Figure 53
Repeat the sending of the original email
The line item will turn yellow. Select the line item, click the execute icon, and select Start Send Process for Selection (
Figure 54). The original email will send again and the line item will turn green.

Figure 54
Resend the original send request
Execute program GRFN_OWP_SENDER_TEST. Run transaction code SA38 or SE38 and execute program GRFN_OWP_SENDER_TEST (
Figure 55). This program regenerates and resends the Adobe form based on current master data. This is useful in situations in which the control master data has changed since the form was originally sent and those changes are required for the end user to process the work item. It’s also useful if a user has no email address or the wrong email address is maintained in the GRC system. Once the email address is updated, this program can be used to immediately resend the Adobe form to the user without waiting for the GRFN_OWP_JOB_SENDER job to run again.

Figure 55
Resend OWP form for Workitem 110693
6. Limit users who can receive email from the system. The GRC system must be able to send email for the OWP process; however, there is a risk that OWP email from a development or QA system could accidentally be sent to end users, causing confusion or complaints. One way to prevent this from happening is to limit which users can be sent email from the GRC system. This allows select users to fully test the OWP process while preventing accidental mass-email incidents.
Execute transaction code SCOT and follow menu path Business Communication Administration > Settings > SMTP Connection > Outbound Messages > SMTP Nodes. This path takes you the screen shown in
Figure 56. Expand the SMTP folder and double-click the Internet node.
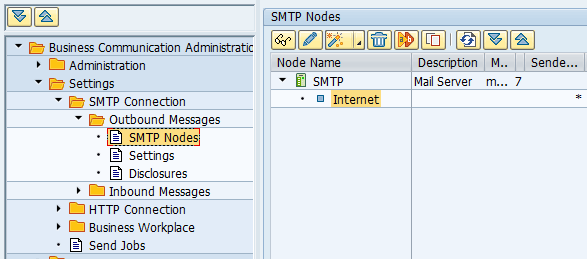
Figure 56
SMTP node navigation for user restrictions
Maintain entries in the Address area for email addresses that are allowed to receive email from the system (
Figure 57). If a user’s email address is not maintained in the list, the system will not send them email. Wildcard values are acceptable. Production systems typically do not limit users who can receive email so * values are used.

Figure 57
Email address list to which the GRC system is allowed to send
Any email the system attempts to send to a user not listed in the Address area will remain in error status until the entry is corrected as shown in Figure 58. To see emails in error status, execute transaction code SOST. Once corrected, emails in error status can be manually resent as described in the “Transaction SOST” section.

Figure 58
Outbound send requests in error status
7. Arrange for ad hoc execution of job GRFN_OWP_JOB_SENDER. The GRFN_OWP_JOB_SENDER job is a recurring job that executes on a regular interval. In the example below, this job is scheduled to run every 10 minutes in the DEV and QA systems. During testing, however, you may want to run the job immediately without having to manually execute it or wait for it to run according to the schedule. There is a way to execute it on an ad hoc basis while leaving the recurring schedule intact.
Execute transaction code SM37. Find the GRFN_OWP_JOB_SENDER in Released status (
Figure 59). Click the check box to select that line item.

Figure 59
GRFN_OWP_JOB_SENDER job in Released status
Click the Job button and then select the Change option as shown in
Figure 60.
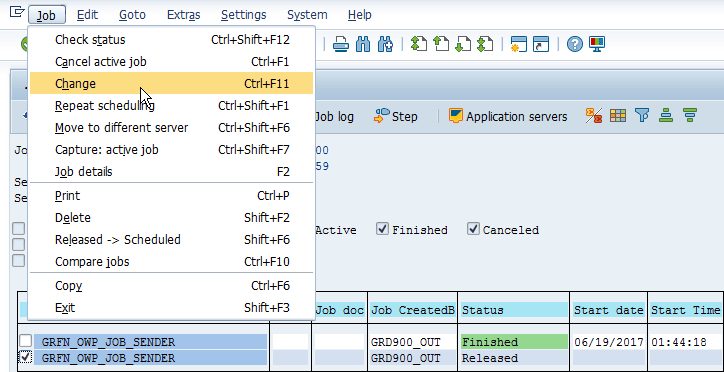
Figure 60
Change the GRFN_OWP_SENDER JOB in Released status
Click the Start condition button in
Figure 61.

Figure 61
Maintain the Start Condition
Click the Immediate button and then click the save icon (
Figure 62).

Figure 62
Execute the job immediately and save your changes
Click the save icon again (
Figure 63).

Figure 63
Save all changes to GRFN_OWP_JOB_SENDER
The job executes immediately and displays the message “Job GRFN_OWP_JOB_SENDER changed” at the bottom of the screen. The schedule remains intact and the job runs again 10 minutes after the last execution. As shown in
Figure 64, the job originally ran at 44 minutes after the hour. It was manually executed at 47 minutes after the hour, and then the recurring job resumed (10 minutes later) at 57 minutes after the hour.

Figure 64
Execution times of GRFN_OWP_JOB_SENDER job before and after change
8. Identify user IDs with missing email addresses. When an OWP job fails due to a missing email address, there is a way to identify the user ID associated with the work item number. This method is most useful prior to SAP Process Control 10.1 Support Package 16 (SAP Note 2340935). To identify the user ID, execute transaction code SE24 (
Figure 65). Enter class name CL_GRFN_PROCESS_UTIL and click the Display button.
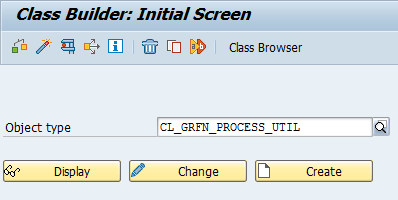
Figure 65
Enter the class name
Select the GET_WF_AGENT method in
Figure 66 and click the test icon.
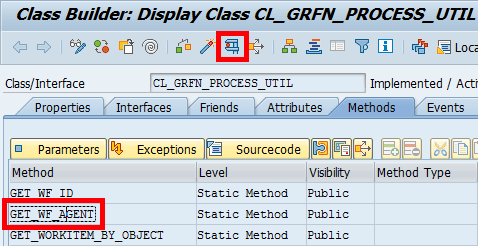
Figure 66
Test the method
Click the execute icon for the GET_WF_AGENT method (
Figure 67).
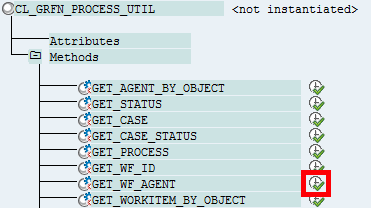
Figure 67
Execute the method
Enter the work item ID (70745) and click the execute icon (
Figure 68).

Figure 68
Enter the Workitem ID
Click the icon for 1 Entry (
Figure 69).
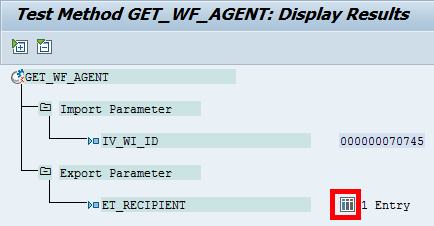
Figure 69
Click the icon to view results
The user ID associated with the failing OWP child job is revealed (
Figure 70).

Figure 70
The user ID for the failing work item is displayed
9. Disable workflow notification email for OWP-enabled work items. Follow IMG menu path Governance, Risk and Compliance > General Settings > Workflow > Workflow Email Notifications > Maintain Workflow Notifications. Part of standard GRC system setup involves activating Business Configuration Sets (BC Sets) for workflow email notification. Once activated, the BC Sets contain default entries for different types of email notifications. When users receive a new work item in their Work Inboxes, the GRC system sends an email notification notifying them about it. This notification typically has a subject of New work items in your Workflow inbox (
Figure 71).

Figure 71
Standard workflow notification email
This notification is unnecessary for work items associated with OWP-enabled business scenarios and it should be disabled. The example used for this entire section is to disable the standard email notification for all work items associated with assessments.
a. Create a Category. Execute transaction code SWNCONFIG. In the screen that appears select the Scenario GRCNOTIFICATION and double-click the Category folder (
Figure 72).

Figure 72
Select Scenario GRCNOTIFICATION, Category NOTIFICATION
Click the copy icon (
Figure 73).
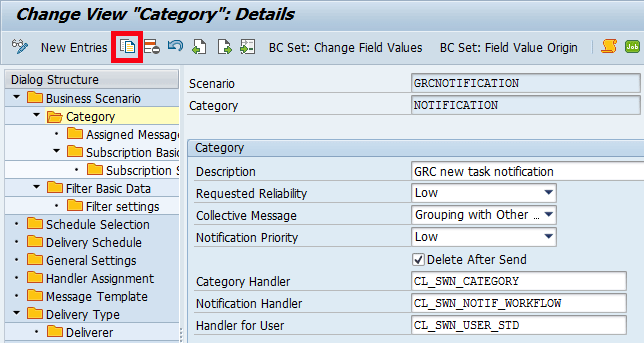
Figure 73
Copy category notification
Change the Category and Description field names and press Enter (
Figure 74).
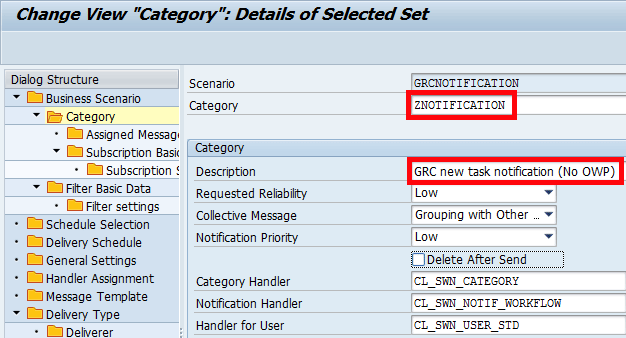
Figure 74
Maintain new Category info
Click the copy all button (
Figure 75).

Figure 75
Copy all dependent Category records
Press Enter three times to copy all dependent entries (
Figure 76).

Figure 76
Copy individual dependent records
Click the green checkmark icon (
Figure 77).
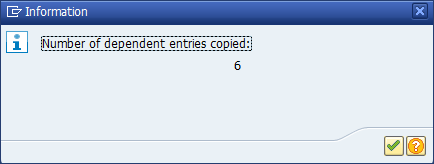
Figure 77
Confirm total records are copied
Click the save icon (
Figure 78).

Save records for new Category ZNOTIFICATION
b. Create a Filter. Select the GRCNOTIFICATION line item and double-click the Filter Basic Data folder (
Figure 79).

Figure 79
Maintain Filter Basic Data
Click the copy icon (
Figure 80).

Figure 80
Copy filter GRCNOTIFYFILTER
Maintain the Filter and Description fields (
Figure 81). In general, the name should be in the customer name space (beginning with a Z or Y) and the description field should be descriptive and meaningful.
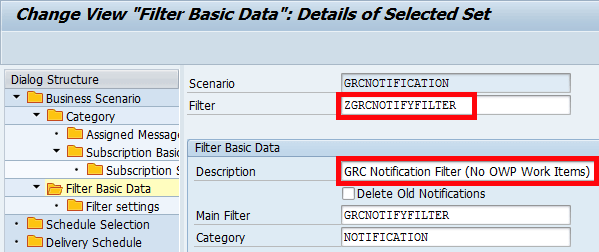
Figure 81
Maintain new Filter information
Press Enter and then click the copy all button (
Figure 82).
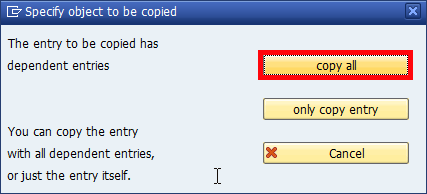
Figure 82
Copy all dependent Filter entries
Click the green checkmark icon (
Figure 83).
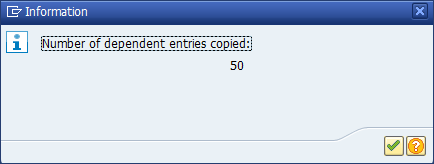
Figure 83
Confirm Total records copied
Click the save icon (
Figure 84).

Figure 84
Save records for the new filter
Change the entries of the Main Filter and Category fields to the entries just created (ZGRCNOTIFYFILTER; ZNOTIFICATION). Click the save icon (
Figure 85).
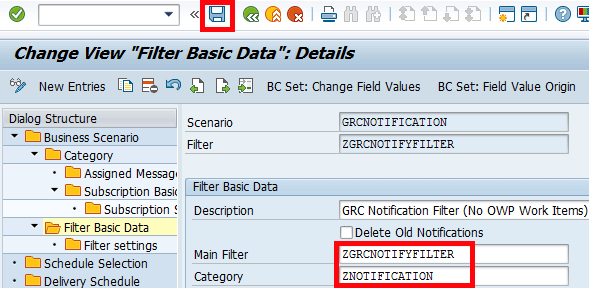
Figure 85
Maintain a new Filter definition
c. Modify Filter Settings. In this example, all workflow tasks associated with assessments, as previously mentioned, will be deactivated for workflow email notification since OWP will be used for assessments. Tasks related to assessments that must be removed from the filter are:
- TS75900006 Start Issue Remediation
- TS75900007 Perform Assessment
- TS75900008 Review Assessment
- TS75900009 Rework Assessment
- TS76307972 Enter Details for Remediation Plan
- TS76307973 Report on Remediation Plan Progress
- TS76307974 Review Remediation Plan Details
- TS76307975 Review and Close Remediation Plan
Select Business Scenario GRCNOTIFICATION. Double-click Filter Basic Data and select the filter that was just created. Double-click the Filter settings folder (
Figure 86).
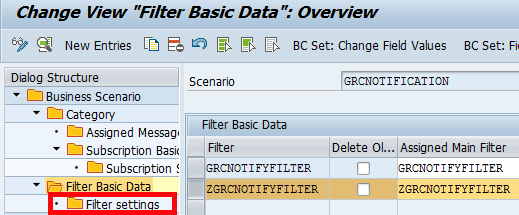
Figure 86
Select a custom filter
Select all the entries to be removed. Click the delete icon. Click the save Icon (
Figure 87).

Figure 87
Remove tasks
d. Maintain Schedule Selection. Double-click the Schedule Selection folder. Change the name of the filter for Scenario GRCNOTIFICATION to the filter just created (ZGRCNOTIFYFILTER). Click the save icon (
Figure 88).

Figure 88
Modify the schedule selection to use the new filter
The next time the workflow notification job runs, email notifications for all assessment-related tasks will not be sent.
Useful SAP Notes and Links
For more information check these SAP Notes:
- 455140 - Configuration of e-mail, fax, paging/SMS via SMTP
- 546147 - SMTP plug-in: MS Exchange sends only to port 25
- 894009 - Adobe Document Services Configuration Guide [SAP NW 7.0]
- 944221 - Troubleshooting if problems occur in forms processing
- 750784 - SAP Interactive Forms: Licenses
- 1633989 - Technical user guide for OWP
- 1866809 - OWP job for WI failing and ST22 Assertion Failed dump
- 2085529 - OWP ASSERTION_FAILED Master Note
- 2210385 - Consolidated Note for Process Control 10.1 – OWP
- 2371279 - Confirmation email for Disc Survey
- 2028284 - Multiple emails generated for same work item
- 2340935 - ST22 dump for sending notification email via GRFN_OWP_SENDER - user id, email id not in system
For more information check these links:
