Learn how to integrate SAP Revenue Accounting and Reporting 1.2 with Convergent Invoicing of SAP Hybris Billing and SAP Contract Accounts Receivable and Payable (FI-CA) in SAP ERP Central Component (ECC).
Key Concept
SAP Revenue Accounting and Reporting is a free add-on product introduced to help companies comply with the International Financial Reporting Standards (IFRS) 15 regulation. The effective date of this new regulation for public companies is January 1, 2018, whereas the effective date of this new regulation for private companies is from 2019. SAP Revenue Accounting and Reporting heavily depends on Business Rule Framework Plus (BRFplus) applications.
SAP Hybris Billing and SAP Revenue Accounting and Reporting integration within SAP ERP helps to efficiently recognize the revenue (received from the SAP Hybris Billing solution) in SAP Revenue Accounting and Reporting to comply with the International Financial Reporting Standards (IFRS) 15 regulation.
Note
At the time of the writing of this article, there are no significant changes with respect to the SAP S/4HANA system as SAP Revenue Accounting and Recognition has its own table set up for organizations to use to meet IFRS 15 standards. To see key settings in SAP Revenue Accounting and Reporting 1.2, review the
Financials Expert article titled “
How to Comply with IFRS 15 Regulations Using SAP Revenue Accounting and Reporting 1.2.”
To configure the SAP Hybris Billing–SAP Revenue Accounting and Reporting solution, carry out the following customization steps in sequence in the SAP ERP Central Component (ECC) 6.0 system:
1. Activate business functions
2. Maintain the following key settings in CI and FI-CA:
- Maintain billable item classes
- Generate interfaces for billable item classes
- Define service types
- Assign service IDs to service types
- Activate integration with Revenue Accounting
- Define the Remote Function Call (RFC) destination of the receiving system
- Activate provider contract items for Revenue Accounting
- Define main transactions and subtransactions
- Define main transactions and subtransactions for items with Product Account Assignment
3. Maintain the following key settings in SAP Revenue Accounting and Reporting:
- Set up user roles and authorizations
- Set up revenue accounting items (RAIs) and RAI management
- Set up revenue accounting contracts
- Integrate cost object controlling with SAP Revenue Accounting and Reporting
- Set up revenue accounting postings
- Set up the Business Rule Framework Plus (BRFplus) application
I now walk you through the processes to complete for each of these three steps.
1. Activate Business Functions
To activate business functions, which are necessary to integrate SAP Hybris Billing and SAP Revenue Accounting and Reporting, execute transaction code SFW5. In the initial screen that the system opens (not shown), click the Continue button. For my example, I use a scenario for the telecommunciation industry, so expand the Telco (telecommunications application) node and activate the business functions shown in Figure 1.

Figure 1
Business functions for integrating SAP Hybris Billing and SAP Revenue Accounting and Reporting
You find the Revenue Accounting node under Contract Accounts Receivable and Payable node. Follow IMG menu path Financial Accounting (New) > Contract Accounts Receivable and Payable > Integration > Revenue Accounting to validate this information.
2. Maintain Key Settings in CI an FI-CA
Now I walk you through the steps to maintain key settings in SAP Contract Accounts Receivable and Payable (FI-CA), starting with billable item classes.
Maintain Billable Item Classes
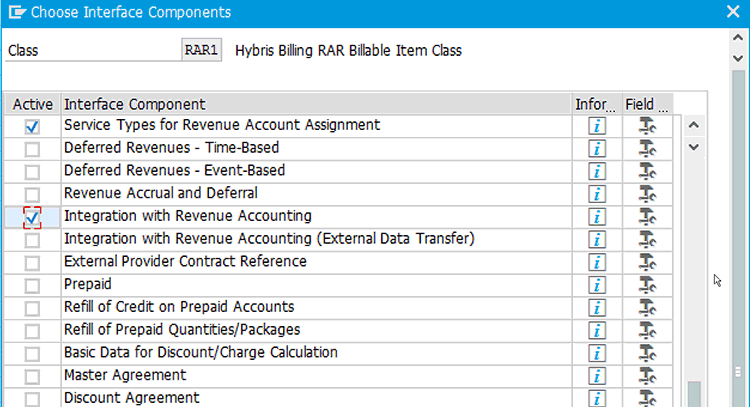
In this configuration step, you add additional interface components in your billable item class that are required for integrating with Revenue Accounting. For example, add the interface component Integration with Revenue Accounting to provide additional fields that you can use to transfer required data to SAP Revenue Accounting and Reporting.
Note
You have already activated billable item classes for your existing SAP Hybris billing scenario, and this SAP Hybris billing setup works correctly in your existing landscape.
Follow IMG menu path Financial Accounting (New) > Contract Accounts Receivable and Payable > Convergent Invoicing > Basic Functions > Billable Items > Billable Item Classes > Maintain Billable Item Classes. Select your billable item classes of usage, recurring, and one-shot charges (for example, RAR 1 – Hybris Billing RAR Billable Item Class) and click the Interface button. This action takes you to the screen in Figure 2. Select the Service Types for Revenue Account Assignment and Integration with Revenue Accounting interface components. Click the enter icon  . Now click the activate icon
  and save icon to save your entries. Your billable item classes are active now.

Figure 2
Add SAP Revenue Accounting and Reporting relevant interfaces to billable item classes
Generate Interfaces for Billable Item Classes
In this configuration step, you generate interfaces for your billable item class that help to transfer billables items that are also relevant for Revenue Accounting. Follow IMG menu path Financial Accounting (New) > Contract Accounts Receivable and Payable > Convergent Invoicing > Basic Functions> Billable Items > Billable Item Classes > Generate Interfaces for Billable Item Classes. This path takes you to the screen in Figure 3. Select your billable item classes of usage, recurring, and one-shot charges and click the Generate button. The system then generates the interface for your billable item class. Click the save icon.

Figure 3
Generate interfaces for billable item classes
Define Service Types
In this configuration step, you configure various service types (for example, One-Off Charge, SMS Usage Charge, and SMS recurring charges) and correspondingly select the check box of One-Item Charge or Fulfillment Item Or Invoice Items. You configure the service type in such a way that the system creates RAIs for the corresponding service type.
Follow IMG menu path Financial Accounting (New) > Contract Accounts Receivable and Payable > Integration > Revenue Accounting > Define Service Types. This path takes you to the screen shown in Figure 4. Click the New Entries button. Enter the Service Type (for example, VOIU) and enter the Service Type Text as Voice Usage Charge. Select the check boxes for Order Item, Fulfill. Item, and Invoice Item. Click the save icon to save your entries. Repeat the steps for the remaining service types.

Figure 4
Define service types
Note
If you flagged the Order Item and One-Time Charge check boxes for your service type, then the system creates order items for revenue accounting. Similarly, if you flagged the fulfillment and Invoice Item check boxes for your service type, then the system creates a fulfillment item and invoice item for revenue accounting.
Assign Service IDs to Service Types
In this configuration step, you derive service types in ECC from the service IDs of SAP CRM. In SAP CRM, a service ID is used and service types are not available. By doing this configuration, you derive the service types of the provider contract that originates from SAP CRM and replicates in SAP ERP. Follow IMG menu path Financial Accounting (New) > Contract Accounts Receivable and Payable > Integration > Revenue Accounting > Assign Service IDs to Service Types. This path takes you to the screen shown in Figure 5.

Figure 5
Service IDs and service types configuration
Click the New Entries button. Enter the following items and click the save icon to save your entries:
- Service ID: for example, VOI_SID
- Service Type: for example, VOIU
- Service Type Text: for example, Voice Usage charge
Activate Integration with Revenue Accounting
In the next step, you activate the integration with Revenue Accounting. Here, you enter the following:
- RA Active: Check the RA Active check box. Selecting this check box enables the RFC destination of the system in which Revenue Accounting is running.
- SSP Condition Type: Enter the default condition type that the system uses for default conditions of order items for the Standalone Selling Price (SSP).
- Transaction Price Condition Type: Enter the default condition type that the system uses for default conditions of order items for the transaction price.
- Service Type for Recurring Charges: Enter the default condition type that the system uses for default conditions of order items for recurring charges.
Follow IMG menu path Financial Accounting (New) > Contract Accounts Receivable and Payable > Integration > Revenue Accounting > Activate Integration with Revenue Accounting. This path takes you to the screen shown in Figure 6. Click the RA Active check box. Enter SSP Condition Type (for example, order item SSP). Enter the Transaction Price Condition Type (for example, order item PR00) and enter the service type (for example, BASC). Click the save icon to save your entries.

Figure 6
Activate Revenue Accounting for the FI-CA application
Define the RFC Destination of the Receiving System
In this step, you enter logical destination of the receiving system (revenue accounting system). Follow IMG menu path Financial Accounting (New) > Contract Accounts Receivable and Payable > Integration > Revenue Accounting > Define the RFC Destination of the Receiving System. Click the execute icon beside the Define the RFC Destination of the Receiving System node to display the screen in Figure 7. In the Destination field, enter the RFC destination and then click the save icon to save your entry.

Figure 7
Define RFC destination
Activate Provider Contract Items for Revenue Accounting
In the next step, you define the derivation of the Revenue Accounting Relevant indicator of the provider contract item. Follow IMG menu path Financial Accounting (New) > Contract Accounts Receivable and Payable > Integration-> Revenue Accounting > Activate Provider Contract Items for Revenue Accounting. This path takes you to the screen shown in Figure 8. In this step, you enter an X in the Rev. Acctg Relevant (Revenue Accounting relevant) check box. Click the save icon to save your entries.

Figure 8
Activate the Rev. Acctg Relevant check box
Define Main Transactions and Subtransactions
In this configuration step, you define the derivation of main transactions and subtransactions of billable items. Follow IMG menu path Financial Accounting (New) > Contract Accounts Receivable and Payable > Convergent Invoicing > Basic Functions > Billable Items > Billable Item Transfer > Account Assignment Derivation > Define Main Transactions and Subtransactions. This path takes you to the screen in Figure 9. Click the create icon or select your existing billable item type and assign the service type against your billable item type (for example, APT1). Click the save icon to save your entries.

Figure 9
Billable items and service type configuration
Define Main and Subtransactions for Items with Product Account Assignment
In this configuration step, you define the derivation of main transactions and subtransactions of billable items along with account assignment to your product. Follow IMG menu path Financial Accounting (New) > Contract Accounts Receivable and Payable > Convergent Invoicing > Basic Functions> Billable Items > Billable Item Transfer > Account Assignment Derivation > Define Main and Subtransactions for Items with Product Account Assignment. This path takes you to the screen in Figure 10. Click the new icon or select your existing Billable Item Type and assign the service type against your Billable Item Type (for example, APT1). Click the save icon to save your entries.

Figure 10
Billable items with account assignment type configuration
3. Maintain Key Settings in SAP Revenue Accounting and Reporting
Now I explain how to maintain key settings in SAP Revenue Accounting and Reporting.
Step 1. Set up RAIs and RAI management. You need to follow step 2 of “How to Comply with IFRS 15 Regulations Using SAP Revenue Accounting and Reporting 1.2” with the use of the standard RAI classes (CA01/02/03) shown in Table 1 or create a new RAI class for the FI-CA component. CA01 is the standard order revenue accounting item class for the FI-CA application. Similarly, CA02 and CA03 are fulfillment and invoice revenue accounting item classes for FI-CA.
RAI class
|
Maintain RAI classes for SD application
|
Maintain RAI classes for FI-CA application
|
Order RAI
|
SD01
|
CA01
|
Fulfillment RAI
|
SD02
|
CA02
|
Invoice RAI
|
SD03
|
CA03
|
Table 1
RAI classes for SD and FI-CA applications
After you follow steps 1–6 in “How to Comply with IFRS 15 Regulations Using SAP Revenue Accounting and Reporting 1.2” and step 1 above, Figures 11 and 12 show all your active RAI classes and corresponding interfaces for SAP Hybris Billing-SAP Revenue Accounting and Reporting integration.

Figure 11
Active FI-CA RAI classes

Figure 12
Active interfaces of FI-CA RAI classes
You need to configure the Sender Component. Follow IMG menu path SAP Customizing Implementation Guide > Financial Accounting (New) > Revenue Accounting > Inbound Processing > Revenue Accounting Item Management> Define Sender Components. The next screen (Figure 13) shows this customization. This step is required to maintain the sender component first and then assign it to the logical system. Note that the assigned source item types (for example, CAOI - CA Provider Contract Item) are automatically populated. No additional customization is needed.

Figure 13
Logical System Assignment for the FI-CA application
To complete this step select CA in the Sender Comp. (sender component) field and click the Assigned Logical Systems Folder. Click the New Entries button and then in the Assigned Logical Systems section, enter data in the fields under the following columns:
- SourceSys. (source system): For my example enter ECCCLNT200
- RFC Destination of Sender: For my example enter phlhdr08_SH4_04
Click the save icon to save your data.
You need to make sure that you have received the correct main items (Order, Fulfillment, and Invoice) with an error-free status and condition items for your sender component CA for FI-CA (Financial Contract Accounts Receivable and Payable) application. For example, the next screen (Figure 14) shows all your error-free main items for the SAP Hybris Billing-SAP Revenue Accounting and Reporting integration solution.

Figure 14
Main items in Revenue Accounting and Reporting
Note
The items shown in
Figure 14 are categorized according to the source item types.
For example, CAOI - CA Provider Contract Item is used in my scenario.
In the standard SAP system, you have the following source item types:
- CAFI: CA Fulfillment Item
- CAII: CA Invoice Item
- CAOI: CA Provider Contract Item
- CAOO CA: One-Off Charge
- CAOX CA: External Order Item
Therefore, the items displayed in
Figure 14 always belong to the above Source Item Types for the SAP Hybris Billing-SAP Revenue Accounting and Reporting integration solution.
BRFplus application: The FARR_AP_CA_PROCESS_TEMPLATE for RAI classes is used for the integration with Contract Accounts Receivable and Payble (FI-CA). Assign a copy version of the BRFplus application: FARR_AP_CA_PROCESS_TEMPLATE for your newly created RAI class. Follow IMG menu path SAP Customizing Implementation Guide > Financial Accounting (New) > Revenue Accounting > Inbound Processing > Revenue Accounting Item Management > Assign BRFplus Applications to Revenue Accounting Item Classes. The next screen (Figure 15) shows this configuration, which is required for the SAP Hybris Billing-SAP Revenue Accounting and Reporting integration solution. Refer to step 6 of the Financials Expert article “How to Comply with IFRS 15 Regulations Using SAP Revenue Accounting and Reporting 1.2” for more details.

Figure 15
Assignment of the BRFplus application to RAI class CA01 (for the FI-CA application)
You need to assign FARR_S_CA01_BRF BRFplus Context Structure to your newly created RAI class. The above context strcuture is used for your copy version of BRFplus application: FARR_AP_CA_PROCESS_TEMPLATE. Follow IMG menu path SAP Customizing Implementation Guide > Financial Accounting (New) > Revenue Accounting > Inbound Processing > Revenue Accounting Item Management> Maintain BRFplus Structure. The next screen (Figure 16) shows this configuration, which is required for the SAP Hybris Billing-SAP Revenue Accounting and Reporting integration solution.

Figure 16
Assignment of the BRFplus function structure to RAI class CA01 (for the FI-CA application)
In the next configuration activity, you define a decision table ID for a decision table to your BRFplus application (ZFARR_AP_CA_PROCESS: copy version of FARR_AP_CA_PROCESS_TEMPLATE). Follow IMG menu path SAP Customizing Implementation Guide > Financial Accounting (New) > Revenue Accounting > Inbound Processing > Revenue Accounting Item Management > Maintain Decision Table ID for Simplified BRFplus UI. The next screen (Figure 17) shows this configuration, which is required for the SAP Hybris Billing-SAP Revenue Accounting and Reporting integration solution.

Figure 17
Decision Table ID configuration (for FI-CA application)
Step 2. Set up the BRFplus application. You need to set up BRFplus as per step 6 of the Financials Expert article “How to Comply with IFRS 15 Regulations Using SAP Revenue Accounting and Reporting 1.2.” You need to use a copy of the BRFplus application: FARR_AP_CA_PROCESS_TEMPLATE as described in this article.
During configuration of decision tables, you need to consider the service type (as described in the “Define Service Types” section). For example, when you are configuring your decision table: DT_PROCESS_POB, you need to enter a service type (Figure 18).

Figure 18
Decision table: DT_PROCESS_POB (for an FI-CA component)
Santosh Kumar
Santosh Kumar is an SAP-certified professional with nine years of consulting experience in SAP Financial Accounting and Controlling (FI-CO). He has thorough knowledge in the integration of sales and distribution (SD), FI-CO, SAP Contract Accounts Receivable and Payable (FI-CA), SAP Hybris Billing and SAP Revenue Accounting and Reporting. Santosh has worked in projects for industries such as high-tech, pharmaceuticals, telecommunications, retail (IS-R), and oil and gas. He works as a support engineer in the SAP Max Attention Team (SAP AGS) at SAP North America.
You may contact the author at skcatch@gmail.com.
If you have comments about this article or publication, or would like to submit an article idea, please contact the editor.


