Learn how to enhance SAP Financial Closing Cockpit task information to leverage and strengthen this tool to store additional information. If this information is captured in manual applications, such as Excel, or left to user memory or understanding, your period-end closing could be disrupted by errors.
Key Concept
The SAP Financial Closing Cockpit is a standard SAP tool to monitor and control the entire period-end closing cycle.
Figure 1

Figure 1
Standard SAP fields for the SAP Financial Closing Cockpit Monitor
The task lists may contain hundreds of steps in the form of tasks. Sometimes the characteristics given by SAP for a task are not sufficient. For example, a task list contains multiple entities and has tasks that are applicable globally or are particular to specific company code, but there is no place provided in task definition to store such information. An example of a global task is group actual costing at the global level. Examples of local tasks are revaluating for local books or executing country-specific tax reports. I walk you through a step-by-step procedure on how you can include such information in task definition and thus effectively control your period-end close using such critical aspects of the tasks. I include two examples:
- Showing the organization applicability information for the task. This scenario is needed when multiple entities are sharing the same template, but not all steps apply to all entities. In this scenario you can identify which steps apply to which entities.
- Showing the responsible party information for the task. This scenario would be needed when multiple parties are involved in your period-end closing process such as end users, a support team, and outsourcing partners. In this scenario, the outsourcing partner executes the process, the support team handles any issues in process, and end users verify and sign off on the execution results. SAP gives an option to enter only the user ID of the processor or person responsible. However, for the support team or outsourcing partner, the exact user might be changed rotationally and thus there should be some feature to mention the party responsible for the task instead of a particular user. Using this scenario you can identify which step is under which party’s responsibility. If a period-end close step is under a different responsibility, then the step is broken down to minute-level tasks so that each task can be assigned to the corresponding responsible party.
I have divided this article into the following sections:
- Technical prerequisite settings for enabling new fields addition
- Create a custom-developed table to store additional information for tasks
- Extend table CI_ADD_DISP_FIELDS to have new fields for the task
- Implement a Business Add-In (BAdI)
- Maintain a custom-developed table to store additional information for the various tasks
- Change the layout in the SAP Financial Closing Cockpit monitor to show these new fields
Technical Prerequisite Settings for Enabling New Fields Addition
Before you add new columns (fields) in the task information display, there are some technical prerequisites. With SAP ERP Central Component (ECC) 6.0 enhancement package 6.0 and higher, those technical settings are already in the system. Therefore, if your system has ECC 6.0 with enhancement package 6.0 or higher or if you are in the add-in environment, you can proceed to the next section.
From ECC 6.0 enhancement package 3.0 to ECC 6.0 enhancement package 5.0, you need to follow only these three steps out of the steps provided in SAP Note 1534751 (https://service.sap.com/sap/support/notes/1534751):
- Execute transaction code SE11 to copy the structure TFC_PATH_ITEM to the new structure TFC_PATH_ITEM_TMP.
- Use transaction code SE11 to enhance the structure TFC_PATH_ITEM by creating the customer include CI_ADD_DISP_FIELDS.
- Implement (manually or via automatic import from transaction code SNOTE) the source code that is contained in the correction instructions of this note. If errors occur during the activation, first activate the enhancement spot ENHS TFC_ADD_DISP_FIELDS, then the BAdI interface INTF IF_ADD_DISPLAY_FIELDS, and then all the other objects.
Create a Custom-Developed Table to Store Additional Information for Tasks
As I discussed earlier, I use two scenarios:
- Showing the organization applicability information for the task
- Showing the responsible party information for the task
For these two scenarios, you need to first create a custom-developed table to store the following information (You can also create separate tables for each scenario, if relevant):
- Template Name
- Task Description
- Organization Applicability
- Responsible Party
Follow these steps to create this new custom-developed table as an example. Execute transaction code SE11 or follow menu path SAP Easy Access Menu > Tools > ABAP Workbench > Development > SE11 - ABAP Dictionary. In this transaction, enter the custom-developed table name (e.g. ZCLOCO_ADD_FIELDS) and click the Create button (
Figure 2).

Figure 2
Create a custom-developed table
In Figure 3, enter a short description for this table and maintain delivery class as A (Application table). Click the Fields tab to maintain various fields. These settings should be done in the development system and then should be transported to various systems, such as quality, integration, and production.

Figure 3
Define a table as an application table with changes allowed
In the Fields tab enter the details for the new columns to be added for task information in the SAP Financial Closing Cockpit (
Figure 4). Also mark the Template Name and Task Description as primary keys so that each task has corresponding additional information.

Figure 4
Enter various fields in the table definition
In Figure 4, the field ORG_APPLICABILITY represents the applicability of a task from a global or local perspective (for example, whether a step is applicable to all company codes or to specific company codes). The field PARTY_RESPONSIBLE represents the party who performs the task (for example, an automatic payment program (APP) is executed by an outsourcing partner, so the APP task is linked to the party responsible and then the actual person from the outsourcing partner can be mapped in a standard SAP field person responsible/processor in the task definition).
Click the Technical Settings button as shown in Figure 4. In the next screen (Figure 5), enter the technical details in the fields under the Logical storage parameters section (e.g., Data class and Size category). You can also select the Log data changes check box if you want to record any addition, change, or deletion by various users in this table.

Figure 5
Enter technical settings for the table definition
Now go back to the main screen by clicking the back button and click the save icon (
Figure 6). Your new custom-developed table shows the status as saved.

Figure 6
Save the custom-developed table
Click the activate icon (Figure 7). Your new custom-developed table is active and ready for use.

Figure 7
Activate the custom-developed table
Now from the menu bar of the next screen (not shown), select Utilities > Table Maintenance Generator
. This action opens a new screen in which you populate the Function group and Maint. Screen No. fields (
Figure 8). Click the create icon.

Figure 8
Table maintenance screen settings
Click the save icon to save the changes (Figure 9). Your table maintenance is generated.

Figure 9
Save the table maintenance screen definition
Extend Table CI_ADD_DISP_FIELDS to Have New Fields for the Task
In the ABAP Dictionary initial screen (Figure 10), enter the include name as TFC_PATH_ITEM and click the display button. In this step you add the same two additional fields that you included in the custom table definition (Figure 7). Therefore, after you maintain the custom table with values for these new fields, the SAP system displays these new fields in the SAP Financial Closing Cockpit monitor via this enhanced structure (TFC_PATH_ITEM).

Figure 10
Display the table TFC_PATH_ITEM
In the next screen (Figure 11), double-click the include CI_ADD_DISP_FIELDS. This action creates a placeholder that you can extend according to your requirements.

Figure 11
Select include CI_ADD_DISP_FIELDS
A pop-up screen appears asking you to confirm the creation of this include structure (Figure 12). Click the Yes button.

Figure 12
Confirm the creation of structure CI_ADD_DISP_FIELDS
In the next screen (
Figure 13), enter a short description for this include and then enter details for the new fields just as you did for the custom-developed table (
Figure 3).

Figure 13
Add new fields in structure CI_ADD_DISP_FIELDS
To save your data, click the save icon (
Figure 14). Note that this structure now shows a status as saved.

Figure 14
Save the structure CI_ADD_DISP_FIELDS
Click the activate button shown in Figure 15. This structure is now active and ready for use.

Figure 15
Activate the structure CI_ADD_DISP_FIELDS
Implement a BAdI
After you have made the custom-developed table and have enhanced the standard include, you need to implement a BAdI to build the logic for filling these new fields. To complete this step, execute transaction code SE19 or follow menu path Tools > ABAP Workbench > Utilities > Business Add-Ins > SE19 - Implementation. This action opens the screen as shown in Figure 16. Enter the BAdI name as TFC_ADD_DISP_FIELDS and click the Create Impl. (Create implementation) button.

Figure 16
Create an implementation for enhancement spot TFC_ADD_DISP_FIELDS
Note
SAP does not provide a sample implementation for creating the BAdI. Therefore, you need to create it from scratch.
In the next screen (Figure 17) enter a name in the Enhancement Implementation field (e.g., ZCLOCO_ADD_FIELDS) for the custom implementation name and a short description in the Short Text field. After you enter data in these fields, click the enter icon (the green check mark).

Figure 17
Define a name of new implementation of enhancement spot
A new screen opens (Figure 18) in which you enter a name from the customer namespace for BAdI Implementation and Implementation Class. You also elect a BAdI definition as ADD_DISPLAY_FIELDS. When you finish entering your data, click the green check mark icon.

Figure 18
Define further details for a new implementation of the enhancement spot
In the next screen, expand the left side of the menu and double-click Implementing Class as shown in Figure 19. The implementation class derives the method characteristics (Parameters, exceptions etc.) from the SAP standard BAdI.

Figure 19
Select the implementation class for the new enhancement implementation
Double-click the method IF_ADD_DISPLAY_FIELDS~SET_ADD_DISP_FIELDS as shown in Figure 20.

Figure 20
Select a method for the new implementation class
A pop-up screen appears asking you if you want to create an implementation for the interface method (Figure 21). Click the Yes button.

Figure 21
Confirm that you want to create an implementation for the method interface
Now you paste the code logic for selecting the organization applicability and party responsible from the custom-developed table ZCLOCO_ADD_FIELD in the Class Builder screen. Figure 22 shows this code logic.

Figure 22
Logic definition inside the BAdI
Note
In the logic shown in Figure 22, you are:
- Fetching the name of the tasklist from the title of the screen.
- Based on the tasklist name and task description, fetching the organizational applicability from the custom developed table ZCLOCO_ADD_FIELD and passing this to structure CS_PATH_ITEM which is used by SAP to show the task information in the SAP Financial Closing Cockpit monitor.
- Based on the tasklist name and task description, fetching the party responsible from the custom-developed table ZCLOCO_ADD_FIELD and passing this to structure CS_PATH_ITEM, which is used by SAP to show the task information in the SAP Financial Closing Cockpit monitor.
After you define the logic, click the save icon and then the activate icon as shown in
Figure 23.

Figure 23
Activate the BAdI Implementation
Maintain the Custom-Developed Table to Store Additional Information for the Various Tasks
You have done the technical changes, such as enabling new fields and implementing a BAdI. Now it is time for you to maintain this custom-developed table to store the additional information for organizational applicability and the party responsible. This maintenance might be common whenever you have some changes, such as new steps, deletion of steps, or changes in information (e.g., change in party responsible).
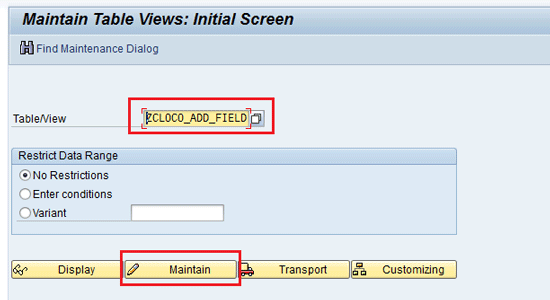
To maintain the entries in this table, execute transaction code SM30. In the Maintain Table Views initial screen enter the name of the custom-developed table name (e.g., ZCLOCO_ADD_FIELD) in the Table/View field (
Figure 24).

Figure 24
Maintain the custom-developed table
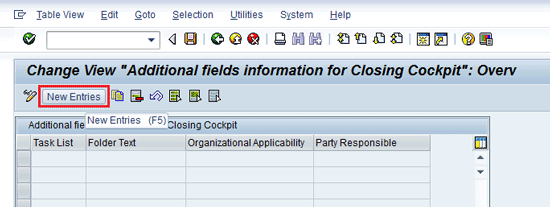
In the next screen (
Figure 25), click the New Entries button.

Figure 25
New entries for the custom-developed table
This action opens a new screen in which you maintain the organizational applicability and party responsible for various tasks (Figure 26).

Figure 26
Enter records for additional information for tasks
To save your entries in this custom-developed table, click the save icon as shown in Figure 27.

Figure 27
Save the entries in the custom-developed table
Change the Layout in the SAP Financial Closing Cockpit Monitor to Show These New Fields
By default, the new fields added do not appear in the SAP Financial Closing Cockpit monitor. To change the layout to include these new fields in the SAP Closing Cockpit monitor display, execute transaction code CLOCO. In the screen that appears, double-click your task list as shown in Figure 28 (In the same way, you can also select the template after executing transaction code CLOCO).

Figure 28
Select the task list from the SAP Financial Closing Cockpit
This action opens a screen that shows the details of the various tasks in the monitor (Figure 29). Select the Change Layout option.

Figure 29
Select the Change Layout option in the SAP Financial Closing Cockpit
In the new screen that appears (Figure 30), select the new fields (e.g., Organizational Applicability and Party Responsible) and click the icon shown in the middle of Figure 30 to move them to the Displayed Columns section. Click the save icon.

Figure 30
Include fields in the layout for the SAP Financial Closing Cockpit
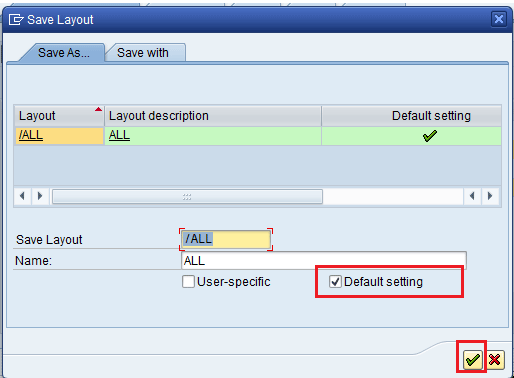
In the next screen (Figure 31) click the Default setting box to save the layout as default settings. Now click the green check mark icon.

Figure 31
Save the changed layout for the SAP Financial Closing Cockpit
This action opens a screen in which you see that the new fields appear in the output (Figure 32). Note also that the values are automatically fetched based on the entries maintained in the custom-developed table.

Figure 32
The new fields added in the SAP Financial Closing Cockpit
The same information is automatically fetched even for all task lists of the template for which the entries are maintained in the custom-developed table, making maintenance easy. You can also perform standard SAP ALV features on these new columns, such as sorting and filtering. These new fields do not appear in the single task details. They appear only in the ALV list view.
Gaurav Agarwal
Gaurav Aggarwal is SAP S/4HANA lead consultant at Infosys Limited. He has more than 14 years of experience, including 11 years in SAP Finance. He has expertise in both SAP FI and Controlling (CO) with integration to other modules in manufacturing and process industries. He is a chartered accountant and SAP Certified Financial Consultant. He holds a bachelor’s degree in commerce and is a techno-functional expert with thorough knowledge of the necessary ABAP for functional experts. He is a veteran in G/L, AR, AP, banking, FA, Travel Management, and closing cockpit and has handled greenfield implementation, upgrades and conversions, rollouts, and support projects.
You may contact the author at
gka2707@gmail.com.
If you have comments about this article or publication, or would like to submit an article idea, please contact the
editor.


