Financials/HR
Learn how to make some improvements in the SAP Travel Management application in the Web Dynpro-based Employee Self Service (ESS) portal. You can enhance the settings and make them more personalized.
Key Concept
POWL_QUERY and SM30 are transaction codes that are used to customize settings (explained in this article) in the SAP Employee Self Service (ESS) portal.
Travel management is a key business process in which employees can submit and claim their expenses incurred for a business purpose. In today’s world, the Employee Self Service (ESS) portal for SAP Travel Management has enhanced the user’s experience in this process. However, I cover some ways that you can improve the performance of the ESS portal for faster handling of employees’ trips by assistants. I explain how assistants can see credit card transactions for employees for whom they enter a trip report without any intervention from these employees. I also describe the various hidden customization tools that can make your portal more convenient and fast for end users. I have divided this article into four main tips.
Note
I explain only the extra settings to improve the ESS portal. Readers should have the prerequisite knowledge of basic settings for travel management via the ESS portal. This article is based on the Web Dynpro-based portal having SAP ERP Central Component (ECC) 6.0 in the back end.
Restrict the Number of Trips to Display in Portal to Improve Performance
By default, the SAP system shows the trips for the last 12 months in the portal. However, an organization might need to change this default setting to include fewer months or more months. You might change the setting to fewer months if your organization has a large number of trips per employee and more months if your organization may need more time to process the trips (e.g., if the company CEO submits a trip expense report once every two years, then he or she would not be able to see the trip in the portal after submission. The SAP system, by default, shows the trips with a start date within the last 12 months).
To change this setting, execute transaction code POWL_QUERY and double-click the POWL query for which you want to change the setting. In this example I change FITV_POWL_TRIPS as shown in Figure 1.

Figure 1
Select POWL query in transaction POWL_QUERY
On the next screen, click the Query Parameters button (Figure 2).
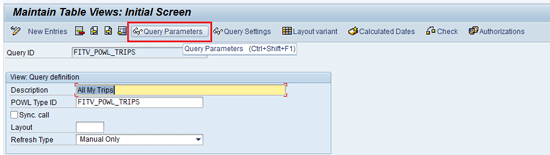
Figure 2
Details for POWL query in transaction POWL_QUERY
On the next screen you see the default SAP setting as 0005_L12M to show trips from the past 12 months (Figure 3).

Figure 3
Changing parameters for POWL query in transaction POWL_QUERY
You can change this setting to a different range of months. For example, you could change the setting to 005_L18M to show trips in the last 18 months. If you want to see all trips in the past, then change this setting to 002_ALL. After you change this setting, click the Accept button to apply the changes. The trips are reflected accordingly in the ESS portal.
Add Credit Card Transaction Details for Assistants
In the standard ECC 6.0 system, SAP provides only three tabs (Travel Requests, Travel Plans, and Expense Reports) for assistants as shown in Figure 4. However, the assistants may also require a list of the credit card transactions for the employee so that they can include this credit card data in the trip reports that they create for the employees.

Figure 4
Various tabs for assistants in the My Employees feature in the ESS portal via standard SAP functionality
Note
I show the procedure to add the credit card transaction tab for the assistant. However, you can also use these settings as pointers for deactivating a tab for an assistant. You might need to deactivate a tab if your organization is not using some travel features, such as travel planning or travel requests, or if an organizational policy does not allow assistants to perform some activities (for example, planning or travel request or travel expense) on others’ behalf. Hiding unnecessary tabs is relevant to make the response rate in the ESS portal faster and to avoid any confusion for end users.
To activate the credit card transaction tab, you need to create settings for three areas:
- Checking the POWL type
- Registering the POWL type for application FITV-POWL-TRIPS-ASSISTANT
- Registering the POWL query for application FITV-POWL-TRIPS-ASSISTANT
Checking the POWL Type
The standard POWL FITV_POWL_TRIPS_CCC is available for an employee’s own credit card transactions. This can be reused for showing the credit card transactions of an employee to assistants, so there is no need to define a new POWL type. During trip creation on behalf of another employee, the assistant needs information of credit card transactions to include in the trip. So this credit card transaction information enables the assistant to see details and to prepare for entering the trip report for the employee. To check the existing POWL type for credit card transactions, execute transaction code SM30. In the screen that appears enter POWL_V_TYPE in the Table/View field. Click the display button as shown in Figure 5.

Figure 5
Select a POWL type to display
On the next screen, you see the POWL FITV_POWL_TRIPS_CCC provided by the SAP system (Figure 6).
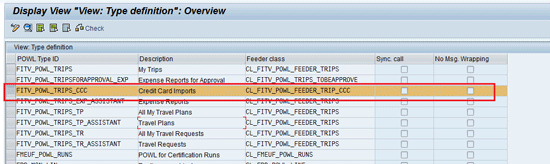
Figure 6
Display POWL type settings for credit card transactions
Registering POWL Type for Application FITV-POWL-TRIPS-ASSISTANT
To register POWL Type for Application FITV-POWL-TRIPS-ASSISTANT, execute transaction code SM30. In the screen that appears enter POWL_V_TYPE_R in the Table/View field and click the Maintain button (Figure 7).

Figure 7
Register a POWL type to a travel application
On the next screen, you see the POWL types registered against application FITV-POWL-TRIPS-ASSISTANT relevant for assistants (Figure 8).

Figure 8
Create a new entry for registering a POWL type to a travel application
You need to add one more POWL type to this application to show the assistant the credit card transactions for the employee. This POWL type is FITV_POWL_TRIPS_CCC. Click the New Entries button and maintain the entry as shown in Figure 9. Click the save icon to save the changes.

Figure 9
Create a new entry for registering a POWL type to a travel application
Registering POWL Query for Application FITV-POWL-TRIPS-ASSISTANT
To register POWL Query for Application FITV-POWL-TRIPS-ASSISTANT, execute transaction code SM30. In the screen that appears, enter POWL_V_QUERY_R in the Table/View field and click the Maintain button (Figure 10).

Figure 10
Register a POWL query to a travel application
On the next screen, you see the POWL queries registered against application FITV-POWL-TRIPS-ASSISTANT relevant for assistants (Figure 11).

Figure 11
Create a new entry for registering a POWL query to a travel application
You need to add one more POWL query to this application to show the assistant the credit card transactions for the employee. This POWL query is FITV_POWL_TRIPS_CCC. Click the New Entries button and maintain the entry as shown in Figure 12. Click the save icon to save the changes.
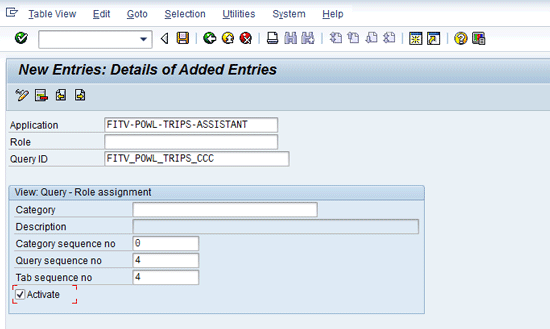
Figure 12
Details for a new entry for registering a POWL type to a travel application
After you maintain these settings, you can see one more tab in the SAP Travel Management portal for the credit card transaction for the employee selected (Figure 13).

Figure 13
Various tabs for the assistant in the My Employees feature in the ESS portal
Centrally Enabling the Selection Criteria to Search Employees for Adding to the My Employees List
When using the My Employees feature in the ESS portal for travel management, you have to create settings for personalization of selection criteria for the first-time execution. For the first-time execution, the ESS portal shows the option Personalization as shown in Figure 14.
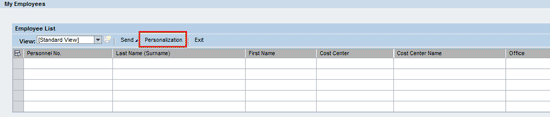
Figure 14
The Personalization option for an assistant in the My Employees feature in the ESS portal
After you click the Personalization button, enter the selection criteria as shown in Figure 15. Click the Save button. The various selection criteria available are P (selection by personnel number), H (selection by organizational structure), and S (selection by cost center in the employee’s HR master).

Figure 15
Enter selection criteria for the assistant in the My Employees feature in the ESS portal
After you enter this selection criteria, the relevant selection options appear directly in the My Employees screen (Figure 16).

Figure 16
New options to add or remove employees after personalization by a user
Now, instead of users making selections for themselves, this process can be done centrally for all users for the migration phase when you release this new functionality over the portal to all users. To release the new personalization options, execute transaction code FPB_MAINTAIN_PERS_M or follow menu path SPRO > Cross-Application Components > General Application Functions > Generic SAP Business Suite Functions > Personalization > Personalization Data: Collective Processing. In the selection screen that appears enter DIA_CO_CCA_TR in the Personalization Dialog field and click the execute icon (Figure 17).

Figure 17
Make personalization settings centrally for all assistants for My Employees
On the next screen, enter the selection criteria as shown in Figure 18. Click the save icon. After you save the changes, they apply to all the users.

Figure 18
Entering selection criteria for the assistant in the My Employees feature centrally
However, the challenge is for the changes in employees, as new employees are added in the organization on a regular basis. Executing this transaction on each occasion is cumbersome and runs the risk of risk missing an employee. To tackle this issue, this transaction can be executed in the background as a daily batch job to make this setting for added employees. For this you need to make a variant for program FPB_PERS_POST_BATCH as shown in Figure 19.

Figure 19
Enter selection criteria for the program to enable background execution
The values of various fields to be populated in the screen shown in Figure 19 are as follows:
- P_DIALOG: DIA_CO_CCA_TR (DIA_CO_CCA_TR is the personalization dialog for trip approval.)
- R_DATE: 0001/01/01 to 9999/12/31 (This wider date range is given to select all employees in the organization.)
- R_VAL1: A, CO-CCA-TR (CO-CCA-TR is the personalization application name.)
- R_VAL2: A, V (V is for identifying the selection type. V is used for the selection type as single value.)
- R_VAL3: A, P (P is for selection by personnel number. A in R_VAL* is for identifying the selection by program and to link R_VAL1, R_VAL2, and R_VAL3.)
How to Delete Personalization Done by Users in SAP Travel Management Portal Screens
Users can also do some personalization on the various fields in the ESS portal. However, sometimes they accidentally do so and thus lose a field, box, or screen on the portal. To restore that field, box or screen, the personalization has to be deleted by the system administrator. I now show you an example of how a user might have deleted a view via personalization and how to find and delete this personalization.
Suppose during the trip creation, an employee has unintentionally right-clicked and selected the option Hide Table “Receipts in This Exp…” as shown in Figure 20.
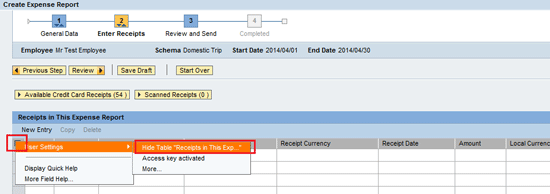
Figure 20
User action for hiding the receipts box in the ESS portal
Therefore, the receipt box disappears as shown in Figure 21, and the user does not have any way to restore it.

Figure 21
The receipts box does not appear in the portal after user action
In such a case, execute transaction code SE80 or follow menu path SAP Easy Access Menu > Tools > ABAP Workbench > Overview > SE80 - Object Navigator. In this transaction, select the option Web Dynpro Comp./Intf. Choose the component name WD_ANALYZE_CONFIG_USER and click the display icon as shown in Figure 22.

Figure 22
Select a Web Dynpro component
Now double-click the Web Dynpro application wd_analyze_config_user as shown in Figure 23 and then click the test/execute icon (Figure 23). (Note that for this activity you would also need access to the S_DEVELOP object or the S_WDR_P13N object. The Reference link is https://help.sap.com/saphelp_nw04s/helpdata/en/ba/139e422bd70931e10000000a1550b0/content.htm.)
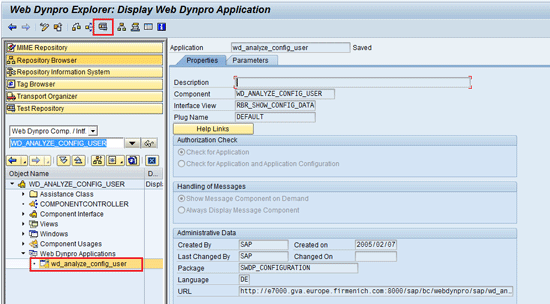
Figure 23
Execute a Web Dynpro application to find user personalizations
After you click the test/execute icon, the Internet page opens with the selection screen as shown in Figure 24. Enter the user name and click the Display button to see the various personalization settings made by this user.
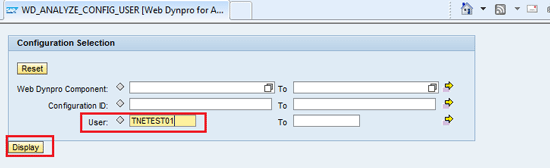
Figure 24
Enter user details for checking personalizations for a user
After you click the display button, the details of the personalization appear in the next screen (Figure 25). In this screen you can select the line (multiple lines can also be selected, if necessary) and then click the Delete button.
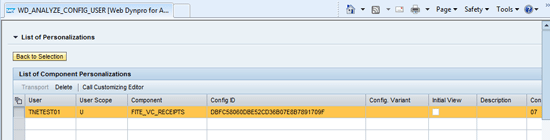
Figure 25
Various personalizations found for the user selected
In the pop-up screen that appears, click the Yes button to confirm the deletion of the personalization (Figure 26).
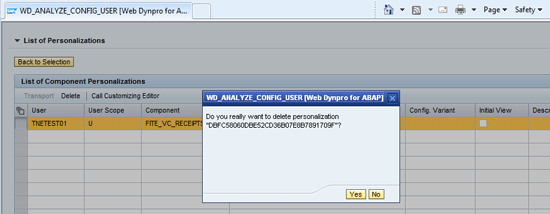
Figure 26
The pop-up screen to confirm the deletion of personalization
The confirmation message appears as shown in Figure 27.

Figure 27
The pop-up screen confirming the successful deletion
After this, if the user goes back into the portal and tries to enter the trip, the earlier hidden receipts box appears again as shown in Figure 28.

Figure 28
The restored receipts box in the portal after deletion of personalization
In Figure 24, you can see how to search for the personalizations by giving a user ID, but you can also search based on the Web Dynpro Component or the Configuration ID. However, the configuration ID is generated dynamically for each change done by a user. You can find the Web Dynpro component by right-clicking that window, which was hidden by the user, and then clicking Technical Help… as shown in Figure 29. (You would need access to S_DEVELOP object or S_WDR_P13N object for checking technical details.)
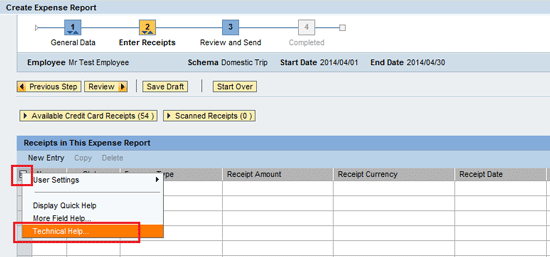
Figure 29
Check technical help of an object in the portal
The system now shows the component details (FITE_VC_RECEIPTS in my example) as shown in Figure 30.

Figure 30
Technical details for an object in the portal (e.g., component name)
Alternatively, in case your organization decides that no user should be able to personalize or hide objects in the portal, then you can also achieve this via customization. For this, execute transaction code SE80 or follow menu path SAP Easy Access Menu > Tools > ABAP Workbench > Overview > SE80 - Object Navigator. In this transaction, select option Web Dynpro Comp./Intf. and choose the component name WD_GLOBAL_PARAMETERS. Click the display icon as shown in Figure 31.

Figure 31
Select a Web Dynpro component
Now double-click the Web Dynpro application wd_global_parameters as shown in Figure 32 and click the Test/Execute icon (Figure 32). (Note that for this activity you also need to access the S_DEVELOP object or the S_WDR_P13N object. The reference link is https://help.sap.com/saphelp_nw04s/helpdata/en/ba/139e422bd70931e10000000a1550b0/content.htm.
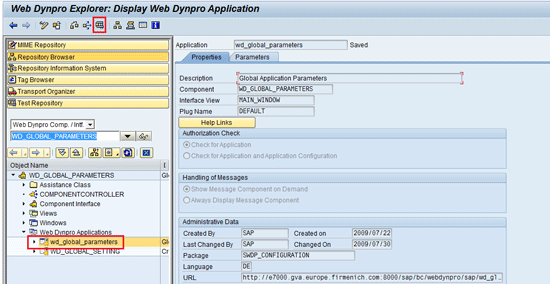
Figure 32
Execute a Web Dynpro application to find user personalizations
In the next screen click the Change button (Figure 33).
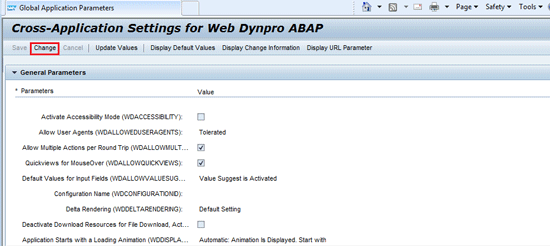
Figure 33
Change the global parameters for a Web Dynpro application
Scroll down the screen until you find the parameter Enables the user to hide UI elements (Figure 34). Leave the check box for this option unselected (Figure 35).
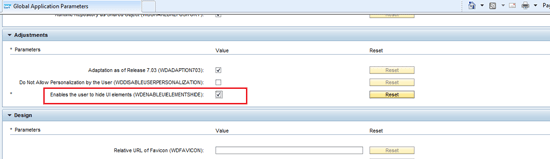
Figure 34
The standard setting for the parameter named Enables the user to hide UI elements
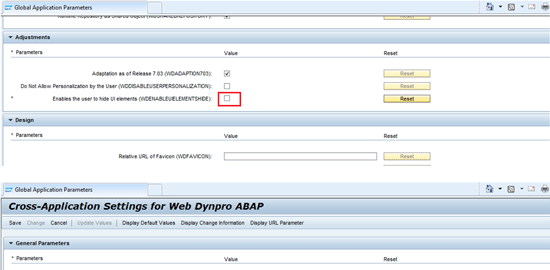
Figure 35
Change the standard setting of the parameter Enables the user to hide UI elements
After this change is made in a global parameter setting, users can no longer use the hide option in the portal. Compare Figure 36 with Figure 20 earlier to see that the hide option is no longer available.
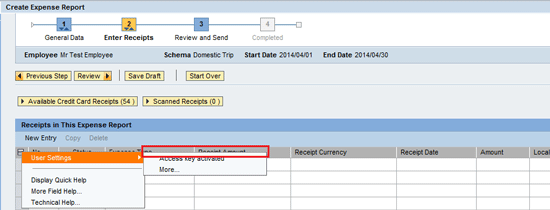
Figure 36
The hide option is no longer available to users in the portal after changing the global parameter
Gaurav Agarwal
Gaurav Aggarwal is SAP S/4HANA lead consultant at Infosys Limited. He has more than 14 years of experience, including 11 years in SAP Finance. He has expertise in both SAP FI and Controlling (CO) with integration to other modules in manufacturing and process industries. He is a chartered accountant and SAP Certified Financial Consultant. He holds a bachelor’s degree in commerce and is a techno-functional expert with thorough knowledge of the necessary ABAP for functional experts. He is a veteran in G/L, AR, AP, banking, FA, Travel Management, and closing cockpit and has handled greenfield implementation, upgrades and conversions, rollouts, and support projects.
You may contact the author at gka2707@gmail.com.
If you have comments about this article or publication, or would like to submit an article idea, please contact the editor.