Discover what you have to consider if you want to integrate a Web Dynpro component or a Web service for persisting data in your process. After you develop your UIs and your Web service, find out how to connect them with the respective process steps.
Key Concept
The development of a composite application is driven by new collaborative process ideas. Business process experts tend to develop these processes by using graphical modeling environments. In the past, there was always a break from this conceptual work to the real implementation due to the different tools that the business process experts and IT experts were using. This changed with the advent of the Business Process Modeling Notation (BPMN), which allows you to bridge the gap between business and IT.
BPMN is not executable out of the box. For each human activity, you need a user interface (UI) and for each automated activity, you need a service call. Using human activities created in my
SAP Professional Journal article “
Composite Designer and SAP NetWeaver Business Process Management Minimize Composite Application Development Efforts,” I will show you how to add Web Dynpro UIs for them and also how to add a Web service call for the automated activity.
Determine What You Need in the UI
For my example, I use Web Dynpro for Java to build my UIs. I concentrate solely on the parts that are relevant for integrating Web Dynpro-based UIs into the business process. Before you start with the development, you first need to think about what you want to achieve in the two UIs, and from that derive the fields you have to add. For the Enter Purchase Request activity, you need a simple order form. For this, you need fields, the appropriate data types, and the information about whether the respective field is read only or not. For the first UI, the list looks like this:
- Name of the requester (string): gives the approver information about the requester
- Name of the approver (string, read only): gives the requester information about the approver because if the request is rejected, you jump back to the Enter Purchase Request step. It is useful to know who was responsible for the rejection.
- Identification of the product to be ordered (string): this is typically a product number that unambiguously identifies the product
- Price of the product (decimal): Normally you would retrieve this information from a back-end system. For the sake of simplicity, this value is entered manually in my form.
- Quantity (decimal): defines the number of items you want to order
- Comment (string): this field is needed for the communication between the requester and approver. Each can add remarks to the current process step for either making sound decisions (e.g., the requester explains why he needs the product) or for providing hints about what needs to be done to be accepted (e.g., the approver explains why he cannot approve the request and that the requester has to lower the quantity).
With this information, you can now start with the development.
Define the Information for the Process Framework
In SAP NetWeaver Developer Studio, go to Composite Designer, which currently only displays the just finished process in the process layer.
Step 1. From the Palette, click the Web Dynpro Component entry within the User Interface section and move the pointer into the User Interface space of the Composite Designer (
Figure 1). Click somewhere in this area. As a result, a wizard opens that allows you to provide basic information about the Web Dynpro component you want to create.

Figure 1
Click Web Dynpro Component
Step 2. In the first wizard step enter the component’s name EnterPurchaseRequest. Click the Next button.
Step 3. Accept all entries of the second wizard step by clicking the Finish button (
Figure 2).

Figure 2
Accept all the entries
Step 4. The newly created Web Dynpro component appears in the User Interface area of the Composite Designer. Double-click it and you are automatically guided to the Web Dynpro development environment (
Figure 3).

Figure 3
Composite Designer showing the process and UI components
The goal is to embed the Web Dynpro UI in your business process. For this to work smoothly, you have to fulfill a contract between the process and the Web Dynpro environment. Keep in mind that data entered in the first step must appear in the second step (the approval). For this to work correctly, the Web Dynpro component must explicitly define which data it will provide to the process framework and which data it can receive from the process framework. In addition, the Web Dynpro component must signal the process framework when the UI entries have been finished and notify it that data is available for processing. You achieve this by using events
Both the fields for exchanging data and the events have to be defined in the Web Dynpro Component Interface Controller, which represents the outside view on a Web Dynpro component. It tells consumers of a Web Dynpro component (such as SAP NetWeaver Business Process Management [SAP NetWeaver BPM] or other Web Dynpro components) how it (the component in question) can be accessed by a clearly defined interface that comprises both fields and events. Therefore, the next step is to define this contract.
Note
In future releases of SAP NetWeaver Composition Environment, the creation of Web Dynpro components that work smoothly together with the process framework will further be simplified. You can expect the automatic creation of Web Dynpro components that automatically fulfill the contract between Web Dynpro and SAP NetWeaver BPM. The fields exchanged between the two will be based on simple XSD data structures. These fields will also be used to derive a default view for the Web Dynpro component: simple fields will appear within forms whereas collections of fields will appear within tables. Finally, buttons for firing the events will be added as well. However, even for those UIs it is important for you to understand all the details about the inner working so that you can maintain and extend those generated UIs afterwards. That’s why I explain in detail how Web Dynpro and the SAP NetWeaver BPM environment work together.
Step 5. After you double-click the Web Dynpro component in the Composite Designer, a new tab strip opens that contains the graphical view of the Web Dynpro component (
Figure 4). You can identify four Web Dynpro artifacts. From left to right these are the view, the window that contains the view, the component controller, and the already mentioned Web Dynpro Component Interface Controller.

Figure 4
Graphical view of the Web Dynpro component
As you can see, a close relationship already exists between the component controller and its interface, indicated by the dashed arrow connecting the two. The relationship is as follows: Every field and every event defined in the interface controller must also appear in the associated component controller. The procedure for how to achieve this is pretty simple: Define fields and events in the interface controller, then copy and paste them to the component controller.
Step 6. Start with the definition of the interface in the interface controller. Double-click the interface controller in
Figure 4. The context of the interface controller opens automatically. At the bottom of the window, you can see what can be exposed as the interface to the outside world (the consumers) represented by different tabs: The Context tab represents the data the component can exchange whereas the Methods tab consists of method signatures that are available in the component and that can be called from outside.
Note
The actual implementation of the methods occurs in the component controller, not in the interface controller.
The Events tab lists the events the component can fire. I will come back to events later. Now I am going to show you how to create the interface from the data perspective. For this, you have to define the fields that the component can exchange with the consumers. In the Context tab, right-click the Context node and select New > Node… from the context menu.
Step 7. A new dialog window for defining a context node pops up. Context nodes are useful for structuring your fields and you want to group your fields semantically. You need to create one node for the requester data. Therefore, select the Manually option and name the node Requester (
Figure 5). Click the Finish button.

Figure 5
Create the Requester context node
Step 8. A new folder appears beneath the Context node that is ready for adding fields. Right-click the Requester node and select New > Attribute… from the context menu to add fields to it.
Step 9. In the dialog window, again choose Manually. Enter the name requesterName and select the type string from the Type drop-down list (
Figure 6). Click the Finish button.

Figure 6
Create the context attribute requesterName
Step 10. Repeat steps 8 and 9 so that the final structure looks like the one depicted in
Figure 7. The data types you have to pick are as follows:
approverName: string
comment: string
productID: string
productPrice: decimal
productQuantity: decimal
requesterName: string

Figure 7
The final context structure
Step 11. You must make one final adjustment before you can copy the fields to the component controller: You need to set the cardinality of each folder node to 1..1. This helps you avoid writing additional code because this setting enables the Web Dynpro framework to automatically reserve the main memory for the node. You don’t have to explicitly allocate memory via the Java new statement. Right-click the folder node (e.g., ApprovalInfo) and select Properties from the context menu.
Step 12. In the Properties tab select 1..1 for the Collection Cardinality property, which is located beneath the Misc node (
Figure 8). Repeat steps 11 and 12 for the Product and Requester nodes.

Figure 8
Assign the Collection Cardinality value
Step 13. Collapse the folder nodes, select all of them, right-click your selection, and choose Copy from the context menu.
Step 14. Because you want to paste the fields to the component controller, navigate back to the Web Dynpro component and double-click Component Controller (
Figure 9).

Figure 9
Double-click Component Controller to access the controller’s Context window
Step 15. The Context window for the component controller opens automatically. Right-click the Context node and choose paste from the context menu to add the fields to the component controller’s context.
After pasting the fields, triangles appear close to the folder and attribute icons. They indicate that the associated fields are available in the interface controller and that they are properly connected. With that, the definition of the data is complete. What’s missing is the definition of the events that informs the process framework about the completion of entering data into the form. This is explained in the next step.
Step 16. To define events, return to the interface controller. Select the Events tab and click the New… button (
Figure 10). A Save Editors dialog might show up. Confirm the dialog by clicking on OK. All changes you have done so far will be saved.

Figure 10
Click the New… button in the Events section
Step 17. The New Event dialog opens. You only have to define the Name of the event. Enter Complete for the name, indicating the successful completion of the UI. Click the Finish button.
Step 18. The new entry appears in the list of events. Repeat step 17 to define a second event named Error. You need this second event because the contract between the UI and the process framework states the necessity to signal two distinct events: one for a successful and one for an erroneous completion. You can name them as you find them appropriate. I prefer Complete and Error to clearly indicate which event stands for which state.
Step 19. Now repeat for the events what you did for the data: copy the events, move to the component controller, and paste them into the events table of the component controller (right-click somewhere in the Events table and select Paste from the context menu). Again, the little triangles appear indicating the successful completion of the copy operation. Save all your changes by choosing File > Save All from the main menu.
With that, you are done with the interface controller and you can close the associated tab. All relevant information for the process framework has been defined.
Implement the Functionality in Web Dynpro
I am now going to explain how to implement the functionality in Web Dynpro and you will see that only a few lines of Java code are necessary to get a running Web Dynpro component that interacts smoothly with SAP NetWeaver BPM.
Step 1. Return to the component controller tab. In this part of the process, you want to encapsulate the code for firing events within a Java method so that it is callable from everywhere within the Web Dynpro component. Recall that you want to build a UI for the requester and when the requester clicks the Submit button for an order, that’s the time you want to indicate that the data entry has been completed successfully. Once the Submit button is clicked within your Web Dynpro view, you want to call the method that you are about to create. For this, move to the component controller’s Methods tab and click the New… button.
Step 2. The New Method dialog opens. Make sure that Method is selected and click the Next button.
Step 3. Enter the name complete and click the Finish button.
Step 4. Click the save icon to bring the Web Dynpro project into a consistent state. The complete method appears in the Methods table. What’s missing is the actual implementation of the functionality, which is firing the newly created event. This can be achieved by right-clicking the method in the Methods table and choosing Navigate to… > Implementation from the context menu.
Step 5. You are guided to your newly created complete() method. Add a new line right after the //@@begin complete() comment and enter the following Java code:
wdThis.wdFireEventComplete();
For your convenience, use the code completion feature of the editor while entering the Java code. For example, enter wdt and press CTRL-space. You receive a list of possible values from which you can select wdThis (
Figure 11). With the variable wdThis you access the Java object representing the current component controller.

Figure 11
Select wdThis using the code completion feature
Note
If the Derived File Encountered dialog pops up while changing the source code, click the Yes button and continue. If you want to avoid this dialog in the future, select the check box in the dialog.
The code completion functionality also works for the methods of an object. After entering the period, you can either wait a moment or press CTRL-space to receive all available methods. You can narrow them down by entering, for example, wd. Choose the appropriate method wdFireEventComplete() as shown in
Figure 12. As result, you receive the Java code.

Figure 12
Select the appropriate method
You have now made a Web Dynpro component process aware. It can now be smoothly integrated into SAP NetWeaver BPM. It will behave according to the contract defined for the interaction between UI technology and process technology. What is left is the definition of the UI itself. Therefore close the window containing the Java source code as well as the window containing the details of the component controller. You no longer need them.
Note
As the next exercise is purely Web Dynpro related, I keep explanations at a minimum. For more details, refer to the Web Dynpro series I mentioned earlier. However, you will be able to finish this exercise even if you are not a passionate Web Dynpro developer.
Define the UI
After closing the source code window as well as the component controller window, you are back in the Web Dynpro component window. Next, you want to make sure that the view obtains access to the data available in the component controller. For this, click the Data Link entry of the Palette, which you can find on the right side of the Web Dynpro component window.
Step 1. Move the pointer on the view icon named EnterPurchaseRequestView, click it once (no drag and drop), move the pointer on the Component Controller, and click again (
Figure 13). This connects the view with the component controller so that you obtain access to all the data that is available in the controller’s context. When you release the mouse button on the Component Controller icon, a dialog pops up, which I explain in the next step.

Figure 13
Connect the EnterPurchaseRequest view with the Component Controller
Step 2. On the right side of the Context Mapping dialog, you can see all the available folders and fields in the component controller’s context. Because you need all the fields in your UI’s context, drag and drop the folders from right to left, one after another. Unfortunately it’s not possible to drag all three folders at once.
For each folder you are moving from right to left, a dialog pops up asking you for the fields you want to make available to the UI context. Select the check boxes for all the fields. This dialog is useful if you are confronted with huge interfaces containing hundreds of fields, but you need only a handful of them for your UI. In these cases, it makes sense to filter the ones you really need. Click the Finish button to proceed. Don’t forget to repeat this step for the Product folder as well as for the Requester folder.
Finally, you receive an overview of the mapping from the view’s context (left side) to the controller (right side) as shown in
Figure 14. Click the Finish button to finish the Context Mapping dialog. As result of the context mapping, a solid arrow from the view to the component controller is displayed (
Figure 15).

Figure 14
Mapping overview from the view’s context to the controller

Model the Requester UI
Now you are ready to actually model the UI. Choose the Select entry from the Palette and double-click the view icon in the graphical environment. On the canvas, the string Hello World! appears, which is the default headline of your form.
Step 1. Select the Hello World! string and in the text field of the Properties tab, replace it with something more meaningful, such as Purchase Order Form. Also change the design of the string to header1 (
Figure 16).

Figure 16
Edit the text and design properties
Step 2. To define the form for entering the purchase order data, you use templates. These are wizards that allow you to define complete forms or tables with just a few clicks. In the Outline tab right-click the RootElement node and select Apply Template from the context menu to start the wizard.
Step 3. On the first screen of the wizard click the Form button. Then click the Next button.
Step 4. You are asked which fields of the view’s context you want to display in the form. Because you need all the fields, select all the check boxes and click the Next button.
Step 5. The last wizard step allows you to do the following:
- Define the field sequence on the UI
- Associate concrete UI components — such as input field, check box, and radio button — to your fields
First, rearrange the field order by using the arrow buttons to the right of the table. The final order should look like the one shown in
Figure 17.

Figure 17
Rearrange the field order and set the Editor properties
Second, adapt the UI component assignment. By default, all fields are associated with the UI component InputField. However, for the comment field you need more space because more text will likely be added during runtime. In
Figure 17, select TextEdit from the drop-down list in the Editor column of the comment field. Click the Finish button.
That’s it. You have a complete form already connected to the view’s context (
Figure 18). Although you could work with this form now, I recommend arranging the fields into columns so that the UI looks a little bit more appealing.

Figure 18
The UI without column formatting
Arrange the Fields into Columns
Select the newly added TransContainer_0 node in the Outline tab and adjust the properties layout to GridLayout and colCount to 2.
Figure 19 shows what the final result should look like. As you can see, I’ve adjusted some more properties but this is definitely not necessary (e.g., I’ve set the Approver Name input field to read-only and renamed all the labels). The only item missing now is the button that fires the event indicating data entry completion.

Figure 19
UI with column formatting
Create the Button
To create the button, you again use an existing template.
Step 1. In the Outline tab, choose Apply Template from the RootElement context menu, select Action Button, click the Next button and enter the name Submit for the Button Label (the Action and Event fields are automatically adapted). Click the Finish button.
Step 2. Consider what should happen when the end user clicks the button. You want to signal the successful completion of the data entry to the process runtime. For that, you have created the complete event in the component controller. So, you have to ensure the firing of this event. You do this by adding code.
Select the button in your working area and look for the Events section in the button’s Properties tab. Locate the onAction entry and select the row. A Go button appears on the far right (
Figure 20). Click it to go to the Java code section where you can add the code.

Figure 20
Click the Go button to access the Java code section
Step 3. Enter the following line of Java code as shown in
Figure 21. Again use the code completion feature — it saves you valuable time and helps you avoid typos.
wdThis.wdGetEnterPurchaseRequestController().complete();

Figure 21
Add the Java code for the onAction property
With wdThis, you access the Java object that represents the current view. From there, you resolve the reference to the associated component controller (wdGetEnterPurchaseRequestController) and call its complete() method, which you created earlier.
With that you are done. Save your changes and close all Web Dynpro related tabs (the Java code tab, the component controller tab, and the Web Dynpro component tab).
You’ve reached another important milestone: The Web Dynpro component is completely finished. Next on my roadmap is the creation of the connection between the process model and the Web Dynpro component.
Create the Connection Between the Process Model and the Web Dynpro Component
So far you only have an empty process model that is not executable. The process still doesn’t know which UI to display and which service to call in which activity. Now that you have a UI available, you need to fill this gap: the connection from the first process step to the newly created UI. The tool solving this problem is again the Composite Designer.
Step 1. Move your pointer over Investment Approval process so that the context buttons show up (
Figure 22). Click the arrow representing the create relation action and drag and drop it to the newly created Web Dynpro component named EnterPurchaseRequest (
Figure 23).

Figure 22
Click the create relation context button

Figure 23
Drag the Investment Approval process to the new Web Dynpro component
Step 2. A dialog opens that explains what happens in the background when you confirm the dialog. The wizard double-checks whether all requirements for integrating a UI into a process are fulfilled (e.g., an event has been defined in the Web Dynpro component and a human activity has been modeled in the process). If all requirements are fulfilled, the wizard takes care of all the technical settings, which are very often cumbersome to maintain (e.g., dependencies between development components). Start the wizard by clicking the OK button.
Step 3. After a while, the wizard shows you the Pick Human Activity dialog that lists the human activities modeled in the process (
Figure 24). Decide which activity of your process is responsible for calling the UI that you want to connect. For this example, select the row containing the Enter Purchase Request activity and click the OK button.

Figure 24
Select the Enter Purchase Request row
Step 4. A new dialog appears asking for the task to which you want to assign the UI. You haven’t defined any tasks yet, but the wizard allows you to create them on the fly. Click the Create New… button.
Note
A task is technically a wrapper around the UI and stands between the UI and the human activity. From a conceptual point of view, however, a task is much more than just assigning a UI to it. You need information about who is allowed to execute the activity, which priorities you assign to the task, and which time constraints have to be considered (activation time, start deadline, completion deadline, or expiration time). Another advantage is that you can reuse the task in other processes, which is not possible if you assign UIs to human activities directly.
Step 5. The New Task dialog opens. You should use the same name as the human activity to which you want to create the connection. Name it Enter Purchase Request and click the Finish button.
Step 6. The newly created task appears in the list (
Figure 25). Select the entry in the table and click the OK button. With that the connection from the human activity to the task is established.

Figure 25
The new Enter Purchase Request task that appears in the list
Step 7. The wizard continues with a dialog asking for the completion event. As you might remember, in the Web Dynpro exercise you could have named the events as you wanted to. So the wizard cannot assume which one is the completion event and which one is the error event. However, it needs this information to recognize during runtime when a UI has been completed. In this example, the completion event is pretty obvious, but this is not necessarily always the case. Select the Complete entry and click the OK button. As a result, the process framework now knows that this particular UI indicates its completion by firing the Complete event.
Step 8. Finally, you receive a summary page listing all the activities that the system has executed (
Figure 26). Confirm the dialog by clicking the OK button. In your development environment, you can see a new window representing the task. You can close it for now because you will come back to it and reopen it when you finish the process modeling.

Figure 26
The summary page listing the executed activities
Develop the Approver UI
Now that you’ve implemented the first UI and connected it with the process, it’s time to develop the UI for the approver and associate it with the Approve Purchase Order activity. As you now know all the details about how to develop Web Dynpro UIs that interact smoothly with SAP NetWeaver BPM, I can keep the description pretty short. Follow the same approach and the same sequence of development steps as you did for the Requester UI.
Step 1. Begin with the list of fields, their data types, and some additional remarks.
- Name of the requester (string — read only): gives the approver information about the requester
- Name of the approver (string): gives the requester information about the approver
- Identification of the product to be ordered (string — read only): this is the product number the requester enters
- Price of the product (decimal — read only)
- Quantity (decimal — read only): defines the number of items the requester wants to order
- Total amount of the order (decimal — read only): based on the quantity and the price per item, you can calculate the total amount. This helps the approver decide on the request.
- Order approved (Boolean): this field represents the decision of the approver, whether the request is accepted or rejected
- Comment (string): for the communication between requester and approver
Summary of the Major Development Steps in Web Dynpro
Step 1. Create a new Web Dynpro component with the name ApprovePR in the Composite Designer.
Step 2. Create context in the interface controller.
Figure 27 shows what the structure looks like. Again, double-check that all folders have the cardinality 1..1 for automatic memory allocation during runtime.

Figure 27
The final structure for the context of the ApprovePR interface controller
Tip!
Copy the context nodes from the Enter Purchase Order interface controller and paste it to the context of the ApprovePO interface controller. This saves you some time as you only have to add the new fields and folders.
Step 3. Create the events Complete and Error in the interface controller
Step 4. Copy the context of the interface controller and paste it into the context of the component controller
Step 5. Copy the events of the interface controller and paste it into the events of the component controller
Step 6. Create the method complete() in the component controller
Step 7. Implement the complete() method (wdThis.wdFireEventComplete();)
Step 8. Create a data link from the view to the component controller and copy all nodes from the component controller’s context to the view’s context
Step 9. Model the screen by applying the template for forms, applying template for the button, and adding Java code for the submit button to call the complete() method in the component controller (wdThis.wdGetApprovePRController().complete();)
Figure 28 shows the final screen.

Figure 28
The Purchase order approval screen
Now that the second UI is in place, you can create the relationship in Composite Designer.
Step 10. Use the context button to create the relationship from the process to the Web Dynpro component (
Figure 29).
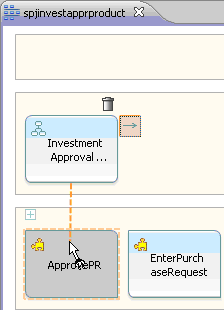
Figure 29
Create the relationship between Investment Approval process and ApprovePR
Step 11. Select the Approve Purchase Request human activity. Click the OK button.
Step 12. Create a new task when prompted. Don’t take the already existing Enter Purchase Request task. Name your new task Approve Purchase Request.
Step 13. Select the newly created task and click the OK button.
Step 14. Select the Complete event and click the OK button.
Step 15. The last dialog screen confirms the successful completion of setting the relationship between the process and Web Dynpro component (
Figure 30).

Figure 30
The relationship between the process and Web Dynpro component ApprovePR is complete
To get a better overview about the relationships within the Composite Designer, you should turn on the option for showing all the links that apply for a selected component. You can toggle this option by clicking the show links icon (
Figure 31).

Figure 31
Click the display links icon to see all the relationships for a selected component in Composite Designer
Congratulations! The next level has been reached: All user interfaces are now in place and are connected to the Investment Approval process via the appropriate tasks. What’s missing is the Web service for creating a purchase order. Solutions can either call a remote system or the persistency in a local business object. For this article I focus on the second option because SAP Composite Application Framework (SAP CAF) offers new features to model business objects that I want to highlight as well.
Model the Business Object for the Investment Approval Scenario
For this investment approval process, you need a business object that contains the data entered during process execution. In
part 3 of my article series about composite applications, I gave an introduction to business object modeling with SAP CAF. In essence, SAP CAF allows you to model business objects by concentrating on your business fields only and the framework takes care of all the cumbersome stuff such as:
- Persistency (including primary key generation)
- Transactional integrity
- Locking
- Authorization and authentication
- Change tracking
- Tracing
The business object Purchase Order should store the following fields:
- requesterName: string
- approverName: string
- productID: string
- productPrice: decimal
- productQuantity: decimal
- orderTotalAmount: decimal
- comment: LongText
If you have worked out such a list for your development projects, you can immediately start modeling your business object. The starting point is once again the Composite Designer.
Step 1. From the Palette, click the Business Object entry located beneath the Business Logic section.
Step 2. Move the pointer into the Business Logic area of the Composite Designer and click again.
Step 3. The Business Object wizard opens. Simply add the business object’s name, PurchaseOrder, and click the Finish button. Your new business object is created.
Step 4. The new graphical editor for business objects opens containing your new business object PurchaseOrder (
Figure 32).

Figure 32
The new business object PurchaseOrder in the graphical editor
Step 5. Move your pointer over your new object. Context buttons appear that allow you to edit your business object. From the available buttons, click once on the blue square, which allows you to add new attributes.
Step 6. Once clicked, a new attribute appears in the field list. You are automatically in edit mode for the name. Enter the name of the new field (requesterName) followed by a colon. After entering the colon, a list of available data types appears. You can narrow down the list by entering additional characters. For example, after entering S the list of available types is reduced to STRING, SHORT, and ShortText. Select the type by clicking it (
Figure 33). After you select a type, press Enter. The new field is now available.
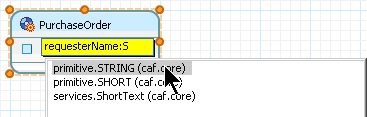
Figure 33
Select a data type for the new field
Step 7. Repeat the previous steps to enter all the fields as shown in
Figure 34. Compared to the previous release of SAP CAF, this new process offers a real productivity boost. You can still jump to the old SAP CAF editor by double-clicking into the area containing the business object’s name. Because you need additional adjustments, double-click the name now.

Figure 34
The list of all the fields with their associated data types of the PurchaseOrder business object
Step 8. After you open the editor, switch to the Structure tab. You can see a list of all the fields that the business object contains. Besides the fields you’ve added, you can also see some administrative fields such as key (for the primary key), createdBy, createdAt, modifiedBy, and modifiedAt. They are automatically filled in by the framework during runtime. Your fields appear beneath the administrative fields.
The framework not only creates attributes automatically for you, it also creates life cycle methods (create, read, update, and delete) as well as methods for searching business objects (finder methods). Those methods can be exposed as Web services. However, for my scenario you only need the create method as a Web service to add a new entry in the PurchaseOrder database table.
Unfortunately, by default the create method does not include any parameters. However, on the Structure tab you can change this by selecting the check boxes in the Optional CREATE Attribute column (
Figure 35). This gives you a create method with parameters that allows you to create a new business object instance in the database table automatically that is filled with the data that the parameters hand over. Because you need a create method with parameters, select all the check boxes as shown in
Figure 35. Without this, two calls (create and update) would have been necessary to achieve the same result.

Figure 35
Select the check boxes in the Optional CREATE Attribute column
Step 9. Click the Permissions tab. This tab allows you to define whether access rights to the business objects should be enforced or not. This is not required for this example, so remove the check mark in the Permission checks enabled check box.
Step 10. Finally, click the Persistency tab. On this tab, you can see the database table that is generated for you, including all its fields (
Figure 36). Save your changes.

Figure 36
Preview the generated database table
Add the Business Object to the Business Process
Close all the SAP CAF-related windows so that you are back in the Composite Designer window. Now you need to add the business object to your business process and associate it to the automated activity. You may protest and say: “Well, we haven’t defined a Web service for our business object yet.” That’s right, but Composite Designer helps out here as well.
Step 1. In the Composite Designer, drag and drop the create relation context button from the Investment Approval Process node to the PurchaseOrder node that is located in the Business Logic area (
Figure 37).

Figure 37
Drag and drop the create relation context button from Investment Approval Process to PurchaseOrder
Step 2. The Create Relation wizard opens, listing all the steps it is going to execute (
Figure 38). The first entry indicates that the Web service is created. This process also provides the Web service to your process model and connects it to the automated activity. Confirm the dialog by clicking the OK button.

Figure 38
The steps in the Create Relation wizard
Step 3. As you haven’t defined which of the business object’s life cycle methods should be provided as the Web service, the Select service operations dialog appears. Select the Exposed check box for the create method and click the OK button.
Step 4. While creating all the connections between your process and the newly created Web service, the Information for Subsequent Wizard dialog pops up (
Figure 39). It guides you on how to fill out the dialog steps that will be displayed after you’ve confirmed the current dialog.

Figure 39
The Information for Subsequent Wizard dialog
You may ask, “Why that?” The Composite Designer reuses existing wizards and only calls them in a certain sequence. The next wizard that will be started behind the scenes is the Web Service Import wizard. This import wizard requires a WSDL file to work correctly. The location of the WSDL file that has been generated in the meantime by the previous wizard is not known to the import wizard. Only the Composite Designer knows where it is stored and it tells you that in step 1 of the description.
Copy this location by selecting the whole line starting with file:///... (as shown in
Figure 39) and pressing CTRL-C. In the current release of the Composite Designer, it is not possible to hand over this string automatically to the import wizard. This will certainly be resolved in the next release. After you’ve copied the string, continue by clicking the OK button.
Step 5. The import wizard starts and asks for the WSDL location. Click the RemoteLocation/File System option and click the Next button.
Step 6. Paste the location you copied in step 4 into the URL field by pressing CTRL-V. Click the Finish button.
Note
If you run into trouble during this step you can always start from the beginning by connecting process and business object in the Composite Designer again (see step 1 for details). So, if you face problems because you didn’t copy the string correctly or missed to copy it, don’t hesitate to start the wizard again.
Step 7. The wizard completes its tasks and lists all the successfully executed steps. Your business object has been published as Web service and is connected to the automated activity. As there is only one automated activity in our process, the wizard automatically picks that one. Otherwise another dialog would have appeared which would have allowed you to assign the service call to one of the listed automated activities. Now that all UIs and services are in place and connected, you can finalize and run the business process.

Dr. Volker Stiehl
Prof. Dr. Volker Stiehl studied computer science at the Friedrich-Alexander-University of Erlangen-Nuremberg. After 12 years as a developer and senior system architect at Siemens, he joined SAP in 2004. As chief product expert, Volker was responsible for the success of the products SAP Process Orchestration, SAP Process Integration, and SAP HANA Cloud Integration (now SAP HANA Cloud Platform, integration service). He left SAP in 2016 and accepted a position as professor at the Ingolstadt Technical University of Applied Sciences where he is currently teaching business information systems. In September 2011, Volker received his Ph.D. degree from the University of Technology Darmstadt. His thesis was on the systematic design and implementation of applications using BPMN. Volker is also the author of Process-Driven Applications with BPMN as well as the co-author of SAP HANA Cloud Integration and a regular speaker at various national and international conferences.
You may contact the author at
editor@SAPpro.com.
If you have comments about this article or publication, or would like to submit an article idea, please contact the
editor.