Learn about the processes involved in sales using configurable products. Read details about the master data to be maintained in the system along with the main customizing settings available for this solution.
Key Concept
Configurable products are useful if your company needs to purchase, manufacture, or sell numerous combinations of parts that form a product.
Note
This article can be used as a guideline during the realization phase of the project and during the pre-cutover to check that all the settings have been transported correctly.
I discuss two types of business activities: master data preparation and transactional processes.
Master Data Preparation
In this section, I introduce the main master data objects that are relevant and necessary to the sales department to post sales transactions for configurable products.
Create a Reference Characteristic
With this step, you create the reference characteristic that the system can use to pass the variant’s condition values to sales documents. To display a characteristic, execute transaction code CT04 or follow menu path Cross-Application Components > Classification System > Master Data > Characteristics. In the initial screen that appears, click the create icon

.
In the Addnl data tab of the screen shown in
Figure 1, populate the following fields:
- Table Name: SDCOM (the technical name of the table that is used for communication between SD and variant configuration)
- Field Name: VKOND (variant condition)

Figure 1
Assign a table and field name to the reference characteristic
In the Procedure for Value Assignment section of
Figure 1, you select the Not Ready for Input indicator (as this characteristic is a reference characteristic). You also select the No Display indicator (this means that the values of this characteristic will not be visible to the end users).
After you press Enter, the system sends a message that the format data was taken from the ABAP dictionary and all fields in
Figure 2 are populated automatically. After you click the save icon to save your data, the system displays a message like the one shown in
Figure 2.

Figure 2
Create a sales variant condition characteristic (basic data)
Note that in the Descriptions tab, you can enter a different description of the characteristic based on the language key, while in the Addnl data and Restrictions tabs, you can specify additional restrictions and validations, such as table field and class validation.
Note
The ECC system transfers values from the configuration to the application using reference characteristics with write access to table fields. For my example, use table SDCOM and field VKOND for transferring variant-dependent surcharges or discounts on prices to the sales documents.
ECC knows these variant keys were passed from variant characteristics and only interrogates those condition types flagged as variant conditions. These reference characteristics are stored in the configuration data and read by the function module V45CU_GET_VARIANT_KEYS, which contains the function module CEI0_GET_CONDITIONS.
The function modules V45CU_GET_VARIANT_KEYS and CEI0_GET_CONDITIONS look up all the values assigned to the VKOND references for the appropriate sales documents.
Create a Variant Class
In this step, you create the variant class that is used to group the relevant configurable product’s characteristics. To create a variant class, execute transaction code CL02 or follow menu path Cross-Application Components > Classification System > Master Data > Classes.
In the screen that appears (not shown), click the create icon. In the Basic Data tab of the screen shown in
Figure 3, populate the following fields:
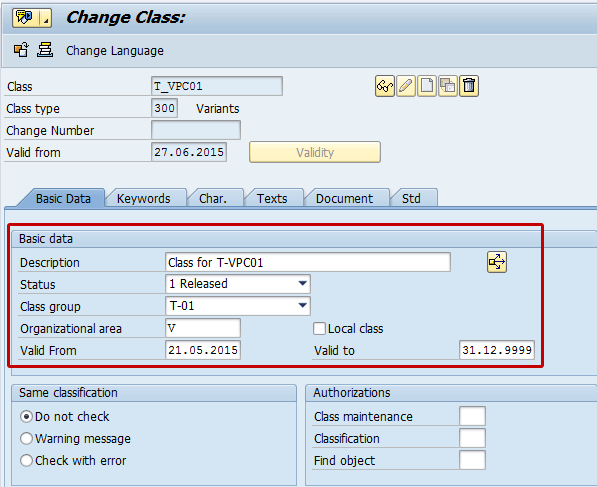
Figure 3
Create a variant class
- Description: Enter a description of the class.
- Status: The status of the class should be Released; otherwise, it cannot be used.
- Class group: The class group is used for reporting purposes. Select an option (e.g., T-01) from the drop-down list.
- Organizational area: Enter a letter for the organizational area to which the class belongs.
- Valid From: Enter a validity period for the class.
This class must contain not only the configurable product’s characteristics but also the reference characteristic (T_VKOND_01) that you created in the previous step that I explained in the “Create a Variant Characteristic” section. Click the save icon to save your data. The system then displays a message like the one shown in
Figure 4.

Figure 4
Link the variant characteristic to the variant class
Create a Variant Product
In this step, you create a configurable product. To complete this step, execute transaction code MM01 or follow menu path Logistics > Materials Management > Material Master > Material > Create > Immediately. In the Basic data 2 tab of the screen that appears, note that the product is defined as configurable if the Material is configurable indicator is selected (
Figure 5).

Figure 5
Define the product as configurable
Now click the Classification tab. In the Classification tab you can classify the product by entering 300 in the Class Type field and T_VPC01 in the Class column (
Figure 6). These are the values that you created in the previous step that I describe in the “Create a Variant Class” section. Click the save icon to save your entries.

Figure 6
Classify the configurable product using class type 300
Define a Variant Condition Key
The variant condition key is used to manage the variant condition. In my example, the variant condition keys are price conditions based on the variants MW01, TW01, and 1GB01. The sales department should be responsible for creating the variant condition key. To create a variant condition key, execute transaction code VK30 or follow menu path SAP Menu > Logistics > Central Functions > Variant Configuration > Environment > Pricing > Define Key. In the screen that appears, enter the variants’ names for the condition and add descriptions as shown in
Figure 7. Click the save icon to save your data.

Figure 7
Create variant condition keys
Note
Variant names are case sensitive.
Define a Variant Condition
The sales department should be responsible for creating a variant condition. In my example, I use variant conditions that are based on 1GB01, for which each gigabyte (GB) of hard disk is priced at 10.00 euro. I also use the variant MT01, for which each minitower is priced at 80.00 euro, and the variant TW01, for which each tower is priced at 120.00 euro.
To define a variant condition, execute transaction code VK11 or follow menu path SAP Menu > Logistics > Central Functions > Variant Configuration > Environment > Pricing > Create Condition. In the initial screen (not shown), enter a name in the Condition type field (e.g., VA00) and press Enter. This action displays a pop-up screen (not shown) in which you choose Key combination from the list of options and specify the option variants. Click the save icon to save your data.
In the next screen, populate the Sales Organization, Distribution Channel, and Material fields and enter the variants’ names along with the amounts and validity periods as shown in
Figure 8. Click the save icon.

Figure 8
Display the price conditions for the variants associated with the configurable products
Note
The description of the variants comes from the table maintained after you execute transaction code VK30.
Define the Configuration Profile
The next step is to define the configuration profile to be assigned to the configurable product. The configuration profile links the configurable object, in this case the configurable product, to the characteristics of the class for configuration. The configuration profile is used to:
- Affect the display options and the scope of characteristics on the value assignment screen
- Define an interface design to group characteristics together and define a sequence on the value assignment screen
- Assign dependencies to a configurable object
- Determine the status of the configurable object
To define a configuration profile, execute transaction code CU42 or follow menu path SAP Menu > Logistics > Central Functions > Variant Configuration > Configuration Profile > Change. In the initial screen (not shown), select the value material as the configurable object and then enter the configurable product material code T-VPC01 in the Material field and press Enter.
In the next screen, specify a configurable profile name in the Profile name field (e.g., PROFILE_PP0) and click the Dependencies button (
Figure 9).
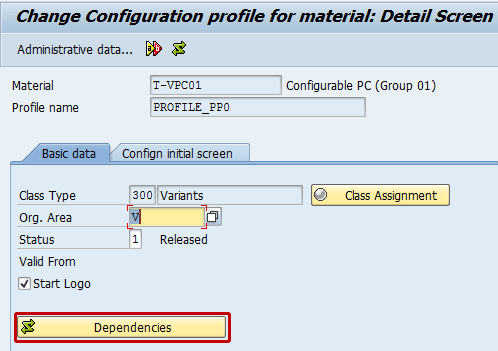
Figure 9
Classify the configurable product using class type 300
This action opens the screen shown in
Figure 10 in which you assign the type of dependencies.

Figure 10
Create a dependency for the configuration profile
In my example, to demonstrate the effects of the dependency, I create one dependency as type Dep. Net. (dependency net) and two dependencies as type Procedure (
Figure 10). Procedures are always used for pricing, whereas the dependency net is allocated to a configurable material in the configuration profile.
The dependency type Procedure can be maintained directly by executing transaction code CU42. In the screen that appears, double-click each line item to edit the dependency. For my example, define the dependency T_PROC_DEFAULT_01 to automatically populate the characteristics T_COL_00 and T_GLO_00, respectively, with the values yellow and gloss if the value of the case characteristic is MT. Click the check icon

to check the consistency of the instructions and then click the save icon to save the data. The system displays a message like the one shown in
Figure 11.

Figure 11
Details for the dependency procedure T_PROC_DEFAULT_01
The dependency procedure T_PROC_PRICE_01 has been created for transferring the condition record to sales. In particular, it transfers an absolute surcharge called 1GB01 for the price condition VA00 of 10.00 EUR (euros) for each GB of the hard disk. Then this condition record is multiplied by the size of the hard disk. In other words, the condition record can vary depending on the size of the disk. Note that the condition record should be copied to the reference characteristic T_VKOND_01 that refers to the SDCOM-VKOND field in variant class (300) T_VPC00. Then click the check icon and check the dependency, release the dependency, and save the data. The system provides a message as shown in
Figure 12.

Figure 12
Details for the dependency procedure T_PROC_PRICE_01
The dependency Net T_CN_VPC01 has been created to populate automatically all three allowed values of the characteristic for extras in case the value of the CPU characteristic is Fast. In order to do so, execute transaction code CU21 or follow menu path SAP Menu > Logistics > Central Functions > Variant Configuration > Dependency > Dependency Net > Create.
In the initial screen (not shown), enter the value T_CN_VPC01 as the dependency net, and then choose the option Basic data and enter the Description Net for T-VPC01, Dependency Group T-01, and Dependency Type Constraint and edit the constraint. Click the check icon to check the consistency of the instructions and click the save icon to save your data. The system displays a message like the one shown in
Figure 13.

Figure 13
Details for the net dependency T_CS_VPC01
Link Condition Records to Characteristic Values
In this step, you link the characteristic values of the casing to the corresponding condition records. You create this link using the input help on the value assignment screen of the configuration simulation. To do so, execute transaction code CU50 or follow menu path SAP Menu > Logistics > Central Functions > Variant Configuration > Environment > Configuration Simulation. Enter the configurable product’s material code in the Material field (e.g., T-VPC-01), enter your plant code in the Plant field, and press F8. Press the input help F4 on the characteristic value PC Casing, and in the PC Casing pop-up screen, select MT (Minitower) and click the assign variant condition icon (this icon is the one circled at the bottom of
Figure 14). In the pop-up screen that appears, enter MT01 in the Variant field and click the save icon.

Figure 14
Link the characteristic’s value minitower to variant MT01
At this stage, the variant condition MT01 has been assigned successfully to the characteristic’s value minitower.
Transactional Processes
In the following steps, you can test the complete purchasing cycle for your configurable products and verify the correlations between the relevant master data and preceding documents.
Create a Sales Quotation
In this step, the sales organization creates a customer’s quotation for the configurable products (PC). To create a quotation for your configurable material, execute transaction code VA21 or follow menu path SAP Menu > Logistics > Sales and Distribution > Sales > Quotation > Create. In the initial screen that appears (not shown), specify the document type (i.e., QT) and the organizational data (i.e., the Sales Organization, Distribution Channel, and Division fields). After you press Enter, the screen shown in the
Figure 15 appears. Specify the product details and define the price conditions and configurable details as shown in
Figure 15.

Figure 15
Create the quotation (item overview)
Select the line item and click the configurable icon

(shown in
Figure 15). The system then displays the Characteristic Value screen as shown in
Figure 16.
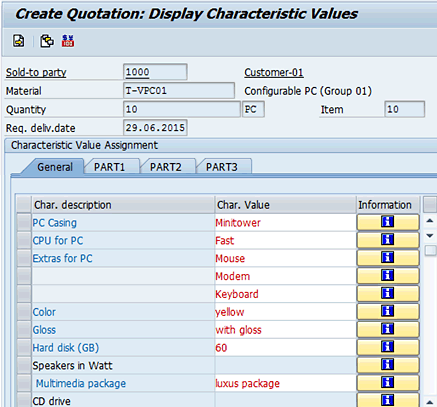
Figure 16
Assign the characteristic’s values to the configurable product
In the General tab of
Figure 16, enter PC Casing as the value MT. Note that when you select the characteristic value MT in the Char. Value column, the system shows its description (Minitower). Note how the values for the characteristics Color and Gloss are populated automatically; this is based on the effect of the dependency procedure T_PROC_PRICE_01 (
Figure 11). Enter CPU for PC as the value Fast and note how the values for the characteristic Extras for PC are populated automatically; this is based on the effect of Net Dependency T_CS_VPC01 (
Figure 13). Then specify the Hard disk (GB) and Multimedia package characteristic’s values.
Now go back to the Quotation Overview screen (
Figure 15), select the line item, and click the condition icon

, as highlighted in
Figure 15. The system shows the price conditions as shown in
Figure 17.

Figure 17
Display the quotation’s variant price conditions
Note the effect of the dependency procedure T_PROC_PRICE_01 for the condition type VA00 and variant 1GB01 (defined in
Figures 8 and
12). The value for the condition type VA00 and variant MT01 has been defined by the settings done in
Figure 8. Go back to the Quotation Overview screen (
Figure 15). Check the consistency of the data and click the save icon to save the document. The system then displays the quotation document number as shown in
Figure 18.
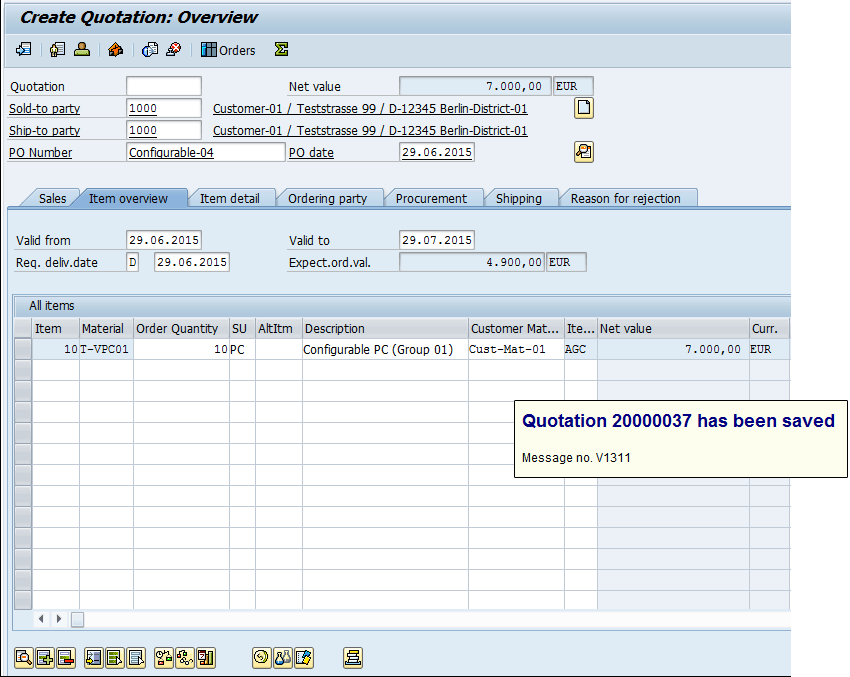
Figure 18
Save the quotation document
Create a Sales Order
In this step, the sales organization converts the quotation into a sales order. To create a sales order for your configurable material, execute transaction code VA01 or follow menu path Logistics > Sales and Distribution > Sales > Order > Create. In the screen that opens (the back of
Figure 19), enter the sales Order Type and the organizational data (the Sales Organization, Distribution Channel, and Division fields). Click the Create with Reference button. In the Quot. (quotation) field of the pop-up screen that appears, enter the number of the quotation document that you created in the previous step (
Figure 19).
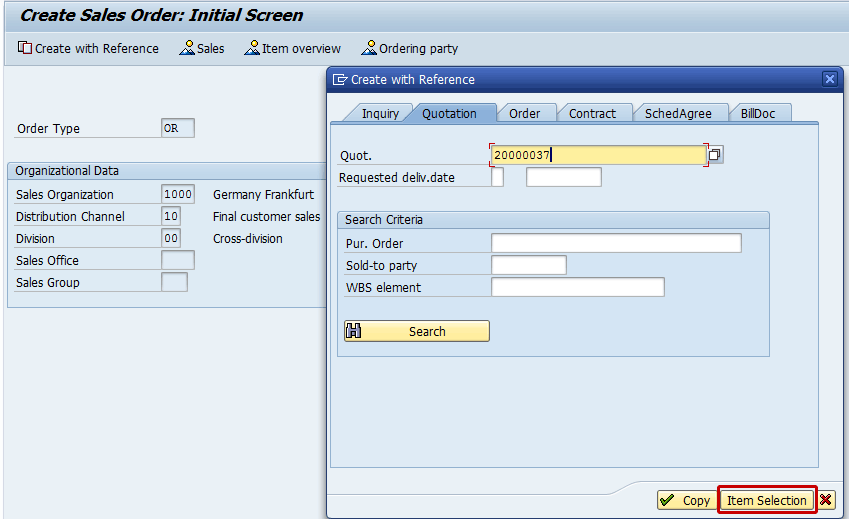
Figure 19
The initial screen to create a sales order with reference to a quotation
Click the Item Selection button. The system then displays the details as shown in
Figure 20.

Figure 20
Copy the quotation’s details for the configurable product (item overview)
In
Figure 20, select the line item (i.e., click the box under the S column), verify the sales quantity, and then click the Copy button. The system then displays the details shown in
Figure 21.

Figure 21
Create a sales order for configurable product (item overview)
Select the line item shown in
Figure 21 and click the configurable icon. The system then displays the details shown in
Figure 22. Verify the characteristic’s values copied from the quotation document.

Figure 22
Verify the characteristic’s values for the configurable product
Then go back to the sales order item overview screen (
Figure 21), select the line item, and click the condition icon. Note the variant price conditions retrieved from the quotation document in
Figure 23. Check the consistency of the document and click the save icon. The system displays an information message with the sales order document number.

Figure 23
Verify the price conditions for the configurable product (item details)
Create an Outbound Delivery
In this step, the warehouse organization creates an outbound delivery for the configurable products. To complete this step, execute transaction code VL01N or follow menu path Logistics > Logistics Execution > Outbound Process > Goods Issue for Outbound Delivery > Post Goods Issue > Outbound Delivery > Create > Single Document (
Figure 24).

Figure 24
Create the outbound delivery for the configurable product
Post the Goods Issue
In this step, the warehouse organization performs a goods issue of configurable products. The goods issue can be done with reference to the outbound delivery by executing transaction code VL02N or following menu path Logistics > Logistics Execution > Outbound Process > Goods Issue for Outbound Delivery > Post Goods Issue > Outbound Delivery Single Document. Enter the Outbound deliv. (outbound delivery) document and press Enter (Figure 25). Press the option Post Goods Issue. The system displays a message like the one shown in Figure 25.

Figure 25
Post a goods issue with reference to the outbound delivery
Post the Billing
In this step, the accounts receivable organization performs the billing posting in the sales and distribution module considering the outbound delivery processed for the configurable product. The posting can be done by executing transaction code VF01 or following menu path Logistics > Sales and Distribution > Billing > Billing Document > Create. After entering the outbound delivery document created for a configurable product, press Enter. The system then displays the screen shown in
Figure 26.

Figure 26
Post billing (line item overview)
In
Figure 26, select the line item and click the condition icon. The sytem then displays the details shown in
Figure 27. Note the condition’s components retrieved from the sales order and then click the save icon to post the document. The system provides the billing document number as specified in
Figure 27.

Figure 27
Verify price conditions in the billing line item
Display the Sales Document History
This step is optional and it is reported just to show that the complete sales cycle has been performed successfully, apart from the final customer’s payment. To display the sales document history created for your configurable products, execute transaction code VA03 or follow menu path Logistics > Sales and Distribution > Sales > Order > Display. In the initial screen that appears (not shown), enter the sales order document number and click the display document flow icon

. The system then displays the details shown in
Figure 28.

Figure 28
Display the sales order document history
Customizing
The default customizing available in the standard system can be used to manage the procurement of the configurable product as it is without making relevant changes.
I apply the IMG changes that I describe in the “Variant Function Group” and “Dependency Group” sections to have more flexibility to quickly find objects created for a specific purpose.
Variant Function Group
The variant function group is used to group together variant functions. It is a three-digit number that can be used as search criteria for finding a variant. To create a new entry, follow menu path SAP Customizing Implementation Guide > Logistics – General > Variant Configuration > Variant Functions (
Figure 29).

Figure 29
Define a new variant function group
Dependency Group
The dependency group is used to group together similar dependencies, or the dependencies that belong to one knowledgebase. It is a three-digit number that can be used as a search criterion for finding dependencies. To create a new entry, follow menu path SAP Customizing Implementation Guide > Logistics – General > Variant Configuration > Dependencies > Define Groups (
Figure 30).

Figure 30
Define a new dependency group
Display the Material Type (Configurable Flag)
In the standard system, the material type defined for configurable materials is KMAT, but it is also possible to use any material type as configurable material as long as the Material is configurable indicator has been selected. In my example, I have used a Halb material type (semifinished goods).
Note that if this indicator is set, it is possible to assign a variant class to the material. This indicator can be set either manually in the master record or in customizing for the material master in the activity define attributes of material types. In this last case, the indicator is set automatically whenever you create a material of the corresponding material type. Then it is not possible to cancel the indicator manually in the material master record.
To define or display this flag in customzing, you execute transaction code OMS2 or follow the menu path SAP Customizing Implementation Guide > Logistics – General > Material Master > Basic Settings > Material Types > Define Attributes of Material Types.
In the initial screen (not shown), select the material type KMAT and click the Details button or double-click the line item. The system displays the details shown in
Figure 31.

Figure 31
Display the material type used for the configurable product
Display Condition Type (Variants)
In the standard system, the condition types used to manage the variants of the configurable products are VA00 and VA01, used respectively to define the quantity and percentage values.
You can define or display a purchasing price condition by following IMG menu path SAP Customizing Implementation Guide > Materials Management > Purchasing > Conditions > Define Price Determination Process > Define Condition Types (option: Define Condition Type). Select VA00 and double-click it. The system then displays the screen shown in
Figure 32. Note the classification of this condition type in the Control data 1 and Control data 2 sections.
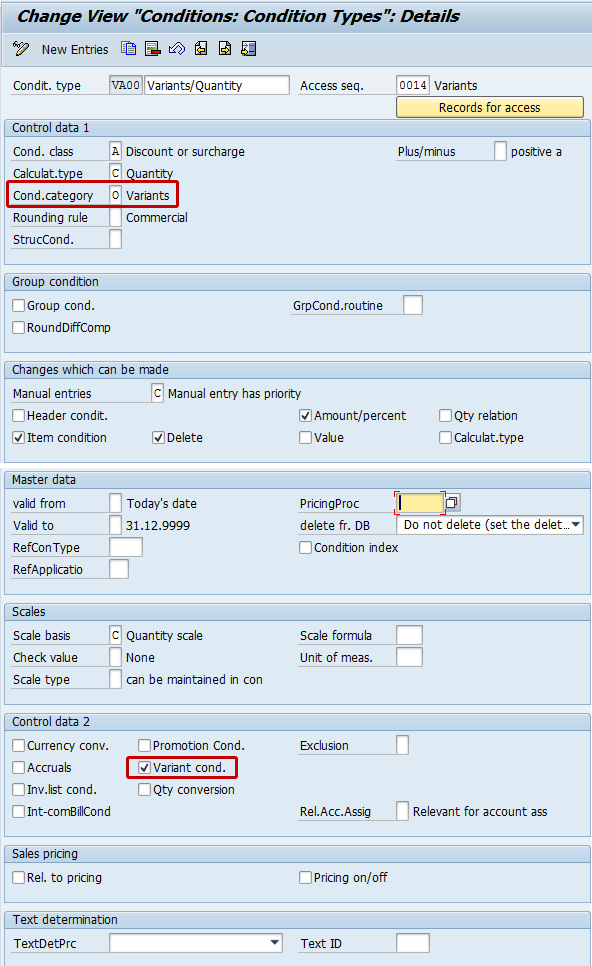
Figure 32
Display the condition type (VA00)
If you need ad hoc behaviors for this condition type, you can copy it into a new condition (e.g., ZA00) and apply the changes (e.g., avoid manual entries).

Gaetano Altavilla
Dr. Gaetano Altavilla is a senior SAP practice manager. His focus is on pre-sales, delivery of SAP application solutions for large international corporations, and SAP knowledge management in Europe, the Middle East, and Africa (EMEA).
In his 18 years of SAP application experience working for many multinational companies, such as Procter & Gamble and Hewlett-Packard, he has covered a wide range of ERP logistic areas, focusing on the MM, WM, SD, LES, PP, PP-PI, PLM (QM, PM, PS) modules, as welll as CRM (TFM), SRM (EBP), SCM (SAP APO), and MES (ME) components.
Dr. Altavilla holds a degree with first-class honors in mathematics from the University of Naples and is certified in many SAP modules: SAP Logistics Bootcamp, SAP MM, SD, LE (SHP/WM/LE), PP, PLM (PM, QM, PS), SRM, CRM, SCM (APO), SCM (TM), FI, CO, and Solution Manager. He also has experience in ABAP/4 and application link enabling (ALE) and IDocs. He has participated in numerous industry conferences, such as the SAP Skills Conference in Walldorf at SAP SE.
You may contact the author at
Gaetano_altavilla@hotmail.com.
If you have comments about this article or publication, or would like to submit an article idea, please contact the
editor.


