SAP Design Studio 1.3 provides the ability to bookmark and personalize dashboards. The designer of the dashboard can integrate these additional functionalities into the design and give them to the consumers of the dashboard, providing them with a personalized viewing experience.
Key Concept
SAP Design Studio 1.3 gives designers the option to integrate the bookmarking and personalization options into the design of their dashboards and applications. Bookmarking allows the consumer of the dashboard to save the current navigation state and to recall, share, or delete such a configuration. Personalization is similar to bookmarking, with the main difference being that a personalization can be used as the default navigation for the dashboard.
I review the concepts of bookmarking and personalization of SAP Design Studio, and then show how to build dashboards with SAP Design Studio, which leverages the bookmarking and personalization functionalities.
Bookmarking in SAP Design Studio
The bookmarking functionality of SAP Design Studio gives the designer of the dashboard the ability to give the consumer of the dashboard the option to save the navigation state of the dashboard. Now this functionality might sound familiar, as this is also available via the personalization feature of SAP Design Studio. Bookmarking and personalization are very similar capabilities, but bookmarking allows the consumer to save multiple navigation states whereas personalization only allows the consumer to save one navigation state.
The bookmarking ability gives the consumer the option to save different navigation states and save them under a given name, as well as the option to then recall these saved bookmarks when viewing the dashboard or application. In addition, the consumer has the option to share saved bookmarks with other users.
Personalization in SAP Design Studio
The personalization functionality feature of SAP Design Studio gives the designer of the application or dashboard the ability to allow the consumer of the dashboard to save the current navigation state of the application. For example, the next time the consumer refreshes the dashboard, the personalized state of the dashboard is used as the default view. In this case, the dashboard shows the revenue over the last 12 months in the form of a crosstab. The consumer of the dashboard may personalize this dashboard to show the revenue broken down by quarters instead of months and, when recalling the dashboard the next time, the default view for the user will be revenue by quarters.
Each user can only have one set of personalized values for a particular dashboard, as the personalization stores the information in a dashboard with a user-specific combination.
The personalization feature in SAP Design Studio is so far only available when using SAP Design Studio in local mode or in combination with the SAP BusinessObjects BI platform; the feature is not available in combination with SAP HANA or SAP BW as deployment platforms for SAP Design Studio.
Comparing SAP Design Studio’s Bookmarking and Personalization Features
From reading the descriptions in the previous sections, you can see that the bookmarking and personalization capabilities are similar. These functionalities allow the user:
- To store the navigation state of the application or dashboard. The information is stored by the user and is dashboard specific.
- To store the information either using local mode or in combination with the SAP BusinessObjects BI platform. Bookmarking and personalization do not support the pure SAP HANA or pure SAP BW deployment options.
In addition to those common functionalities, there are some important differences between the bookmarking and personalization functionalities. These are:
- Using personalization, the user can store only one set of values and each new storing request automatically overwrites the existing values for the user. Bookmarking allows the user to store multiple different sets of value combinations under given names.
- Using personalization, the user can leverage the stored value combination as a default option for the selected dashboard and the dashboard is rendered with those default values. Using bookmarking, the user cannot define a default value combination and instead needs to load the dashboard first and then select the bookmark.
As you can see, bookmarking and personalization are similar features available in SAP Design Studio, with the main differentiator being that with personalization the consumer can have one personal set of values per dashboard and with bookmarking the consumer can have several value combinations per dashboard.
Creating an SAP Design Studio Application Using Bookmarking
Now that I’ve covered the basics of bookmarking, let’s create the first Design Studio application with bookmarking functionality. In this example, I show how to create a relatively simple dashboard. This dashboard presents a filter and a chart to the user and additionally allows the user to save bookmarks based on the settings.
For this example I use a BEx Query based on the SAP BW Demo Model (
https://scn.sap.com/docs/DOC-33313 ). The BEx Query is based on the MultiProvider 0D_NW_M01 and contains the Free Characteristics Product Group, Product, and Product Category, and the Key Figures Costs and Net Value (
Figure 1).

Figure 1
BEx Query
Here are the steps for creating the Design Studio application:
1. From the Start menu, follow menu path > All Programs > SAP > SAP Business Intelligence > SAP BusinessObjects Design Studio > Design Studio. If this results in a logon screen, click the Skip button as you should be in local mode of SAP BusinessObjects Design Studio for this exercise.
2. Close the welcome screen, navigate to the Application menu, and select the New menu option.
3. Enter DESIGNSTUDIO01 for the Name and Description.
4. Select Desktop Browser as the Target Device.
5. Click the Finish button.
6. Navigate to the Outline tab and select the Data Sources folder (
Figure 2).
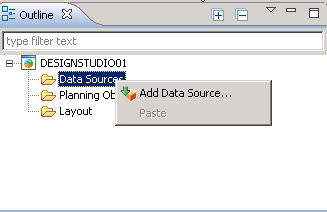
Figure 2
Add the data source
7. Right-click and select the Add Data Source… option.
8. In the context menu that opens (not shown), click Browse for the Connection option.
9. From the resulting list of connection options, select the connection to your SAP BW system.
10. Log on to your SAP NetWeaver BW system.
11. Once logged on, click the OK button.
12. Click Browse for the Data Source option.
13. Click the Search tab.
14. Search for the BEx Query you created.
15. Select the Query and click the OK button.
16. Enter QUERY001 as the Data Source Alias.
17. Finally, click the OK button again.
For this small dashboard, you need the following components:
- A chart
- A button to save the bookmarks
- A button to load the bookmarks
- A drop-down box to list the bookmarks
- An input field to provide a name as input for the bookmarks
- A filter option to set different filter values for the bookmarks
Continue with these next steps to achieve these goals.
18. Add a Chart from the Analytic Components to your empty canvas of the new application.
19. Navigate to the Properties shown on the right side and enter these values:
- Top Margin: 400
- Left Margin: 10
- Bottom Margin: 10
- Right Margin: 10
- Width: auto
- Height: auto
20. Set the Data source property to the value QUERY001.
21. Set the Name property to the value CHART01.
22. Add a button from the Basic Components to the empty canvas of the new application.
23. Navigate to the Properties shown on the right side of the screen and enter these values:
- Top Margin: 5
- Left Margin: 10
- Bottom Margin: auto
- Right Margin: auto
- Width: 200
- Height: 50
24. Set the Text property to the value Save Bookmark.
25. Set the Name property to the value BUTTON_SAVE.
26. Add a button from the Basic Components to the empty canvas of the new application.
27. Navigate to the Properties shown on the right side of the screen and enter these values:
- Top Margin: 70
- Left Margin: 10
- Bottom Margin: auto
- Right Margin: auto
- Width: 200
- Height: 50
28. Set the Text property to the value Load Bookmark(s).
29. Set the Name property to the value BUTTON_LOAD.
30. Add a drop-down box from the Basic Components to the empty canvas of the new application.
31. Navigate to the Properties shown on the right side of the screen and enter these values:
- Top Margin: 5
- Left Margin: 300
- Bottom Margin: auto
- Right Margin: auto
- Width: 300
- Height: auto
32. Set the Name property to the value BOOKMARK_LIST.
33. Add an input field from the Basic Components to the empty canvas of the new application.
34. Navigate to the Properties shown on the right side of the screen and enter these values:
- Top Margin: 150
- Left Margin: 10
- Bottom Margin: auto
- Right Margin: auto
- Width: 200
- Height: auto
35. Set the Name property to the value BOOKMARK_INPUT.
36. Add a dimension filter from the Analytic Components to the empty canvas of the new application.
37. Navigate to the Properties shown on the right side of the screen and enter these values:
- Top Margin: 300
- Left Margin: 10
- Bottom Margin: auto
- Right Margin: auto
- Width: 200
- Height: 50
38. Set the Name property to the value DIM_FILTER.
39. Set the Data source property to the value QUERY001.
40. Navigate to the Dimension property and open the Dimension Selection editor (
Figure 3).

Figure 3
Select the dimension
41. Select the Product Group dimension.
42. Click the OK button.
You now have all the necessary components and just need to add the scripting. Follow these steps:
43. Navigate to the button BUTTON_SAVE and open the Properties.
44. Navigate to the On Click property and open the editor.
45. Add the code shown in
Figure 4.

Figure 4
Code for a Save button
The first line of code picks up the text to enter into the Input field and stores it in the variable BookmarkTitle. The second line of code saves the current state as a Bookmark with the title set from the variable BookmarkTitle.
46. After you add the code, click the OK button.
47. Navigate to the button BUTTON_LOAD. This button is not loading the actual bookmarks for the application, but instead it updates the list of available bookmarks for the drop-down box.
48. Navigate to the On Click property and open the editor.
49. Add the code in
Figure 5.

Figure 5
Code for a Load button
First the code gets a list of all of the available bookmarks and stores them in an array AllBookmarks. The second step removes the current list of items from the drop-down box and adds a first item. This is not really a bookmark, but instead is just an empty value. The last step in the script is a loop that goes through the array AllBookmarks and adds each item of the array to the drop-down box.
Here I add an empty item as the first entry to the drop-down box because the first actual bookmark is listed as the first item, but the application would not be refreshed as the drop-down box only has an On Select event and not an On Change event.
50. Click the OK button.
51. Navigate to the BOOKMARK_LIST drop-down box.
52. Navigate to the On Select property and open the editor.
53. Add the code in
Figure 6.

Figure 6
Code for a drop-down list
54. Follow the menu Application > Save All.
55. Execute your application using the menu Application > Execute Locally, which should result in a screen like the one shown in
Figure 7.

Figure 7
The new Design Studio application with bookmarks
Your application should now allow you to filter the chart based on the Product Group dimension, and you can then store the navigational state using the Input field and the button to save the bookmark. After you save the bookmark, you can use a button to load the list of bookmarks and refresh the drop-down list. Then, when you select the bookmark entry from the drop-down box, the saved navigational state is loaded.
As you can see, this is a very simple application. Notice that I created a separate button for refreshing the list of available bookmarks in the drop-down list. The reason for this is simply the fact that when loading a bookmark with the On Select event of the drop-down list, the application is reset and local variables are no longer defined.
The application you just created uses specific buttons to perform steps, such as saving the bookmark or refreshing the list of available bookmarks. These steps can also be performed at different times in your dashboard. The reason for separating these steps by using buttons is simply to show the individual steps for saving and loading bookmarks.
Creating an SAP Design Studio Application Using Personalization
With the first example, I showed how you can save and re-load bookmarks. In the second part of this exercise I am going to show how you can use the personalization feature. Remember, a user can create only one personalization setting for the dashboard, but can create multiple bookmark settings.
To illustrate the following steps, I continue to use the application created in the previous section. With the previous application open in the SAP Design Studio client tool, please continue by following these 18 additional steps.
1. Add a button from the Basic Components to the empty canvas of the new application.
2. Navigate to the Properties shown on the right side of the screen and enter these:
- Top Margin: 150
- Left Margin: 300
- Bottom Margin: auto
- Right Margin: auto
- Width: 200
- Height: 50
3. Set the Name property to the value PERSONALIZATION_SAVE.
4. Set the Text property to the value Save Personalization.
5. Add a button from the Basic Components to the empty canvas of the new application.
6. Navigate to the Properties shown on the right side of the screen and enter these:
- Top Margin: 220
- Left Margin: 300
- Bottom Margin: auto
- Right Margin: auto
- Width: 200
- Height: 50
7. Set the Name property to the value PERSONALIZATION_DELETE.
8. Set the Text property to the value Delete Personalization.
9. Navigate to the PERSONALIZATION_SAVE button.
10. Navigate to the On Click property and open the editor.
11. Add the code in
Figure 8. This line of code uses the current settings and saves the actual navigation state as personalized settings.

Figure 8
Code to save personalization
12. Click the OK button.
13. Navigate to the PERSONALIZATION_DELETE button.
14. Navigate to the On Click property and open the editor.
15. Add the code in
Figure 9. This code shown removes the personalized settings for the user.

Figure 9
Code to delete personalization
16. Click the OK button.
17. Follow menu path Application > Save All.
18. Execute the application using the menu Application > Execute Locally (
Figure 10).

Figure 10
The new Design Studio application with personalization
The application now has the two additional options to save and to delete the personalization for the user. Follow these steps in your application to see the impact:
- Use the Dimension Filter for dimension Product Group and specify a filter value; for example, Laptops.
- Click the Save Personalization button.
- Close your browser window.
- Re-start the application using the menu Application > Execute Locally.
In the screen that opens, you should now notice that the application has started with the previously personalized filter value. You can use the Delete Personalization button to remove this configuration for the user.
These short exercises should give you a good overview of SAP BusinessObjects Design Studio bookmarking and personalization features, and offer some ideas on how you can leverage these functionalities in your dashboard projects.
Product Roadmap Disclaimer
The descriptions in this article of future functionality are the
author’s interpretation of the publicly available product integration
roadmap. These items are subject to change at any time without any
notice, and the author does not provide any warranty on these
statements.

Ingo Hilgefort
Ingo Hilgefort started his career in 1999 with Seagate Software/Crystal Decisions as a trainer and consultant. He moved to Walldorf for Crystal Decisions at the end of 2000, and worked with the SAP NetWeaver BW development team integrating Crystal Reports with SAP NetWeaver BW. He then relocated to Vancouver in 2004, and worked as a product manager/program manager (in engineering) on the integration of BusinessObjects products with SAP products. Ingo's focus is now on the integration of the SAP BusinessObjects BI suite with SAP landscapes, such as SAP BW and SAP BW on SAP HANA, focusing on end-to-end integration scenarios. In addition to his experience as a product manager and in his engineering roles, Ingo has been involved in architecting and delivering deployments of SAP BusinessObjects software in combination with SAP software for a number of global customers, and has been recognized by the SAP Community as an SAP Mentor for SAP BusinessObjects- and SAP integration-related topics. Currently, Ingo is the Vice President of Product Management and Product Strategy at Visual BI Solutions, working on extensions to SAP’s product offering such as SAP BusinessObjects Design Studio and SAP Lumira. You may follow him on Twitter at
@ihilgefort.
You may contact the author at
Ingo@visualbi.com.
If you have comments about this article or publication, or would like to submit an article idea, please contact the
editor.