Learn five key steps to create drill-down reports in the material ledger so that you can view actual costing information for all materials in one plant or for all materials in all plants assigned to all company codes at same time.
Key Concept
In the material ledger, it is very important to understand the Material Price Analysis transaction (transaction code CKM3N). This transaction displays all the material ledger-related transactions for one plant or material.
In the Material Price Analysis transaction (transaction code CKM3N) of the material ledger, you can view transactions of only one plant or material at a time as shown in Figure 1.
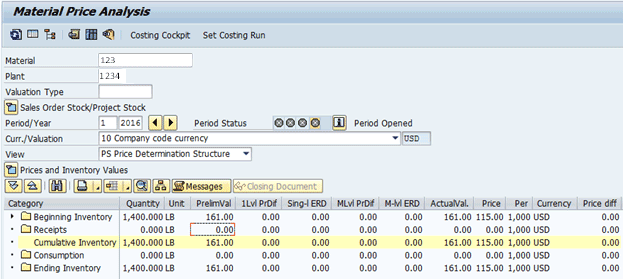
Figure 1
The Material Price Analysis screen
However, sometimes you want to see actual costing information for all materials in one plant or for all materials in all plants assigned to all company codes at same time. I explain how to create similar reports for all plants or materials with drill-down functionality in your SAP system. If you have this information, you can easily reconcile your trial balance inventory with the material ledger actual inventory. I walk you through the following steps:
- Maintain key figures
- Maintain a global variable
- Create, change, or display forms
- Create, change, or display reports
- Run a report
In the “Transaction Code Tips” sidebar, I pass on some tips to use when you want to create transports for reports or forms or create a client copy for reports or forms.
The five steps listed above are the same as those for creating Report Painter or Profitability Analysis (CO-PA) reports, but for the material ledger, SAP provided a new set of transaction codes. These transactions codes are not found in the SAP Easy Access menu or in an SPRO path. You have to remember them. I explain which transaction code to use for each step that I describe.
Step 1. Maintain Key Figures
Key figures define an amount to be reported. There are two types of key figures: basic and calculated. Basic key figures are the standard key figures provided by SAP. You cannot create, change, or delete basic key figures. To view the basic key figures for the material ledger, execute transaction code KKML7. This action opens the screen shown in Figure 2 with the list of basic key figures.
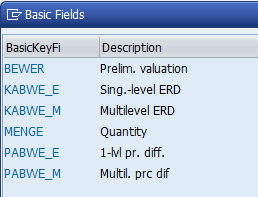
Figure 2
Basic key figures
Calculated key figures are the manually created key figures with which you can use basic key figures for calculation. To create a calculated key figure for actual value, execute transaction code KKML7. In the screen that appears (Figure 3) enter ACTVAL in the Key Figure field and click the create icon.
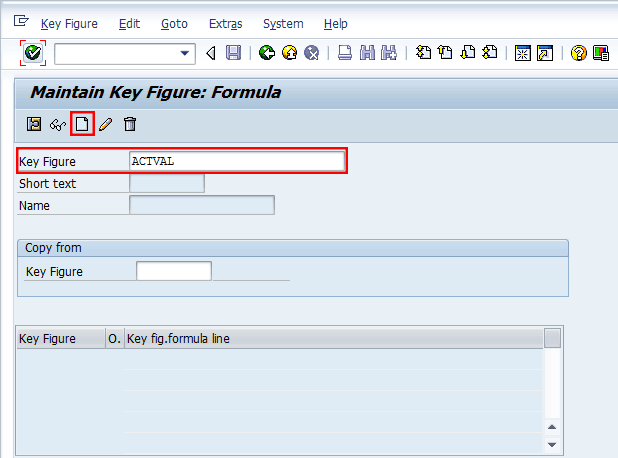
Figure 3
Maintain a calculated key figure field
In the next screen (Figure 4), enter names in the Short text and Name fields. Enter a key figure formula as shown in the lower section of Figure 4. As you can see you have used basic key figures provided by SAP to create a calculated key figure.
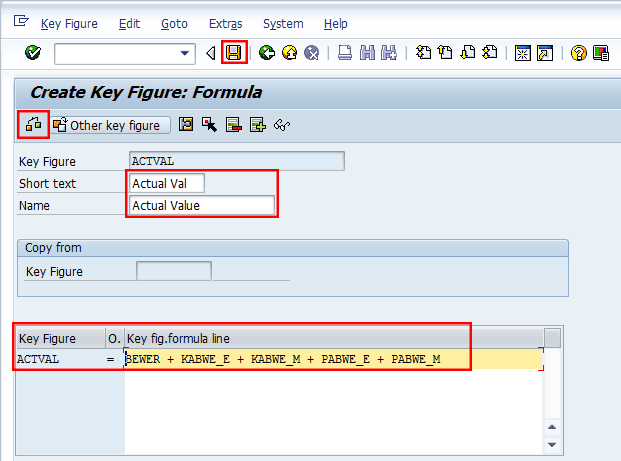
Figure 4
Create Key Figure: Formula
For my example, the formula is Actual Value = Preliminary valuation + single-level price variance + multi-level price variance + single-level exchange rate variance + multi-level exchange rate variance. As shown in Figure 4, the formula contains the technical names of the basic key figures shown in Figure 2.
Click the check formula icon  to validate the formula and then click the save icon
  .
.
Step 2. Maintain a Global Variable
Sometimes there is a need to create variables for calculation of the period and year based on selection parameters. The selection parameters are based on which data is to be fetched and displayed in the report output developed in a material ledger report. SAP has provided standard global variables that you can use in this report. To create, change, and display variables, execute transaction code KKMLV. Figure 5 shows all the variables that SAP has provided.
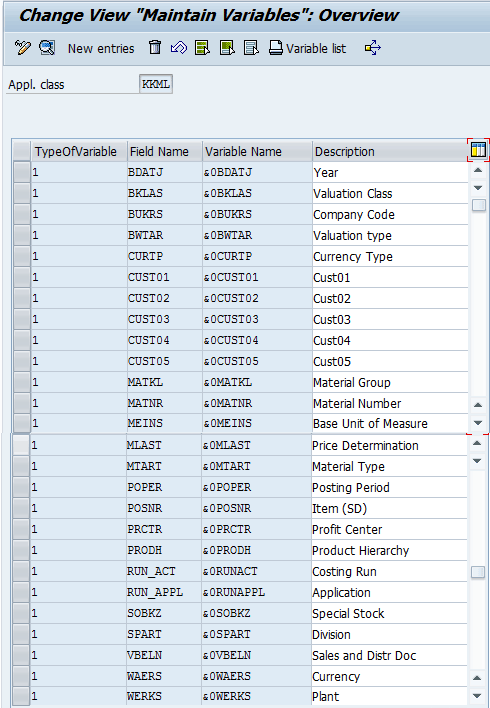
Figure 5
SAP global variables
Note
The variables shown in Figure 5 are different from the standard Report Painter variables.
If you want to create a new variable, click the New entries button (Figure 5). Now enter data as shown in Figure 6.
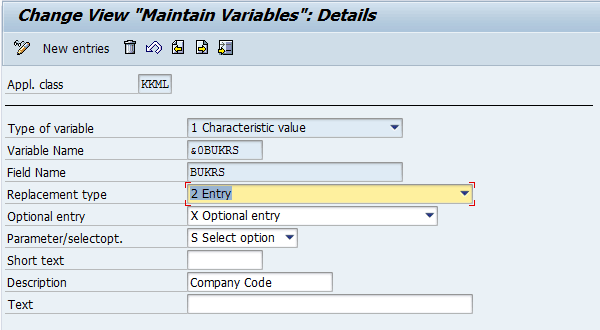
Figure 6
Create a variable
The information about the importance of each field is described below.
- Type of variable: Here you select what kind of variable you want to create. For example, Characteristic value, Text, Formula, Hierarchy, Hierarchy node, Hierarchy node/Characteristic.
- Variable Name: Here you enter the name of the variable. A global variable name starts with an ampersand (&), and SAP variables provided within the system have a number as the second character. A user-defined global variable has a letter as the second character.
- Field Name: In this field, you select the field from the table that you want to reference.
- Replacement type: The replacement type defines how a variable is to be replaced by a value. A variable can be replaced manually or automatically. For example, manual entry, user exit, or fixed value.
- Optional entry: If the content of the variables is defined by an entry, this field controls whether this entry is mandatory.
- Parameter/selectopt: Parameter means that only a single value may by input for the variable. You can use this parameter option for currency, for example. The select-option variable means that the general selection options are available for the variable.
- Short text and Description: These fields are used to enter the text for the variable.
Step 3. Create, Change, or Display Forms
Forms are the structures required as the basis for the definition of reports. You can use the same form for any number of different reports. To create, change, or display a form, execute transaction codes KKML4, KKML5, and KKML6, respectively.
As an example, create a form in which the structure looks like the screen that displays after you execute transaction code CKM3N. To do this, execute transaction code KKML4. Enter a Form name and description as shown in Figure 7 and click the Create button.
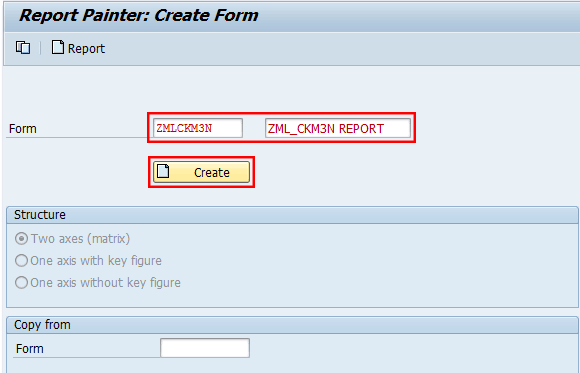
Figure 7
Enter a form name and a description
This action opens the screen shown in Figure 8.
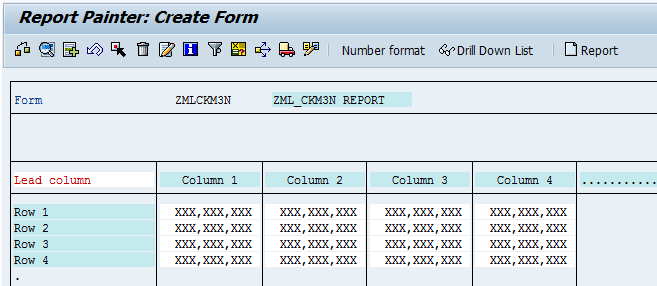
Figure 8
Configure the Lead column
First, you need to enter information about the Lead column. Click Row 1. In the pop-up screen that appears (Figure 9), select the Characteristics radio button and click the enter icon  .
.
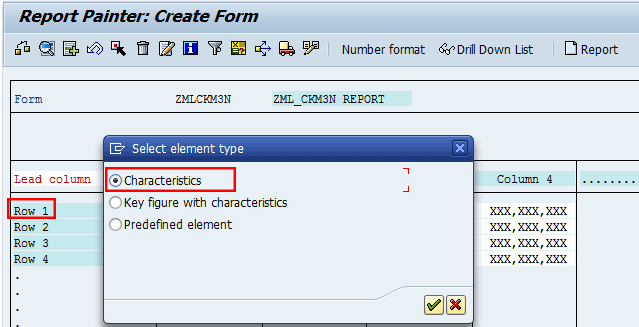
Figure 9
Select an element type
In the next screen (Figure 10), you need to select the Category. If you place your cursor in the From field and press F4, you can view all the possible options for a category in the pop-up screen (Figure 10). The material ledger data includes the following categories that reference the respective period in the respective currency:
- Beginning Inventory – AB
- Price Changes – PC
- Receipts – ZU
- Other Receipts/Consumption – VP
- Consumption – VN
- Ending inventory/current inventory – EB
- Cumulative inventory – KB
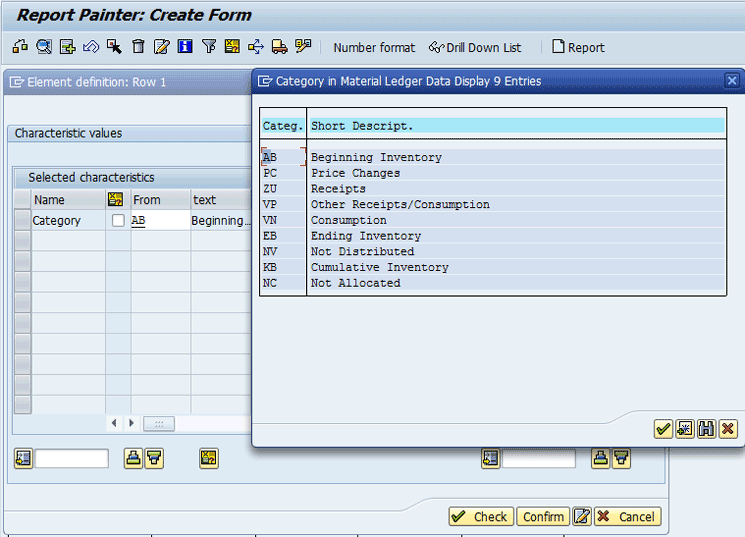
Figure 10
Select categories
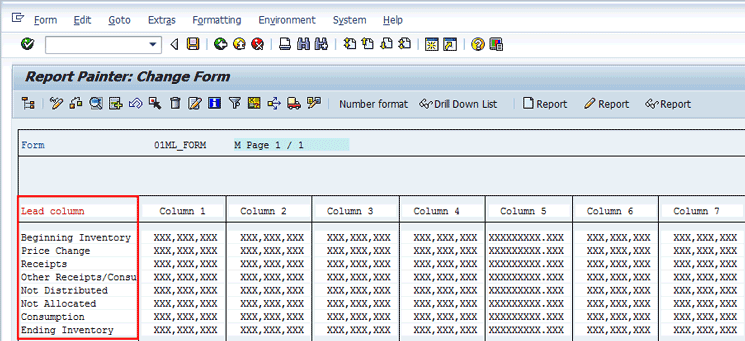
Figure 11
Categories displayed for the Lead column

Figure 12
Select an element type for Column 1
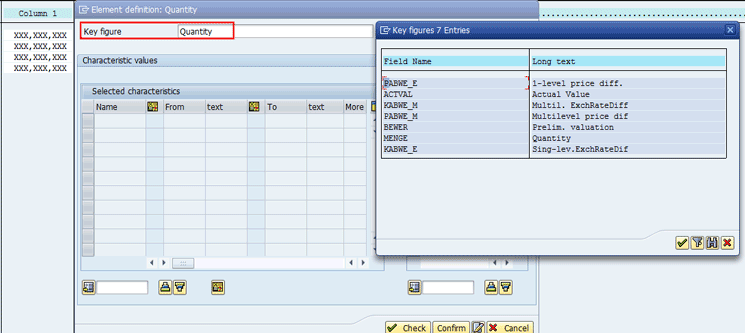
Figure 13
Select the key figure
One by one select all the key figures for each separate column, click the Check button, and then click the Confirm button. The final structure looks like the screen shown in Figure 14.
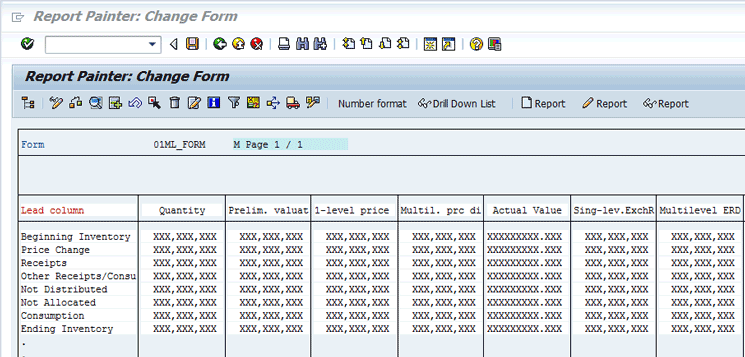
Figure 14
Final structure for a form
Figure 12
This action opens the screen shown in Figure 15 in which you can enter all the required fields you need for data selection. You can also use the variable I described earlier as shown in the From column in Figure 15. To enter a variable, you need to check the indicator (between the Name and From comuns) as shown in Figure 15.
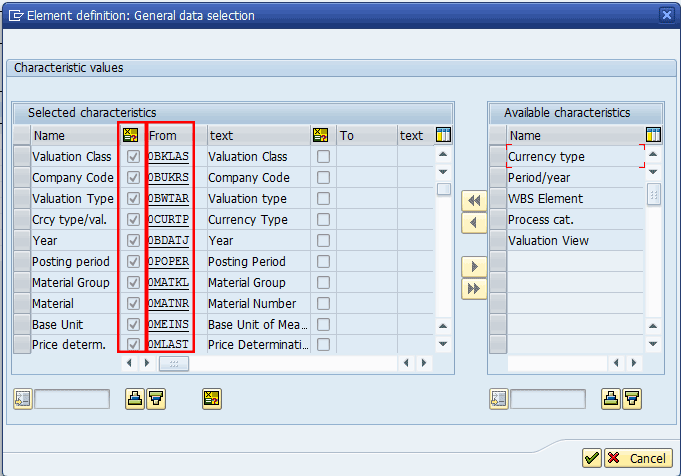
Figure 15
General data selection
As you can see in Figure 15, you can use variables that you can enter while running the report in selection parameters to get the required data. After you are done with general data selection, click the enter icon. The system then returns you to the screen shown in Figure 14.
Click the save icon to save the form. In the next step you need to create a report and assign this form to that report.
Step 4. Create, Change, or Display Reports
To create, change, or display reports, execute transaction codes KKML1, KKML2, and KKML3, respectively.
To create a report, execute transaction code KKML1. In the screen that opens, enter a report name and a form name as shown in Figure 16. Then press Enter to go to the screen shown in Figure 17.
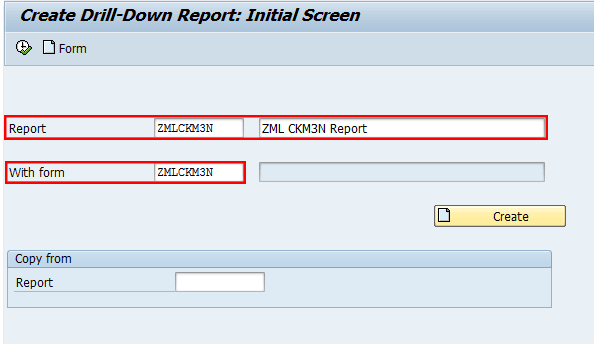
Figure 16
The initial screen to create a drill-down report
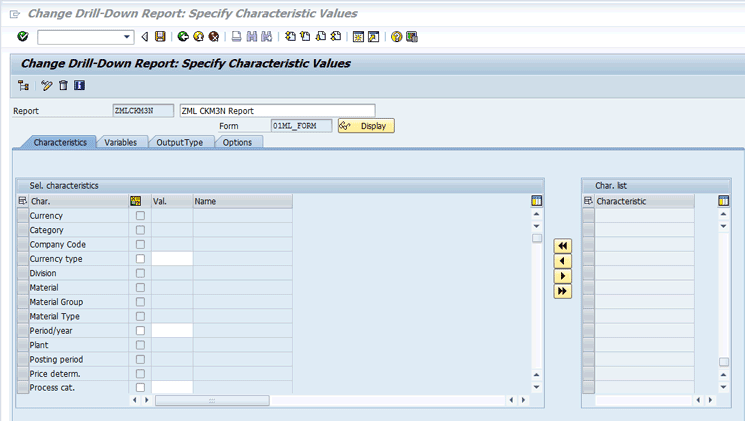
Figure 17
Characteristics for the selection screen
In the Characteristics tab of Figure 17, you can select all the characteristics that you want for the selection screen. By default, the characteristics appear in the Char. list (characteristic list) section in the right side of Figure 17. To select a particular characteristic, you need to select that characteristic on the right side and click this icon  to move it to the left side to the Sel. characteristics (selected characteristics) section. Figure 17 shows that you have moved all the available characteristics to the Sel. characteristics section.
Now click the Variables tab (Figure 18). In this tab you see all the variables you used while you created the form as shown in Figure 15. You can also default the value that you want to enter in the selection screen. You can enter only the default value for variables that have been created with the Parameter option as explained in Figure 6 while creating a variable. Select the indicators under the Entry at Execution column if you want to allow changes to this default value at the time of the report execution.

Figure 18
The Variables tab
Click the save icon to save the report. The report is now ready to run.
Step 5. Run a Report
To run a report, execute transaction code KKML0.This action opens the screen shown in Figure 19 in which you can view all the reports created.
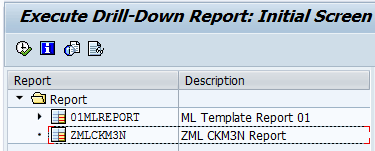
Figure 19
The initial screen to execute a drill-down report
Select a report and click the execute icon  . The selection screen appears (Figure 20) in which you can enter all the selection parameters for which you want to run the report (e.g., Year, Company Code, Posting Period, and so on). Note that the Currency Type field is autopopulated with the value 10 because you entered it as a default value. You can change this value if you want to report in a currency other than the default currency.
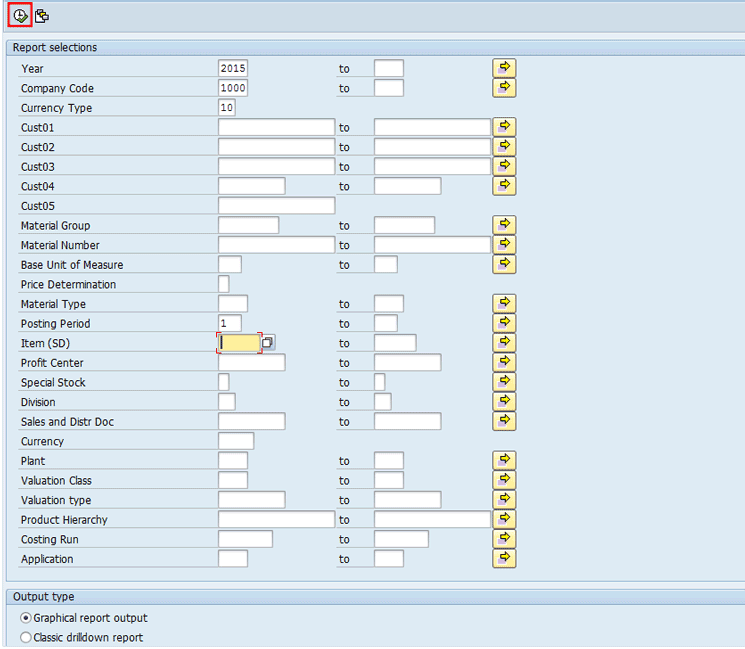
Figure 20
The report selection screen
After you click the execute icon in Figure 20, the report output appears in the next screen (Figure 21).
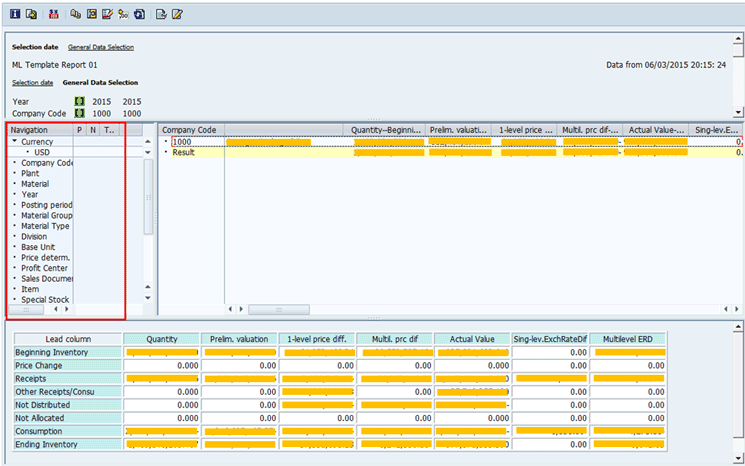
Figure 21
The report output
You can get drill down further in this report by clicking the required characteristics on the left side under Navigation (Figure 21). Each time you click a specific characteristic, a Result appears on the right side and the data displayed on the bottom part of the report changes.
Transaction Code Tips
There are several other transaction codes provided by SAP to create transports or client copies of reports or forms as shown below.
Create Transports for Reports or Forms
To create transports for reports and forms, use the following transaction codes:
- KKMLH: Transport of reports
- KKMLI: Transport of forms
Create a Client Copy for Reports or Forms
To create a client copy for reports and forms use the following transaction codes:
- KKMLJ: Client copy of reports
- KKMLK: Client copy of forms
The main use for this kind report is you can easily reconcile your trail balance inventory (based on material types such as raw material, semi-finished goods, and finished goods) with material ledger actual inventory by comparing ending inventory for every period.
Mehulkumar Patel
Mehulkumar Patel is a senior system engineer and certified SAP controlling (CO) consultant with approximately 10 years of experience in SAP FI/CO. He has done multiple end-to-end SAP implementations of SAP applications. He holds bachelor’s and master’s degrees in computer science and an MBA in finance. He also is certified in SAP CO.
If you have comments about this article or publication, or would like to submit an article idea, please contact the editor.


