Discover how to create templates for services configuration (profiles). Then see how to apply these templates (bundled in a business scenario) to services to create endpoints together instead of separate endpoint creation for each service. Service-oriented architecture (SOA) Manager, as a configuration tool for ABAP Web Services, offers additional configuration objects to easily carry out configuration tasks in service-oriented architecture landscapes.
Key Concept
SOA Manager is the configuration tool for ABAP Web Services that offers advanced configuration functionalities. Among these, the combined configuration of multiple services and consumers, called service-oriented architecture (SOA) Configuration for Connectivity, is important especially for complex scenarios with several consumer and provider services to ease the configuration task.
As the concept of service-oriented architecture (SOA) becomes a reality for an increasing number of companies, the question of how best to run a service-based landscape becomes more important. The actual implementation of SAP-delivered enterprise services or the creation of new enterprise services with new functionality is only one aspect of the whole picture. Once the implementation work is done the next step is to configure the runtime behavior of the services. Only then are they ready for the consuming applications to use. SOA Manager is the tool for configuring both provider and consumer services on the ABAP stack.
One of SOA Manager’s improvements is the advanced concept of service configuration — referred to as SOA Configuration for Connectivity — which allows you to configure multiple services at one time (among other things). I focus on the SOA Configuration for Connectivity functionality for ABAP services. I first take a general look at why you need an advanced service management concept before moving on to the concepts behind the new approach. Then I will narrow down the focus to the configuration areas for multiple service providers.
SOA Manager is available with SAP NetWeaver Application Server (SAP NetWeaver AS) ABAP 7.0 (with Support Package 14). This article is based on SAP NetWeaver enhancement package 2 for SAP NetWeaver 7.0 with Support Package 4. The predecessor, SAP enhancement package 1, offers similar functionality. However, the user interface and the handling differ in some areas.
Note
SAP NetWeaver enhancement package 2 for SAP NetWeaver 7.0 is sometimes also referred to as Code line or Basis 7.02, according to release 702 of the software component SAP_BASIS (check menu System > Status and navigate to the component information via the magnifier icon). SAP Business Suite 7 Innovations 2010, which is expected to be in Ramp-Up in 2011, will be based on SAP NetWeaver enhancement package 2 for SAP NetWeaver 7.0.
This article assumes that you are familiar with the basic concepts of SOA as well as the Web services technology of SAP NetWeaver AS ABAP. You can find more information on these topics at the Web Services page and the ABAP Connectivity Home page.
SOA Configuration for Connectivity
Before I go into the details of the concrete business example, it is helpful to understand the key concepts of SOA configuration. In general, there are several dimensions to consider when configuring services. SOA configuration can apply to:
- The ABAP or Java stack
- Service providers or consumers
- Single or multiple services
As mentioned earlier, one of the important goals is to streamline the configuration process so that you can conveniently apply it to groups of services. Figure 1 shows an overview on the dimensions of services configuration:
- 1 (right): First you configure the provider service, specifying how the service can be called from a remote system
- 2 (left): Next, configure the service consumer, adapting the consumer to the settings the provider service has established

Figure 1
Dimensions of services configuration (source: SAP)
The simple illustration in Figure 1 does not reflect the real-life situation that typically includes many services as part of a scenario with services on the provider side and proxies on the consumer side — and you have to configure them all to enable the runtime of the scenario. (For more information about the initial tasks you carry out, see the sidebar “Generic Configuration Tasks.”) Now keep in mind that configuration is not transported, so you have to configure the same services in your development, test, and production systems. Multiple services configuration (as part of SOA Configuration for Connectivity) relieves the task for the administrator, once the concept and the configuration objects are embraced.
Business Example: Configure Multiple Service Providers
I use the six enterprise services within the SAP NetWeaver Demo Model to illustrate the configuration steps. Although these services are not used in a live scenario, you can use these services to easily reproduce the configuration because they are delivered with SAP NetWeaver AS ABAP and are part of the SAP NetWeaver ABAP trial. For this article, I discuss the provider side of the configuration for the six enterprise services, including the creation of endpoints for the services.
Note
The authorization roles for working with the SOA Manager have the prefix SAP_BC_WEBSERVICE*. An example is the role SAP_BC_WEBSERVICE_CONFIGURATOR, which contains authorizations for users who administer the SOA Manager. SAP Note 1318883 (“Introduction of new authorizations in Web Service Framework”) provides an overview and explains how to import missing roles.
Endpoints, Profiles, and Business Scenarios
To make an enterprise service accessible for a call from a remote system, you must configure an endpoint, which determines the functionality’s runtime behavior (e.g., security settings). The goal is to generate endpoints for multiple provider services. For this task you have to create two configuration objects: a profile and a business scenario.
The profile is a reusable placeholder for runtime configuration settings, specifying items such as basic authentication. By creating a profile, you can later apply the same configuration settings to several services.
The business scenario is the assembly of the provider services that you intend to configure. In it, each service has an associated profile. First you create the business scenario, assign the provider services, and reference a profile for each service. Then you activate the business scenario, which in turn creates and activates the desired endpoints.
The overview in Figure 2 shows the provider system with existing services in the upper block. During services configuration, the endpoints are created based on the profiles and the business scenario. The provider services are created as design time objects in the ABAP Workbench (transaction SE80), whereas you configure the profile, business scenario, and endpoints in the SOA Manager (transaction SOAMANAGER).

Figure 2
Overview of multiple provider services configuration objects
Create Endpoints
I’ll show you how to create the endpoints for the six services in the SAP NetWeaver Demo Model by using a profile and a business scenario. After starting SOA Manager, on the Technical Administration tab click the Profile Management link. The existing profiles are shown, listed by their names (Figure 3).

Figure 3
View the existing profiles
Select a profile in the table to view its settings, which are organized into four tabs. The last three tabs (Messaging, Transport Settings, and Security) reflect the profile’s settings. Together with the profile’s name, you have four categories that you have to set up when you create a new profile, guided by a wizard (Figure 4).

Figure 4
The four steps to create a profile in the wizard
A profile can be active or inactive. Also, you cannot edit a profile — you can only create a new version and change the settings within it. This ensures consistency across provider and consumer systems, as I will discuss later.
Note
The system creates the DEFAULT_PROFILE automatically during the first use of SOA Manager. It cannot be deleted, just deactivated.
Now let’s walk through the Profile Management Wizard in detail. Except for the profile’s name and description, I kept the default settings for this example. In the first step, enter the profile’s name and a description (Figure 5). Click the Next button at the top of the screen to move to the second step.

Figure 5
Enter the Profile Name and Profile Description
The second step allows you to specify the Web Service Reliable Messaging (WS-RM) settings and the method of message ID transfer (Figure 6). Click the Next button to proceed to step 3.

Figure 6
Specify the WS-RM settings and the method of message ID transfer
In step 3, you set up the transport settings, in which you specify the proxy parameters (Figure 7). In this case, the term “proxy parameters” relates to the network proxy, and not any consumer proxy. Click the Next button to proceed to step 4.

Figure 7
Set up the transport settings for the profile
The final parameters in step 4 concern the security settings (Figure 8). In my example, I am using basic authentication with a user ID and password. For productive services, you would use a higher level of security settings.

Figure 8
Select User ID/Password for basic authentication
Click the Finish button to complete the wizard. The system creates the profile and a pop-up window asks whether or not to activate the new profile immediately. Because I intend to use the profile in the next step, I click the Yes button to activate the profile. However, you can activate or deactivate profiles in Profile Management anytime. (If you want to activate profiles later, see the sidebar “SOA Configuration Request Queue.”)
You are halfway done: the profile exists and it is ready for you to assign it to the services. Now you have to create the business scenario to enable this assignment. Return to the SOA Manager overview screen by clicking the Back link in the upper-right corner of the screen. This time, click the Service Administration tab and then click the Business Scenario Configuration link. Similar to the profile overview table, you see an overview of the existing business scenarios. As with the profile, a wizard guides you through the configuration. Click the New button to start the wizard to create a new business scenario.
This wizard has three steps. Step 1 asks for a scenario name and a description, then step 2 is for the assignment of the provider services, and step 3 offers the assignment of consumer proxies (which is not relevant for my example of multiple provider services configuration). Let’s have a closer look at step 2, assignment of services to the business scenario (Figure 9).

Figure 9
Click the Add button to add a provider service to the business scenario
You cannot enter the service name manually, so you need to click the Add button. The search window that opens offers a search pattern field for the service name. You can search for a service by the external name, the internal name, or both. The internal name is the ABAP name, in capital letters. The external name reflects the service operation name for services modeled in the Enterprise Services Repository (ES Repository).
If the services were published to a service registry and have a common classification, the advanced search in the search window can help, offering the search for selected classifications sorted either by deployment unit, process component, business object (DPB) or software component, process component, or business object (SPB).
The search may result in a list with more than one service, and you can select several services from that result list using the control key. Click the Add to Worklist button to add the services selected in the search window to the worklist of the business scenario (Figure 10). Keep in mind that even with only one service in the search result list, you have to select that service before you click the Add To Worklist button. Otherwise, the search window closes without adding the service to the scenario. In my example, the SAP NetWeaver Demo Model service names do not have any patterns in common, so I have to open the search window several times.

Figure 10
Add services to the worklist
After you add all the provider services to the scenario, you need to assign a profile to the services. Select a service and click the Assign Profile button (Figure 11). You can select the profile from a list shown in the pop-up window. Different services may require different settings (e.g., different security settings depending on their business criticality). Therefore, it makes sense that each service can have its own profile. In my example, I just used the one profile for all services. To select all the services at once, click the select icon  and then choose Select All.

Figure 11
Assign the profile to the provider services
After you assign the profile, navigate to the third wizard step (Consumer Side). For this example, I skip this step, so click the Finish button to create the business scenario (Figure 12). Like the profile, you need to activate the business scenario. Click the Yes button in the pop-up window.

Figure 12
Click the Finish button to create the business scenario
The system takes you to the SOA configuration request queue (Figure 13). The request queue lists the six endpoints I configured. In addition, the system adds a seventh item to clear the Web Service Inspection Language (WSIL) cache so that the system considers new endpoints in WSIL responses.
Note
WSIL is a standard for the specification of Web services, supported by both SAP NetWeaver AS ABAP and Java. You use WSIL to search the system directly for services. For ABAP systems, the WSIL URL is as follows: https://<host name>:<http port number>/sap/bc/srt/wsil?sap-client=<client>. Sending an HTTP request to this service returns a document in XML format listing all the services with their endpoints and the Web Services Description Language (WSDL) URL.

Figure 13
SOA configuration request queue
When the processing is complete, a pop-up window tells you that the queue processing is finished. If an error occurs, you see a Failed message in the Status column. To view the error message, select the request item, and view the message in the message area below the progress bar. An example for an error situation is when you have assigned a profile to a service that uses lower security settings than the services developer preset. For more information, see the service description in the ABAP workbench in the Configuration section.
Working with the Business Scenarios
You can import and export business scenarios. When clicking the Export button in the business scenario’s overview screen (Figure 14), you can decide on whether or not to export all assignments to profiles and system connections with the business scenario. You can use this option as a backup for that configuration object. This way you can re-import the business scenario with all assignments to the same system to restore the state in case problems occur. An export without these assignments may be useful to transport the business scenario to other systems (e.g., from development to production) in which the assignments have to be newly created, or for documentation purposes.

Figure 14
Export the business scenario
Test the Configuration
After you create the endpoints, profiles, and business scenario, test an endpoint with the Web Service Navigator (WS Navigator), if it has been configured beforehand (see the sidebar on generic configuration tasks). Find the endpoints in the Service Administration tab by clicking the Single Service Configuration link. The search pattern Product* lists the service ProductByIDQueryResponseIn (Figure 15). Select it and click the Apply Selection button.

Figure 15
Search for the endpoint with the Product* search pattern
Applying the selection results in an overview of the service definition details (Figure 16). The drop-down selection for Selected Binding shows that two endpoints were created for the service (HTTPS and HTTP). The naming of the endpoints consists of the prefix Binding_ and the specification for T=Transport security and A=Authentication security. The name Binding_T_HTTP_A_HTTP indicates that HTTP is used for both.

Figure 16
The Selected Binding menu shows the endpoints created for the service
The WSDL for the endpoint is a technical description of the service, so you can use the URL to the WSDL to publish the service. If you want to access the endpoint’s WSDL URL, click the Display selected Binding’s or Service’s WSDL URL link. If a Services Registry is maintained (see the sidebar on generic configuration tasks), you can publish the endpoints manually to it in SOA Manager by clicking the Technical Administration tab and selecting the Publication Administration link.
However, manual publication is not useful if you have created many endpoints. In addition, you can administer the scheduled publication of all endpoints in SOA Manager by clicking the Technical Administration tab and selecting Global System Settings. Furthermore, you can set up rules for the publication by clicking the Service Administration tab and selecting Publication Rules.
Selecting the Configurations tab in Figure 16 shows the two endpoints for the service listed in a table (Figure 17). In the Creation Type column, you can see that both endpoints are Created based on profile. You can select and display the endpoints, but you cannot delete or edit them because they belong to a business scenario.

Figure 17
Two endpoints are available for the provider service
Select the second endpoint Binding_T_HTTP_A_HTTP to view its settings. Click the Transport Settings tab to view the Calculated Access URL (Figure 18). The profile’s name and version are part of the URL.
Note
If you want to change the configuration settings for the service, you have to create a version 2 for the profile in which the modified settings apply. You can then edit the business scenario and assign the version 2 of the profile to the service, in addition to the assigned version 1 of the profile. When you activate the business scenario, the system creates an additional endpoint for the service. That additional endpoint exists parallel to the initial endpoint of version 1. This way all consumers can adapt the new endpoint. Finally, when all the clients have switched, you can deactivate the initial endpoint.

Figure 18
View the Calculated Access URL
Click the Overview link to return to the screen in Figure 16. Now you can test the endpoint with the WS Navigator. Select the second binding Binding_T_HTTP_A_HTTP again in the drop-down list. The link opens the WS Navigator to test that endpoint (Figure 19).

Figure 19
Test the endpoint Binding_T_HTTP_A_HTTP
In the Parameters section, you can set the input parameters for the test. The easiest way to test is to enter * for the ProductID (because any product result is OK), and select the is Null check box to suppress the optional MessageHeader. Click Execute to run the test: The Web Service Navigator will call your endpoint. If the SAP NetWeaver Demo Model has been configured (i.e., data has been generated with transaction S_NWDEMO_DG), you should now be able to obtain a valid result for the test (Figure 20). A valid result lists one or more products in the Result section. Any communication error (e.g., HTTP code 404 for service unknown) is displayed below the Result section. Note that the UI of your WS Navigator may show minor differences, depending on the release.
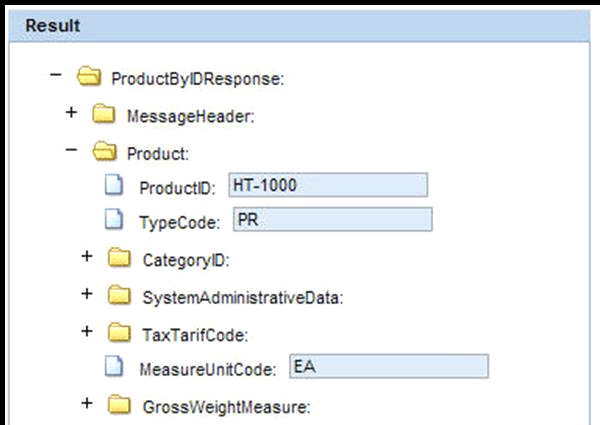
Figure 20
Results of the endpoint test
Generic Configuration Tasks
Some configuration tasks in the SOA Manager are generic (i.e., not specific for one consumer or provider service). You can find them on the Technical Administration tab when you log on to the SOA Manager.
- Service Identifier: This tab shows the important External Identifier key, which is a kind of GUID for the provider system. All WSDL documents hold that key as identification, visible in the tag <BusinessApplicationId>. When services are published that are technically identical, you can use the key to distinguish their provider systems. Optionally, you can specify an organization or business system name (the latter appears in the SOA Manager header). If the External Identifier field is empty, click the Save button to create the value.
- Services Registry: You can set up the connection parameters to one or more services registries by going to Technical Administration > Global System Settings. Specify whether you want to publish the services on a schedule or if you want to publish them manually.
- Web Services Navigator: If you intend to start a test for an endpoint using the Web Services Navigator (which is based on SAP NetWeaver AS Java), you have to specify the Java host and port at Technical Administration > Global System Settings.
SOA Configuration Request Queue
Assume you have a profile that is already assigned to services, with endpoints created based on the profile settings. Clicking the Deactivation button for this profile brings you to the SOA configuration request queue, which lists all endpoints the system should deactivate because you are deactivating the profile. Click the Start request queue processing button to deactivate the endpoints. If you intend to carry out several changes, you can start the processing later.
The Check Processing State button in the Profile Management overview navigates to the SOA configuration request queue and enables you to start the request queue processing. If the queue is empty, the Check Processing State button in the Profile Management Overview has no effect — no error or success message is displayed.
You can always reach the SOA configuration request queue from the initial SOA Manager screen. In the Service Administration area, use the last link below named SOA Configuration Request Queue Management.
Boris Rubarth
Boris Rubarth works as a knowledge architect at SAP AG in Walldorf, Germany. He started at SAP as an instructor for customer training in 1999, focused on integration and connectivity topics, and developed knowledge material on these topics. Boris then worked in SAP NetWeaver Product Management for more than two years, covering SAP NetWeaver as an Integration Platform and AS ABAP topics. He holds a PhD in physics.
You may contact the author at Boris.Rubarth@sap.com.
If you have comments about this article or publication, or would like to submit an article idea, please contact the editor.