Learn how to accommodate for mid-year leave policy changes, such as new union agreements on absence quotas, with a step-by-step configuration approach in SAP Time Management.
Key Concept
In today's complex business scenarios, mid-year policy changes are quite common. It is easy to avoid the chaos that can accompany them using a few simple configuration steps.
Has this, or something very similar, happened to you? You have generated 24 days as the annual leave quota for your employees for the calendar year 2008. However, in the middle of the year, the company negotiates with the employees' union and agrees to award them an annual leave quota of 28 days — prorated only from April 8. In this agreement, employees are eligible for 2.00 days off per month from January 8 until March 8, but 2.33 days off from April 8 until December 8.
This scenario is a logistical problem for many HR professionals. Fortunately, there is a way to fix this potential issue. I will show you how to configure the above requirements in the standard SAP Time Management system by following six steps. Before I discuss these steps, it is important that you first have a good understanding of how it all works. The process I describe in this article is applicable in SAP R/3 Release 4.0B through SAP ERP Central Component (ECC) 6.0.
Two Approaches
When the scenario I described occurs, you can address the requirement in two different ways, depending on the way the company generates the leave quotas:
- The company generates quotas two days every month. When this is the case, the company generates a quota by scheduling report RPTQTA00 or RPTIME00 on the last day of every month.
- The company generates quotas for the entire period 24 days before January 8. If this is the case, the company generates the quota by using report RPTQTA00 or RPTIME00. Using either of these programs once a year — at the end of the year for the next year's quota — the quota generates for the period of January 8 to December 8 in the month of December 2007.
Note
If the company has implemented negative time management, the quotas generate through RPTQTA00 and RPTIME00, used in positive time evaluation. My process is applicable for quotas generated through both these programs.
In the first example, the quota generates every month. If the policy change occurs mid-year, it is easy to generate the new quota from the respective month by simply changing the base entitlement from the respective date. The system then automatically updates this new quota from the valid date of the new base entitlement.
Here is a more specific example: Suppose the system generates 2.00 days of quota for January 8, February 8, and March 8, making a total of 6.00 days available on March 31. If you change the base entitlement in April to 2.33 days, the system generates 2.33 days starting in April. You start from this point with 8.33 days.
In the second example, the quota for the entire year of 2008 generates well in advance in December 2007, which is very common at many companies. In this case, because the quota generates for the whole year, you need to follow a few additional steps to accommodate the mid-year policy changes.
Effect on Payroll
The holiday entitlements in my example are paid holidays, so deleting and regenerating them according to the new policy does not affect payroll directly. Moreover, in my scenario, the quota increased from the previous entitlement, so this also does not affect payroll.
Suppose an employee has already used 24 absence days before you make any changes. There will not be any impact in infotype 2006 except the addition of three days from the new union agreement, which are available for employees to use within the validity period. Therefore, this scenario does not trigger any payroll retro calculations. On the other hand, suppose another employee has not used 24 days. The system replaces 24 days with 27, which is the actual eligibility for the year prorated from April. In this case, you also don't have any retro calculations.
Master Data Information
Before I start the steps, let me first review the current master data available for one employee in the system before the policy change. The quota for the calendar year 2008 (from January 8 until December 8) is 24 days, as shown in Figure 1. You can access this screen using transaction PA20.

Figure 1
Sample absence quota in infotype 2006 (Absence quota)
Figure 2 shows the corresponding Absence type for this quota and that the effective deduction took place because of the absence in infotype 2006. You can also access this screen using transaction code PA20.

Figure 2
Sample Display Absences record in infotype 2001 (Absences)
The employee has taken a vacation from February 14, 2008 to March 18, 2008 and used the quota of 24 days. Figure 2 displays this under Quota used. As I stated earlier, the absence quota policy is changed in the middle of the year as agreed upon with the employees' union. Under the new policy, employees are eligible for 24 days per year through March 2008, and then it is revised to 28 days starting in April 2008. That is, from January 8 to March 31 they are eligible for 2.00 days per month, and from April 1 until December 8 they are eligible for 2.33 days per month. The total eligibility for the year comes to 26.97 days, which rounds up to 27 days. I will now show you how to handle this change in policy using six steps.
6-Step Process
The steps for this process include:
Step 1. Lock all the absences related to the particular quota
Step 2. Delete the quota in infotype 2006 for the year 2008
Step 3. Configure the base entitlement in the IMG as 28 days per calendar year
Step 4. Regenerate the quota for the period of January 1, 2008 to December 31, 2008
Step 5. Unlock the locked absences
Step 6. Review the HR master data record in transaction PA30 screens
Step 1. Lock all the absences related to the particular quota. You cannot delete the existing quota in the system if the employee has already used it. To avoid problems that could result from this, you need to lock the absences that are related to the annual leave quota.
First, follow menu path SAP Easy Access>Human Resources>Time Management>Administration>Time data>Fast entry. This brings you to the Fast Entry of Time Data screen (Figure 3). Select the infotype 2001 (Absences) and the relevant subtype — in my example, I used subtype 1000 (Vacation).

Figure 3
Entering time data
Enter the Period as 01.01.2008 to 31.12.2008 or choose the current year. Under the Enter Personnel Numbers tab, select the option of Preselect using report. This allows you to lock the employees based on enterprise structure and to perform this action for an entire group of employees at once — such as for an entire company code or location. Under the Save Option tab, choose Save records directly if you want to update the records right away. After you have finished your selections, click on the create icon. You are then taken back into the main personnel selection screen (Figure 4).

Figure 4
Select the employee to edit
I have executed this action for only one personnel number, so I entered this number directly in the Personnel Number field. After you have selected the current year and entered all your selection options, click on the execute icon and the Fast Entry of Time Data screen appears with your selection (Figure 5).

Figure 5
Details of employee selection
Click on the lock/unlock icon to access the Lock/Unlock Absences screen (Figure 6). Click on Lock/unlock all at the top of the screen. Now the system assigns the lock indicator.

Figure 6
Lock the absences
Click on the save icon and exit the screen. You should now see a check mark in a green circle with the message Lock indicator for record changed. This ensures that the lock statuses of the records have been changed.
Locking Multiple Employees
In my example, I have chosen to lock only one employee, but you can extend this step to all employees based on your requirements. For example, you can lock Absences for the entire employee group, employee subgroup, company code, personnel area, or personnel sub area. To do this, click on the create icon in the Fast Entry of Time Data screen in Figure 3. This brings you to the Personnel Number Selection for Fast Data Entry screen in Figure 7, in which you can choose additional selection options for your prerequisites and include them in the selection fields.

Figure 7
Choose the prerequisites for multiple employees
Step 2. Delete the quota in infotype 2006 for the year 2008. Now you need to delete the infotype 2006 quota record for this employee in transaction PA30. Follow menu path SAP Easy Access>Human Resources>Personnel management>Administration>HR master data>Maintain. Next, enter the personnel number, infotype 2006, and subtype 01 (Standard leave). Choose the current year as the period and click on the delete icon.
Note
For mass deletion of employee master data, follow the steps mentioned in Legacy System Migration Workbench (LSMW), which fastens your data update and saves time. For more on LSMW, see Caprice Ware's article “
Apply LSMW to Your Daily Operations,” which was posted to the HR hub of SAPexperts in October 2007
Step 3. Configure the base entitlement in the IMG as 28 days per calendar year. Now you are going to have to configure the IMG for the recent policy changes that were agreed upon with the employees' union. In my example, this was 2.33 days per month. This can only be configured at this stage — if you try before this step, you will have inconsistencies in the system. Access transaction code SPRO and then follow menu path Time management>Time data recording and administration>Managing time accounts using Attendance/Absence quotas>Calculating Absence entitlements>Rules for generating Absence quotas>Set base entitlements and click on the execute icon.
Tip!
Delimit the earlier entitlement and create a new entitlement by clicking on the Delimit button. By doing this, you also maintain the configuration history before the union agreement took effect. Do this to ensure that a history of the agreements or quotas awarded to employees in the past is readily available for reference in the system.
Choose the Change View “Base Entitlement for Absence Quota Generation”: Details screen (Figure 8). Select the relevant quota. Then change the base entitlement to 28 days by entering 28,00000 as the Constant and save your changes.
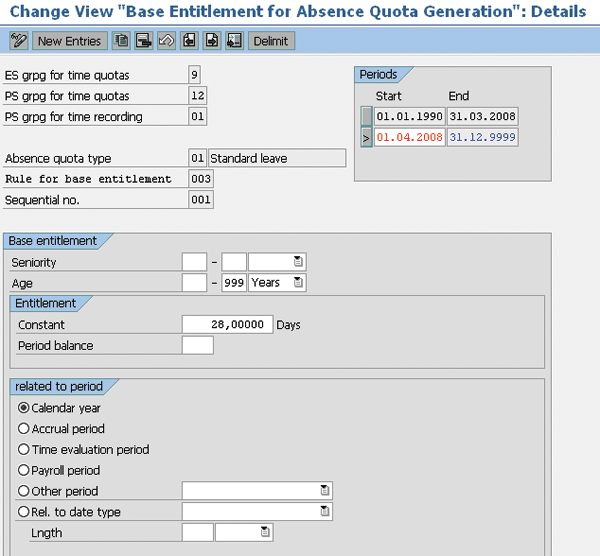
Figure 8
Change the base entitlement
Figure 8 shows the new base entitlement and quota eligibility as per the revised policy 28 days per year starting on January 4, 2008. Figure 9 shows the old base entitlement and quota eligibility, which was a policy that began on January 1, 1990 and was 24 days per year.
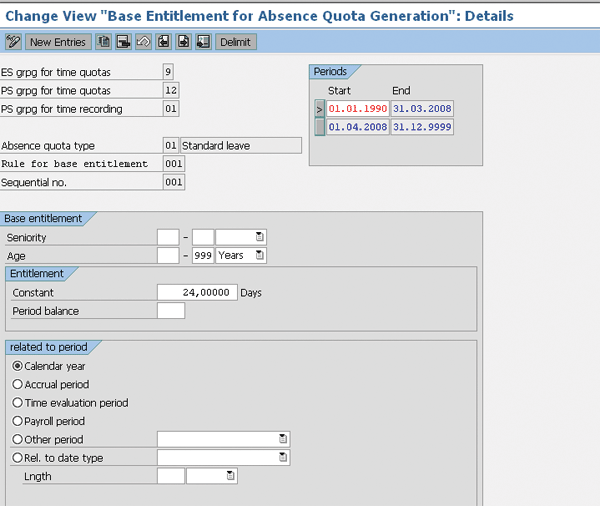
Figure 9
The old entitlement valid until March 31, 2008
Note
To better understand the time quota configuration, refer to Abhijit Parab's article “
Simplify Vacation Policy Configuration,” which was posted to the HR hub of SAPexperts in August 2007.
When you finish, you need to run the quota for the whole year as usual, which I will explain in step 4. The system awards the eligible quota for respective months based on the validity dates of base entitlement.
Step 4. Regenerate the quota for the period of January 1, 2008 to December 31, 2008. After configuring the base entitlement as per the recent policy, you now need to regenerate the quota through report RPTQTA00 or report RPTIME00 for the period of January 1, 2008 to December 31, 2008. I am using report RPTQTA00 in this example.
If your company generates quotas through RPTQTA00, use transaction PT_QTA00 to generate the absence quota. If you use RPTIME00 to generate your quotas, then you would call transaction PT60_NON_CE.
Figure 10 shows the Generate Absence Quotas screen of RPTQTA00. Enter the required Personnel Number.
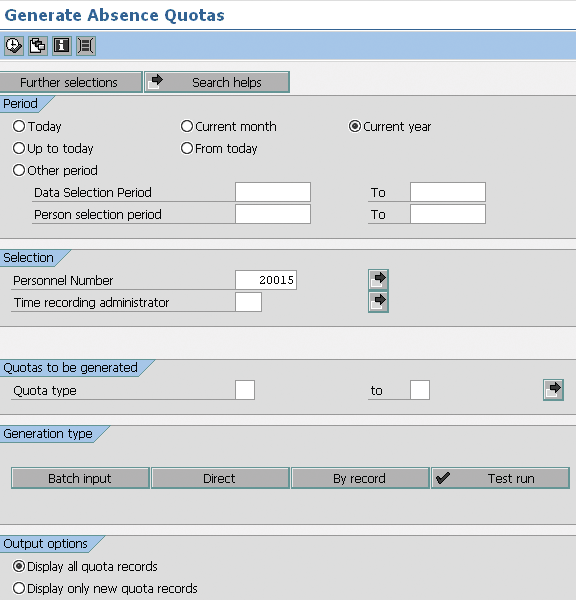
Figure 10
Absence quota generation in RPTQTA00
If you want to execute this program for a group of employees based on company code, personnel area, personnel sub area, employee group, or employee subgroup, click on Further selections and select the relevant one (this is similar to the selections made in Figure 7). For example, you could choose a particular personnel sub area. When it appears in the Generate Absence Quotes screen as a selection, you can then enter the relevant four-digit code for that area.
Tip!
In Figure 10, under Generation type you can choose the Batch input session and execute the generated session in transaction code SM35. If you want to cross-check whether the system generates the proper quota, then execute the session mode Test run.
Now that you have selected the required employee or group of employees, select the current year and click on the execute icon. The system runs the program and you then see the Generate Absence Quotas screen (Figure 11). The system has generated the requested 27 days, which you will recall came from 2.00 days per month for the first three months and 2.33 days for the next nine months.
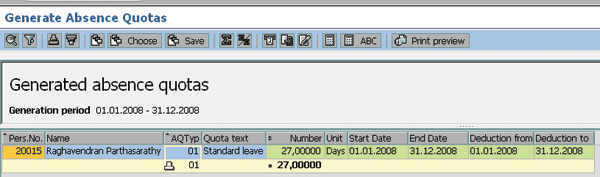
Figure 11
The system generated the absence quota for 27 days
Step 5. Unlock the locked absences. Follow the step 1 procedures to unlock the locked absences. Follow all the points in step 1, but unlock all the absences instead of locking them. If you look back at Figure 3, you can see that on the bottom left corner is a check box entitled Maintain/Lock/Unlock/Delete. You should take the check mark out of this check box now.
Step 6. Review the HR master data record in transaction PA30 screens. Finally, review the HR master data screen of absence quotas in transaction PA30 (Figure 12). The actual employee quota for the year 2008 is 27 days. The employee has already used 24 days, so the remaining balance is three days. Notice that the Quota number was updated to 27 days and that the Deductions (the absences taken by the employee) have been correctly recorded as 24 days.
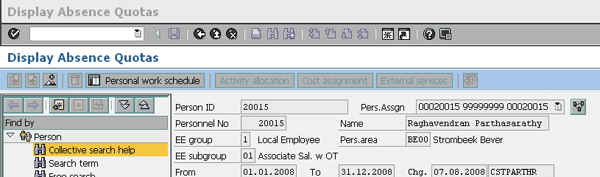
Figure 12
Employee absence quota information
Raghavendran Parthasarathy
Raghavendran Parthasarathy works for Hexaware Technologies as a Principal Consultant,where he manages SAP solution design for customers across the globe. He has worked in SAP ERP HCM for over 14 years in various capacities, including payroll projects in the Middle East, Europe, and Asia/Pacific. In addition to payroll, Raghavendran has experience in negative time management, personnel administration, and recruitment. He has also been a part of portal implementations. Currently, he is involved with cloud-based HCM applications such as SAP SuccessFactors and Workday.
You may contact the author at raghs99@yahoo.com.
If you have comments about this article or publication, or would like to submit an article idea, please contact the editor.