Manager
Learn a step-by-step procedure for creating a systems data container, test configuration, test plan, and test packages in SAP Solution Manager 7.1. See how to assign an existing test data container to test configuration and assign testers to test packages.
Key Concept
Test configuration is an automated test case of reusable objects in extended Computer Aided Test Tool (eCATT) that consists of three essential parts: test script, test data container, and system data container. Test script is a sequence of commands that formulates the test that performs the execution of a process in one or more applications in an automated way using eCATT (for SAP GUI-based applications only) or an external test tool. Test data container is a reusable data object with a set of user-defined parameters. System data container is a list of systems that are addressed during the test.
A complete automated test case requires a combination of one test script to provide instructions, one system data container to describe the relevant system landscape, and one or more sets of data with which to execute the test. The test configuration and system data containers help you achieve greater consistency in your test activities and useful reports for validating the complete coverage and the consistency of test plans to reuse the project structure created in the business blueprint to gain reliable test results. Following these steps helps you create an effective automation test with proper tools and framework by reducing cost and risk, and providing fast return on investment.
In my previous article, “Set Up a Test Automation Framework with SAP Solution Manager 7.1,” I showed you step by step how to set up a test automation framework in SAP Solution Manager 7.1 and integrate the third-party test tool HP QuickTest Professional (QTP). Then I walked through how to prepare a managed system for test automation. In this article, I show you how to create a system data container, test configuration, test plan, and test packages. I also show you step by step how to assign testers to test configuration.
The prerequisites for this process include:
- SAP Solution Manager 7.1 Support Package 1
- HP QuickTest Professional, including SAP Add-in
- Managed systems considered for testing available in Solution Manager Landscape Management
You need to perform six steps to create and execute automated test cases:
- Step 1. Create a system data container (SDC)
- Step 2. Create a new test configuration
- Step 3. Assign an existing test data container to test configuration
- Step 4. Create a test plan
- Step 5. Create a test package
- Step 6. Assign a tester to a test package
Step 1. Create an SDC
An SDC is a list of systems that are addressed during the test. Use of an SDC allows the flexible execution of a test script in different target systems. Because the systems are represented by the logical components, the Remote Function Call (RFC) destinations to the systems under test are retrieved automatically when creating an SDC in the test automation framework. You can change the system’s role when executing a test case in different target systems without having to adjust any system parameters.
You can create an SDC manually or automatically. It is more convenient to create the SDC automatically from the systems (i.e., logical components) assigned to a Solution Manager project than to manually create the SDC using transaction STCE. In my example, I show you how to create an SDC automatically. To do that, first you need to make sure that in your Solution Manager project all systems relevant for your business processes are assigned as logical components. Log in to Solution Manager with your user name and password, and use transaction SOLAR_PROJECT_ADMIN. Select and double-click your project that you are going to use for creating automated test cases. The Project Change screen appears. Navigate to the System Landscape tab (Figure 1). In the System Data Container field, enter a description (e.g., Z_SDC_PRJ_OTP1) and click the create icon.
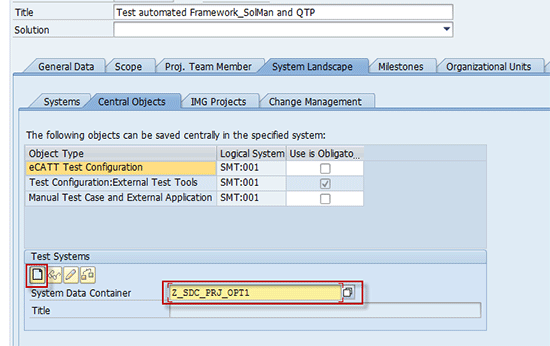
Figure 1
Create an SDC
The Create Object Directory Entry window appears (Figure 2). Click the Local Object button twice to assign the package.
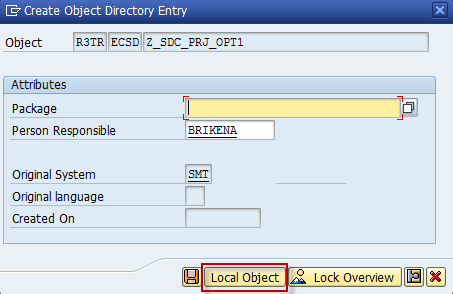
Figure 2
Create the object directory entry
The SDC is automatically generated in the background and a message at the bottom of the screen confirms the successful creation. The title is then automatically populated (Figure 3).
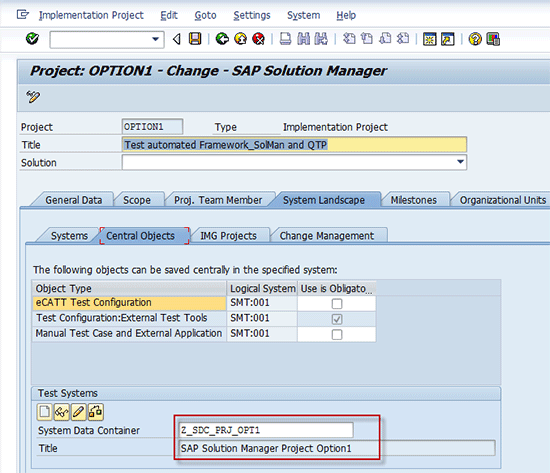
Figure 3
SDC created
Double-click the System Data Container value to open the SDC detail display screen (Figure 4).

Figure 4
SDC detail display screen
Step 2. Create a New Test Configuration
As a prerequisite to create a test configuration in Solution Manager, you need to have all business processes documented. Make sure that the project in Solution Manager is set up and contains all business scenarios, business processes, and business steps, and that each process step has a transaction assigned in transaction SOLAR01. To create a test configuration, use transaction SOLMAN_WORKCENTER and go to the Test Management tab (Figure 5). Click Test Preparation and you see under Active Queries you have the options My Projects and All Projects. If you want to use your project to create test configuration, click My Projects and you see a list of your projects. If you want a different project, choose All Projects. From the list, select the project for which you want to create a test configuration and click the Configuration button.
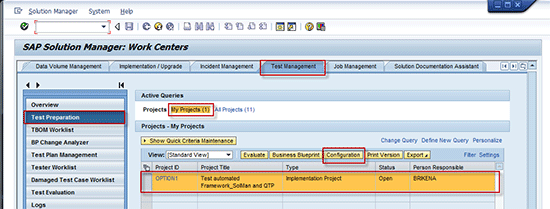
Figure 5
Test preparation
The Configuration screen (transaction SOLAR02) of your project appears (Figure 6). Expand the configuration structure of the project and select process step Create sales order. Go to the Test Cases tab and create the test configuration by selecting QuickTest Professional Test Configuration from the drop-down list in the Test Case Type field.

Figure 6
Select process steps and test case type
Enter Z_OTC_CREATESALESORDER_QTP as the Test Case value and press Enter or click the create icon (Figure 7).
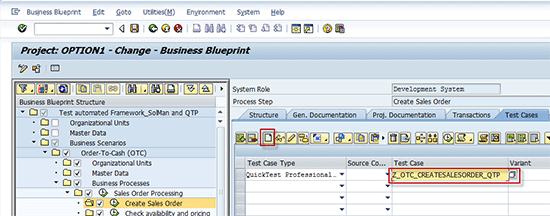
Figure 7
Create the test configuration
Press Enter and the Create Test Case pop-up screen appears (Figure 8). Click Yes.
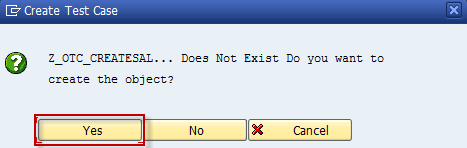
Figure 8
Confirm the test case creation
On the next screen, go to the Attributes tab and then the General Data tab (Figure 9). Enter the required data, such as Title, Application Component, and Person Responsible. The Title and Application Component values depend on your project; the Person Responsible should be the person creating the test configuration.
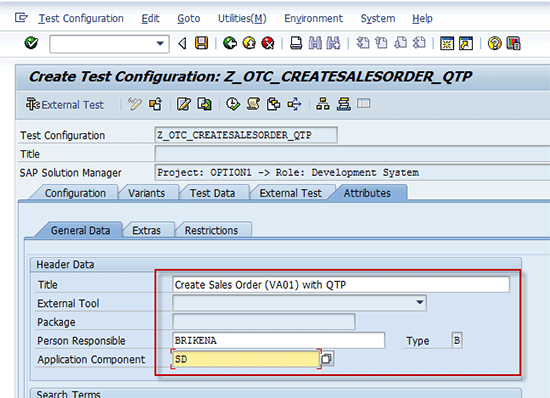
Figure 9
Enter general data
Click the Configuration tab (Figure 10). The Test Script data is automatically populated. Under System Data, enter the System Data Cont. and Target System values by going to input help and selecting the system data container and target system.

Figure 10
Assign the system data container and target system
Click the save icon and the Create Object Directory Entry pop-up screen appears (Figure 11). Click the Local Object button twice to assign the package.
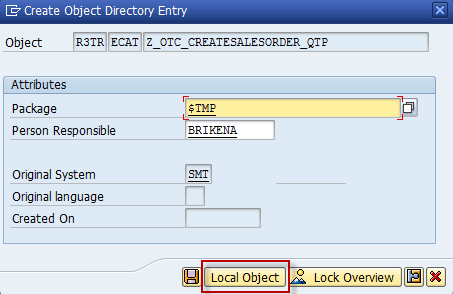
Figure 11
Create the object directory entry
Launch QTP
Next you want to launch the third-party testing tool, which in this case is QTP. After saving the previous screen, click the External Test button shown in Figure 12. QTP launches automatically.
Note
Once the external test tool is launched from Solution Manager, it is open in integrated mode. You can’t access Solution Manager sessions because they are kept in the background. To access SAP Solution Manager sessions, open a new session or stop the external test tool and save to go back to Solution Manager.
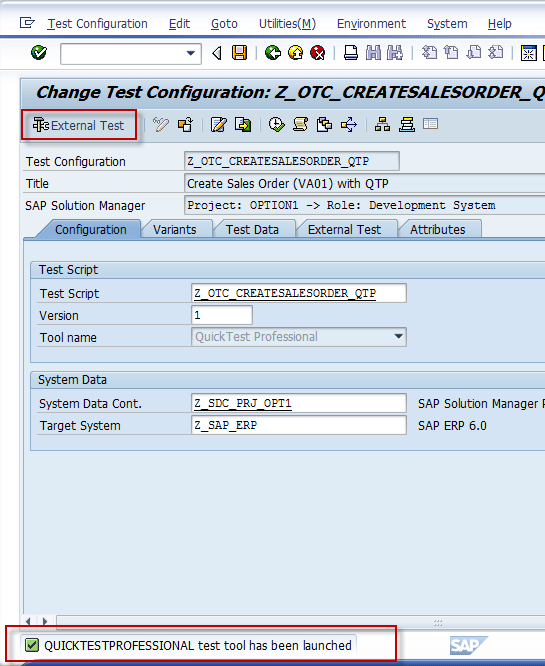
Figure 12
Launching QTP
Now that QTP is launched from Solution Manager in integrated mode, the QTP initial screen is open and is ready to record a new script (Figure 13). To start recording the script, click Record to open the Record and Run Settings dialog box. Select Open the following SAP client when a record or run session begins and make sure that System data container, Target system, and Destination that you used for creating the test configuration are selected. In the Auto-logon section, make sure that you select the Enable auto-logon check box so the User and Client information is automatically filled. You’ll have to enter the password manually. Click the Apply button and then click the OK button.

Figure 13
Set the record and run settings
Record Test Scripts in the Target System
After you’ve clicked OK, the recording of the test script begins and QTP automatically launches. In doing so, it logs you in automatically to the target SAP ERP Central Component (SAP ECC) system. In this example, I want to record the step of creating a sales order. Use transaction code VA01 and press Enter. This takes you to the Create Sales Order: Initial Screen (Figure 14). Enter the appropriate values for the Order Type (e.g., OR), Sales Organization (e.g., 1000), Distribution Channel (e.g., 12), and Division (e.g., 00).
Note
While you are recording the script, all activities that you do are captured by QTP, so make sure that you only follow the step of creating the sales order and do not do any other activities.
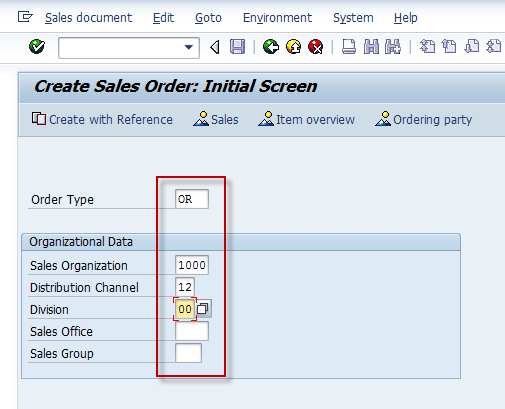
Figure 14
Create a new sales order screen
The Create Standard Order screen appears (Figure 15). Enter the appropriate values for Sold-to-Party (e.g., 1001), Ship-to-Party (e.g., 1001), Material (e.g., L-80R), and Order Quantity (e.g., 1). Press Enter.
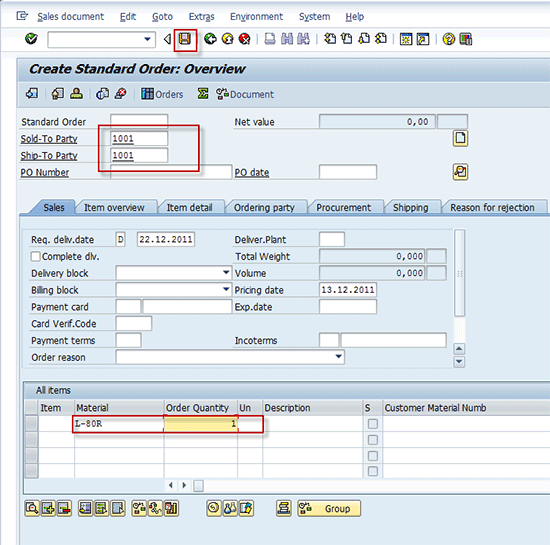
Figure 15
Create a standard order
All the information entered for blank fields in the Create Standard Order screen automatically fills in. On the top of the screen, click the save icon. At the bottom of the screen a message appears saying the Create Sales Order transaction and the sales order number were successfully created. Once it is saved, click the Exit button to exit the SAP ECC system. Confirm by clicking Yes in the Log Off pop-up screen (Figure 16).

Figure 16
Log off the target system
Now you go back to QTP. To finish recording, click the Stop button (Figure 17).
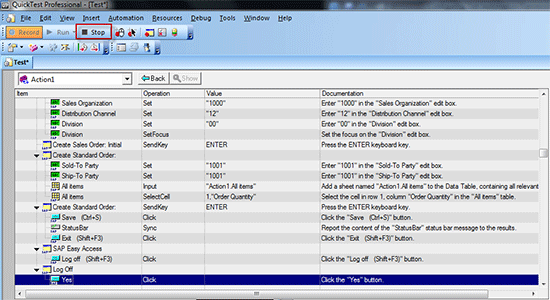
Figure 17
Stop the recording in QTP
All recorded steps of the Create Sales Order transaction are displayed in QTP (Figure 18). Click the save icon to save the test script and close QTP.
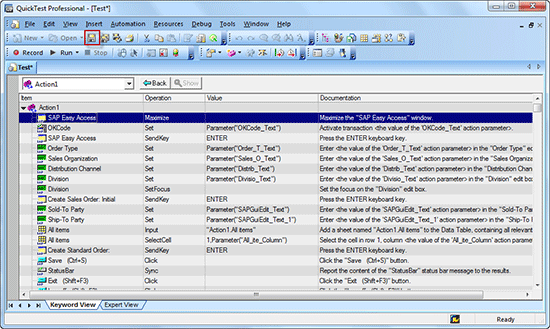
Figure 18
Save the test script
Once you close QTP, the test script is populated to Solution Manager and linked to the test configuration. The system takes you to the Change Test Configuration screen in Solution Manager. Save the test configuration and go back to the Configuration screen of the project by clicking the back icon (Figure 19). Then save.
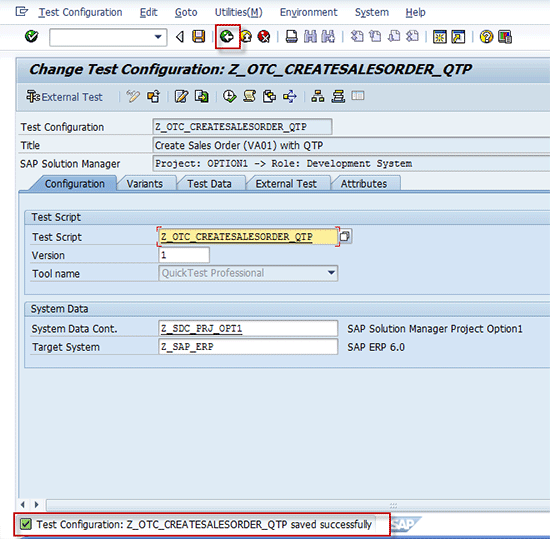
Figure 19
Test configuration is saved
Check Parameters in Solution Manager
Now that the test configuration is created and is ready to be executed, you need to check parameters in Solution Manager to make sure they are correctly populated from QTP. Go to the Test Cases tab in the Configuration screen and make sure that you select the test configuration you created and click the change icon (Figure 20).

Figure 20
Check parameters in Solution Manager
The Change Test Configuration screen opens (Figure 21). To check that parameters have been correctly populated, go to the Variants tab. Here you can review each value and see if it is right.
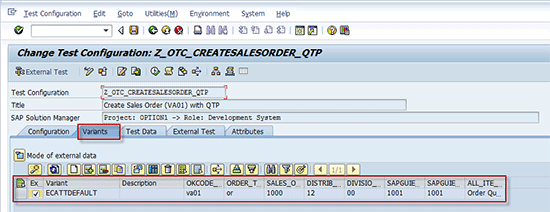
Figure 21
Verify populated parameters
Step 3. Assign an Existing Test Data Container to Test Configuration
The test data container is a persistent data object with set user-defined parameters that are stored separately from the test scripts for reusability and maintainability. In the test configuration, a test script and test data containers are brought together to create an executable automated test case.
To assign an existing test data container to test configuration, go to the Test Data tab on the Change Test Configuration screen. Then click the append row icon (Figure 22).
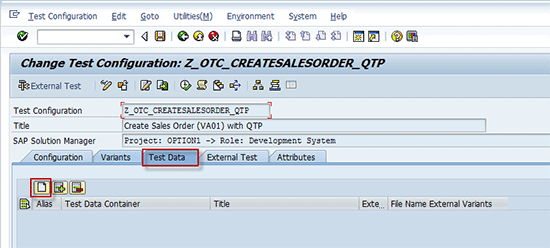
Figure 22
Assign an existing test data container
Note
On the Test Data tab you can assign one or more test data containers to a test configuration.
In the column under Test Data Container, click the input help icon to select the test data container. Alternatively, enter the test data container (e.g., Z_TDC_CREATE_VA01_OTP1) and press Enter (Figure 23). Click the save icon.

Figure 23
Test data container assigned
Copy Test Data from the Test Data Container to Test Configuration
Now go to the Variants tab to map test data from the test data container to test configuration and click the variant maintenance assistant icon (Figure 24).
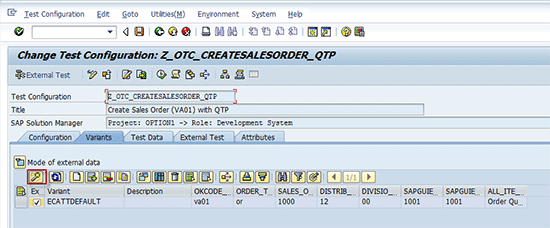
Figure 24
eCATT variant maintenance assistant
This takes you to the eCATT Variant Maintenance Assistant screen (Figure 25). The screen splits into two parts: Test Data Container is on the left side and Test Configuration is on the right side. Select all variants by clicking the select all icon and click the Attach as Variant(s) button to map the variants to the Test Configuration section (Figure 26).
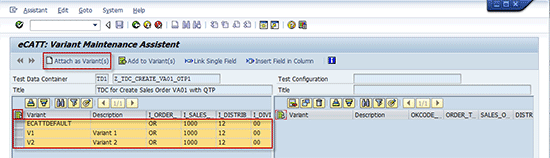
Figure 25
The screen is split into two sections
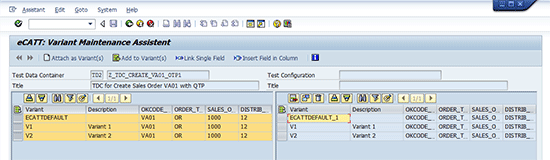
Figure 26
Attach variants to test configuration
Once the variants are attached to the test configuration, click the back icon to go back to the Change Test Configuration screen. To change the references view (Figure 27) to actual value (Figure 28), click the toggle icon (Figure 27). The test configuration contains references to a test script. It can contain a reference to one system data container and references to several test data containers. The test configuration references the import part of the data interface of the test script. The references are not direct, but are made through aliases. <NAME> is the name of the parameter in the test data container. References to a value in a test data container are usually displayed in the form <name>. You can switch the view between reference forms to the actual value. For this example, in Figure 27 the reference form <OKCODE> is displayed in Figure 28 as <VA01>.
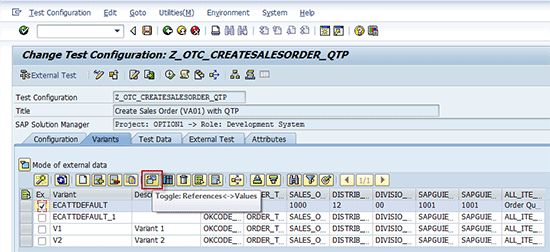
Figure 27
Reference view

Figure 28
Change references to actual values
Click the save icon and then click the back icon to go back to the Project Configuration screen.
Step 4. Create a Test Plan
It is required to create a test plan so you can provide automated test cases to testers. Use transaction SOLMAN_WORKCENTER to go to the Test Management work center. Select Test Plan Management in the Test Management work center, click the Test Plan button, and from the context menu, select Create Test Plan (Figure 29).
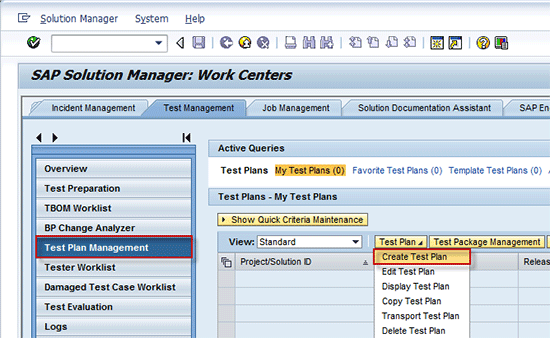
Figure 29
Create a test plan
The Create Test Plan - Central Attributes dialog box opens (Figure 30). Make sure that your project is selected, and in the Title field enter the title of your test plan that you are creating (e.g., Test Plan for Test Option1 Implementation Project). In the Person Responsible field, make sure that your user is selected, then click the next icon.
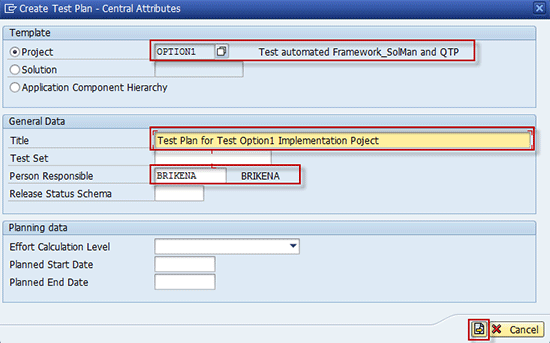
Figure 30
Enter central attributes
The Create Test Plan - Additional Attributes dialog box opens (Figure 31). In the System Data field click the Copy from Project/Solution button to copy your SDC that you assigned in your project (e.g., Z_SDC_PRJ_OPT1). Then click the next icon.
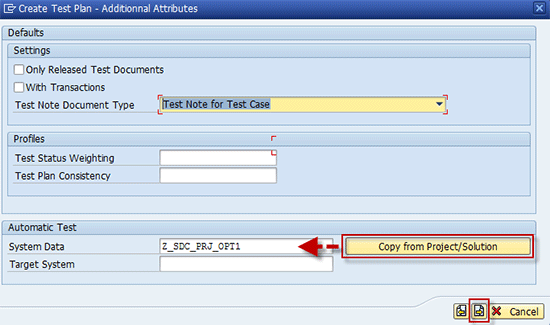
Figure 31
Additional attributes
Then the Test Plan screen appears (Figure 32). Here you can select test cases. To do that, expand the Test Plan Structure under the process steps and select the test cases. Once you select all the test cases, click the Test Plan button.

Figure 32
Select test cases under process steps
The Create Object Directory Entry appears (Figure 33). Click the Local Object button and the package is automatically assigned.

Figure 33
Click the Local Object button
Then you go back to the Test Plan Management section of the Test Management work center (Figure 34). Refresh the page and the generated test plan is displayed.
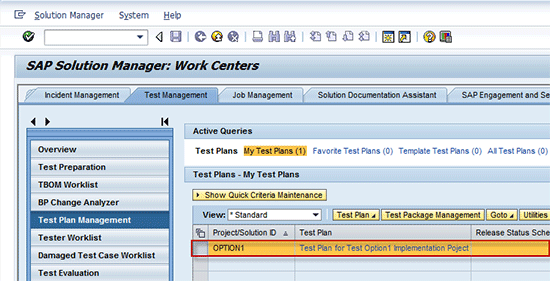
Figure 34
Create a test plan
Step 5. Create a Test Package
To provide automated test cases to a tester after creating a test plan, you need to create a test package and assign a tester to the package. In the Test Plan Management section of the Test Management work center, select a test plan that is already created and click the Test Package Management button (Figure 35).
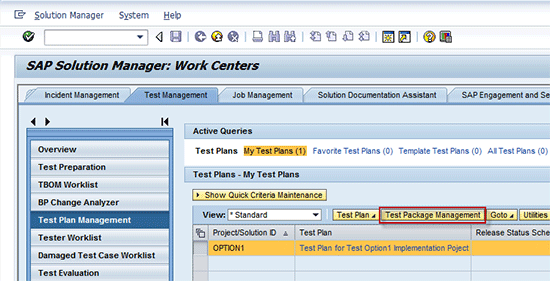
Figure 35
Create a test package
The Test Package Management - Test Organizer screen opens (Figure 36). Click the create test package icon.
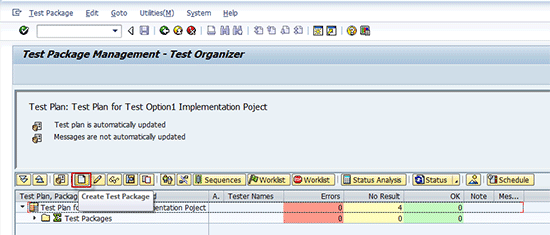
Figure 36
Create a test package
Next it takes you to the test package creation screen. Here you can select test cases. Expand the Test Plan Structure and under the process steps select the test cases and click the Test Package button (Figure 37).
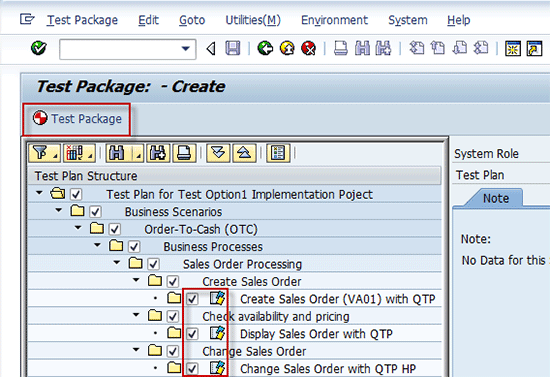
Figure 37
Select test cases under process steps
The Test Package Information dialog box opens (Figure 38). In the Title field enter the title of your test package that you are creating (e.g., Test Package for Test Option1 Implementation Project). In the Person Respons. field, make sure that your user is selected, then click the execute icon.

Figure 38
Enter test package information
The Create Object Directory Entry appears (Figure 39). Click the Local Object button and the package is automatically assigned.

Figure 39
Click the Local Object button
After the package is assigned, at the bottom of the screen a message is displayed that the test package was successfully generated. Also, the recently generated test package is displayed in the Test Package Management - Test Organizer screen (Figure 40).

Figure 40
Test package created
Step 6. Assign a Tester to a Test Package
Now that the test plan and test package are created, your next step is to assign the tester to the recently created test package. To do that, in the Test Package Management - Test Organizer screen first make sure that you select the created test package then click the assign tester icon (Figure 41).
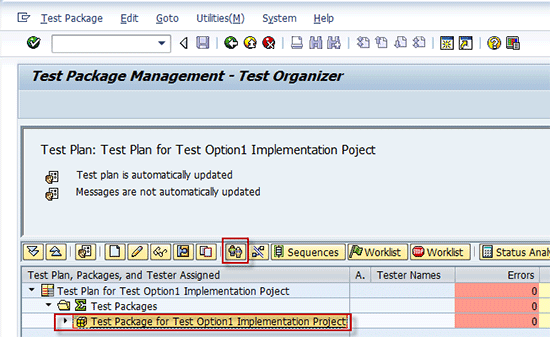
Figure 41
Assign a tester
The Restrict Value Range dialog box opens (Figure 42). Enter your user name and click the continue icon.
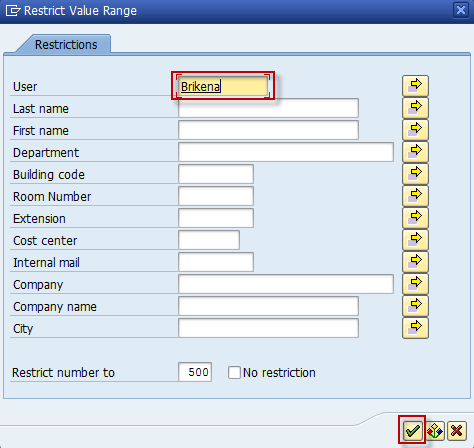
Figure 42
Restrict the value range
Note
To assign more than one tester to a test package, click the multiply selection icon (the yellow arrow next to the User field in Figure 42) to search and select user names.
Then in the Hit List 1 Entry screen, select the user by checking the box and clicking the continue icon (Figure 43).
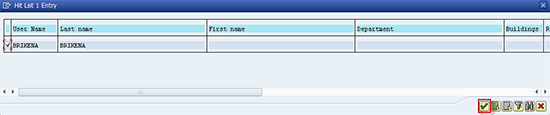
Figure 43
Select the user
The tester is now assigned to the test package and is displayed under the test package in the Test Package Management - Test Organizer screen and in the Tester Worklist (Figure 44).
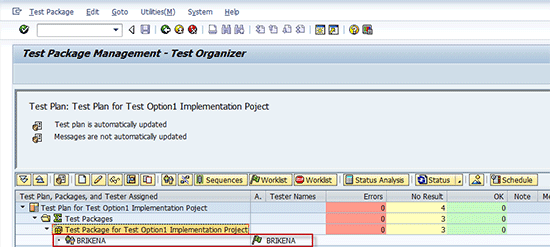
Figure 44
The tester assigned to test package
Brikena Berisha
Brikena Berisha graduated with a degree in finance and international business from California State University of San Bernardino in 2006. She has more than five years of consulting experience in project management, including project implementations and upgrades, testing with SAP Solution Manager 7.0 and 7.1, SAP Quality Center by HP, QTP by HP, and SAP TAO. Brikena is a consultant at CoreALM Consulting Company, specializing in SAP consulting, in particular application lifecycle management, SAP solutions, and third-party solutions that are integrated with SAP Solution Manager.
To contact the editor, click here.
You may contact the author at brikena.berisha@corealm.com.
If you have comments about this article or publication, or would like to submit an article idea, please contact the editor.