When you want to perform calculations on your data, you may be accustomed to downloading an R/3 report into Microsoft Excel and performing calculations there. However, you can save yourself some work by creating the calculated fields in SAP Query itself. Using an example query, the author shows you how.
At some point, you will want to perform calculations on your data. You may think you have to resort to downloading an R/3 report into Microsoft Excel and performing calculations there. However, did you know you can save yourself some work by creating the calculated fields in SAP Query itself?
In SAP Query, you can multiply an annual salary by 4 percent to determine potential increases or inflation for salary projections and budgeting. Or you can take an employee’s hire date and subtract it from the current date or a future date to determine or project their length of service. I find calculated fields most helpful when I want to compare the differences between two columns in a report, such as an employee’s cost center stored on infotype 0001 and the cost center that came through with their time sheet on infotype 315.
In addition, you can use calculated fields to:
- Perform “if-then” statements. If an employee’s termination reason code is A1 (death) or B1 (better opportunity), you can output a column that defines the termination as unavoidable.
- Output symbols and pictures if certain conditions are met. If an employee has been terminated but the benefits are still active, you can include a red flag next to the line on the report output for that person.
- Calculate wage types. If an employee is paid bi-weekly and you want to calculate his annual salary, you can create a calculated field that says if the wage type record equals 1023, then multiply the wage type amount by 26.
On one of my very first SAP installations, we did not know this calculation functionality was available. We looked for more information and found the SAP Help text was very basic. The complex calculations and step-by-step instructions I cover in this article are not explained elsewhere. Using several examples, I’ll show you how to create calculated fields in SAP Query. Then, I’ll show you how to use them to perform a calculation or output a value if a certain condition exists, as well as how to output text, pictures, and symbols with your reports.
To provide a baseline for you to follow, I have created a query that outputs the fields shown in Figure 1.
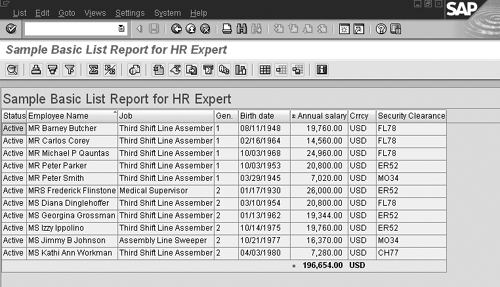
Figure 1
Fields included in an example SAP Query
The Basics
In SAP Query, you define your reports by selecting infotypes, selecting fields for output, and then defining what that output will look like.
My first example uses a calculated field in a report that will help a company analyze the effects of a reduction in pay. All employees are going to get a $1,000 reduction. Using SAP Query, I am going to create a basic calculated field for annual salary minus $1,000. All calculations for SAP Query are inserted onto the Select Field screen, which is the third screen of SAP Query. It lists the available fields for your report. From this screen, you follow the menu path Edit>Short names>Switch on/off. This allows you to create short names for your existing query fields. Figure 2 shows that I entered a short name for the Annual salary field on infotype 0008, calling it ANSAL.
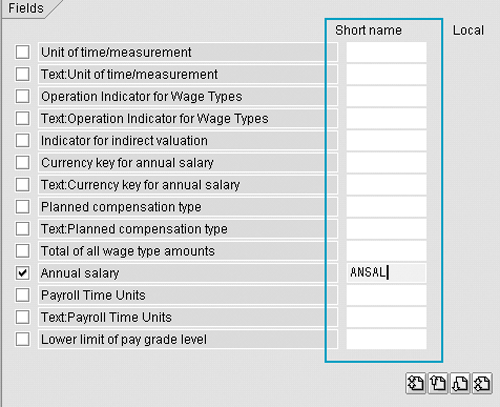
Figure 2
Creating short names for fields
Having a short name assigned to that field makes it easier to use the field in a calculation, because I can refer to it as “ANSAL” instead of “Annual salary.” Now I am ready to create a calculated field that uses the ANSAL field to perform the mathematical function of annual salary minus $1,000.
Calculated fields in SAP Query are referred to as “local fields.” To create a local field, follow these steps:
1. From the Select Field screen in SAP Query, follow menu path Edit>local Field>Create.
2. A dialog box appears. Give your local field a short name, field description, and column heading. (I’m calling mine PayCut.)
3. Select the attributes for the field. (See Figure 3.) The easiest method is to indicate that the field is similar to an existing field. This is what I did when I indicated that the field had the same attributes as the ANSAL field. (Both are currency fields.) Several options are available, including Date field, Time field, and Text field.
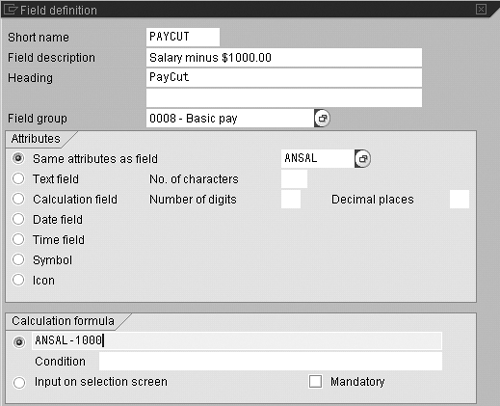
Figure 3
Calculation formula entered
4. Enter the Calculation formula of ANSAL - 1000. Select the enter button. This translates to an output in the new PayCut field of the calculation: annual salary minus $1,000.
5. Add the new local field to your report output on the Basic List screen in SAP Query. I placed it next to the Annual Salary field (Figure 4).

Figure 4
PayCut field added to the basic list report
This basic method works for date calculations as well. Use hire date plus one year, for example, to determine employee service anniversaries, or use the date of birth subtracted from today to determine age.
Note!
You can use the following valid operators in local fields:
* (multiplication), / (division), DIV (whole number division, i.e., the result is an integer), MOD (remainder), + (addition), and - (subtraction).
The following operands are valid: short names of fields, %NAME, %DATE, %TIME, numeric constants (e.g., 10 or 153.72), character strings in the form “xxxxxxxx,” and names of symbols and icons.
Using a Condition
Now that you have created a basic calculation, let’s use a condition to determine a calculation. Let me put it in a simpler way: In some cases in HR and Payroll reporting, you want to perform a calculation or output a value only if a certain condition exists. For example, you can use a calculated field to say that if an employee is in a certain cost center, then pay a bonus. This basic example applies to numerous business scenarios. You can analyze how much it would cost for an employee on the third shift to work on a holiday by calculating the cost of increasing the hourly rate from straight time to time and a half. To create a calculated field that is based on a condition, follow these steps:
1. On the SAP Query Select Field screen, enter a short name for any field that you will be referencing. I’m using the Compensation plan field that is a field from custom infotype 9002, which outputs the compensation plan number. (You can do calculations on any field, including fields from custom infotypes.) I used the short name CompPlan.
2. Create a Local field to store the new value by following the menu path Edit>Local field>Create. A dialog box appears (Figure 5) in which you give the local field a Short name, Field description, and column Heading. (I called mine COMPADJUST.)

Figure 5
Formula entered in the dialog box
3. Select the attributes for the field. The easiest method is to say the field is like an existing field. I indicated that the field has the same Attributes as the ANSAL field.
4. Enter the formula — in this case, (ANSAL *2) — in the Calculation formula section of the dialog box. This formula translates to output in the new Compensation Adjustment field of the following calculation: annual salary (ANSAL) multiplied by 2.
5. Because I want this calculation performed only for the employees belonging to the 80000026 compensation plan, I need to enter a value in the Condition field at the bottom of the dialog box. Enter the short name and the value for the group (COMPPLAN = 80000026).
6. Select the enter button.
7. Once the new local field is created, add it to your report output on the Basic List screen in SAP Query. I placed it next to the Compensation Plan (Figure 6).

Figure 6
Compensation Adjustment field added
Performing Complex Calculations
You have seen examples of simple basic calculations and calculations based on conditions. Now you can also use your local fields in SAP Query to perform complex calculations. In many cases in HR and Payroll, you only want to see report output if certain complex conditions are met. For example, the last of the output fields in my report is Security Clearance (Figure 1). I can perform a complex calculation to say that if the value of the Security Clearance field equals X, then you output Y, or if it equals B, then you output A. In a real scenario, I may need to base a condition on several variables:
|
Condition
Formula
|
SECURITY = ‘FL78’
‘Red’ |
Condition
Formula |
SECURITY = ‘ER52’
‘Yellow’ |
Condition
Formula |
SECURITY = ‘MO34’
‘Green’ |
| otherwise |
‘Black’ |
To use local fields to perform complex calculations, follow these steps:
1. Start by giving the Security Clearance field a short name — in this example, the word SECURITY.
2. Create a local field called Badge with the column heading Badge Color. Select the Complex Calculation button.
3. Enter the conditions, as shown above.
4. Add the new local field to your report output on the Basic List screen. I placed it next to the Security Clearance field (Figure 7).

Figure 7
Badge Color field added
Outputting Text
Instead of performing a calculation when some conditions are met, you can also output text. For example, you can create a calculated field that marks employees who are under the minimum salary range of $20,000. See Figures 8 and 9.

Figure 8
Create the calculation for identifying annual salaries under $20,000

Figure 9
Field entered for salary under $20,000
Inserting Pictures or Symbols
You can also use calculated fields to insert pictures or symbols in your reports. You can create a calculated field to output a symbol (there are hundreds to choose from) if a particular condition is met. For instance, I can insert a red flag symbol for any employee in my report who makes less than $20,000.
To insert pictures and symbols in your report, follow these steps:
1. Create a local field. Call it Flagged with the column heading Flagged.
2. For the Attributes of the field, select the Icon button.
3. Place your cursor in the Complex calculation field and select the Icon button.
4. Select an icon from the list in the dialog box by double-clicking on it.
5. Enter your condition in the Condition box. I’m entering ANSAL<20000 (which translates to: annual salary is less than $20,000).
6. Select the enter button.
7. Add the new local field to your report output on the Basic List screen in SAP Query. I placed it in the first column of my report. (See Figure 10.)

Figure 10
Flagged column added to the basic list report
You can also insert symbols into your report. You can create a field that simply stores the value of a symbol. Symbols include pictures of telephones and printers. If you were creating a report that listed contact information, you could output the picture of a telephone before you output the telephone numbers.
Tip!
When using R/3, you often need to output data only if a certain condition is met. Report selection screens are often used for this. For example, if you have a report of all employees, you can specify on the selection screen that you want to output only all “active” employees or only employees in a specific cost center. What you cannot do on a selection screen is to output data only if certain conditional statements are met. The use of calculated fields is helpful in this case. You can create a calculated field called FIELDX that performs a complex conditional “if-then” statement. Then you can include FIELDX on your reports selection screen to determine what records to output.
Depending on your selected output or printer, the symbols and icons may differ from what you see on the screen. I’ve given you a few of the options for the use of calculated fields in SAP Query for HR and Payroll reporting. Start with the basics, and before you know it, you will be creating robust reports that do not require any further manipulation in Microsoft Excel.

Danielle Larocca
Danielle Larocca is currently the Senior Vice President of Human Capital Management for EPI-USE Labs. Previously she was the Executive Vice President of Operations/Chief Knowledge Officer at a technology start-up. She has more than 20 years of strategic leadership experience in multi-national business, business process re-engineering, and project and people management. Danielle is an expert on SAP Human Resources (HR) and reporting and has authored four best-selling books on SAP. She is a regular speaker at numerous conferences around the world on topics such as HR, technology, change management, and leadership. She is an official SAP Mentor, a global designation assigned to less than 160 professionals worldwide, who serve as influential community participants in the SAP ecosystem. This group is nominated by the community and selected by the SAP Mentors’ Advisory Board to keep SAP relevant. Danielle also serves as an expert advisor for SAP Professional Journal.
You may contact the author at me@daniellelarocca.com.
If you have comments about this article or publication, or would like to submit an article idea, please contact the editor.