Learn how the key performance indicator (KPI) framework is implemented in SAP Manufacturing Integration and Intelligence (SAP MII) and how to create KPIs in SAP MII. Discover how to monitor and visualize these KPIs.
Key Concept
The key performance indicator (KPI) framework is a built-in feature provided by SAP Manufacturing Integration and Intelligence (SAP MII) that enables you to define KPIs and then create logic to calculate and monitor them. In addition to these features, the KPI framework also allows you to create your own user interface (UI) and consume data of KPIs from SAP MII. SAP MII’s KPI framework leverages the ability of SAP MII to fetch the data needed for the calculation of KPIs from any shop floor system or historian using SAP MII data connectors. You can also create custom logic for calculation in SAP MII and then calculate your KPIs based on these calculations.
Key performance indicator (KPI) creation, measurement, and monitoring are critical for performance evaluation. KPIs, which are numerical measures that are used to monitor the critical areas of operation, can differ at various levels of an organization. KPIs let the business know how well the organization or a part of it is performing. They are normally created for a particular business scenario and serve a specific purpose (i.e., monitor critical areas). These KPIs let the management and the stakeholders associated with that scenario understand which areas of their business are performing well, which areas need monitoring, and which areas need immediate attention and improvement.
SAP Manufacturing Integration and Intelligence (SAP MII) version 14.0 enables you to create and configure these KPIs according to your business needs and monitor them easily using SAP MII’s built-in KPI monitoring screen. From a framework point of view, the KPI framework consists of three major steps:
- KPI definition
- KPI data acquisition
- KPI data consumption
In the following sections, I lead you through these steps and help you understand all the features and capabilities of SAP MII’s KPI framework:
- Types of KPIs
- KPI definition
- KPI data consumption and monitoring
- Use of alerts in KPI
Note
The KPI framework is only available in SAP MII 14.0 and above. Prerequisites for this article are knowledge of SAP MII and SAP MII’s Business Logic Services (BLS).
Types of KPIs
SAP MII’s KPI framework has two types of KPIs: base and composite. Base KPIs are not dependent on any other KPI, whereas composite KPIs depend on other KPIs to get data.
Base KPIs
Base KPIs are the performance indicators that are independent of other KPIs. These KPI are self-sufficient and can collect and calculate values by themselves without the need of any external system. However, these KPIs can be part of another KPI to gather required data. Therefore, these are called base KPIs as they measure the performance of individual or fundamental measures of a system.
Base KPIs are represented by this icon  in SAP MII. They can be configured to collect data from either a query template or transaction. Examples of base KPIs are Availability, Quality, First Pass Yield, and Performance.
Composite KPIs
A composite KPI is a combination of one or more base KPIs. The value of a composite KPI is calculated based on the values of each of its dependent KPIs or systems. A composite KPI can have its own source of data. However, during calculation of a KPI, all the dependent KPIs are taken into account and the value is generated. Composite KPIs can be dependent on base KPIs, composite KPIs, or both.
The composite KPIs are represented by this icon  in SAP MII. The composite KPI can be configured to collect data from multiple data sources that can be query templates, transactions, or other KPIs. However, for a composite KPI, it is mandatory that at least one KPI be configured as a data source.
An example of a composite KPI is Overall Equipment Effectiveness (OEE). This KPI is dependent on three other base KPIs: Availability, Quality, and Performance.
The formula to calculate OEE is OEE % = Availability % * Quality % * Performance %
I now explain how these KPIs (base and composite) are defined and consumed.
KPI Definition
The KPI definition is where you create and configure your KPIs. Because KPIs are created to monitor specific business indicators, each KPI is unique. If you have knowledge of SAP MII’s manufacturing data objects (MDOs), then you would notice that most of the features and configurations in KPI are similar to an MDO. This is because both MDOs and KPIs perform similarly after they are deployed. The latter has additional capabilities to calculate expressions, aggregate data, and send alerts based on threshold values.
Configuring a Base KPI
KPIs are created in SAP MII’s workbench. To create a KPI, you need to launch the workbench from SAP MII’s Admin Menu. The link to the workbench can be found under Content Development (Figure 1).

Figure 1
The workbench menu
Note
Because you are creating and configuring your own KPI, you need an XMII_DEVELOPER role to use the workbench.
Like MDOs, KPIs are found under the Object tab of the workbench. Right-click any project (in SAP MII, a project is the first level of your SAP MII file system) and select New File. In the adjacent sub-menu, you have the option to create a base KPI or a composite KPI. Create a base KPI first and then use the same KPI to create a composite KPI. Select Base KPI from the menu options (Figure 2).

Figure 2
Create a new KPI
After you select Base KPI from the menu options in Figure 2, the screen shown in Figure 3 loads automatically.

Figure 3
New KPI
The KPI configurations are divided into many categories. In SAP MII they are called Template Categories. These categories are found on the bottom left section of the workbench (Figure 3). Each category has its own importance and functionality.
General
General is the default category that is opened when you create a KPI. This category contains all the header information needed for the KPI (Figure 4).

Figure 4
General configuration
The different fields that are available in the General category are shown in Figure 4. The Description field is a normal text box in which you can describe what your KPI is about and what it is meant to measure. The description of the KPI is not displayed when the KPI would eventually be consumed. It is used by the developers to identify the purpose of the KPI easily.
In the Data Type field you have an option to select the data type of the KPI value that will be generated. Four types of data types are supported: integer, float, double, and long. Integer can be used when you need a whole number with the decimal places rounded off, and float can be used for lower-precision decimal values. If you need high-precision values, then double and long are used.
As the name suggests, the Unit of Measure field lets you know what the measuring unit of the KPI is. The value may not always be a percentage. For example, it could denote pressure, temperature, or power. Therefore, this field gives firsthand information of what the KPI is measuring.
The read-only Mode field is pre-selected according to the type of KPI you select.
The Type and Range field is an important part of the configuration that lets you know the state of the measuring unit. The state could be Green, Yellow, or Red depending on the type of KPI you choose. You can choose from three types:
- Positive
- Negative
- Bidirectional
Positive means that the higher the value of the KPI, the better the performance. Examples are those KPIs in which a higher value is expected, such as Availability, Quality, Performance, and Efficiency.
An example of a positive KPI is shown in Figure 5. The Green range is the top section followed by Yellow, and then Red, which denotes that the KPI is in a danger state.
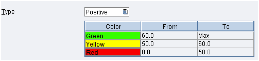
Figure 5
A positive KPI
Negative KPIs are the opposite of positive KPIs. The value of negative KPIs is desired to be as low as possible. Lower values of these KPIs indicate a good performance. Examples of negative KPIs include system downtime, incident management, and safety hazards.
The range order is Red, Yellow, and Green. An example of a negative KPI is shown in Figure 6.
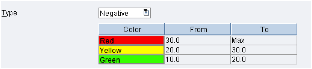
Figure 6
A negative KPI
Bidirectional KPIs are certain KPIs such as temperature of a boiler, pressure, or frequency that need to operate in a specific range between upper and lower limits. The desired value is expected to be in between the upper and lower limit. An example of a bidirectional KPI is shown in Figure 7.

Figure 7
A bidirectional KPI
The Aggregation Logic field defines the logic to be used for the aggregation of the values while querying the KPI. You can select one of the following choices:
- MIN: The minimum value from the retrieved results is returned as a result of the query. Use this option to find the minimum value of the KPI that a particular system encountered over a certain period of time.
- MAX: The maximum of all the values returned is the result of the query. Use this option to find the maximum value of the KPI that a particular system encountered over a certain period of time.
- AVG: The average of all the values obtained is returned as result of the query. Use this aggregation logic to find out the average KPI value of a system.
- SUM: Summation of all the KPI values obtained is returned as a query result. Use this option to find out the total number of goods produced by a work center, for example, over a given period of time.
- RANGE: This aggregation logic gives the difference between the maximum and minimum value of the KPI. Use this logic to find the span of extremities of the company’s performance.
I look at the use examples of aggregation logic when I explain the KPI Query.
Custom Properties are additional properties that you can configure along with the KPI. Although these properties are not used for calculation of actual KPI values, they can be used as metadata information for the created KPI.
Once you have configured the General category, the next step is to configure the data provider or the source of data to the KPI.
Data Provider
The Data Provider screen is used to provide a data source to the KPI. For base KPIs, the data provider can be either a query template or a transaction. For a composite KPI, the data provider can be a query template, transaction, or another KPI.
To add a data provider, click the Load button on the screen, and in the pop-up screen that appears (Figure 8), select the desired query template or transaction. After you make your selection, click the OK button. You can also select the query template from the left pane of the Data Provider screen and then click the Paste from Browser button.

Figure 8
Choose a data provider
After you make your selections, the Data provider screen looks like Figure 9.
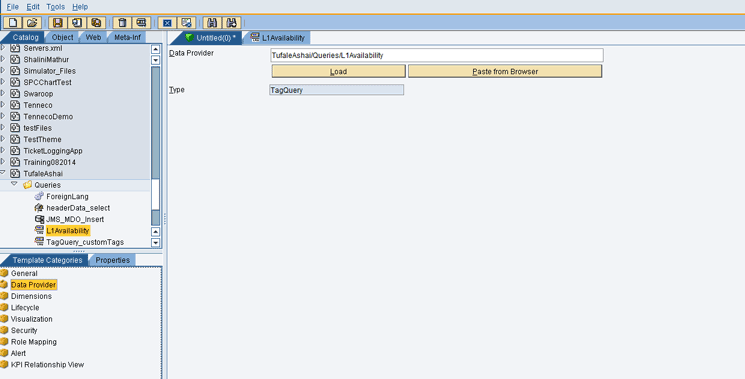
Figure 9
The Data Provider screen
Dimensions
Dimensions are like columns in the table. The data that is coming in from the data provider has columns that can then be mapped to the KPI’s attributes. These attributes of the KPI to which the columns are mapped are called dimensions.
You can create up to 128 dimensions for a KPI. Each dimension acts as filter criteria when you want to query the KPI. When the KPI is saved and deployed, the dimensions become the columns, storing rows of data that come in from the data provider.
If you do not have an extra dimension in your query template or transaction, you could just map the value to the value dimension and Timestamp column to the Timestamp dimension of the KPI. In my example, my data provider has only two dimensions (Timestamp and Value). Therefore, I map the value (L1Availability) column to the value dimension and repeat the same mapping to the Timestamp column (Figure 10).

Figure 10
Dimensions
After the dimensions are mapped, the next step is to save and deploy the KPI so that it starts gathering the data. However, in order for the KPI to gather the data, you need to schedule it for a specific time. This is done in the Lifecycle category.
Lifecycle
The Lifecycle category is used to schedule the KPI to gather the data at a given time. Therefore, you need to create the schedulers that do the data accumulation job and store the data within the KPI. This is an important step because without schedulers, the KPI cannot store the data in them and therefore, when you consume the KPI, there is nothing that can be retrieved. While creating a scheduler, you can define a time pattern for the scheduler to be run. Each time the scheduler runs as per the defined schedule, the data provider query is executed and the values for each of the KPI dimensions are calculated and stored in the respective KPIs.
To create a new scheduler, click the New button (Figure 11). This action enables you to edit the Name field. The Name field is mandatory, so you need to enter an appropriate name. It is always better to enter the name of the KPI that you are measuring as the schedule’s name for easy identification. However, by default, a scheduler of name Task_Name_0 is created. You may choose to delete it or rename the scheduler by just changing its name.

Figure 11
Create a scheduler
Enable the scheduler by selecting the check box beside the Enabled field (Figure 11). Select a pattern for the scheduler to run. To select the pattern, click the pattern editor  icon.
icon.
In the Mode field, select the mode of the scheduler. You can select Append to append the data to the existing data in the table, Delete to delete the data in the table and then insert, or Update mode to update only the value in the KPI.
Click the Deploy All button to deploy the scheduler. After the scheduler is deployed, the schedulers start running according to the pattern that is selected. Click the Run button to run the scheduler.
In my example (Figure 11) I have created the scheduler to run at 0th second of every minute in an hour.
There are situations in which the lifecycle method cannot populate your KPI. For example, if the KPI values are provided by user inputs after every shift, then the lifecycle method cannot fetch the data. To overcome this limitation, the KPI framework provides you with the flexibility to feed data into the KPI manually without the need of lifecycle jobs. This is done by using KPI Query’s insert mode. I describe this mode in detail when I discuss the KPI Query.
Role Mapping
The final step is to assign roles to your KPI. This step ensures that only those users who have proper authorizations can consume the KPI data. To add roles to your KPI, select the roles from the Available Roles section and click the add  icon to move it to the Assigned Roles section (Figure 12). Alternatively, you can click the add all
  icon to add all available roles to the Assigned Roles section.
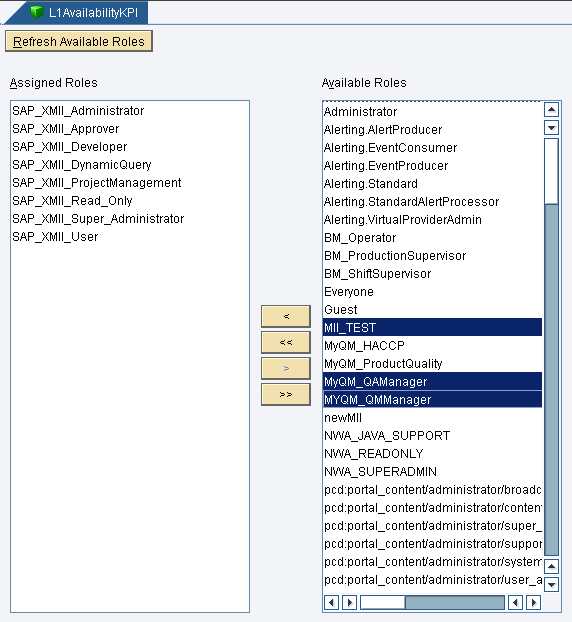
Figure 12
Role mapping
Note
To select multiple roles, press Ctrl on the keyboard and then select the roles.
After you finish the mappings, save the KPI by either clicking the save icon or pressing Ctrl and S on the keyboard. Give it an appropriate name depending on the KPI you are creating. You have just created your first base KPI. You can repeat the same procedure to create two more base KPIs for Quality and Performance. I now look at how to create a composite KPI using the already created base KPIs.
Note
In the steps above, I omitted Alert, KPI Relationship View, and Visualization categories. I explain the Alert category in the “Use of Alerts with KPIs” section, the KPI Relationship View category in the “Configuring Composite KPIs” section, and the Visualization category in the “KPI Data Consumption and Monitoring” section.
Configuring Composite KPIs
As discussed earlier, a composite KPI depends on other KPIs to gather data and calculate values accordingly. Therefore, while creating a composite KPI, you not only select the dependent KPIs but also tell the KPI how the values need to be calculated.
For my example, calculate the OEE of a functional system. You have already created the base KPIs that you need. The steps involved in creating a composite KPI are similar to those for creating a base KPI, but the key difference is in configuring the data source and the dimensions.
The Data Provider Screen for the Composite KPI
When you open the Data Provider screen of a composite KPI (Figure 13), you notice that there is an additional box called KPI Data Provider. This box is used to add the KPIs on which the composite KPI depends.
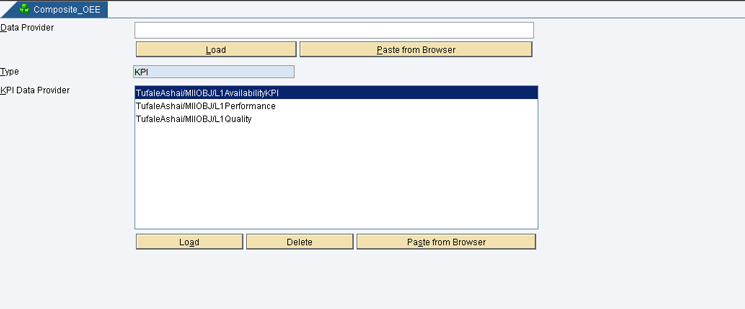
Figure 13
The composite KPI Data Provider screen
To add dependent KPIs, click the Load button. In the pop-up screen that opens (Figure 14), select the KPIs that you want to add. After you select the KPIs you need, click the OK button.
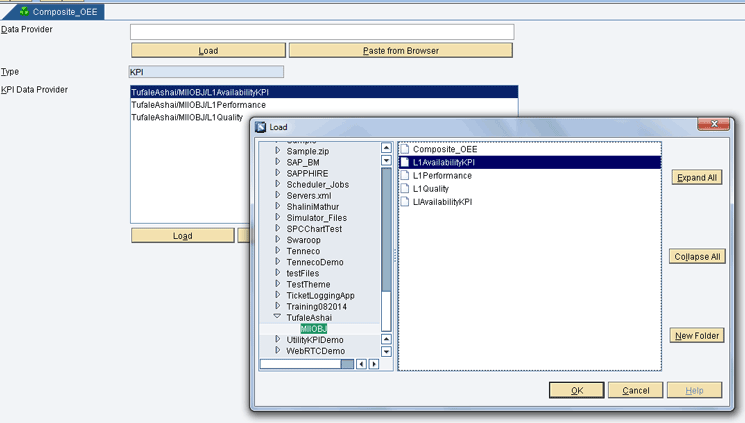
Figure 14
Select dependent KPIs
Sometimes, a composite KPI may also have its own values coming in from external systems. In that case, you also populate the Data Provider field with a query template or a transaction. However, in my example, the composite KPI (i.e., OEE) depends on the three base KPIs that have been selected. Therefore, do not populate the Data Provider field.
The Dimensions Screen for a Composite KPI
The Dimensions screen for a composite KPI is similar to that of a base KPI. The difference comes when you want to map the value of multiple KPIs to your composite KPI. To set the value for your composite KPI, click the EDIT Expression button (Figure 15) and type in the expression.
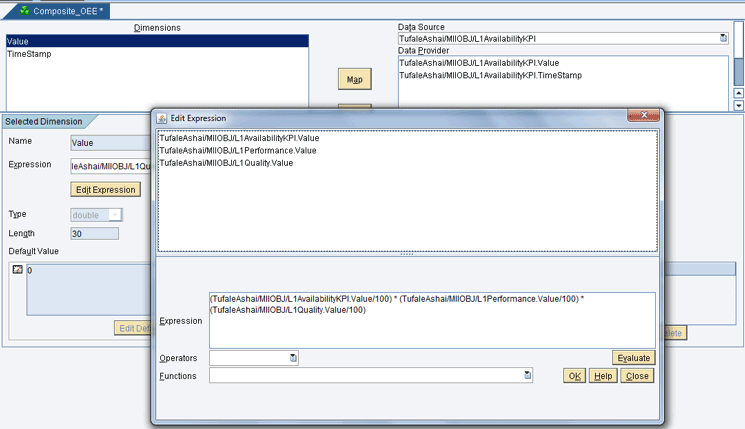
Figure 15
The Dimensions screen for a composite KPI
In my example, the OEE KPI is a product of the other three KPIs, and therefore, my expression looks similar to the one shown in Figure 15. After you edit the expression, click the OK button and then continue to configure the other categories of the KPI. Apart from these two configurations (Data Provider and Dimensions), all other configurations remain the same.
If you need a visual representation of the different KPIs you have used, click the KPI Relationship View category to see your current KPIs along with the used KPIs (Figure 16). This category provides you with an easy picture of what KPI you are using, and if your KPI is used by some other KPI, another box reads Used By. A KPI can be reused in as many KPIs as you want.

Figure 16
The KPI Relationship View
You have now configured all your KPIs.
KPI Data Consumption and Monitoring
In this section, I explain how to query the data in the KPI and then how to visualize this data.
KPI Query
SAP MII 14.0 includes a new type of query template called KPI Query that enables you to query KPI data. Like all other query templates, the KPI Query also needs a data server and a connector to run. In SAP MII’s terms, a connector is like an adapter that can connect and get the data from an external system. A data server is a connection that has been established using the connector. You specify the server details in the data server and use the connector to get the data.
For KPIs, SAP MII by default provides you with a data server called KPIConnector. You can use this data server to query any KPI that has been created on that server. You can enable and disable this server or create your own data server using the Data Servers screen (Figure 17) in the SAP MII Admin Menu.

Figure 17
The Data Servers screen
The next step in querying the data is to create a KPI Query. To do this, go back to the SAP MII workbench, and under the Catalog tab, right-click a project and select New and KPIQuery (Figure 18).

Figure 18
Create a KPI Query
Like the KPI configurations, the KPI Query configurations also have different categories. The initial category is the Data Source category (Figure 19). In Figure 19, you choose the data server and also the KPI that you want to query. Because you are using the default data server, you select the KPIConnector server from the list in the Available Servers section of Figure 19. If you have multiple data servers, then you can choose one from this list. For my example, however, you use the default data server and have not created any other servers. Therefore, you choose the KPIConnector server.

Figure 19
Configure the Data Source category
The next step is to choose the KPI. To choose the KPI, click the Load button. In the pop-up screen that appears, locate and select the KPI that you want to query. After you select the KPI from the pop-up menu and click the OK button, the name of the KPI is populated in the KPI field. After you have selected your KPI, click the OK button.
Lastly, the Modes field provides you with a drop-down list of the following different modes of querying:
- AttributeList: This mode is used to list all the Dimensions of the KPI.
- Delete: This mode is used to delete data of the selected KPI.
- Info: This mode is used to list all the metadata of a KPI such as custom properties, description, type, and threshold ranges.
- Insert: This mode is used to insert data into the KPI.
- KPIList: This mode is used to list all the KPIs that are created on the selected data server.
- ModeList: This mode is used to list all the different modes that KPI Query can run.
- Select: This mode is used to retrieve the data from the selected KPI.
Because you want to get the data from the KPI, use the Select mode. Choose this mode from the drop-down list in the Modes field. After you finish the configurations in this screen, your Data Source screen looks similar to the one shown in Figure 20.
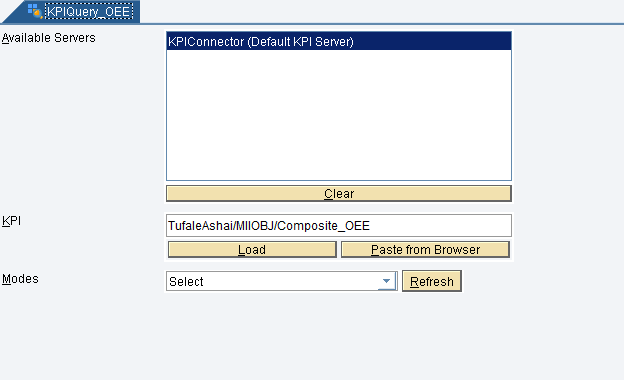
Figure 20
The Data Source screen
The next step is to configure the dimensions to query. To complete this step, select the Select Query category and choose the dimensions (Figure 21).

Figure 21
Select dimensions to query
To choose the dimensions, select the Value dimension from the Available Dimensions section and click the add icon to move it to the Selected Dimensions section. Alternatively, you can click the add all icon to add all the available dimensions to the Selected Dimensions section.
In my example, you have only one dimension (the Value dimension). Therefore, select that dimension as your result column. If you have additional dimensions, then you can also configure the Filter Expression. For example, if your KPI gets the data for multiple work centers, then you could add a Filter Expression as Work Center Dimension = WC1 depending on your dimension name and dimension value. The Filter Expression is similar to the “WHERE” clause in SQL.
The next field to configure is the Granularity. This along with aggregation logic specified during the configuration of the KPI determines how the data is represented when the KPI is queried. There are six types of granularities available:
- Hour: When the granularity is Hour, data is aggregated hourly according to the aggregation logic defined. For example, if the aggregation logic is MIN and Granularity is Hour, then the query result would be the minimum of all values in each hour.
- Day: When the granularity is Day, data is aggregated on a daily basis according to the aggregation logic defined. For example, if the aggregation logic is MAX and Granularity is Day, then the query result would be the maximum of all values for each day.
- Month: When the granularity is Month, data is aggregated monthly according to the aggregation logic defined. For example, if the aggregation logic is AVG and Granularity is Month, then the average of all values for each month is the query result.
- Week: When the granularity is Week, data is aggregated weekly according to the aggregation logic defined. For example, if the aggregation logic is SUM and Granularity is Week, then the sum or total of all values for each week is the query result.
- None: If you do not want to have any granularity, then you can choose the option as None. However, the aggregation logic is then applied to the entire data set. For example, if the aggregation logic is MIN and granularity is None, then the minimum of all values in the KPI is your query result.
- Raw: This type of granularity is used when the user wants to see all the data that is present in the KPI.
Table 1 is an example data set of how the aggregation logic and granularity work.
Value
|
Timestamp |
78.84
|
05/30/2015 07:00:00
|
81.52
|
05/30/2015 08:00:00
|
| 79.86 |
05/30/2015 11:00:00 |
| 79.06 |
05/30/2015 12:00:00 |
| 82.02 |
05/30/2015 13:00:00 |
| 80.99 |
05/30/2015 14:00:00 |
| 78.54 |
05/30/2015 15:00:00 |
| 78.66 |
05/30/2015 17:00:00 |
| 78.62 |
05/30/2015 18:00:00 |
| 78.41 |
05/30/2015 21:00:00 |
| 78.83 |
05/30/2015 22:00:00 |
| 78.55 |
05/30/2015 23:00:00 |
| 87.23 |
05/31/2015 02:00:00 |
87.16
|
05/31/2015 04:00:00
|
84.38
|
05/31/2015 06:00:00
|
83.33
|
05/31/2015 07:00:00
|
87.05
|
05/31/2015 09:00:00
|
| 87.28 |
05/31/2015 10:00:00 |
| 86.96 |
05/31/2015 11:00:00 |
| 87.11 |
05/31/2015 13:00:00 |
87.06 |
05/31/2015 14:00:00 |
87.15 |
05/31/2015 15:00:00 |
Table 1
A sample data set on which aggregation is performed
In Table 2 the aggregation logic is MIN and the granularity is Day.
| Value |
Timestamp |
78.41
|
05/30/2015 00:00:00
|
83.33
|
05/31/2015 00:00:00
|
Table 2
A sample result with aggregation logic as MIN
If the aggregation logic is MAX and granularity is Day, then the maximum of all the values in the given dataset for each day is returned (Table 3).
| Value |
Timestamp |
82.37
|
05/30/2015 00:00:00
|
87.28
|
05/31/2015 00:00:00
|
Table 3
A sample result with aggregation logic as MAX
If the aggregation logic is SUM and granularity is Day, then the sum of all values in the given dataset for each day is returned (Table 4).
Value
|
Timestamp
|
949.92
|
05/30/2015 00:00:00
|
895.99
|
05/31/2015 00:00:00
|
Table 4
A sample result with aggregation logic as SUM
If the aggregation logic is RANGE and granularity is Day, then the difference between the minimum and maximum value is returned for each day (Table 5).
| Value |
Timestamp |
3.96
|
05/30/2015 00:00:00
|
6.27
|
05/31/2015 00:00:00
|
Table 5
A sample result with aggregation logic as RANGE
Depending on the business case and the need, correct aggregation and granularity can be used.
After you have configured your query template, you can save it and give it a suitable name. Saving a file in SAP MII workbench is similar to saving any file in the file system. Just press Ctrl and S on your keyboard or click the save icon and give it an appropriate name.
Test the query by creating a display template for the query you have created. A display template in SAP MII is a visualization mechanism that converts your query data result to a chart. You can configure one of many types of charts that are by default available in SAP MII.
Now I explain how to create display templates in SAP MII. Under the Catalog tab, right-click the project or a folder and then click New and choose i5Chart from the list of menu options (Figure 22).
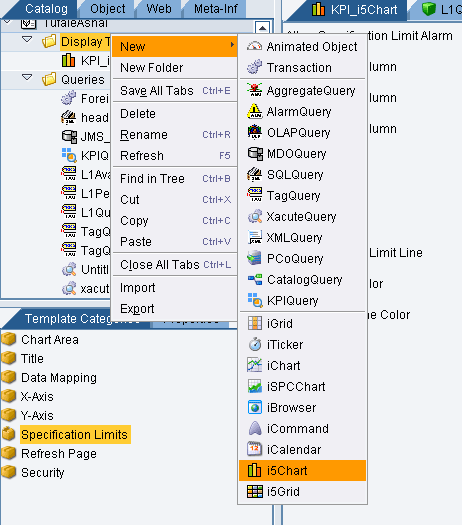
Figure 22
New i5Chart
Note
An i5Chart is an SAPUI5-based chart that was released with SAP MII 14.0. Prior to SAP MII 14.0, applets were used to display charts and analytics. Now SAP MII 14.0 enables you to use UI5 charts instead of applets.
After a new chart has been loaded on the workbench, the first category to load is the Chart Area category. Select the type of chart you want to create and specify the coloring for the chart (Figure 23). For now, leave the setting as is and move on to the Data Mapping category to configure the display templates for the query input.
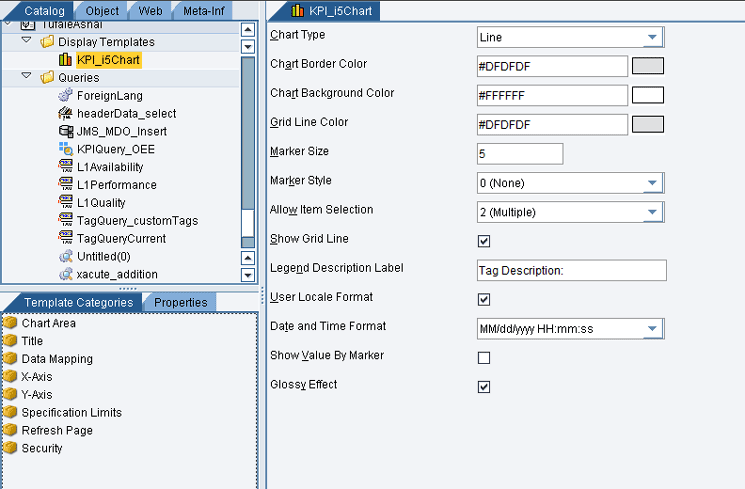
Figure 23
i5Chart - Chart Area
In the Data Mapping screen, choose the query template that you have just created. To load the query template, click the Load button, browse through the projects, select the desired query template (e.g., KPIQuery_OEE), and click the OK button (Figure 24). The screen then loads the available column names for the query templates.

Figure 24
Load a query template
In the Column Names section of Figure 25, select Value and click the Add button in the Value Columns section. Repeat the same process in the Label Columns section, but this time select the TimeStamp in the Column Names column and click the Add button (Figure 25).

Figure 25
i5chart - Data Mapping
After you complete the data mapping, click the save icon or press Ctrl and S to save the display template and give it an appropriate name. Test the display template by clicking the test  icon.
icon.
Now you have created a KPI Query and a Display Template for the KPI. The next step is to add this query and display template to the KPI. To complete this step, double-click Composite_OEE to open your composite KPI and then under the Template Categories tab, select the Visualization category (Figure 26). Add your query and display templates to the designated fields by clicking the Load button.
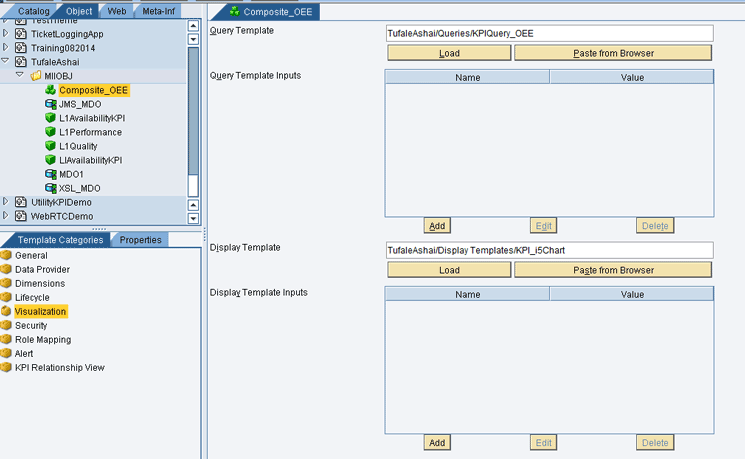
Figure 26
The KPI Visualization category
KPI Insert Query
Insert query mode is used when you want to insert the data into the KPI on an ad hoc basis. For example, if the KPI values are entered by user inputs after a shift ends, then periodic queries and lifecycle jobs cannot populate the data. To overcome this limitation, you can use the Insert query mode of the KPI Query.
To insert the data into the KPI, first choose Insert from the drop-down list of options in the Modes field (Figure 27).

Figure 27
KPI Query Insert Mode
In the next screen (Figure 28), select the Insert Query category from the left panel. Note that your dimensions are present in the Available Dimensions section and an Attribute table is present on the right. The attribute table has 128 entries, which means that you can insert up to 128 dimensions at a time.
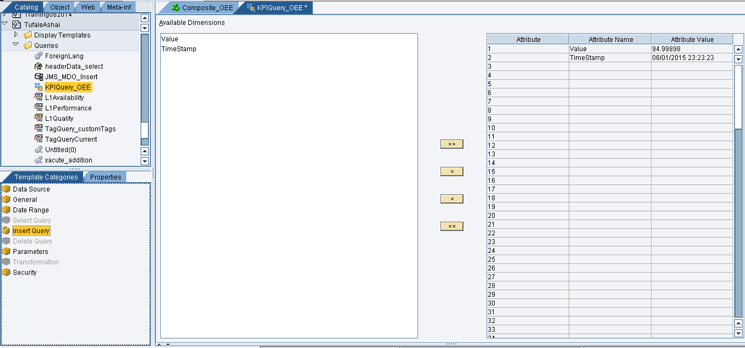
Figure 28
Add dimensions and values
Click the add all icon to add all dimensions to the attribute table or click the add icon to add one dimension at a time to the attribute table. After you add the dimensions, the next step is to add the value of the dimension. To complete this step, double-click the Attribute Value column and enter the value for the dimension.
To run the query, click the test icon. The data is then inserted into the KPI table. The Insert query can be placed inside an SAP MII transaction or can be called from a web page when you insert data into the form.
The KPI Monitor Screen
The final step is to monitor the KPIs that you have created. SAP MII gives you the flexibility to create your own dashboard and add the display template in it, or you can monitor your KPI using SAP MII’s KPI Monitor screen.
To open the KPI Monitor screen, go back to the SAP MII Admin Menu. Under the Alerts and KPI category, click the KPI Monitor link to open the KPI Monitor (Figure 29).

Figure 29
The KPI Monitor screen
Initially, the screen is empty if you have not configured the KPIs previously. To configure the monitoring, you need to create a search template. A search template is a collection of KPIs that can be used and reused for monitoring of KPIs. Each search template can contain one or more search KPIs.
Click the Create button. In the expanded Search Template Details panel in the next screen (Figure 30), enter the template name in the Name field and populate the Description and Duration fields. The next step is to add the KPIs that you want to monitor. Click the Add button, and in the pop-up screen, select the KPIs you want to monitor.
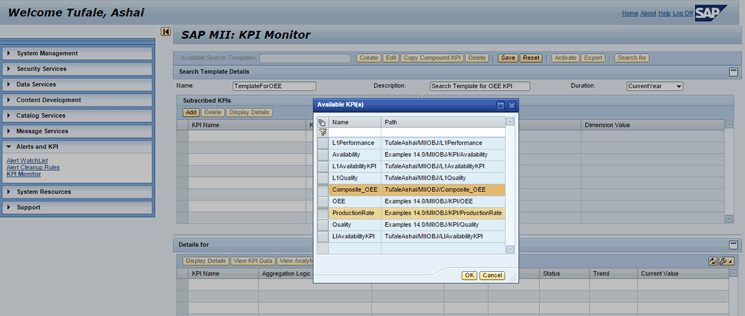
Figure 30
Create search templates
Note
If you are unable to see the KPI in the Available KPI(s) dialog box, it means you have not added proper roles in the Role Mapping category while creating the KPI.
After you select the KPIs, click the OK button. The KPIs are now added to the Subscribed KPIs table (Figure 31).
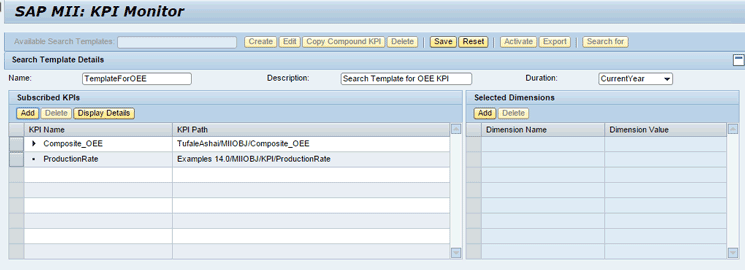
Figure 31
Subscribed KPIs
If you want to look at the KPI details, click the Display Details button in the Subscribed KPIs table. To configure the dimensions, select a KPI and then click the Add button in the Selected Dimensions table. In the dialog box that opens (Figure 32), select the dimensions whose values you want to change and click the OK button.

Figure 32
Add dimensions
Note
To select multiple dimensions, press the Ctrl key and click the rows under the Name column in the pop-up screen shown in Figure 32.
You can configure the dimensions by adding the dimension filter or you can leave them blank to get the KPI value for all dimensions. Click the Save button to save the search template. After you save the template, the Details panel shows you the KPI values.
Because you added a composite KPI, the KPI Monitor screen displays it like a tree structure (Figure 33). The composite KPI is displayed as the parent node and base KPIs as leaf nodes. You can also see the current values of these KPIs along with their statuses and trends.

Figure 33
The KPI Monitor screen
Note
If you cannot view the trend, it means that the KPI Monitor screen is unable to find a previous value 24 hours before the current timestamp.
The status is according to the threshold values you had set during KPI configuration. To see the threshold values, select a KPI and then click the Display Details button. In the dialog box that opens, click the Target Details tab to see the range for KPIs (Figure 34).
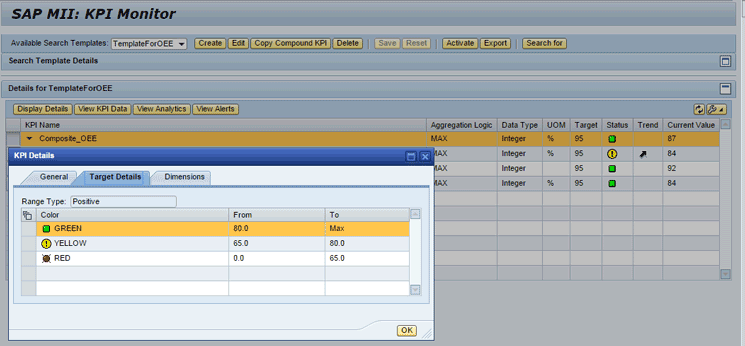
Figure 34
View KPI details
To view tabular or graphical representations of this data, click the View KPI Data button and the View Analytics button, respectively. Clicking the View KPI Data button displays the KPI data in a table format (Figure 35).

Figure 35
KPI data as a table
Clicking the View Analytics button displays the data as a graph (Figure 36).

Figure 36
KPI data as a graph
You need to add the query and display templates to the KPI to view the tabular and graphical representations of data.
By using the KPI Monitor screen, you can monitor your KPIs and also view the data in tabular and graphical formats.
However, what happens when the KPI crosses a threshold value? For example in Figure 34, you see that the KPI is in red status when the value comes below 65 and is in Yellow status when it comes below 80. So how are users notified that the value of KPI has dropped to undesirable values?
To answer to this question, use the alert framework that is provided by SAP MII. Both the KPI and alert framework are loosely coupled. Loosely coupled means that it is not mandatory for a KPI to be configured with alerts and vice versa. I now explain how to make use of this coupling and the alert framework to send notifications to the users whenever the KPI values drop below the specified limits.
Use of Alerts in KPIs
A KPI can be configured to raise alerts whenever the KPI values cross the specified limits. You can configure multiple alerts for a KPI. However, you need to create an alert first.
To create an alert, select the Object tab of the workbench, right-click any project or folder, and select New File and Alert from the menu options (Figure 37).

Figure 37
Alert configuration
After the new alert screen is loaded (Figure 38), you can complete the following steps:
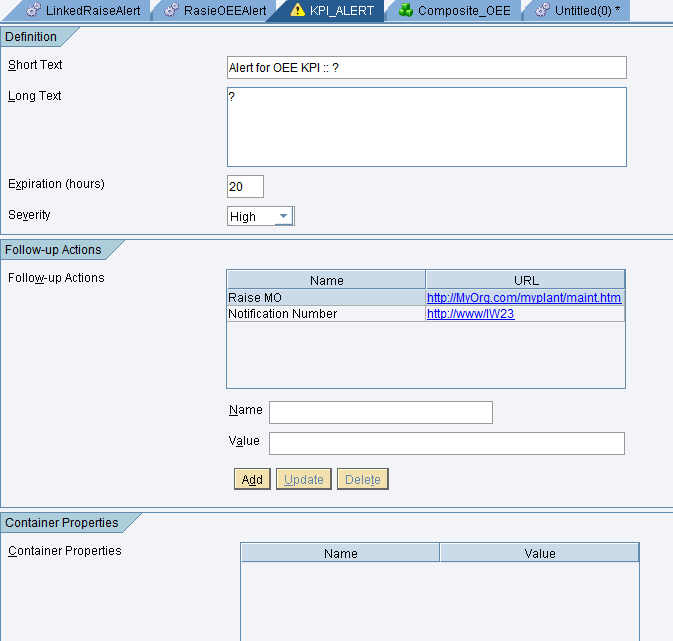
Figure 38
Create an alert
- Enter a short text and a long text to the alert. You can use question marks as placeholders for both short and long texts. These values can be filled in later when the alert is actually raised.
- Enter the expiration hours for the alert. This is the duration after which the alert auto expires.
- Enter the severity of the alert. This can be High, Medium, or Low.
- Add Follow-up Actions. These are name value pairs that you have to do once the alert is raised. Normally, these are steps you need to take. Examples include raising a maintenance order, scheduling maintenance, or inspecting after a fix. The values for follow-up actions are specified as URLs.
- Add Container Properties. These are name value pairs similar to Follow-up actions. However, these are used to add some other information that you may need to complete the alert. The values for Container properties can be in the form of Strings.
- Choose a Delivery Transaction. This is a transaction that the alert calls whenever an alert is raised. You can set up your delivery transaction to send an e-mail message or a short messaging service (SMS) text message to a mobile phone of the concerned user whenever an alert is raised.
- The last step is to add roles to the alert from the Role Mapping category.
Save the alert definitions by giving an appropriate name. Then open the OEE KPI you had created earlier and navigate to the Alerts category. Now configure the alerts for OEE KPI (Figure 39).
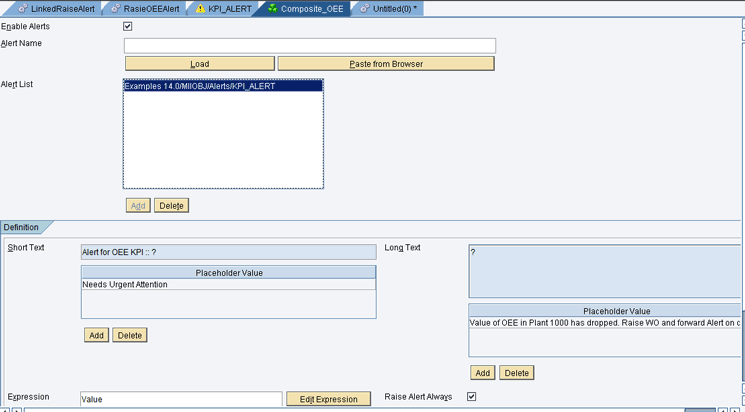
Figure 39
Alert configuration in a KPI
Start the configuration by selecting the Enable Alerts check box. Click the Load button and select the alert definition you created. In the dialog box that opens (not shown), navigate and select the alert object. Click the OK button to close the dialog box.
Click the Add button to add the alert object to the list. Enter the place holder values for short and long texts. Add the expression for the alert value. This normally is the KPI value that you may want to display.
If you have not added the Follow-up Actions while creating an alert, you can add them in the KPI configuration. Click the save icon or press Ctrl and S to save the KPI.
The alert has been added to the KPI. From now on, whenever the KPI runs and the value goes below the threshold, an alert is raised. You can monitor these alerts by using the KPI Monitor screen or the Alert WatchList (Figure 40) screen in SAP MII’s Admin Menu.

Figure 40
The Alert WatchList Screen
Tufale Ashai
Tufale Ashai is a senior IT consultant at Fujitsu Consulting India with approximately six years’ experience in the IT industry. He is currently working on providing SAP MII-based solutions.
Tufale was a member of the SAP MII Product Development Team at SAP Labs Bangalore and has worked on releases 12.x, 14.0, and 15.0 of SAP MII as a senior developer.
You may contact the author at tufyle@gmail.com.
If you have comments about this article or publication, or would like to submit an article idea, please contact the editor.