Learn how to create an SAP Time Management solution to restrict the running of time evaluation in the future in your production environment, while allowing time evaluation to run in the development and quality environments. With this functionality, you alleviate the risk of running time evaluation into the future in the production environment, and you also never need to manually adjust the schema to allow (or disallow) this functionality when testing changes.
Key Concept
SAP ERP HCM Time Management schema operations and personnel calculation rules (PCRs) are used to determine which environment the user is in and whether time evaluation should be allowed to run into the future (e.g., beyond the current date). Time evaluation uses logic within the time schema to turn future time evaluation on or off depending on the environment.
By creating and implementing an SAP Time Management custom functionality, you can restrict time evaluation from running in the future in your production environment. Using this custom functionality also alleviates the need to manually adjust the schema to allow this functionality when testing changes.
The reason this is a big deal is because when you run time evaluation in the SAP ERP HCM Time Management system to generate quotas, allowing it to run into the future can cause incorrect quota balances, as well as other issues. For example, when employees are clocked in and but don’t clock out, this schema can generate errors that cause confusion. In one scenario, time evaluation was accidentally run for three months into the future for a large population that used clock times and absence quotas, which resulted in risky time-cluster cleanup, which is not recommended in the production system. In this case, this did not result in incorrect or extra pay for the employees, but did create an issue with incorrectly calculated quota balances.
SAP ERP HCM System Best Practices
The SAP ERP HCM system provides the flexibility of testing changes out into the future by allowing time evaluation to be run into the future via the standard schema. This is necessary for testing changes for the upcoming year and each year when updating the holiday calendar or adding new policies. In a production environment you should never run time evaluation in the future because it can add errors to employees’ data.
Once companies have issues with future time evaluation, the tendency is to turn off future time evaluation by commenting out the logic in the schema. This, however, typically means turning it off in all the environments: production, quality assurance (QA), and development. This potentially causes problems later when changes are being tested for the upcoming year or a project, and future time evaluation is turned on again in the development or QA system to test the change for the upcoming year. When changes are put on a transport only for testing purposes, there is a risk that the change will be accidentally transported to production since it may be on the same transport as another change (for example, generating work scheduler).
An interesting thing I learned is that standard SAP allows the system ID in the payroll schema to be returned by using a decision variable on operation TABLESYST and checking VARGBSYSID, but this functionality does not exist in Time Management.
As a result, there is no standard way to determine which SAP system you are in within the time schema in order to build logic to allow future time evaluation to be left on in non-production environments and then turned off in the production environment. In order to accomplish this I have written my own operation to check if it is a production system following SAP best practices.
Create a SAP Time Management Custom Operation
The first step is to create a custom time management operation. The custom operation tells the system all the attributes of the operation as well as (ultimately) writing the ABAP code for the operation.
Execute transaction code PE04. In the screen that opens (Figure 1), enter the name of the new operation in the Name field (ZFUTU), select the Object class Time management and the Object Type Operation radio buttons, and click the Create button.
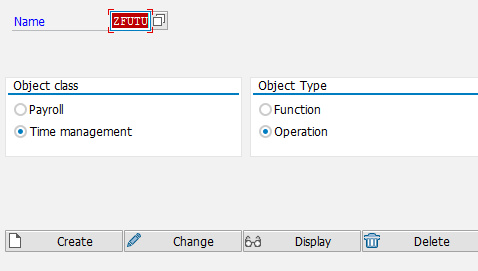
Figure 1
Create a new time management operation
This opens up the main screen where you can edit all the attributes of the operation (Figure 2). Some key things to pay attention to are the Model and Parameter values as these define the structure of the operation as well as the values that you need to fill in when writing your logic later. The screen in Figure 2 shows the attributes of the operation. Here you can define your own parameter values and then write code for them. You can have one operation with two values, which behave differently depending on how the code is written. An example of this would be one operation with two values—one to determine if it is a day before a holiday and the second to determine if it’s a day after a holiday, each with different coding logic.

Figure 2
Select the time management operation attributes
Click the save icon to finish creating the operation. Next you need to run a standard SAP program to generate includes from table T52A0. This table contains all the time and payroll operations and functions. The standard program RPUCT700 generates the code that is needed for the Time Management program to do this automatically. To generate the includes from table T52A0, execute transaction code SE38 (Figure 3) and enter Program RPUCT700 (e.g., Report Generation from T52A0). Select the Source Code radio button, click the execute icon  , and the screen in Figure 4 opens.
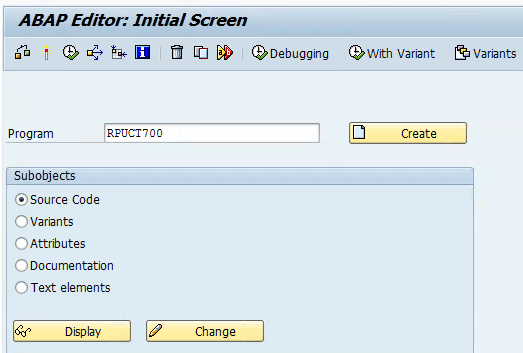
Figure 3
Execute transaction code SE38 to run the program

Figure 4
Generate the report from table T52A0
Enter the parameters as shown in Figure 4 and run the program by clicking the execute icon. In this case, I am using these parameters because they are specific to Time Management (not payroll) and for an operation (not a function). After clicking the execute icon you should see your custom operation generated in the next screen (Figure 5).
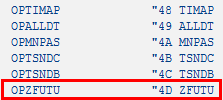
Figure 5
Output of program RPUCT700
The next step is to link the new operation to the programming logic. This is necessary so that you can go directly to the programming screen from the operation via transaction code PE04. In the programming section you are simply updating the navigation index—it does not actually affect the functionality. You need to do this for each program called by the Time Management operation, as follows:
- RPUCCT00
- SAPFP51T
- SAPFP51T_V3S
Execute transaction code SE38, and in the screen that opens (Figure 6) enter the program name and click the Display button. In the screen that opens (not shown), click Utilities > Update Navigation Index. You need to do this step for each of the programs listed above. Once done, you can then navigate directly to the logic via the operation from transaction code PE04.

Figure 6
Transaction code E38 view of program SAPFP51T_V3S
Create an Enhancement Spot to Add Code in an SAP ERP HCM Object
In SAP, as a standard practice, you should never register an SAP object and make code changes to it. Instead, it is recommended that you should copy that object to a Z version and make your changes there. However, with the time management and payroll schema it is common practice to register the standard SAP object where you can write your own functions and operations.
For time management, this would mean registering object RPTMOZ00. RPTMOZ00 is a standard SAP include that is reserved for company-specific modifications within the time evaluation driver. If you do not know what you are doing or write bad programming logic then there is a risk to making modifications. For this reason, I recommend that you create an enhancement spot within this object rather than registering the object with SAP. The reality is the INCLUDE mentioned above was provided by SAP for company modifications and SAP would probably never change it, but it is better to be on the safe side and just use an enhancement spot. To create the enhancement spot within this object, do the following.
Execute transaction code SE38 and in the screen that opens (Figure 7) enter RPTMOZ00 as the Program name, select the Source Code radio button, and click the Display button.

Figure 7
Switch to display mode
In the screen that opens (not shown), navigate to Edit > Enhancement Operations > Show implicit Enhancement Options to display the implicit enhancement options, and where you can create the enhancement implementation.
Click the enhance icon  in the toolbar (not shown). Click Edit, then Enhancement Operations, and then Show Implicit Enhancement Options to see all the enhancement options. This opens the screen in Figure 8 that shows the lines where enhancement implementations can be added.

Figure 8
Add lines to add enhancements
Put the cursor on the line (as in Figure 8) and from the toolbar select Edit, Enhancement Operations, and Create Implementation. In the screen that opens (Figure 9), enter the information for the enhancement implementation. In this example, I name the enhancement ZTIME_CUSTOMIZATIONS with Custom Time Functions & Operations as the Short Text. Then click the green checkmark icon.

Figure 9
Create a new enhancement implementation
The next steps are to save the new object to a package and transport it, as shown in Figures 10 and 11.

Figure 10
Save the new enhancement implementation

Figure 11
Save the new enhancement implementation onto transport
With these steps, you have finished creating your new enhancement. The next step is to enter the code. As a result of these changes, you are now allowed to edit the code in the standard SAP include. This can be seen in Figure 12, where there is now white space on the screen where code can be added.

Figure 12
The complete enhancement implementation
Add the Code in an SAP ERP HCM Object
The next step is to add the new code. (Note that the code is called from Time Evaluation if the operation is put in a time management schema rule because it is a standard include.)
In the white space (in Figure 12), write the code for your operation to check whether or not you are in the production environment. First, here is an explanation of the code logic (shown in Figure 13):
- Name the subroutine FORM OPZFUTU. OP = operation and ZFUTU is the name of your operation. The subroutine has to be named OP followed by the name that you selected for your operation in Figure 2.
- After the data declarations, do a case statement on the last five digits of the OP10 field (these come from the attributes of your operation). OP stands for operation and 10 is the amount of digits. The first five digits contain the name of the operation and the last five digits contain the parameter values of the operation. The data that you created in the parameter value is being checked. (You can create multiple values and then have different source code for those different values. For example, if I have operation ZFUTU and then two parameter values for PRODU and DEVEL then the statement would say CASE OP10+5(5) and then you would have two additional statements—WHEN ‘PRODU’ and WHEN ‘DEVEL’— where you would write different logic.)
- Next select a single entry from the standard SAP table T000 to check if the CCATEGORY field has a P in it (this tells you if the system is a production system). This is a standard SAP table that is used to check whether the current system you are doing the processing in is a production system or not. SAP uses this table in their own programming. Here you are checking to pull back the entry to see if the client that you are logged into matches the entry on the table. Each system and client only has a single row on this table. The value you want resides in the CCATEGORY field.
- If it has a P, then you are passing Yes to the operation; otherwise, you are passing No to the operation.
- Last, you do the standard perform statement (e.g., SAP PERFORM FILLVARGT) to pass the values from the schema to the rule that you just created.
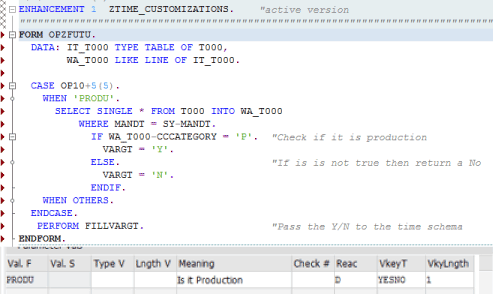
Figure 13
Custom operation programming logic
Note
Table T000 is the way standard SAP programs check the environment to see
if it is a production environment. If it is, program RPUDEL20 initiates
a warning.
Create an SAP Time Management Personnel Calculation Rule (PCR) that Calls the Custom Operation
Now that you have created the operation and the logic that the operation processes, the next step is to create a time schema PCR that calls the custom operation. You can do this by following these steps.
Execute transaction code PE02 (Figure 14) and click the Create button to create a new rule. In the next screen (Figure 15) enter a description in the Rule field, select the program class (in this case, T, to tell the system that this is a Time Management schema rule), and add an asterisk (*) in the Country grouping field to tell the system that this rule is valid for any country. Then click the save icon.

Figure 14
Open the PCR screen to create a new schema rule

Figure 15
Create a new schema rule
Once you have created and saved the rule, go back to the main transaction code PE02 screen by clicking the back icon  in the toolbar (not shown). Select the Source text radio button (Figure 14) and click the Change button. In the screen that appears, add your logic, as shown in Figure 16. This logic is a decision operation and it calls the custom operation. The logic checks to see if Y (yes) or N (no) is returned from the custom operation. If it is Y then pass T (true) to the IF statement.

Figure 16
Add the schema rule logic
Insert the PCR into the Time Schema
Now that you have created a PCR with your logic, you need to insert it into the time schema. You do this by following these steps.
Execute transaction code PE01. In the screen that opens (Figure 17), enter the schema that you are putting into this rule (ZMIS in this example), select the Source Text and Attributes radio buttons, and click the Change button. This opens the main screen (Figure 18) where you can edit the schema.

Figure 17
Add the time schema to the rule

Figure 18
Edit the schema rules
Based on the standard future time evaluation logic in the time schema, you need to build your logic in two places—function CHECK FUT and function ACTIO—to call rule TD10 (Figure 19). This logic is to check whether or not the standard function CHECK FUT and the standard rule TD10 should be called based on whether it’s a production system.
This logic in Figure 18 tells the schema that IF the rule FUT comes back with Y (yes) then the function CHECK is not to be processed, but the standard rule TD10 (which ends Time Management beyond the current day) is to be processed.
Run Time Evaluation to See the Results of the Operation
Now it’s time to test the operation to make sure it works and returns the correct results. Execute transaction code PT60 and, in the screen that opens (Figure 19), enter the schema where you inserted the rule. In this example, enter 85000 as the Personnel Number, ZMIS as the Evaluation schema, and SAP&TEDT as the Time statement variant. Make sure you select the Display log check box under Program options, then click the execute icon, which generates and opens the time evaluation log (Figure 20).
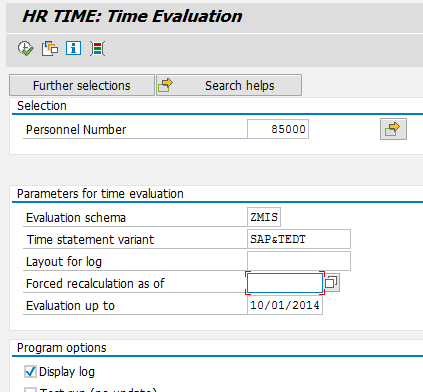
Figure 19
Execute the time schema

Figure 20
Check the time schema log
Once the log is generated, navigate to the rule, and double-click it to open and see the processing (Figure 21).

Figure 21
Check the custom rule processing
Here you can see that your logic returned N (no), which indicates that this is not a production environment. You can confirm this by going to table T000 and verifying that C (for customizing) is in the CCATEGORY line (Figure 22). You should also verify that that your production environment is set to P, which it definitely should be.

Figure 22
Check the table T000 category entry

Imran Sajid
Imran Sajid is a Senior Education Consultant at SAP based in the Atlanta, GA, area. At SAP, he focuses on teaching classes in the HCM area within both SAP and SuccessFactors. Previously, Imran was a consultant who implemented and provided post-go-live support for more than a dozen different client systems spanning many industries, including manufacturing, automotive, retail, information systems, the public sector, and energy. He is the author of the book entitled, The Payroll Control Center for SAP ERP HCM and SAP SuccessFactors, as well as a frequent contributor to SAP Experts, where he has published almost a dozen articles. Imran is also frequent blogger on SAP Community Network (SCN). He graduated from the Georgia State University Robinson College of Business with a degree in Computer Information Systems. Imran can be found on Twitter @ImranSajidSAP.
You may contact the author at Imran.Sajid@sap.com.
If you have comments about this article or publication, or would like to submit an article idea, please contact the editor.


