Business Server Pages are the best flexible way to deliver Web-based solutions in SAP systems. Instead of providing the same look and feel of standard SAP screens, developers can use the vast library of HTML and JavaScript. Find out how to decrease overhead by calling pre-deployed SAP screens and transactions through their iViews or the respective transaction code. In addition, discover how to include Single Sign-On (SSO) and how to call transactions in a non-portal environment.
Key Concept
Business Server Pages (BSPs) provide a uniform, widely-used Web interface for SAP systems. An object-oriented environment provides a way to implement business logic (ABAP) and presentation developed by HTML or JavaScript. HTMLB represents intelligent tags that help developers create faster applications versus standard HTML tags. Server-side scripting supports a direct connection to the application server element, such as ABAP Objects, dictionary objects, and function modules.
Of all the environments that SAP delivers for developing Web-enabled applications, only Business Server Pages (BSPs) is a mixture of HTML and ABAP. This allows you to use ABAP or JavaScript for server-side or client-side scripting to develop and design Web-enabled applications with HTML.
Suppose you have a requirement to extend a BSP by calling a specific transaction, such as calling certain infotypes in SAP ERP Human Capital Management (SAP ERP HCM) from SAP E-Recruitment for certain events. You can call SAP transactions or portal iViews to shrink the overhead of developing them in a BSP environment. After calling the transaction via the BSP, the transaction acts the same as if you were in SAP ERP — all the authorization and validation checks work.
I will show you how to call any SAP screen or portal iView through a BSP. I will explain the BSP concepts and tools you need to enhance your BSP skills and aid you in integrating BSPs with SAP NetWeaver Portal. All the examples are taken from SAP ERP 6.0 and SAP NetWeaver Portal 5.0. To carry out this process, you should be familiar with ABAP programming standards and SAP NetWeaver Portal.
Part 1: Create the BSP Application Page
First, you need to create the BSP application. By using the Model View Controller (MVC) design pattern, you can take advantage of common themes used by other developers. Moreover, you can reuse the controller classes in other applications, which reduces maintenance efforts.
I follow a simple method, called Page with Flow Logic, to create the BSP application. In this process, you design the presentation in the Layout tab, the data declaration in the Page Attributes tab, new data types in the Type Definition tab, and flow logic in the Event Handler tab. The Event Handler tab is directly connected to SAP ERP, from which you can obtain data from the repository and mold it in the Layout tab.
For this example, create the BSP application YBSP_LINK_SAP in transaction SE80. Click the Repository Browser button and select BSP Application from the drop-down menu (Figure 1). Now add the BSP to your application by right-clicking YBSP_LINK_SAP and choosing Create > Page. Name your page and give it a brief description. For this example, I created the BSP SELECTION_SCREEN.htm, which becomes the selection screen for the BSP application (Figure 2).

Figure 1
Create the BSP application

Figure
Create the selection screen page
Tip!
In the Layout tab, you use tags to create screens and Web pages (e.g., <htmlb:textView> and <htmlb:button>). You can find these reusable tags and their options in the Tag Browser window. To see all the available tags, click the Tag Browser button in transaction SE80 transaction and follow menu path BSP Extensions > Transportable > htmlb.

Figure 3
Sample code for the Press Me button

Figure 4
The Press Me button in the selection screen BSP application page
Part 2: Create the BSP Application
I use a simple example to create my BSP application in which the system fetches data from the SFLIGHT table according to user selection on SELECTION_SCREEN.htm. The system then displays the result on the next page as display only. I also show you how to pass data between two BSPs. In this example, the second BSP fetches data from SAP ERP and displays it in the results page. Furthermore, I show how to call an SAP transaction or iView from the second BSP. Figure 5 illustrates the process.

Figure 5
Overview of example BSP application
Use transaction SE80 to go to the Repository Browser and select the BSP application YBSP_LINK_SAP. Then follow these six steps:
Step 1. Data declaration
Step 2. Design the layout for the selection page
Step 3. Set up how to fetch the data
Step 4. Design the layout for the result page
Step 5. Fetch the data
Step 6. Call SAP Screen via a shortcut or Portal iView
Step 1. Data Declaration
In this step, you overwrite the standard layout code to meet your requirements and declare your variables. In the Page Attributes tab, enter the information for the T_SFLIGHT variable shown in Figure 6.

Figure 6
Page attributes for SELECTION_SCREEN.htm
Step 2. Design the Layout of the Selection Page
After declaring T_SFLIGHT in the Page Attributes tab, you create the layout for your selection screen. Go to the Layout tab and enter the layout code using the downloadable file at the end of this article.
In the first and second lines of the code, let the compiler know that you are using ABAP and HTMLB to design the layout:
<%@page language="abap" %>
%@extension name="htmlb" prefix="htmlb" %
After these two lines, create a frame (TabStrip) with three fields: Carrier ID, Connection ID, and Flight Date for your selection screen (Figure 7) for this example. This helps familiarize you with how to work within the BSP and how the system passes data between pages when using the Page with Flow Logic option. If you are familiar with BSPs, then you can jump to step 6 “Call the SAP Screen via a shortcut or portal iView
Note
For more information on the TabStrip function, see the demo in the standard BSP application SBSPEXT_HTMLB. Here you can find all HTMLB examples.

Figure 7
Create a frame with the three fields Carrier ID, Connection ID, and Flight Date
At the end of the layout code, define the Display Report button to process the data from the three fields and to show the output on the result page (Figure 8).

Figure 8
Button to display result page after selection
Step 3. Set Up How to Fetch the Data
In this step, you set up the system to fetch all the data from the BSP Page (Selection_Screen.htm) and show the output on the next page, which is the result page. Click the Event Handler tab and choose OnInputProcessing.
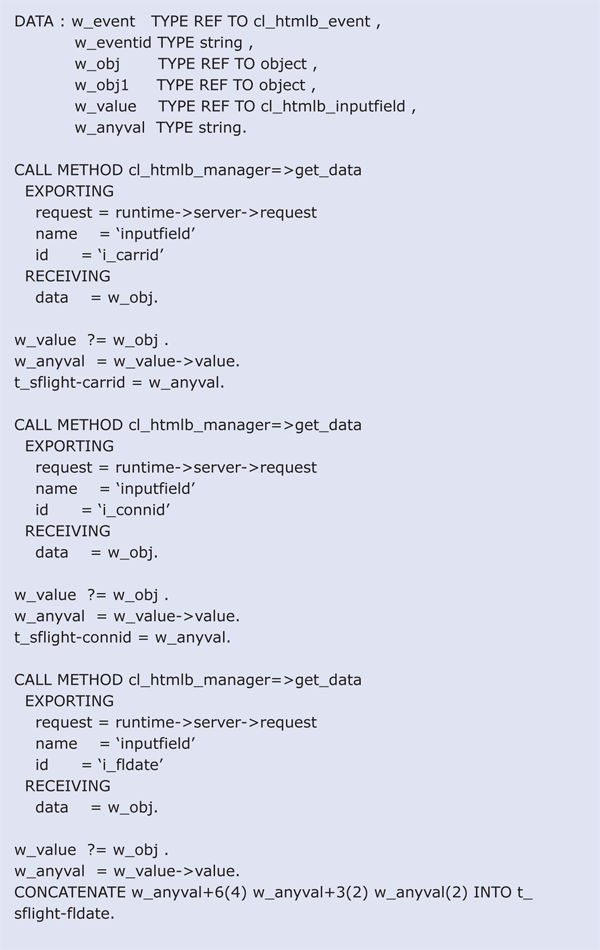
Add the code in Figure 9 to the OnInputProcessing event. In this code, you tell the system to fetch the values the user entered into the selection screen by using the call method cl_htmlb_manager=>get_data. Then, tell the system to get data by the IDs i_carrid, i_connid, and i_fldate into their respective variable (i.e., t_sflight-carrid, t_sflight-connid & t_sflight-fldate).

Figure 9
Fetch values from the SELECTION_SCREEN.htm page

Figure 10
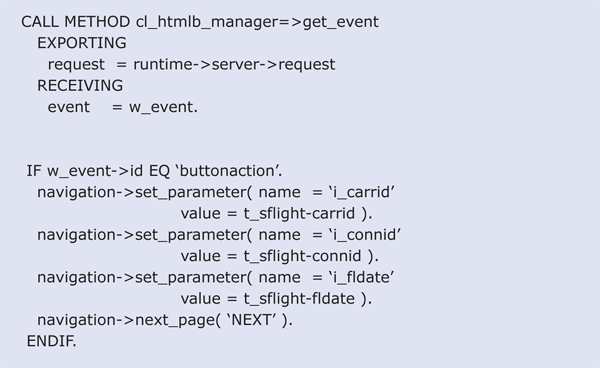
Pass variables to the result page
Step 4. Create the Layout for the Result Page
In this step, you create a second page (the result page) to display your data. In transaction SE80, right-click YBSP_LINK_SAP and choose Create > Page from the context menu. Create a page with the name MAIN_PAGE and with the Page with Flow Logic option. Provide a description.
Then double-click YBSP_LINK_SAP in the navigation tree and click the Navigation tab. Enter SELECTION_SCREEN.htm in the Start column, NEXT in the Navigation Request column, and MAIN_PAGE.htm in the Target column (Figure 11). This tells the BSP application that whenever someone clicks the Display Report button on the SELECTION_SCREEN, the system raises the NEXT event, (which you can see in the second-to-last last line of Figure 10) and branch to the next page.

Figure 11
Set up the navigation between the two BSPs
Now set up the layout of MAIN_PAGE.htm to display the result data from the SFLIGHT table. In the Page Attributes tab, enter the following three attributes in Figure 12:
- DISPLAY_PORTAL: Contains the Portal iView URL
- DISPLAY_URL: Contains the path for the SAP transaction you want to call from BSP (SAP Shortcut)
- WA_SFLIGHT: Displays the values from the SFLIGHT table on the result page, depending what the user enters in the selection screen

Figure 12
MAIN_PAGE.htm page attributes
Next, click the Layout tab for MAIN_PAGE.htm and enter the Layout of MAIN_PAGE.htm code at the end of the article. This code enables the system to show the SFLIGHT data in display-only mode so users know it is the result page.
At the beginning of the layout code, I added the JavaScript code DisplayTrans() and PortalDisplay() for the SAP transaction and Portal iView URLs (Figure 13). I also used the function window.open to open the URL for the SAP screens in a new window.

Figure 13
JavaScript code at the beginning of the MAIN_PAGE.htm layout code

Figure 14
Code for the SAP transaction and portal iView link buttons

Figure 15
Result from MAIN_PAGE.htm
Step 5. Fetch the Data
In this step, you fetch data from the SFLIGHT table according to the parameters passed by the user from the selection screen. Click Event Handler > OnInitilization event in MAIN_PAGE.htm and enter the OnInitialization event code in Figure 16. At runtime, the call method cl_htmlb_manager=>get_data pulls data according to the ID provided in this method from the selection screen. These fetched values are then added in the variables declared globally (Page Attribute) in MAIN_PAGE.htm. At the end of this code, select a single record from the SFLIGHT table and show the result.

Figure 16
Fetch the parameters from the selection screen
- Use a shortcut to view the transaction in a non-portal environment
- Display an iView from SAP NetWeaver Portal through a BSP
In the “Integrate Transactional iViews Using Application Integrator” section, I entered the attributes DISPLAY_URL and DISPLAY_PORTAL in the MAIN_PAGE.htm Page Attribute tab (Figure 12). The DISPLAY_URL attribute contains the URL path to the SAP Transaction — this is the shortcut. The DISPLAY_PORTAL attribute is for the Portal iView URL. I will walk through these two methods, starting with the shortcut method.
Step 6. Call the SAP Screen via a Shortcut or Portal iView
To call an SAP screen using a shortcut, create a program (YBSP_LINK_BY_BSP) with selection parameters in transaction SE38. Enter the code in Figure 17 to display the selection screen and then the output. Activate the code and ensure no errors occur and the program runs smoothly.

Figure 17
Source code for YBSP_LINK_BY_BSP

Figure 18
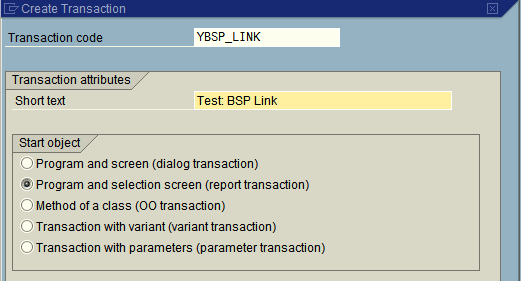
Create the YBSP_LINK transaction code

Figure 19
Code to set up the work directory in Windows
Note
You can concatenate values by passing your own variables in l_param, which gives you dynamic parameters for the transaction.

Figure 20
Add the values for the carrier ID and DYNP_OKCODE
After entering the above mentioned code, add the following code mentioned in Figure 21 to the OnCreate event. The function code SWN_CREATE_SHORTCUT creates a shortcut. I used an asterisk (*) with i_transaction to indicate that the system should start screen processing when transaction YBSP_LINK is called. If you don’t use an asterisk, the user becomes stuck on the selection screen of the called transaction and requires user intervention. Function code ONLI appears in a modal window and also requires user intervention.

Figure 21
Enter the code to create the shortcut

Figure 22
Enter the code to set up the HTTP response for the shortcut

Figure 23
Enter the code to create the shortcut URL
Note
Make sure the SAP ERP server name is mentioned in the SAP Logon Pad. Otherwise, you need to enter a password every time you try to call this transaction. Moreover, variables should be present on the SAP screen when passing parameters through the SAP shortcut and should be visible otherwise you would not be able to pass them.
Carry out the Portal iView URL Option
After you go through the steps in the following section, you can implement this process in other systems. However, you first need to know how to deploy a transactional iView, which you can read about in the document “Launching the iView Wizard and First Steps.”
You need to pass system information and client details to call these iViews by using the Application Integrator, a tool that helps developers call transactional iViews even though they are not deployed in the SAP NetWeaver Portal server. Otherwise, whenever you access these views through Portal, an incomprehensible, dynamic URL is generated.
To prevent this, perform the following steps to integrate BSPs with SAP NetWeaver Portal screens. (I performed all the steps in SAP NetWeaver Portal 5.0, but these steps also apply to future releases.)
Step 1. Log in to your portal server and click Content Administration.
Step 2. Click the Browse tab.
Step 3. Navigate to Portal Content > Migrated Content > EP 5.0 > Templates and click com.sap.portal.appintegrator.sap.bwc.Transaction. On the bottom left of the screen, the Quick Info window appears. The ID field in the Quick Info window represents the complete path to call transactional iViews through a URL. (This is not the URL that you need to call transactional iViews.) This serves as a gateway to call transactional iViews from outside the portal environment and helps in calling portal iViews whether or not they are deployed in your portal environment.
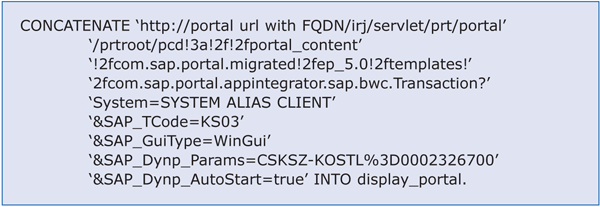
Moreover, you can use the URL to call whatever transaction you like. You need to convert this URL to an escape URL, which you use to create and pass parameters to screen elements. For example, call the URL in Figure 24 with your portal Fully Qualified Domain Name (FQDN), system name, client, and transaction. This URL passes parameters to a transactional iView (i.e., KS03).

Figure 24
The full escape URL
- https://portal url with FQDN represents the address of your portal server, for example, https://myexampleportalserver.com
- /irj/servlet/prt/portal/prtroot/ represents portal contents
- pcd!3a!2f!2fportal_content!2fcom.sap.portal.migrated!2fep_5.0!2ftemplates!2fcom.sap.portal.appintegrator.sap.bwc.Transaction. This is the escape URL of the ID found in the Quick Info window (step 3).
- ?System=SYSTEM ALIAS CLIENT. For SYSTEM ALIAS, enter your server name (e.g., DEV) and for CLIENT, enter your client (e.g., 0100)
- &SAP_TCode=KS03. Use the transaction code that you want to execute
- &SAP_GuiType=WinGui is to call the SAP GUI
- &SAP_Dynp_Params=CSKSZ-KOSTL%3D0002326700 is the parameter that you are passing to the portal screen. CSKSZ-KOSTL is the name of the field appearing on the KS03 transaction Selection Screen. Use %3D instead of the equal (=) sign to pass data to the screen.
- &SAP_Dynp_AutoStart=true starts the transaction
Use this URL for any button of your BSP and call it using JavaScript, such as window.open (“myurl”).
In the OnCreate section in the Event Handler tab of the MAIN_PAGE.htm, concatenate the URL (Figure 25) to the display_portal variable. Later on you can concatenate and use other transactions with their respective parameters of SAP ERP to be shown in the portal environment from a BSP.

Figure 25
Portal URL
Tip!
Your application probably doesn’t reside in your development server, so you’ll need to transport it to the QA and production servers. Your FQDN changes according to the QA and production servers. You should maintain these FQDN parameters in table maintenance and call them depending on your server name. Deploy the BSP iView in the portal; otherwise the user has to enter a password when branching into SAP NetWeaver Portal from BSP.
Muhammad Usman Malik
Muhammad Usman Malik is a senior SAP consultant at Saudi Business Machines (SBM), Saudi Arabia. Usman has been involved in ABAP development and functional configuration of HR for many years. He has several years of experience implementing and supporting SAP systems including logistics, WebDynpro ABAP, workflow, and FI/CO at multinational and local companies.
You may contact the author at usman.malik.sap@gmail.com.
If you have comments about this article or publication, or would like to submit an article idea, please contact the editor.


