The Objective Setting and Appraisals function in mySAP HR offers a workflow-enabled performance feedback process. The authors present a comprehensive, five-step example that will allow you to optimize the performance feedback process in your company.
With the Objective Setting and Appraisals function, mySAP ERP supports users in implementing a workflow-enabled performance feedback process. In the latest release of R/3 Enterprise, SAP delivers status and workflow support for Objective Setting and Appraisals. It allows you to tailor the performance feedback process to your company’s needs.
Using HR Extension Set 2.00 for R/3 Enterprise, we’ll show how to implement an employee-initiated performance feedback process. Our example is of a workflow notification requesting that the manager approve objectives after the employee has entered them in the system. By using a similar approach, you will be able to set up various performance feedback processes such as an approval by the manager’s manager or a person in the HR department after the direct manager has appraised the employee.
The Role of Statuses and Substatuses
The Objective Setting and Appraisals function is delivered with nine statuses and one substatus, each of which can represent a phase of the performance planning and feedback process. The process is controlled by the status flow, which can be defined for each appraisal template separately. You can configure the system so that in each staus or substatus, certain actions can be carried out by authorized users on parts of the document while other parts are in display mode or hidden. You can:
- Enable employees to change the objective setting column of a document in the phase when objectives are defined (status In Planning)
- Hide irrelevant parts of the document during a certain phase, such as the part and final appraisal column during the objective setting phase (status In Planning)
- Lock the objective setting column when the final appraisal is entered (status In Process)
During each status, up to three buttons are available. They can be used to reach a subsequent phase (status) in the process. The statuses and the typical actions during each phase are described in Tables 1 and 2. A typical status flow and the available buttons are shown in Figure 1. When you create a template, the statuses In Preparation and Completed are mandatory. You can select other available statuses when the process requires it.
|
In Preparation
|
On creation of an appraisal document, it has the status In Preparation. During this phase, the document can be prepared by filling the header fields, e.g., enter manager’s and employee’s name, the appraisers, and the performance feedback period. You can skip this phase if the system knows the required header data.
|
|
In Planning
|
During the planning phase, the objectives of the appraisee are entered in the document. This can be done manually by the manager or employee or automatically by the system.
|
|
In Review
|
This status reflects that objectives may change during the performance feedback period due to business requirements. During this phase, these changes can be entered in the document.
|
|
Part Appraisal in Process (Substatus)
|
When the performance feedback period approaches its end, each part appraiser receives a part appraisal document where he or she can evaluate the employee. The evaluations of each part appraiser can be hidden from others so that independent evaluations are possible. Part appraisals can be self-appraisals or peer feedback.
|
|
In Process
|
This status is usually reached at the end of the performance feedback period when the managers evaluate employees and enter final ratings for each objective.
|
|
Completes
|
If no approval process is activated, this status indicates the end of the performance feedback process. When the document reaches this status, the system can perform follow-up activities — for example, the automatic update of qualifications in the employee’s profile. If an approval process is activated, reaching this status can trigger a workflow event and send an approval request to the approver, who can be the employee, the manager, or the manager’s manager.
|
|
|
| Table 1 |
List of statuses when approval process is not activated |
|
|
Approved
|
With activated approval process, this status indicates the end of the performance feedback process. When the document reaches this status, the system can perform follow-up activities such as the update of qualifications in the employee’s profile. Status changes are still possible in this status — e.g., reset to the status In Process. |
|
Closed Approval
|
The document is irreversibly locked for status changes. Usually, appraisal documents are set into this status by an administrator at the very end of the performance feedback cycle for archiving purposes. |
|
Rejected
|
This status indicates that the appraisal was not accepted by the approver, e.g., the employee. Reaching this status can trigger a workflow event that sends a change request to the appraiser. Status changes are still possible in this status, e.g., reset to the status In Process. |
|
Closed Rejected
|
The document is irreversibly locked for status changes. |
|
|
| Table 2 |
Additional statuses when an approval process is activated |
|
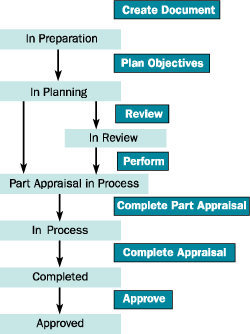
Figure 1
A typical status flow and standard buttons leading through the performance feedback process
Besides the statuses, SAP delivers 14 predefined workflow events (Table 3). These workflow events are notifications to participants in the performance feedback process requesting an action, such as the approval of objectives. In order to workflow your performance feedback process, you combine the workflow events with the status flow so that status changes of the document trigger a workflow event.
|
Appraisee - change request
INFO_APPRAISEE_CHANGE
|
A request to change the document is sent to the appraisee. The document is dis-played in change mode. Which parts of the document are changeable depends onthe document status and template customizing for column access. |
|
Appraisee - approval request
INFO_APPRAISEE_CHANGE_APPROVE
|
A request to approve the document is sent to the appraisee. The document is dis-played in change mode. Which parts of the document are changeable depends onthe document status and template customizing for column access. |
Appraisee - review request (one week previous)
INFO_APPRAISEE_CHANGE_REVIEW |
A notification is sent to the appraisee one week before the review date recorded inthe appraisee's appraisal document. |
|
Appraisee - display request
INFO_APPRAISEE_DISPLAY
|
A notification is sent to the appraisee that the document can be displayed. The docu-ment is displayed in display mode, so that no changes to the document are possibleand no buttons for status changes are available. |
Appraisee - information appraisal document approved
INFO_APPRAISEE_DISPL_APPROVED |
A notification is sent to the appraisee that the document has been approved. Thedocument is displayed in display mode, so that no changes to the document arepossible and no buttons for status changes are available. |
Appraisee - information appraisal document rejected
INFO_APPRAISEE_DISPL_REJECTED |
A notification is sent to the appraisee that the document has been rejected. The doc-ument is displayed in display mode, so that no changes to the document arepossible and no buttons for status changes are available. |
Appraiser - approval request
INFO_APPRAISER_CHANGE_APPROVE |
A request to approve the document is sent to the appraiser. The document is dis-played in change mode. Which parts of the document are changeable depends onthe document status and template customizing for column access. |
Appraiser - request in completion period
INFO_APPRAISER_CHANGE_EXE_PER |
A notification is sent to the appraiser telling him that a document needs to be com-pleted in the time frame determined by the completion period. |
Appraiser - review request (one week previous)
INFO_APPRAISER_CHANGE_REVIEW |
A notification is sent to the appraiser one week before the review date recorded inthe appraisee's appraisal document. |
Appraiser - display request
INFO_APPRAISER_DISPLAY |
A notification is sent to the appraiser that the document can be displayed. The docu-ment is displayed in display mode, so that no changes to the document are possibleand no buttons for status changes are available. |
Appraiser - information appraisal document approved
INFO_APPRAISER_DISPL_APPROVED |
A notification is sent to the appraiser that the document has been approved. Thedocument is displayed in display mode, so that no changes to the document arepossible and no buttons for status changes are available. |
Appraiser - information appraisal document rejected
INFO_APPRAISER_DISPL_REJECTED |
A notification is sent to the appraiser that the document has been rejected. The document is displayed in display mode, so that no changes to the document are possibleand no buttons for status changes are available. |
Higher-level manager - request approval
INFO_HIGHER_MANAGER_APPROVE |
A request to approve the document is sent to the manager's manager who is deter-mined as the next higher chief position in the organizational structure. The documentis displayed in change mode. Which parts of the document are changeable dependson the document status and template customizing for column access. |
Next part appraiser - appraisal request
NEXT_PART_APPRAISER_APPRAISAL_REQUEST |
A request to evaluate the employee is sent to the next part appraiser. The partappraisal document is displayed in change mode. Which parts of the document arechangeable depends on the template customizing for column access. |
|
|
| Table 3 |
Standard workflow events |
|
Note
The following Business Add-In (BAdI) allows you to define your own status names to reflect the process required in your company: Appraisal Document - Alternative for Status Names (HRHAP00_DOC_STATNAME). By copying the inactive implementation Alternative Status Names (HRHAP00_STATNAME_01), you can specify your own status names for the complete appraisal template catalog per category group, category, or template.
How to Tailor Your Performance Feedback Process
In order to workflow-enable your performance feedback process, follow these five steps:
Step 1. Activate the required workflow events once during system setup.
Step 2. Create required substatuses.
Step 3. Create new buttons.
Step 4. Define previous status and subsequent status.
Step 5. Tailor the status and workflow.
We’ll use as an example an employee-initiated performance feedback process. It includes a workflow requesting the manager to approve the objectives after the employee has entered them in the system. After the employee has created the document and entered the objectives, he or she clicks on the button Send to Manager for Approval and the system sets the document into the substatus For Approval by Manager. The manager receives a notification and approves or rejects the objectives. If the objectives are approved, the employee receives an approval notification and the system sets the document into the status In Review. If the manager rejects the objectives, the employee receives a notification that the objectives are rejected and the system resets the document in the status In Planning so that the employee can rework the objectives. The rest of the example process consists of an objective review during the In Review status and part and final appraisals without further workflow support.
Step 1: Activate Workflow Events
You activate the required workflow events either by using standard workflow tools or via the administrator function of Objective Setting and Appraisals (PHAP_ADMIN_PA). Choose Utilities>Event Linkage (Workflow). In the column Type linkage active, place a check mark next to the events you want to activate and click on the activate icon. (See Figure 2.) Now the workflow events are ready to use.
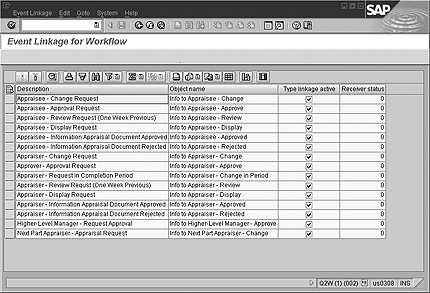
Figure 2
Activate required workflow events
Step 2: Create Required Substatuses
Once your company has agreed on the process required for the performance feedback cycle, you can first evaluate if the statuses delivered in the standard are sufficient for your requirements. Keep in mind that you can also rename the statuses to fit them into your process. If a certain step is missing for your required process, you can close this gap by adding a new substatus to the status flow.
In our example, the gap is the phase when the employee has finished planning the objectives and an approval by the manager is required, before the review phase begins. You can close the gap by adding the new substatus For Approval by Manager to the status In Planning.
To add a substatus, open the appraisal catalog and choose Goto>Basic Settings or start transaction OOHAP_BASIC directly. (See Figure 3.) In the dialog structure on the left side of the screen, choose Substatus and make a new entry. The new entry consists of the status that the substatus belongs to, an identifier from the customer name space, and a text for the new substatus. In this example, the new substatus is For Approval by Manager.
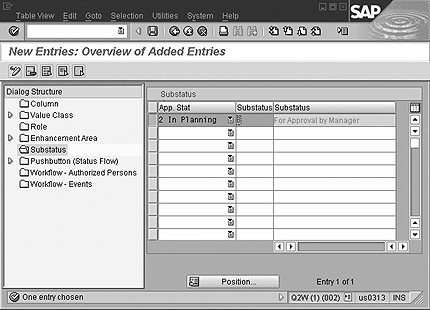
Figure 3
Add a new substatus — in this example, For Approval by Manager
Step 3. Create New Buttons
In addition to the substatus, you have to define new buttons needed to reach the new substatus from previous statuses and to reach subsequent statuses from the new substatus. Employees need the buttons to send the document to the manager for approval and managers need them to approve or reject the objectives of the employees.
Note
Technically, the workflow events are implemented as workflow templates. If you need to create additional workflow events for your process, the best way is to copy an existing workflow template and to change the rule of the task that is used in the workflow template. To include the workflow event for the performance management process, open the appraisal catalog and choose Goto>Basic Settings or start transaction OOHAP_BASIC directly. The activity Workflow – Events allows you to include the event.
In our example, we are creating three new buttons (Figure 4):
- Send to Manager for Approval to reach the new substatus For Approval by Manager after entering the objectives in the document
- Approve Objectives to approve the employee’s objectives and reach the next status In Review
- Reject Objectives to reject the employee’s objectives and reset the document into the status In Planning

Figure 4
Define new buttons — in this example, the three new buttons Send to Manager for Approval, Approve Objectives, and Reject Objectives
Step 4. Define Previous and Subsequent Status
For the new buttons, you also need to define which of the main statuses are allowed as Previous Status and Subsequent Status (Figure 5). For this example, the previous and subsequent statuses are defined as shown in Table 4.
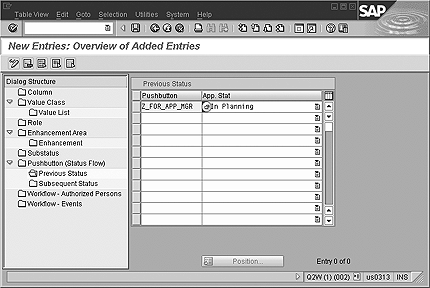
Figure 5
Define possible previous status for button — in this example, the previous status In Planning is assigned to the button Send to Manager for Approval
| Send to Manager for Approval |
In Planning |
In Review |
| Approve Objectives |
In Planning |
In Review |
| Reject Objectives |
In Planning |
In Planning |
|
|
| Table 4 |
Previous and subsequent statuses for new buttons |
|
Step 5. Tailor the Status Flow and Workflow for an Appraisal Template
Once you have finished the definitions of the required substatuses and buttons, you can start to tailor the status and workflow for an appraisal template in the appraisal template catalog. In the catalog, you first need to activate the new substatus on category group and category level. To do that, select the relevant category group or category and change to the tab Status flow. On the subtab Status, select the new substatus For Approval by Manager so that it is available for new templates that you create under the category group/category (Figure 6). Also check the subtabs Person Authorized and Event to make sure that the required persons and events are made available for the templates in this category.

Figure 6
Activate substatus for category — in this example, the new substatus For Approval by Manager is activated for all templates in the category Performance Feedback 2004
Note
The complete implementation work is done in the Appraisal Template Catalog, which you can reach via the SAP reference IMG following the menu path Personnel Management>Personnel Development>Objective Setting and Appraisals>Edit Forms or via transaction PHAP_CATALOG_PA.
Once you have activated the substatus, create a template that meets your requirements regarding description, layout, column access, use of value lists, roles, and processing. For procedures to configure an appraisal template, refer to system help and the SAP Library under Human Resources>Personnel Management>Personnel Development>mySAP HR Objective Setting and Appraisals. In this example, we are using the template Objectives 2004, which was created based on the example template Example: Objective Setting. To build the status and workflow for the template, change to the tab Status Flow. On the subtab Status, activate the status For Approval by Manager. On the subtab Event, you can now start to tie workflow events to status changes.
The following is an example status and workflow setup for two steps in the process:
- The employee sends the objectives to the manager for approval
- The manager approves the objectives and by doing so starts the review phase
Table 5 gives you a complete overview of the status and workflow for the example template.
|
In Preparation
|
|
In Planning
|
|
Set Objectives
|
All Users
|
|
|
|
|
|
In Preparation
|
|
In Planning
|
|
End Preparation
|
All Users
|
Saved and Leave Appraisal Document
|
|
|
|
|
In Planning
|
|
In Planning
|
For Approval by Manager
|
Send to Manager for Approval
|
All Users
|
Saved and Leave Appraisal Document
|
|
X
|
Approver- Approval Request
|
|
In Planning
|
For Approval by Manager
|
In Planning
|
|
Reject Objectives
|
Appraiser
|
|
|
X
|
Appraisee- Change Request
|
|
In Planning
|
For Approval by Manager
|
In Review
|
|
Approve Objectives
|
Appraiser
|
Saved and Change to Display Mode
|
|
X
|
Appraisee- Information Appraisal Document Approved
|
|
In Review
|
|
In Process
|
|
Execute
|
All Users
|
|
|
|
|
|
In Review
|
|
In Process
|
Part Appraisal in Process
|
Start Appraisal Process
|
All Users
|
Saved and Leave Appraisal Document
|
|
|
|
|
In Review
|
|
In Review
|
|
Next Review
|
All Users
|
|
|
|
|
|
In Process
|
|
Completed
|
|
Complete
|
All Users
|
Saved and Change to Display Mode
|
|
|
|
|
In Process
|
Part Appraisal in Process
|
In Process
|
Part Appraisal in Process
|
Complete Part Appraisal
|
All Users
|
Saved and Change to Display Mode
|
|
|
|
|
Completed
|
|
|
|
|
All Users
|
|
X
|
|
|
|
|
| Table 5 |
Overview of status and workflow for the template Objectives 2004 |
|
To enable the employee to send the manager a request to approve the objectives, you select the status In Planning. On the right side of the screen shown in Figure 7 on the next page, enter the name of the button that the employee needs to use, in this case Send to Manager for Approval. As the Target Status, you choose the status In Planning and the substatus For Approval by Manager. As the required Workflow Event you choose Approver - Approval Request. The additional settings allow you to select authorized persons who are allowed to use a button and the state of the application after the button is used.
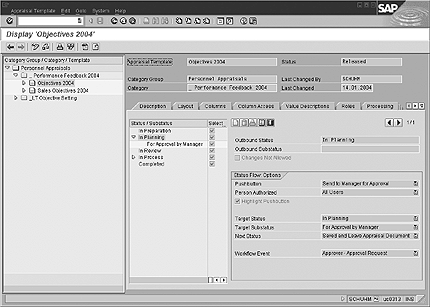
Figure 7
Setup of status and workflow — in this example, the status and workflow is set up for the template Objectives 2004. Clicking on Send to Manager for Approval triggers a status change from In Planning to In Planning/substatus For Approval by Manager. The status change triggers the Workflow Event Approver - Approval Request.
To enable the manager to approve the objectives, you now select the substatus For Approval by Manager on the screen shown in Figure 8. On the right side of the screen, enter the name of the button that the manager uses to approve the objectives, in this case Approve Objectives. As the Target Status, you choose the status In Review and no substatus. As the required Workflow Event you choose Appraisee - Information Appraisal Document Approved.
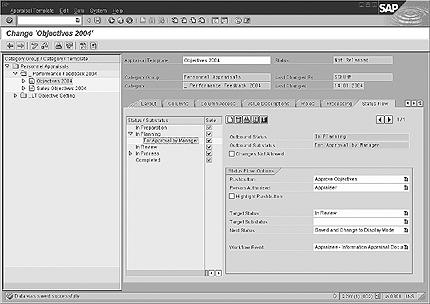
Figure 8
Setup of status and workflow — in this example, the status and workflow is set up so that clicking on Approve Objectives triggers a status change from In Planning/substatus For Approval by Manager to In Review. The status change triggers the Workflow Event Appraisee - Information Appraisal Document Approved.
As additional settings, you can define that only the appraiser is an authorized person, and the document is saved and displayed in display mode after using the button. You can now set the remaining status flow with the same process. When you have finished the configuration, release the template and use it for your performance feedback process. The buttons and functions are available for the user via the button Send to Manager for Approval for the employee (Figure 9).
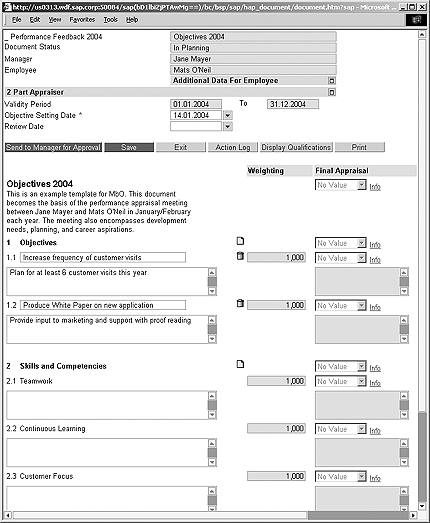
Figure 9
View of the appraisal document after the employee Mats O'Neil has set his objectives and wants to send an approval request to his manager. The newly defined button Send to Manager for Approval is available.
Prerequisites for Objective Setting and Appraisals
The application Objective Setting and Appraisals was first delivered with HR Extension Set 1.10 for R/3 Enterprise. The workflow capabilities described in this article were added with HR Extension Set 2.00, which is part of mySAP ERP Edition 2003. HR Extension Set 1.10 already provides the required business object in the Business Object Repository for building a customer workflow. The events are delivered with HR Extension Set 2.00.
If you are on HR Extension Set 1.10, you have two options to steer the performance feedback process:
- Build your own workflow events by using the existing BOR object. This is not recommended if you are planning an upgrade to HR Extension Set 2.00 in the near future, because it provides standard capabilities.
- Use the predefined status flow described in Tables 1 and 2 and restrict the column access during the different statuses. The column access is defined in the template customizing and allows you to ensure, for example, that only the manager can change the objectives during the In Planning status. In addition, you need to establish an organizational process to ensure that every participant obtains the required information at the right time.
We recommend option 2 if an upgrade will be done within an acceptable time frame. It allows you to fully exploit the SAP standard and avoid workflow development. This process does not change when you use Manager Self-Service or Employee Self-Service.
Martina Schuh
Martina Schuh joined SAP in 1999. She has been dedicated to the subject of HCM Analytics from the outset. Since 2001 she has been product manager for HCM Analytics and Talent Management, including Employee Performance Management and Succession Planning.
You may contact the author at martina.schuh@sap.com.
If you have comments about this article or publication, or would like to submit an article idea, please contact the editor.