Learn about the new security concepts within the SAP CRM 2007 WebClient UI, such as new tools to use in conjunction with the Profile Generator, including the use of the Business Role and Navigation Bar. Also find out about the method you can use to determine a user’s Business Role.
Key Concept
The release of SAP CRM 2007 introduces a new authorization concept to complement standard SAP CRM security profiles. With the introduction of SAP CRM 2006s/2007, transactions have been replaced with Business Roles that link users into components. It is these components that now need to be secured.
The release of SAP CRM 2006s/2007 introduces a new Web-based user interface (UI). This milestone provides a new method for navigation and personalization that you can tailor for your users based on their roles in their businesses. If you have been the team member charged with setting up security profiles in the past, you may be somewhat overwhelmed with the new UI. Transactions no longer exist. You may now be asking yourself “How do I secure CRM functionality without using transactions?”
The good news is that the knowledge you already have about setting up security profiles is very valuable. Securing SAP CRM 2006s/2007 is simply a case of adding a few more tools to your “bag of tricks.” Through the use of the Navigation Bar, Business Role, and a new profile generation tool, you can have your users up and running in no time.
The Business Role
The release of SAP CRM 2006s/2007 introduces the Business Role, a new core object in the determination of the user navigation through the SAP CRM system. Each user is assigned to a Business Role that defines the available functionality in the L-shaped view, which contains the work centers and logical links.
When designing your user access within SAP CRM, you can use the Business Role to restrict access to functionality. From a project resource perspective, the design and configuration of the Business Role is a cross- component task. It involves working with the SAP CRM team and the business to define the overall functionality that the system requires. When this is known, the Business Roles can be defined. In the past, such a task would normally fall to the portals team.
Note
For further details on how you can configure the Navigation Bar Profile, refer to the article “
Create CRM Business Roles Easily with Web-Based Business Role Customizing” by Britta Ollrogge. You can find this in the CRM hub of SAPexperts. The article also demonstrates how you can now do customizing for Business Roles using the CRM WebClient UI as well as via transaction
SPRO in the SAPGUI. The example in this article is from the SAPGUI.
However, with the new functionality introduced with the Business Role, this design and build logically sits closely with security design. As a result, the security team has set up the Business Roles on my current project.
Each Business Role is assigned a Navigation Bar Profile. This profile specifies which work centers should be made available as well as which logical links should be provided for a work center or as direct links on the home page.
To view the configuration for a Navigation Bar Profile, first you need to find the Navigation Bar Profile assigned to the Business Role. Go to the Business Role configuration for this role by using transaction SPRO and following menu path Customer Relationship Management>Business Role>Define Business Role or by using transaction CRMC_UI_PROFILE. Double-click on the Business Role you are interested in and locate the Navigation Bar Profile assigned to it.
Figure 1 shows the Business Role SALESPRO. The standard Navigation Bar Profile (Nav Bar Profile) is SLS-PRO. This profile provides a user with access to functionality relevant to a sales professional such as accounts and opportunities.

Figure 1
The Navigation Bar Profile for the SALESPRO Business Role
Now that you know the Navigation Bar Profile go to transaction SPRO and follow menu path Customer RelationshipManagement>UI Framework>Navigation Bar Profile. This takes you to the transaction in which you can view and edit the Navigation Bar Profile.
To view the work centers assigned to this Navigation Bar Profile, click on Define Profile and highlight the Navigation Bar Profile you are interested in, for example, SLS-PRO. Then click on Assign Work Centers. The system provides a list of all the work centers already assigned to your Navigation Bar Profile.
Figure 2 shows the Navigation Bar Profile SLS-PRO and the work centers assigned, such as work center SLS-ACC for Account Management. The position specifies the order they appear on the left side of your work center L-shaped area. As specified in the configuration, the Account Management work center appears in the fifth position in the work center listed on the left side of the UI home page (Figure 3).

Figure 2
Navigation Bar Profile SLS-PRO work centers
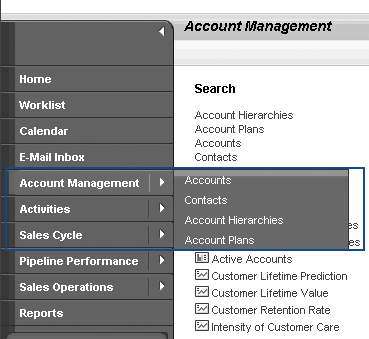
Figure 3
The SALESPRO Navigation Bar Profile SLS- PRO determines the order of the work centers
Security for Business Roles
After you have defined what is required for your user Business Roles — including the Navigation Bar Profile — you can start configuration. If your requirements are not reflected in a standard SAP delivered Business Role you need to create a new Navigation Bar Profile and a new Business Role to go with it. Furthermore, you must create a security profile to reflect the functionality you wish to provide.
You may have already noticed that within the configuration for the Business Role there is a field to specify the PFCG profile (Figure 1). Don’t be fooled. This does not automatically provide users with security access if they are assigned to this Business Role. Later in this article I will point out a key use for this field. However, for now, all you need to know is that you still need to assign security profiles directly to your users’ profiles.
Previously, you used the Profile Generator to create your security profiles by specifying a user menu and adding each of the required transactions. From here, you generated a security profile that included all the required transactions.
In SAP CRM 2007, you can still use the Profile Generator. UI Components (Business Server Page [BSP] Components) replace SAP CRM transactions. Each piece of functionality contains one or more components that provide the user with access to SAP CRM functionality.
For example, if you need to provide access to the business partner, you need BSP Components such as BP_HEAD and BP_DATA. The question is, now that you can no longer define transactions in the Profile Generator for SAP CRM security, what do you do? How do you find out and include all the right components to ensure the user has all the correct access without having to give SAP_ALL and SAP_NEW to everyone? Using the new authorization object collection tool, you can generate a PFCG profile based on the configuration of your Business Role.
The following section outlines a step-by-step process to generate a PFCG profile based on the functionality provided in your Business Role.
Generate a PFCG Profile from the Business Role
Step 1. Create a new empty PFCG profile. First you need a PFCG profile shell. Go to transaction PFCG, enter the name of your new profile, and click on the Single Role button to create a new role. At this point you just need to save this role. This profile will be filled in subsequent steps.
Figure 4 shows the initial screen for the creation of a new role ZCRM_SALESPRO. Note that a single PFCG profile can only be assigned to one Business Role. I have created a new PFCG profile here because I couldn’t use the PFCG profile already assigned to the Business Role I am copying.
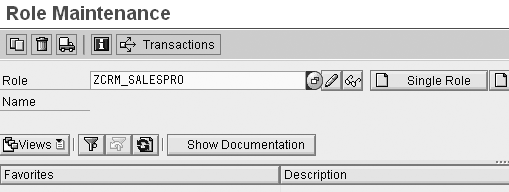
Figure 4
Create an empty PFCG profile
Step 2. Create a new Navigation Bar Profile. If a standard Business Role does not meet your functionality access needs, you can create your own Navigation Bar Profile. For example, if you do not want to give the users access to the Sales Cycle work center in the Navigation Bar Profile SLS-PRO, you must create a new Navigation Bar Profile that excludes the work center SLS-CYCLE.
It is often easier to copy an existing Navigation Bar Profile than to create a new one from the bottom up. For example, if the SALESPRO Business Role has a majority of the work areas and logical links you require, copy the Navigation Bar Profile used in this Business Role.
You can go to the Navigation Bar Profile and copy it to a version you can then adjust. Use transaction SPRO and follow menu path Customer Relationship Management>UI Framework>Technical Role Definition>Navigation Bar Profile or use transaction CRMC_ UI_NBLINKS. To copy the Navigation Bar Profile, select the one you wish to copy and click on the copy icon.
Step 3. Create your new Business Role. Now that you have your own Navigation Bar Profile you can create a new Business Role. Once again, it is often easier to copy an existing Business Role than to create a new one. Copy the Business Role which closely resembles your requirements. In the PFCG field, enter the name of your new empty PFCG role.
In the example in Figure 5 I copied SALESPRO to create a new Business Role ZSALESPRO_DM. As a part of this copy I assigned the new Navigation Bar Profile ZSLS-PRO- DEMO and the shell PFCG role ZCRM_SALESPRO.
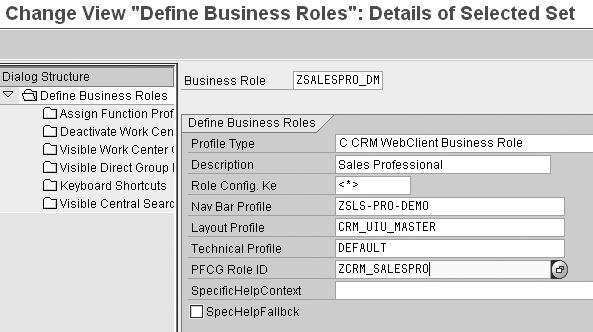
Figure 5
Copy the SALESPRO Business Role and specify your empty PFCG profile and Navigation Bar Profile
Step 4. Generate your PFCG profile. As a part of the SAP CRM 2007 release, a new program gathers all the authorization objects required to meet the functionality provided in a Business Role. To use this program, go to transaction SE38 and execute program CRMD_UI_ROLE_PREPARE.
In the screen that appears, choose the Select a Business Role option (Figure 6). Then enter the name of your new Business Role in the Business Role field and enter the language code in the Language field. For example, in Figure 6 I selected EN for English. Click on the execute icon to run the program.
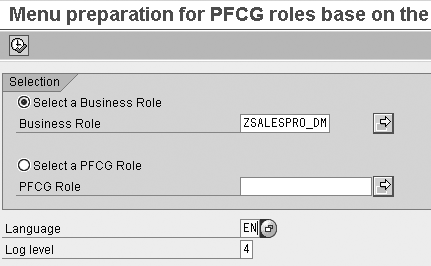
Figure 6
Generate the file of components to use in the security profile for your Business Role
On execution, the program generates a log that outlines all the components that will be included in a PFCG profile. These provide the user with access to all the work areas and logical links in his or her Business Role.
The program also generates a file that contains all the components and authorization objects. The file is automatically saved to your local SAPWorkDir directory. Your Business Role name is the file name — in my example, the file name placed in the SAPWorkDir is ZSALESPRO.txt.
How does it work? If you have set up security in the past, you will be familiar with transaction SU22. This specifies the required security authorization objects for each piece of SAP CRM functionality. In previous releases, there were many security objects linked to a transaction. With the advent of SAP CRM 2007 components, SAP has updated transaction SU22 with the required authorization objects linked to each UI component.
Step 5. Generate a profile (Figure 7). Return to your empty PFCG profile using transaction PFCG and navigate to the Menu tab. Click on the Import From file button in Figure 7. The system then prompts you to enter the file. Browse for the file you have generated in the previous step — in my example, this is ZSALESPRO.txt. Finally, click on the Authorizations tab and click on the Change Authorization Data button to navigate to the full list of authorization objects (Figure 8). The resulting screen contains a list of all the authorization objects as specified by the uploaded file (Figure 9).
Tip!
The component
S_SERVICE is included as a part of your uploaded file. This component, used for external services, is now redundant. You must inactivate this component by clicking on the inactivate icon

to the left of the object name. Failure to do this may cause issues in the generation of your profile.
Note
Along with this new role you also have to assign the role SAP_CRM_UIU_FRAMEWORK to all of your users. This gives the user access to the L-shape of the UI. The program does not automatically include the objects in this role.
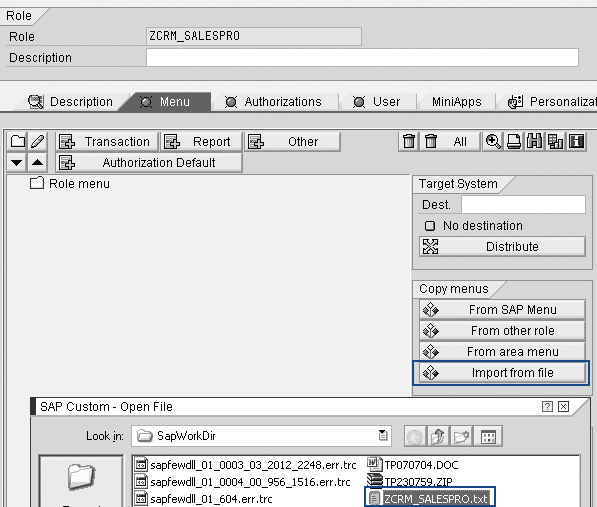
Figure 7
In your PFCG profile, import the file generated in the previous step
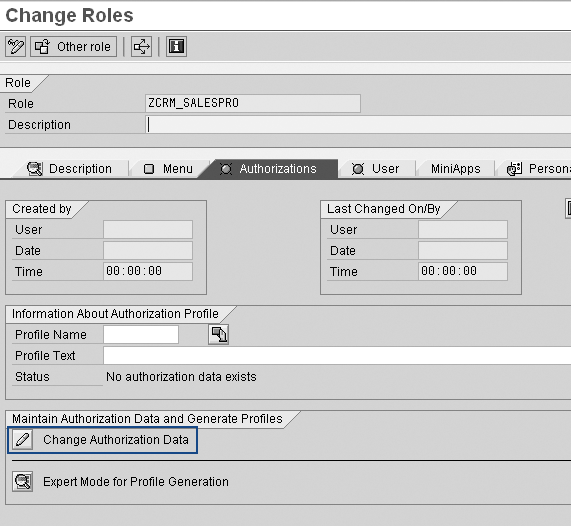
Figure 8
Change Authorization Data button to navigate to the full list of authorization objects

Figure 9
New authorization object UIU_COMP
The final step to create your profile is to generate. Click on the generate icon to create an authorization profile that can now be assigned to users.
New Objects in the PFCG Profile
If you take a look at the components of your newly generated PFCG profile, you can see the new objects that now influence security access. You can find all the components specified in the Business Role in UIU_COMP. Figure 9 shows the authorization object UIU_COMP for my generated role.
Each UIU_COMP has three values: component name, inbound plug, and component window name. The component name is an object in the UI. For example, BP_HEAD is the component name for business partner maintenance. The inbound plug defines the various links into the component. The component window name defines the first window to display when the inbound plug is called. The good news is you don’t have to worry too much about these values because the Profile Generator sets all the values for you.
However, sometimes you may want to adjust these settings. A common example of a modification to the generated profile is when you choose to give all users the same Business Role, but then you would like to vary the security profile for different users groups. This can be achieved by restricting security access to the work centers, the main menu headings on the left side of the L-shaped frame of the CRM 2007 WebClient UI.
Let’s use the SALESPRO Business Role. The Navigation Bar Profile SLS- PRO is assigned to this Business Role. This profile contains many work centers such as SLS- ACC for Account Management and SLS-ACT for Activities. If you want to restrict access to the Activities menu option for a particular user group, you can copy the security profile you have generated from the SALESPRO Business Role and then make some adjustments. In this example, you would remove the SLS-ACT work center from your security profile.
To do this, go to transaction PFCG, navigate to the Authorizations tab and click on the Change Authorizations button. Now you need to locate where the SLS- ACT work center has been added to your profile. Perform a search for component UIU_COMP by clicking on the Search button, entering the authorization object UIU_COMP, and clicking on the Find Object button. This takes you to a list of all the included UI components.
Unfortunately, you cannot search for individual field values in authorization objects. You need to look through each of the UIU_COMP entries to find the work center. For example, work center SLS- ACT is listed as WCC_SLS_ACT. Most work centers have component name WCC_* where the asterisk is the work center name as specified in the Navigation Bar Profile. To restrict access to this work center, you need to click on the delete icon to delete this entry. Then regenerate your profile.
This profile is now ready to assign to users to remove their access from the restricted areas. Figure 10 demonstrates how to delete the work center for activities from your security profile in transaction PFCG. This security access removes the Activity work area from the L- shaped UI. As a result, you have a single Business Role influenced by the user’s security profile.
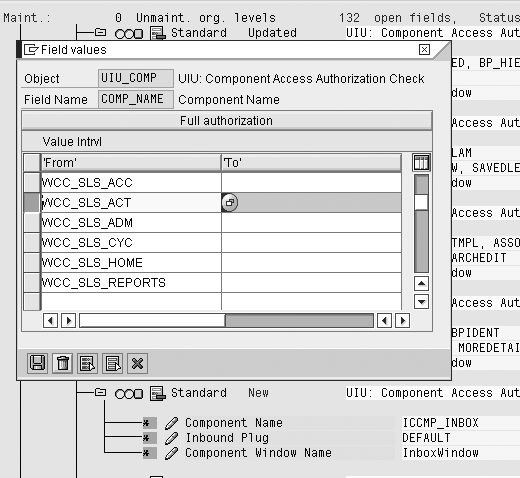
Figure 10
Delete the Activity work center from authorization object UIU_COMP
Now that you have created a new Business Role, Navigation Bar Profile, and security profile, you can see that there are two ways you can implement security for different user groups in SAP CRM 2007.
- Business Role: Separate Business Roles provide user groups with different access to functionality via the Navigation Bar Profile assigned to the Business Role. You can generate a security profile for each Business Role to reflect this required functionality.
- Security profile: You can have a single Business Role in which each user group that has this Business Role can have a different security profile. This controls access to various work areas and logical links by removing security access.
Determination of Business Roles for Users
Three methods in SAP CRM 2007 help you determine which Business Role a user is assigned to: assignment to a position in the organizational structure, user parameter, and link between the user’s PFCG profile and the Business Role.
Assignment to a position in the organizational structure: This position has a Business Role assigned. Users assigned to that position inherit the Business Role of that position when logging on. This is the most practical approach for users who are employees in the organization.
User parameter: In a user’s parameters, set up in transaction SU01, enter parameter CRM_UI_PROFILE and specify the required Business Role. This method is useful when you are in the build phase of a project and have not yet defined the organizational structure or if you are testing various Business Roles.
Link between the user’s PFCG profile and the Business Role: This is where the PFCG profile you specify in the Business Role comes into play. When users log in, if they are not assigned to the org structure and they have no CRM_UI_PROFILE parameter, the final potential link to a Business Role is via the users’ PFCG profiles.
For example, if the user has PFCG profile XYZ, SAP CRM 2007 looks for a Business Role that has XYZ specified at the PFCG profile in the configuration. Remembering that a PFCG profile can only be assigned to one Business Role, the system automatically assigns the matching Business Role to the user. This approach is useful for your external users (i.e., customers or vendors that log into your system). With this option, you don’t have to have to add these users to your organizational structure to provide them with access to your system.
As you can see, there are many ways that you can apply the new security concepts to your user base. You should also now realize that all your hard work over the past few years learning SAP CRM security was not in vain. By adding a new authorization object UIU_COMP to the security profile and combining it with the CRM Business Role, you have a new method for securing CRM functionality. Of course after you have locked down the functionality, you now need to lock down the data. This we can save for another day.
Katrina Burke
Is a senior CRM consultant at SAP Australia. Working as an SAP consultant for 13 years, initially Katrina was entrenched in ABAP and SAPScript. In later projects in both Asia and Europe, Katrina worked as a development manager and HR Payroll consultant. Most recently Katrina has been working at SAP as a CRM consultant specializing in business partner, marketing, and opportunity management. In her current CRM consulting role, she has been working with SAP CRM 2006s.
You may contact the author at katrina.burke@sap.com.
If you have comments about this article or publication, or would like to submit an article idea, please contact the editor.