Explore the four methods—MDM Business Package, MDM Web Dynpro Configurator, MDM Web Services, and MDM Java API—from which you can choose to integrate SAP NetWeaver Master Data Management (SAP NetWeaver MDM) and SAP NetWeaver Portal. Learn how and when to implement the integration method that best addresses your business structure, and then take that integration to the next level with advanced integration techniques using Business Process Management and Rules Management.
Key Concept
SAP provides the MDM Web Dynpro Configurator (MDM WDC), which is a modeling tool that you can use to create a number of reusable components, such as search, item details, and result sets, for any repository. These components can be reused in multiple Web Dynpro Java applications. Using MDM Web Dynpro Configurator to create reusable objects saves significant time by avoiding the need for user interface (UI) design. MDM WDC generates a UI automatically based on the configuration chosen at the time of project creation.
Data is the driving factor for almost every business; therefore, it is imperative that data is managed, modeled, and syndicated correctly throughout the IT landscape. Business models are changing at tremendous speed and so is the amount of data. Keeping track of a vast inventory of information is a challenge. Because of this, organizations find themselves managing and modeling data that is dispersed and confined into different silos throughout the enterprise. SAP NetWeaver Master Data Management (SAP NetWeaver MDM) is designed
precisely for such scenarios and to help organizations to consolidate, harmonize, distribute, and model their business data.
Take the example of industry codes. There are various types of codes such as SIC, ISIC, NEC, NAICS, USSIC, UKSIC, and many more. Classification of codes in the US might be different from those in other countries, which might each have a system of classifying industries.
Now, consider a financial institution that is managing data with varying industry codes across the globe. It becomes difficult to manage data that must be available in different classifications. Not only is this data difficult to manage, but also it is sensitive.
SAP NetWeaver MDM can implement a central master data of industry codes. With SAP NetWeaver MDM’s data consolidation and harmonization capabilities, a global company can create a reference model for linking of all the industry codes in one unified repository. Then, this data can be distributed by SAP NetWeaver MDM’s own syndication mechanism and workflow into different systems across the enterprise.
This brief overview of an end-to-end implementation of MDM-Portal integration is also a practical guide for working on a portal implementation — i.e., SAP NetWeaver Portal Composite Environment (SAP NetWeaver Portal CE) 7.1 or 7.2 or SAP NetWeaver Portal 7.3 with Business Process Management (BPM) and Rules Management (BRM) as the backbone of the project.
Such projects often falter when companies don’t choose the right development approach and end up experimenting, which results in loss of time and resources. In addition, companies often fail to understand the limitations of different development methodologies, and, therefore, deliverables are delayed and of poor quality.
I explore four development approaches and their limitations. People or project team members who are new to integration tools can use it not only a guide, but also as a benchmark for making important technical decisions in their project implementation.
Need for MDM?Portal Integration
Communication today is dominated by thin clients, such as browsers, that provide data accessibility at any time from any part of the world. Without having to go to an office or connect to a VPN to get the required data, SAP NetWeaver Portal offers a unified and single point of entry for all SAP and third-party applications. It offers out-of-the box methods for integrating different systems and, therefore, providing ease of accessibility to heterogeneous data in a single place.
SAP NetWeaver MDM integration tools, such as MDM Console, MDM Data Manager, and so on, are complex to use. Non-technical users would find it difficult to retrieve the data or even design a report using these core tools. Also, these integration tools give unauthorized access to sensitive information, such as names of repositories or user IDs. To make MDM-Portal integration easy and secure, SAP introduced the MDM-Portal Integration process, which enables quick data retrieval, modeling, and application design, based on standard MDM tables.
Following are the MDM-Portal Integration methods outlined in this article:
- MDM Business Package
- MDM Web Dynpro Configurator (MDM WDC)
- MDM Web Services
- MDM APIs
Note
Because this article focuses on portal integration, I cover Java APIs, as portals are on the Java stack. ABAP APIs are not, and are therefore beyond the scope of this article.
Extending MDM capabilities over the thin client became a necessity and in line with that market need, SAP released MDM Business Package for NW Portal 7.0. With the release of the composite environments, that is, SAP NetWeaver Portal CE 7.1 and 7.2, SAP discontinued the business package and introduced MDM WDC. With MDM WDC, MDM Web Services and APIs were resurrected.
The type of integration you need depends on the MDM and portal version you are using. You can use a business package, MDM Java APIs, a Web service, or simply MDM WDC. The possibilities are many, but use cases and documentation for each one of them are few. You can easily find how to integrate MDM Business Package and SAP NetWeaver Portal. On the other hand, information on MDM Web Services or how to tweak MDM WDC Components is sparse. This is also the case with process modeling tools, BPM and BRM.
Let’s begin with the MDM Business Package in relation to SAP NetWeaver Portal 7.0.
SAP NetWeaver Portal 7.0 and MDM Business Package
SAP NetWeaver Portal 7.0 includes a Java-based Business Package with standard iViews for picklist, hierarchy, attribute, aualifier, and text searches, as well as item details and result sets.
For MDM Server 5.5, integration is pretty simple and straightforward. You download the Software Component Archive (SCA) files from SAP Marketplace and install them with the Software Deployment Manager (SDM), which is the standard tool that you use to install J2EE components on the SAP J2EE engines. It is available on your portal server using the following URL: srsap<SID>JC00SDMprogramRemoteGui.bat. Make sure that you deploy the following SCA files at once:
- BPMDMTECHN04_0.SCA – Provides wizards and iView required to define MDM repositories
- BPMDMAPPLI04_0.SCA – Provides redesigned roles, iViews, and worksets
- MDMJAVAAPI04_0.SCA ––Provides the Java Framework for MDM Java-related developments
After the deployment is completed, you can check to make sure that the components were deployed successfully on your server by accessing the portal’s index.html page. You can access the index page by using the following URL: https://<host>:<port>/index.html –> System Information.
Look for MDM-deployed components. In a majority of the cases, no errors are caused by the deployment of the files. However, having insufficient authorization for SCA deployment can stall the deployment of certain components whose safety level is HIGH. In that case, you must deploy these files with Admin ID or user ID with deployment authorizations. Another possible cause of error is not following the deployment sequence of the files. There are some interdependent components that need to refer to other components deployed in previous files. In case of an error, you have to undeploy the files and redeploy them.
Therefore, it is critical that you perform the following sequence of deployment:
- Log in to Visual Administrator with administrative privilege.
- Go to Services > Connection container > MDM Factory.
- Click the Properties tab and set the server details and maximum allowed connection (i.e., pooling properties).
- Now, go to Services > Monitoring. Here you can see the up-to-date information on the MDM-deployed components. You can also see if there are errors in the deployments.
Complete any post-installation configuration necessary before you use MDM Portal contents and MDM Repositories. Once you know that the deployment was successful, you can create three iViews, so that you can (1) search the MDM repository (i.e., Search iView), (2) fetch the data (i.e., Result Set iView), and (3) edit or delete a record (i.e., Item Details iView).
Use the following questions to identify when you should use the MDM Business Package in your project:
- Is the SAP NetWeaver Portal in your landscape on the SAP NetWeaver CE platform?
- Use any of MDM WDC/WD Java/MDM APIs/MDM Webservices but not Business Package
- Does your project require customization in any of the MDM components?
- Do not use MDM WDC or Business Package. Instead use MDM WD Java APIs and/or MDM Webservices
- Does your project require process enablement via BPM?
- Use MDM WDC with WD Java but not MDM Business Package
- Do you need out-of-the-box functionality?
- Use Business Package only if you are not on the SAP NetWeaver CE Version. If you are on the CE version then use MDM WDC. You must not use WD Java APIs or MDM Webservices.
Also take note of the following:
- MDM WDC is not available for SAP NetWeaver Portal 7.0
- MDM WDC is available for SAP NetWeaver CE versions and also for 7.3
- MDM Business Package Java is available for SAP NetWeaver Portal 7.0 and 7.3
There are business packages for SAP NetWeaver Portal 7.0 and 7.3. However, SAP has not released any business packages for SAP NetWeaver Portal CE 7.1 and 7.2; therefore, you have to use either MDM APIs or MDM Web Services to build custom applications for your SAP NetWeaver CE environment. You can also use MDM WDC if you are going to work with out-of-the-box features with minimum or no customizations.
MDM WDC
MDM WDC is a wizard-based tool that you can use to quickly build applications on top of your MDM Repositories. Unlike with MDM Business Package for 7.0, there is no need to create multiple iViews with MDM WDC for SAP NetWeaver Portal CE. Moreover, this tool is compatible with the Web Dynpro Java (WDJ) Framework and can be seamlessly integrated into WDJ components. Because of the WDJ compatibility, you can easily control the visibility of screen fields and control navigation and display. You can even add new functionalities such as the ability to download data to a Microsoft Excel spreadsheet or a PDF. You cannot do this with MDM Business Package 7.0.
Let us now have a brief look at how MDM WDC works.
Working with MDM Web Dynpro Configurator
You access MDM WDC using the following URL: https://<hostname>:<port>/mdm/wdconfig. After logging in to MDM WDC, you see a number of screens with options, as shown in
Figure 1.
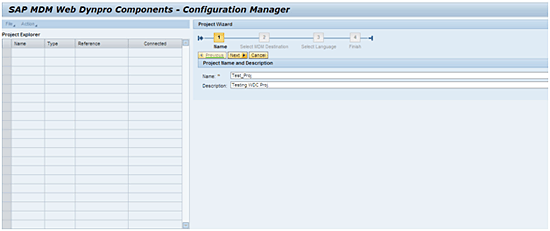
Figure 1
MDM WDC screen elements
The initial screen of WDC contains a Project Explorer, toolbar menu, and Project Wizard. Project Explorer is the place in which you create all your WDC projects using the File option on the toolbar menu. The Action option on the toolbar menu supports tasks, such as describing project properties, editing a project, and deleting one.
A typical MDM WDC project is made up of three sub-projects, which you create “under” the main project. As shown
Figure 1, the sub-projects of the project (test_2) are Search, Item Details, and Result Set. More
precisely, these MDM components are reusable, auto-generated code that you can use in any application without spending time on integration. You can also modularize a MDM implementation by extending these applications into a WDJ framework.
A project must always be connected to an MDM repository through an MDM destination. An MDM destination enables you to expose MDM metadata to your MDM WDC.
The last column in the Project Explorer shows the connection status of a project. You can easily relate this structure to creating MDM Business Package content. You create three iViews, namely Search, Item Details, and Result Set, in case of the MDM Business Package in Portal 7.0. Overall logical structure is unchanged; however, many new capabilities are offered in MDM WDC. You can easily control the visibility of a button, add an extra button to enable download functionality in a result set, and set field validations — just to name a few new features.
You use the Project Wizard, located on the right side of the screen, to configure project properties such as the name of the project, data language, and MDM destination selection.
Create an MDM WDC Project
An MDM WDC project is the major component that contains sub-projects, such as Search or Item Details. MDM WDC project is a parent component that is responsible for connecting to MDM repository. You cannot create sub-projects without creating a parent project.
Creating a Search Component
To create a new MDM WDC Project, you begin by creating a search component. Click the File menu (
Figure 1), and then click Search Component. If your main project is successfully connected to MDM Repository, click the Search Table drop-down arrow to display all MDM tables available for selection (
Figure 2). Next, choose the table with which you want to work.
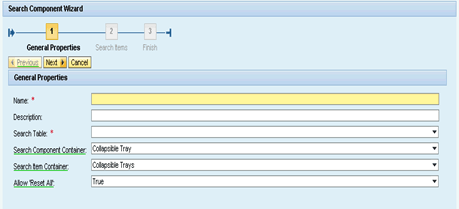
Figure 2
Select a table in the Search Component Wizard
Note that the Name and Search Table fields are the only mandatory fields. You can leave the rest of the field options unchanged. After you have entered the required data, click the Next button
In the Search Items section, you identify the type of search needed for a particular repository in MDM Console. There are two types of searches: Named or Free-Form. The Named search is used for grouping searched records based on some criteria defined in MDM Data Manager. The Free-Form search presents just the qualifying records. Records are never grouped in case of Free-Form search. In this case, the Named search is not enabled for the MDM repository that you are connected to, so you need to select the Free-Form search (
Figure 3)
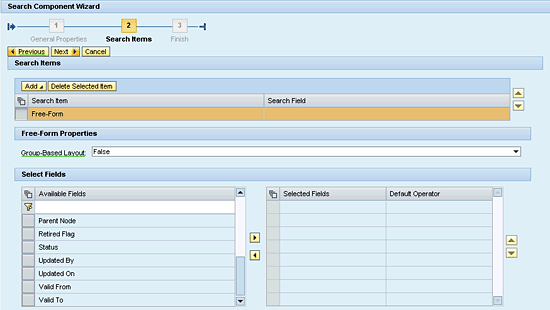
Figure 3
Specify Named or Free-Form search
Note
There is another search type, the Local search. I purposely did not list it here because it is only available after you have searched for a record or records. You then have the option to save the search as a Local search. Therefore, next time you need the same record, you don’t need to perform a search on an entire MDM Repository. You can fetch the record directly from Local search if you have saved it.
When selecting a Free-Form search, you need to specify the Group-Based Layout property as False so the search records are not grouped together. If you need a group-based output, you would select a Named search instead. The Free-Form search provides greater flexibility and is completely user-need based.
The Select Fields section automatically displays all fields in the MDM table specified in the first screen of the Search Component Wizard (
Figure 2). You can choose the fields you want to use in the search.
Note
Free-Form search is the most commonly used type of search option for MDM WDC. Even if you are planning to integrate this component in Web Dynpro Java and use it in a BPM Process, Free-Form search always satisfies your technical requirements.
You can preview how the Free-Form search component looks in real-time in
Figure 4.

Figure 4
Preview of a Free-Form search component
Next, you create the Item Details component.
Create an Item Details Component
At this point in the process, you are able to choose buttons and configure general properties, such as single use locking and multilingual support. Item Details is the component with which the user can create, edit, or delete values. See
Figure 5 for more configuration options.
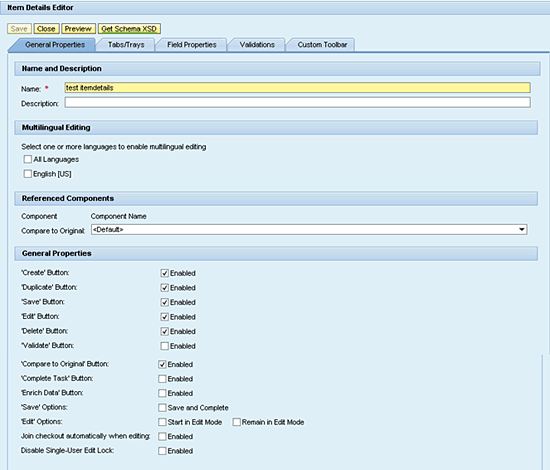
Figure 5
Select options for the Item Details component
Figure 6 shows the Layout type. You can select whether to display item details vertically or horizontally, which is a significant advantage over a standard MDM Business Package.
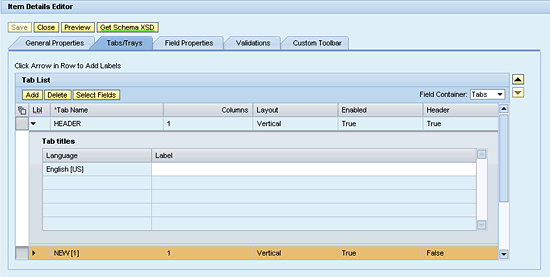
Figure 6
Choose the layout type
Figure 7 shows the field properties and possible configurations. You can control all possible field operations — such as making a field mandatory, enabling a field for editing, and raising an event to perform some further action in case you are using Web Dynpro Java — using the Field Properties tab.
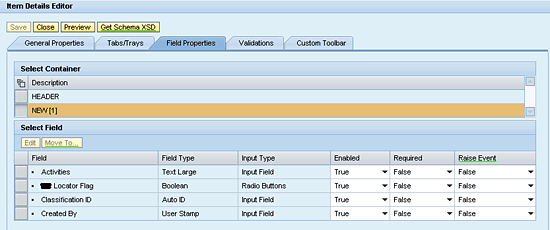
Figure 7
Specify the field properties in the Items Details component
Field validation is an important error prevention method used in almost every application, be it a Web site registration form or an SAP Portal application. To enable field validation, MDM WDC allows you to include validations that are already configured in the MDM Repository. Note that you cannot write your own validation in MDM WDC directly. You can only set validations in the MDM Console. Whatever field validations are configured, MDM WDC fetches them all and makes them available for selection.
Figure 8 shows an example of how a field validation might be set.

Figure 8
Set field validations
Figure 9 displays the Item Details component in preview mode.
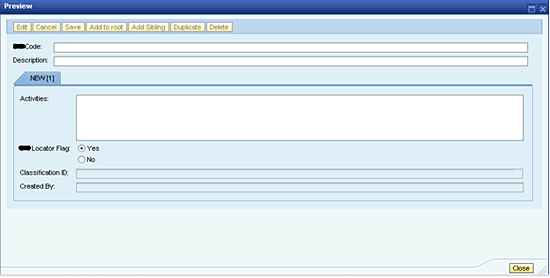
Figure 9
Preview the Item Details component
Create the Result Set Component
You have already created two out of three required components of a typical MDM WDC project. Now you will create the last component: Result Set. You create this component based on how you want the results of your search displayed.
Figure 10 shows the configuration options for the Result Set component. Note that you can control the table width and column widths, which isn’t possible in the MDM Business Package. You can also enable the result set of a selected item for comparison with result set of another item using the Comparison Component option. This comparison functionality is similar to a compare functionality provided on any e-commerce Web site.
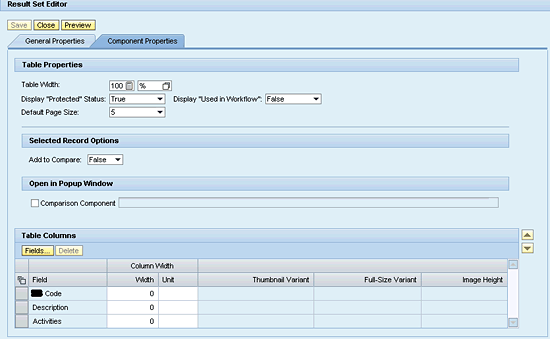
Figure 10
Set allowed components for comparison for Result Set component
You have created all three required components, and now your MDM WDC project is all set for integration with a Web Dynpro Java application, a BPM process, or an independent execution.
Integrating an MDM WDC Project in a WDJ Framework
Integration of an MDM WDC project with a WDJ application is easy. You write a code to refer to the MDM project and sub-projects by using a repository bean class. Note that when working with MDM WDC projects in WDJ, you need to add the two dependencies: MDM_JAVA_API and MDM_JAVA_WD_FRAMEWORK. These dependencies are available once you deploy the MDM API SCA files on your SAP NetWeaver Java stack. Following are the required SCAs. #### represents the service pack number.
- MDMJ710<SP Level>_P####.sca
- MDMJAVAWDFRW<SP Level>_P####.sca
Pseudo Code for WDC Component and MDM WDC Component
To execute the MDM WDC Component, you must add a reference to the configuration. You write the code in
Figure 11 to the DoInit() and DoExit() methods of your WDJ application.
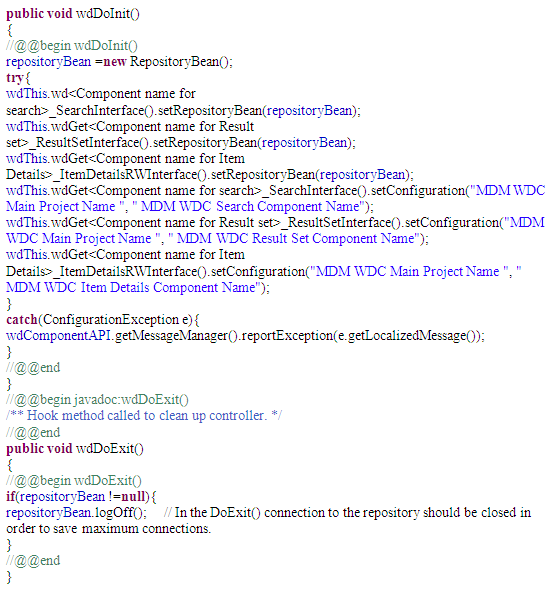
Figure 11
Add a reference to the configuration in DoInit() and DoExit()
When to Use MDM WDC
Use the following questions to identify when you should use the MDM Business Package in your project.
- Is the SAP NetWeaver Portal in your landscape on the SAP NetWeaver CE platform?
- If yes, use any of MDM WDC/WD Java/MDM APIs/MDM Webservices but not Business Package
- Does your project require customization in any of the MDM components?
- If yes, do not use MDM WDC or Business Package. Instead use MDM WD Java APIs and/or MDM Webservices
- Does your project require process enablement via BPM?
- If yes, use MDM WDC with WD Java but not MDM Business Package
- Do you need out-of-the-box functionality?
- If yes, use Business Package only if you are not on the SAP NetWeaver CE Version. If you are on the CE version then use MDM WDC. You should not use WD Java APIs or MDM Webservices
Working with MDM Web Services
MDM Web services provide additional flexibility to your MDM Portal integration, unlike MDM WDC components. You can customize the application functionality by using MDM Web services. What makes MDM Web services more interesting is that you don’t need to write an application and convert it to Web service. SAP provides the MDM Web Service Generator – a wizard-based standard application that enables you to select MDM tables. That automatically converts an entire MDM repository into a Web service that can easily be consumed in a WDJ application. To access the MDM Web Service Generator, use the following URL:
https://<HOST_Name>:<HTTP_Port>/webdynpro/dispatcher/sap.com/tc~mdm~ws~generator~ui/WSGenerator
Figure 12 shows the MDM Web Service Generator. From this screen, you can create a new MDM Web service or edit an existing one.
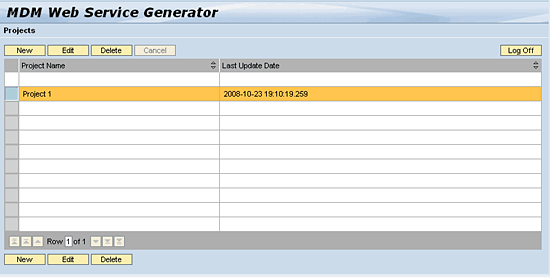
Figure 12
Create a new MDM Web service or edit an existing one
To create a new MDM Web service, click the New button. Enter the MDM Server, MDM Repository details, and your logon credentials, as shown in
Figure 13.
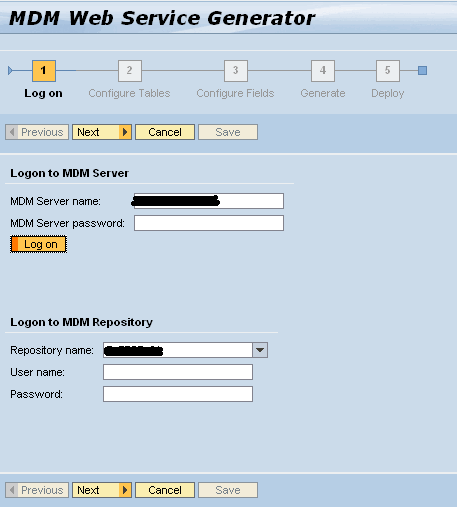
Figure 13
Enter the MDM Server, MDM Repository, and your logon credentials
Next, configure the tables from the MDM Repository and select the database operations that you want to perform. As shown in
Figure 14, the MDM Web Service Generator provides the standard CRUD (Create, Retrieve, Update, and Delete) support for application development, in addition to the Sea and Retr (Search and Retrieve) columns.

Figure 14
Specify CRUD for application development support
With the tables set, you now select the fields that you want to expose in the Web service, as shown in
Figure 15.
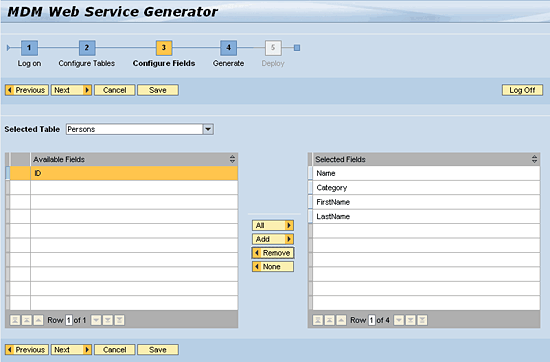
Figure 15
Select the fields to expose in the Web service
Click the Next button to display the fourth step in the wizard (
Figure 16).
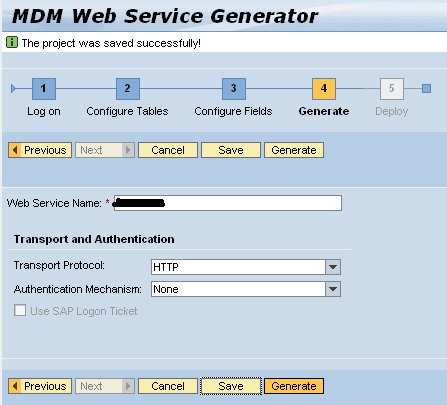
Figure 16
You’re ready to generate the Web service
Before you generate the Web service, it is important to understand the Authentication Mechanism options for a Web service. If the Authentication Mechanism field is set to None, then the Web service connects to the MDM repository with the standard admin user but without a password. (The password field is left empty when you log on to MDM server as the administrator with those standard credentials). If the Authentication Mechanism field is set to HTTP, then the same user IDs must exist in the Portal and MDM servers. Otherwise, every time you try to generate the Web service, you get a user authentication error.
An MDM Web service is a separate component that must be deployed in your Java stack. Remember, you can deploy this component with SAP NetWeaver 7.0, but not with SAP NetWeaver CE 7.1 or 7.2.
You must deploy the following SCA files to enable MDM Web services, where ######## is a label for your SP level:
- MDMWEBSERVICES02_0-########.SCA (MDM Web service component)
- MDMWEBSERVRUNT02_0-########.SCA (Runtime Library required for MDM Web service component)
MDM Web Service Generator can be accessed using following URL once you have deployed the above SCAs on your Java stack:
https://<HOST_Name>:<HTTP_Port>/webdynpro/dispatcher/sap.com/tc~mdm~ws~generator~ui/WSGenerator
MDM Web Service Integration with Portal
I assume that most of you know how to consume Remote Function Calls (RFCs) and BAPIs in a WDJ application. Therefore, I do not go into the details of the process for MDM Web Services integration with a portal.
Simply put, all you need to do is create an adaptive Web service model from the deployed MDM Web Service and then import the fields for context mapping. The rest of the development process is similar to any RFC/BAPI integration with WDJ.
In case you do not know how to create an adaptive RFC model, use the following link for further details.
https://www.sdn.sap.com/irj/scn/go/portal/prtroot/docs/library/uuid/a00f7103-6790-2a10-ac9c-fcac7c5b18a3?QuickLink=index&overridelayout=true&22990959950229
For further details on MDM Web Services and all possible configurations, use the following link:
https://help.sap.com/saphelp_mdm71/helpdata/en/49/008aa968af3697e10000000a42189b/frameset.htm
When to Use MDM Web Services
Ask yourself the following questions to decide when you should use MDM Web services in your project:
- Does your developer team lack a working knowledge of MDM Java APIs?
- If this is the first time you are working on MDM Portal integration and developments, do you need to explore which approach to choose to jumpstart the development of an MDM Web service?
- Is the scope of the custom development moderate (that is, this is not a complex customization)?
- Will your project be driven by a delivery schedule?
If you answered yes to any of these questions, then using MDM Web services is the most beneficial approach, especially if you need to fast track the delivery. You can also combine MDM Web services and MDM APIs to optimize the development process. For example, an MDM search is a generic process. You can easily create a search Web service and reuse it whenever needed. There’s no need to write same code every time.
Working with MDM Java APIs
Many aspects of MDM Java APIs haven’t changed significantly since MDM 5.5. Even if you are on the MDM server 7.1, the Java API usage remains almost the same. Currently, two types of MDM Java APIs are available: MDM4J APIs and the new MDM Java APIs. MDM4J APIs are restrictive to repository content, and they never allow data management or MDM server administration. However, the new MDM APIs are flexible, and you can manage data and repository content, as well as perform MDM server administration.
Table 1 provides a brief summary of the most important differences between MDM4J and New MDM APIs.
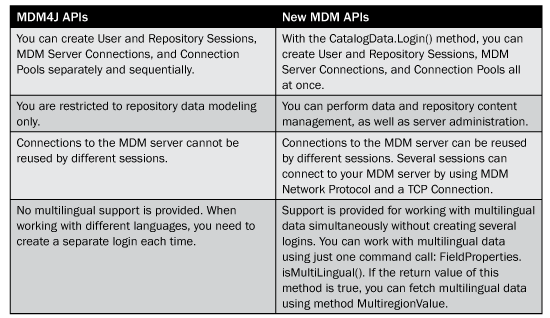
Table 1
Comparison between MDM4J and New MDM APIs
Note
If you are on MDM Server 7.1, then you have to use new MDM APIs. MDM4J APIs are invalid since MDM Server 7.1.
Getting Started with MDM Java APIs
A typical process starts with creating a trusted connection to an MDM server.
- Create a JNDI Content to begin the process by entering the following code in the DoInit() section of the component:
Context context = new InitialContext();
- Obtain the connection factory using JNDI lookup by entering the code in the DoInit() section of the component:
IConnectionFactory connectionFactory = (IConnectionFactory)context.lookup("deployedAdapters/MDMEFactory/shareable/MDMEFa
ctory");
- Set connection properties:
IConnectionSpec spec = connectionFactory.getConnectionSpec();
spec.setPropertyValue("ManagedConnectionType", "ConnectionAccessorType");
spec.setPropertyValue("Server", “localhost");
spec.setPropertyValue("CodeRegion", "English [US]");
- Get the connection:
IConnection connection = connectionFactory.getConnectionEx(spec);
Create a session context, using one of the three types of sessions: Server Session, Repository Session, or User Session, as shown here, respectively:
- ServerSessionContext sessionContext = new ServerSessionContext(serverName);
- RepositorySessionContext sessionContext = new RepositorySessionContext(serverName, repositoryName, userName);
- UserSessionContext sessionContext = new UserSessionContext(serverName, repositoryName, regionName, userName);
- Get the instance of SessionManager and create the user session:
String userSession = sessionManager.createSession(sessionContext, SessionTypes.UserSessionType, password);
- Create a record using execute command:
CreateRecordCommand l_rec = new CreateRecordCommand((UserSessionContext)sessionContext);
l_rec.setRecord(record);
l_rec.execute();
This is a one-time process. You can reuse the session contexts to connect to the MDM Repository several times in a same application.
When to Use MDM Java APIs
You should use MDM Java APIs in your project when:
- You clearly understand the scope and limitations of every possible way of MDM Portal integration such as MDM WDC, MDM Web services and MDM Java APIs
- The scope of custom development is high to complex and cannot be achieved by using MDM WDC and MDM Web services
- You have worked with MDM APIs previously and there is no other way to achieve the required functionality
Note
Because custom application development using MDM Java APIs is time-consuming, you should discuss the need for time to develop applications.
The Power of Combined Development
You can expedite the application development by combining all MDM Portal integration methods in one Web Dynpro application:
- Use MDM WDC to work with standard components, such as Main Tables, in the MDM Repository. Recall that you can reuse the search component.
- Use MDM Web services to achieve moderate custom developments, such as export to Microsoft Excel, on a result set.
- Use MDM Java APIs for any further complex requirement.
You want to use this granular approach only when you clearly know functionality and limitations of each of the three integration methods discussed thus far. If you combine the application development this way, you can save more than 20 percent of development efforts and 30 percent of rework efforts. My team and I achieved these statistics in a recent project and performed the final delivery two weeks in advance.
Advanced Integration – BPM and BRM
In the preceding sections, you learned about several MDM Portal integration methods and in what circumstances you should use them. Now let’s take this topic further and discuss how BPM and BRM integration can turn your vanilla-flavored MDM Portal integration into a business process enabler.
BPM, as its name signifies, is a process management engine. If you have worked on SAP enhancement package 6 or SAP Netweaver Portal 7.0, you know this as Guided Procedures. BPM replaced Guided Procedures entirely, but there is no API support available until you upgrade to 7.3. You can use BPM functionality with ease, but you cannot call an object of your process and manipulate it or its properties.
BRM is a next step of the Model View Controller (MVC) pattern. It separates not only the code but also the business conditions. For example, if you have an application that offers a number of options to input data and is based on what has been entered, the application changes the execution flow. That means the flow of the application is never the same for any two users. If you are logged in as an administrator, the application grants you read-write rights. If you are logged as an end user, the application most likely gives you read-only access (a user with the data steward role, on the other hand, would have write access). Imagine doing this programmatically for every business condition? If you use BRM in this case, you can save at least 65 percent of the recoding time.
BRM manages business conditions by using a decision table, which is a collection of conditions and associated actions. For example, if the condition is Administrator, then its corresponding action is calling the read-write component of the WDJ application. If End-user is the condition, then calling the read-only component of the WDJ application is its action. All the conditions and associated actions are provided in a tabulated table. Therefore, all you have to do is create a Web service by right-clicking the Business Rule folder – located in the project folder structure of the BRM DC – and selecting the Create WSDL artifact option. Now, in your WDJ application, you create a Web service adaptive model and set the Web service to invoke parameters to the request node. Upon execution, the Web service returns the action value, which can either be read-write or read-only. Based on the value returned, you can control the application flow.
BPM-MDM-Portal Integration
Before discussing BPM integration methodology, you need to know the following terms:
- Human activity is an activity used in BPM that requires manual (human) interaction. With a human activity, you can assign WDJ components to the UI for a specific task.
- Automated activity does not need human interaction. It is important to know that automated activities need Web services for processing. This means you cannot assign Web Dynpro components to a UI that uses automated activities.
The following is a step-by-step approach to BPM and BRM integration with MDM.
Step 1. Create a Development Component
Launch SAP Netweaver Development Studio and navigate to the Development Infrastructure view. Create a new development component of type Process Composer (
Figure 17).

Figure 17
Create a new development component of type Process Composer
Enter the name you want to give the development component (e.g., dc_approval_process), and in the case, leave all other options unchanged. Then, click the Finish button.
Figure 18 shows the project structure that will be created in your NWDS Process Composer.

Figure 18
Create and name the development component
Step 2. Name the Process
Right-click the Processes folder (
Figure 18), and then enter a name for the process, such as approval process. Check the option for New Pool so that a new pool for the process is created. A pool is a parent container that contains the lanes of the process. Enter the name of the lanes as User, Verification, and Confirmation (
Figure 19).

Figure 19
Create a new pool for the new process
Step 3. Create Human Activities and Automated Activities
Create two human activities and name them Submit Claim and Confirm Claim. Then create an automated activity called Verification (
Figure 20) using the BPM dashboard.
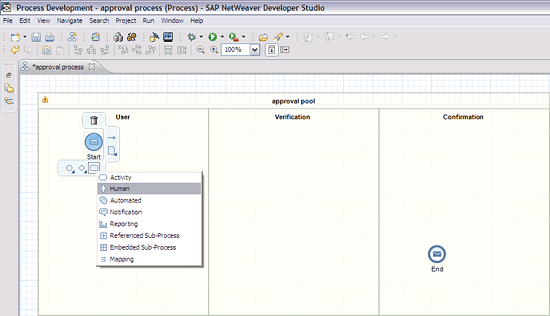
Figure 20
Use the BPM dashboard to create two human activities and an automated activity
Your process should like
Figure 21.

Figure 21
The new development process
If you see an error alert, such as the Verification Gate error, as shown in
Figure 21, make sure to assign a default gate for an exclusive gateway. You must also assign an administrator to the approval pool by clicking the error alert.
Step 4. Create Tasks for Each Human Activity
Double-click the Submit Claims activity. Next, select Task in the left pane and New on the drop-down list. The New Task dialog box opens, as shown in
Figure 22.
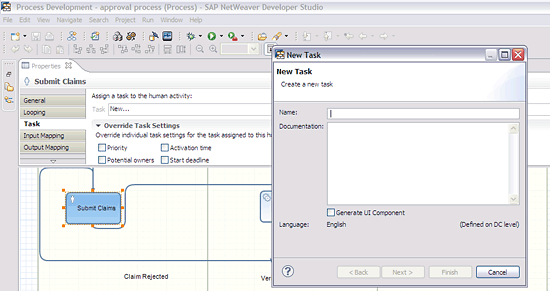
Figure 22
Create tasks for each human activity
You can enter any logical name in Name field of a new task. You check off the Generate UI Component box when you want the system to generate a UI automatically for your MDM WDC components. You can use this option when you don’t have WDJ components to take care of the UIs. In short, if your project does not involve any customization, then you may choose to generate the UI option. However, if you have any customization, do not use this option.
Next, follow the same process for the Confirm Claims activity.
Note
I assume that you already have MDM WDC Components integrated into WDJ components as shown earlier in the article. Creating a WDJ Component for assigning to a Task User Interface is beyond the scope of this article. However, see the sidebar “Assign a WDC Web Dynpro Java Component to a BPM Task” for information on that type of integration.
Sidebar: Assign a WDC WDJ Component to a BPM Task
You have created the process, the required activities, and the activity tasks. Now you can see how to integrate the already created MDM WDC WDJ components into a BPM task, so that your BPM process can directly interact with MDM tables.
To assign a WDJ component to UI of the task, select the task that you have just created, and go to the User Interface section. Click the Choose button to display the available options for the selected task. As shown in
Figure A, you can call either online components, such as Web Dynpro Java, WD ABAP, or Visual Composer, or offline components, such as Adobe Forms.
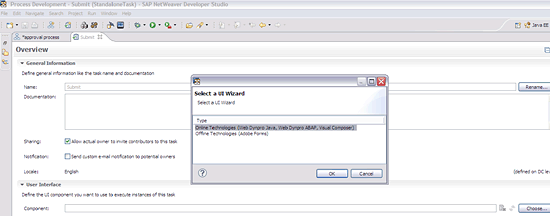
Figure A
Display options for the task
Select the first option (Online Technologies), and then proceed to select the MDM WDJ component. Choose which MDM WDC WDJ component you want to assign to selected task (
Figure B).
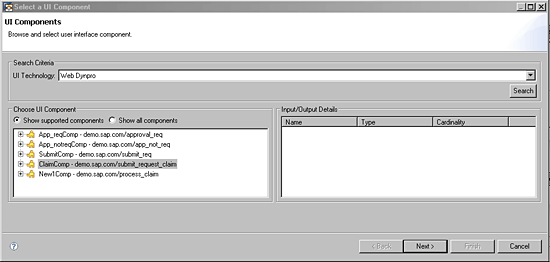
Figure B
Select the component
The ClaimComp is the WDJ component added to the Process Composer Development Component — in this case, the d c_approal_process dependencies. It is extremly important that your MDM WDC WDJ component have a complete event without which the component will fail to display here. If your WDJ components are not displayed here, check the WDJ component and confirm that you have a complete event already created.
To create a complete event in WDJ application, go to the Component Controller of the WDJ component, and create a complete event (
Figure C).

Figure C
Create a complete event
Create a method in the Component Controller named trigger_compete, as shown in
Figure D.

Figure D
Create a method in the Component Controller
Go to the implementation of the trigger_complete method, and enter the following piece of code to execute the complete event: wdThis.wdFireEventComplete();
Now, go to the event handler of the Submit button (this can be any other button on which you want to trigger the complete button), and to call the trigger_complete method of the component controller, enter the following code: wdThis.wdGetClaimCompController().trigger_complete();
Once you complete all of the steps, you can assign MDM WDC components to the UI of a task (
Figure 2).
Step 5. Assign Users and Roles to Show Who Is Responsible for Each Task
It is mandatory to assign at least one user or role to the task. The process flow stalls if a user or role is not assigned to the task (
Figure 23).
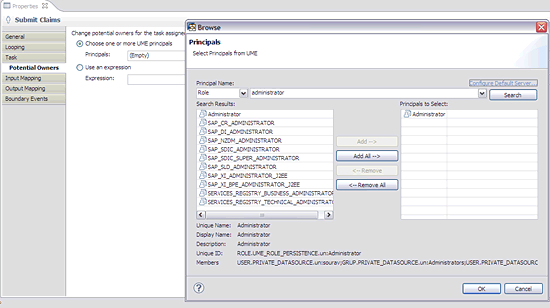
Figure 23
Assign at least one user or role to the task
Similarly, you must assign a UI component to the Confirm Claim task and potential owners of the task. To start the claim approval process, log on as the NetWeaver administrator (NWA), and then navigate to Configuration Management > Processes & Tasks > Process Repository. Select the process and click the Start Process button (
Figure 24).

Figure 24
Start the claim approval process
As shown in
Figure 25, the process window opens. Click the Start Process button again.
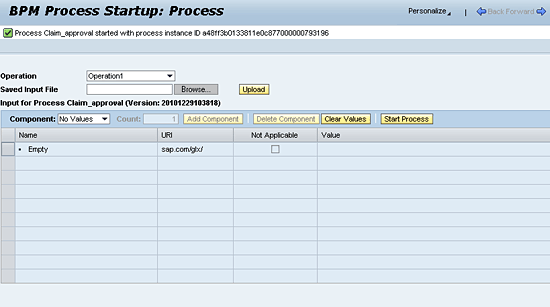
Figure 25
Start the process
Next, log in to the portal as the first user. As shown in
Figure 26, you see a Universal Worklist (UWL) task in the worklist.

Figure 26
Select the UWL task
Here you select the UWL task (i.e., Submit the claim request). This action assigns your MDM WDC WDJ component to the first task that is executed, resulting in an interface that allows you to directly interact with MDM repositories.
You have successfully integrated SAP NetWeaver MDM with BPM by using the WDC Components and WDJ components you created. You can now call the initial WDJ component that encapsulates all three MDM WDC components, thereby making the MDM WDC screens available to BPM task UIs.
BRM Integration with BPM Processes
You use the same process as the preceding section for a BRM integration. So far you have assigned MDM WDC WDJ components to process UI tasks and successfully launched the process. Now you can see how to work with an automated activity by assigning a BRM Web service to manipulate the process flow, depending on value returned by the BRM ruleset.
A typical BRM development involves the following activities:
- Create of an XML Schema Definition (XSD) that will generate input and output parameters of the Web service generated from BRM DC. You can think of this as an RFC with importing and exporting parameters.
- Add elements to XSD schema that will physically accept and return parameters.
- Add XSD to the project alias.
- Create a rule set and create a decision table within the ruleset.
- Set conditions and their associated actions in the decision table.
- Set input and output parameters for the decision table.
- Create a new rule and add following line of code — Boolean TRUE Equals Boolean TRUE — in the If section of the rule. In the then section add the reference to the decision table, as shown in Figure 27.
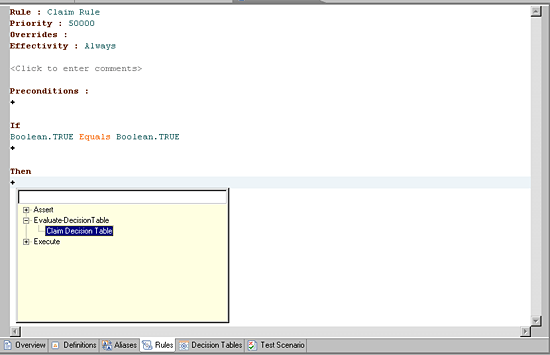
Figure 27
Create a new rule with code
The meaning of Boolean TRUE Equals Boolean TRUE condition is: If true equals true then evaluate the decision table. This way the decision is evaluated every time.
- Create the WSDL (Web Services Description Language) Artifact from the rule set and deploy the Web service.
For more information on the process of creating BRM DC and the preceding steps, refer to the following link:
https://www.sdn.sap.com/irj/scn/go/portal/prtroot/docs/library/uuid/b07ce666-fdf1-2c10-96b0-be959a344ede?QuickLink=index&overridelayout=true&47047071901612
Because an automated activity needs a Web service for determining process flow, you now need to set up the process to consume the BRM Web service in the BPM DC and to see how process flow is modified dynamically. Import the WSDL Artifact in the BPM DC by right-clicking Services Folder in your project structure (
Figure 28).
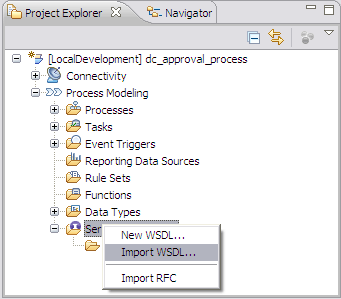
Figure 28
Import WSDL
Set the available WSDL Sources option to Remote Location / File System, and then enter the WSDL URL of the BRM Web service. If you do not know how to find WSDL URL of this Web service, navigate to Web Site Navigator, and search for the Web service. In the Web service details, you will find the WSDL URL of the Web service. In addition, you can also check if the Web service is working correctly before importing it into the BPM DC from here.
Unlike MDM WDC WD Java components that are assigned to UI of a task, a BRM Web service will be assigned to a Service Interface of the automated activity. Therefore, you need to create a new service reference while importing the WSDL into BPM DC. See
Figure 29 for the details.
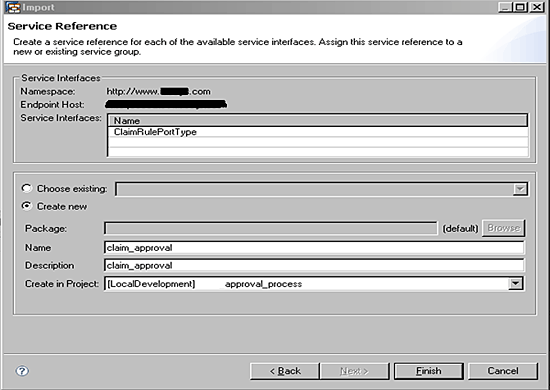
Figure 29
Create a new service reference during importing activity
Assign the service interface to the automated activity. Select the activity to which this Web service interface must be assigned. When you select the required activity, it displays associated properties on the Properties tab (
Figure 30).

Figure 30
Properties tab
Next, select the newly created service interface from the service interface dropdown. The rest of the fields will be populated automatically once you select the service interface.
Relate output mapping to context mapping in WDJ framework. Output mapping serves same functionality, in this case, that is served by context mapping in case of WDJ. However, here instead of normal context, you’d need something called process context (
Figure 31).

Figure 31
Process context
Output mapping simply means mapping output parameters of the first task to the input of the automated activity. Similarly perform the input mapping for automated activity and output mapping for second task. With this BRM, integration into BPM is complete. Now build and deploy your applications to finish the process.
Note
This article assumes that you have already assigned a provider system to the BRM Web service. If you don’t know how to do that, navigate to NWA > SOA Management > Application Communication and search for the BPM process. Select the BPM process and choose edit. Now select RulePortType and click Assign Provider Systems. The provider system will be the system that you are using for the BPM and BRM deployments.
How 7.3 Fits into This Scenario
It’s been a year since SAP Netweaver 7.3 was released, and you may have some questions, such as: Are there any advantages to choosing 7.3 over implementing other Portal releases? How can I use most of the delta functionality of 7.3? It is important to understand that you cannot just go with the latest release because it’s the latest release. You must be sure about what advantages SAP NetWeaver 7.3 can bring into your landscape when your other systems might still be on the lower version.
Although BPM and BRM may be useful for your process mapping project, even these advanced technologies have certain limitations. Let’s consider an example in which you have a process of Leave Management and two levels of approval are required. You have submitted the leave request to the first level of approval. It’s been over a week and you have no clue about what is happening with your leave application. You thought to use BPM Monitoring to see if the Level 1 approver has approved your leave. If the Level 1 approver has approved the request, you can see the completed status in monitoring report against approver Level 1. However, you do not know if the approver has rejected the request or sent it to the Level 2 approver. You want to see with whom your request is pending. BPM falls short here. Alhough it shows the status of your process, it fails to show you with whom the task is pending.
SAP has answered this limitation with SAP NetWeaver 7.3. With SAP NetWeaver Portal 7.3 you can use BPM APIs to fetch the process IDs of all the processes that have an Incomplete status. From these processes you can fetch the tasks, and from the tasks you can further fetch the status of each task and its owner. You can have a look at SAP Javadoc for BPM APIs at the two links below:
https://help.sap.com/javadocs/NW73/SPS02/CE/bpem/com.sap.bpem/com/sap/bpm/tm/api/Status.htm
https://help.sap.com/javadocs/NW73/SPS02/CE/bpem/com.sap.bpem/index.html
Ameya Pimpalgaonkar
Ameya Pimpalgaonkar is a senior SAP architect. He specializes in SAP Netweaver Portal, SAP BPM, BRM, MDM, and SAP Mobile. His interests include UI and front-end technologies, SAPUI5, Responsive Design, and integration of modern technologies with SAP UI. He has also worked on HTML5, CSS3, and jQuery. Ameya is also a certified usability analyst from HFI, USA.
You may contact the author at
ameya85@gmail.com.
If you have comments about this article or publication, or would like to submit an article idea, please contact the
editor.


