Learn in a few steps how to display or hide agents’ phone numbers as they call specific CRM business partners using integration between SAP CRM and SAP Business Communications Management. The changes you need to make involve marketing attributes, a modification of the business partner’s phone number before it reaches the dial pad, and specific routing rules in SAP Business Communications Management and in the gateway.
Key Concept
SAP Business Communications Management is an inbound and outbound telephony and contact center solution based on open IT standards that can be installed and integrated with SAP CRM.
Sometimes companies or individuals wish to make outbound calls temporarily unidentified to prevent being called back directly or to lower and filter possible inbound calls. This behavior is mainly observed in call centers. You can activate this feature on all types of phones to hide the phone number when it goes across the network. There are two common ways to enable this feature:
- One technique, which companies use especially on older phone models, is to dial a specific number in front of the desired phone number. This then sends the operator a flag, which stops the transmission of the number.
- Another technique used universally is to alter the setting options in a phone to enable or disable the number display. By selecting this setting, the network stops reporting the caller ID information when transmitting the call.
To achieve this functionality in an SAP CRM computer telephony integration deployment, a mixture of both techniques is necessary. Integrating SAP CRM and SAP Business Communications Management by taking the following five steps allows you to define whether to display a sender’s outgoing phone number for specific CRM business partners.
Step 1. Create and Assign Marketing Attributes
SAP CRM uses marketing attributes to easily enhance business partner master data with new information and fields that are not currently available. The focus in this first step is to create a new attribute set, attribute, and values, and assign these to a business partner in SAP CRM. In this case, when assigned to a specific business partner, the attribute controls the visibility of the caller’s number when this partner is called.
Create an Attribute
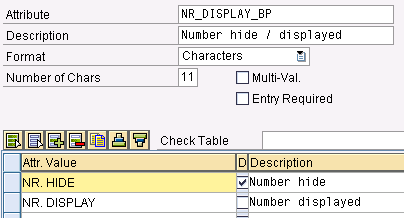
Transaction CRMD_PROF_CHAR creates a new attribute and assigns values to it. As an example, let’s name the attribute NR_DISPLAY_BP. You assign to the attribute two new values called NR. HIDE and NR. DISPLAY (Figure 1). These values determine the visibility of the phone number. You can also determine the number of characters or digits permitted for the attribute values. In my example, this number is 11, matching the length of value NR. DISPLAY.
NR. HIDE is the standard value as per the check box, meaning that if no value is selected on the business partner, the agent’s number is not displayed. To save your entries, click the save icon, which isn’t visible in Figure 1 but appears at the top of your screen.

Figure 1
Create an attribute
Create an Attribute Set
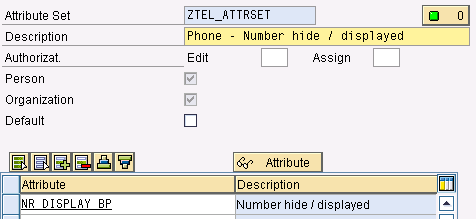
Attribute sets group together attributes for marketing purposes. Using transaction CRMD_PROF_TEMPL, you can assign multiple attributes to one attribute set, which is named ZTEL_ATTRSET in my example. Furthermore, you assign to it the previously created attribute NR_DISPLAY_BP and make this attribute set available for people and organizations (Figure 2). This allows you to use and add this marketing attribute in different business partner categories without restrictions. To save your entries, click the save icon at the top of the screen.

Figure 2
Create an attribute set
Note
How you name the attribute sets, attributes, and values does not really matter. However, I recommend you use meaningful names because you select the names when assigning these entries to business partners in SAP CRM WebUI. Furthermore, if the names change, you need to adjust the code created in step 2 below.
Assign Marketing Characteristics to a Business Partner
Finally, in the business partner overview screen in SAP CRM WebUI, assign the created marketing characteristics to a business partner using a drop-down list (Figure 3). Select and open an account. Click the assignment block Marketing Attributes in the account overview. Click Insert and then insert an Attribute Set, Attribute, and Value.

Figure 3
Assign marketing characteristics
Step 2. Enhance CRM Components and the Custom Controller
Now that you have created the marketing characteristics and assigned them to business partners, you enhance two components following the menu path or the transaction code below by redefining two methods:
- Component CRMCMP_BPIDENT, which includes the custom controller CuCoBuPa and its class CL_CRMCMP_B_CUCOBUPA_IMPL. The methods within this class are called any time a business partner is identified or confirmed. You redefine method BP_CONFIRM, which allows you to edit the business partner’s phone number before it is sent automatically to the CRM dial pad. The dial pad is an SAP CRM tool that displays a virtual number keypad similar to that of a touch-tone phone. The modification involves a check on marketing attribute values, which then in certain cases implicates a change of the phone number.
- Component CRMCMP_CLM, which includes the custom controller CuCoCLM and its class CL_CRMCMP_C_CUCOCLM_IMPL. The methods within this class are called any time a call list is executed or used. You need to redefine method PUBLISH_PHONE_NUMBER, which allows the system to populate the CRM dial pad with the business partner’s phone number
Note
You can access the same screen in the SAP CRM back end either using transaction code BSP_WD_CMPWB or via transaction SPRO, IMG Menu Customer Relationship Management > UI Framework > UI Framework Definition > Configure User Interface.
Enhance Component CRMCMP_BPIDENT
To enhance an existing standard component, click the Enhance Component button (Figure 4), create your own project-defined enhancement set, and follow the next steps.

Figure 4
Enhance component CRMCMP_BPIDENT
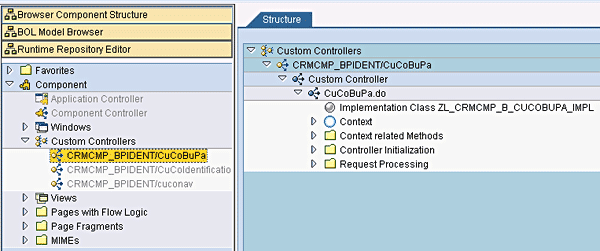
Subsequently, you need to enhance the custom controller CuCoBuPa to be able to redefine specific methods (in my example, BP_CONFIRM). To do so, right-click custom controller CuCoBuPa and select Enhance (Figure 5).

Figure 5
Enhance custom controller CuCoBuPa
This creates the new Z implementation class ZL_CRMCMP_B_CUCOBUPA_IMPL (Figure 6) in which you can enhance or change standard methods.

Figure 6
Z implementation class creation
To redefine the interface, double-click the Z class, click the Methods tab, click the method BP_CONFIRM, and click the redefine icon (Figure 7).

Figure 7
Redefine method BP_CONFIRM
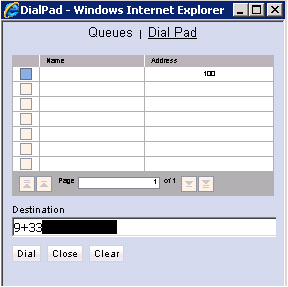
The system then displays the existing code of the method to be modified. This code can now be enhanced with the custom code that is available as a download at the end of this article. Finally, click the activate icon to activate the modified class (Figure 8). The enhanced code retrieves the current BP marketing attribute value and the edited phone number in case the value is NR. DISPLAY. You add a specific character in front of the number, for example, 9. The result in the dial pad then looks like the display in Figure 9 — in this case, a French number (+33 is the country code for France).

Figure 8
Activate class

Figure 9
Dial pad for value NR. DISPLAY
Note
You do not need to add 9 to the number; you can add other characters. However, if you add other characters, you need to adjust the code as well as the routing entries, which are maintained in steps 4 and 5.
Enhance Component CRMCMP_CLM
To enhance component CRMCMP_CLM, follow the same procedure described above. However, in this case redefine method PUBLISH_PHONE_NUMBER. The code for this enhancement is available as a file download at the bottom of this article.
Step 3. Substitute Controllers for Global Custom Controller
Follow IMG menu path Customer Relationship Management > UI Framework > UI Framework Definition > Maintain Runtime Framework Profile to make changes to the profile you are using in the WebUI. Doing so allows you to switch the original controller to your own controller created during the component enhancements of CRMCMP_BPIDENT and CRMCMP_CLM (refer to step 1). In this example, the BSP applications need to be substituted because of the redefined methods, which are using a Global Custom Controller. The two new BSP applications are ZIC_BP_IDENT and ZWEBUI1 and store the enhancement objects created in step 2 (Figure 10).

Figure 10
Substitute controllers for the Global Custom Controller
Step 4. Maintain the Routing Rule
After the dial pad in SAP CRM is filled with the edited phone number, the number goes to SAP Business Communications Management. To process the incoming modified number before sending it across to the gateway, you must create a routing rule. In fact, although the number in SAP CRM looks like 9+33xxxxxxxxx, it displays in SAP Business Communications Management as +9+33xxxxxxxxx (Figure 11).

Figure 11
Number in SAP Business Communications Management
The rule needs to replace +9+ so that the gateway can handle the incoming number and successfully process it further. You can use several methods to do so. One approach is to create a routing rule in the SAP Business Communications Management System Administrator application (providing that a general routing is already set up, which replaces + with 00). In this example, the first + converts to 00 using the general routing rule, which surpasses the normal rules. Therefore, the pattern to be modified looks like 009+. The asterisk in Figure 12 acts as a place holder for many characters. The pattern then changes to 900 when the number reaches the gateway (Figure 12). The new number looks like 90033xxxxxxxxx.

Figure 12
Rule in SAP Business Communications Management
Step 5. Edit Manipulation Tables in the Gateway
In the gateway configuration, two number manipulations need to occur:
- In case the business partner’s phone number has a 9 at the front, this character needs to be stripped out to restore the original business partner phone number before editing to be able to send the number correctly to the operator. For example, if the prefix is 9, then this character (being the first in the phone number starting from the left) needs to be stripped out (line 1 in Figure 13). The final number looks like 0033xxxxxxxxx.

Figure 13
Deletion of 9 from the phone number
- As described earlier in this article, as soon as the business partner’s number arrives into the gateway with a 9 in front, it means that the agent would like to have his or her number displayed on the receiver's phone and not as an unknown call. In this case, you need to add rules into the manipulation table consisting of the prefix, the internal agent’s extension number and the final number, which will be displayed on the receiver’s phone. By use of the agent’s extension number, multiple rules as well as all sorts of outbound number representation for different agents can be determined. For example, if the business partner’s phone number contains 9 as prefix and the agent’s extension is 83812, then the outbound number representation on the receiver’s phone looks like 0399995678 (line 1 in Figure 14). However, if the agent’s extension is 83811, then the outbound number representation on the receiver’s phone looks like 0399991234 (line 2 in Figure 14).

Figure 14
Display caller's phone number
Olivier Lempert
Olivier Lempert is a senior consultant at ecenta AG in Walldorf, Germany, and has three years of experience in SAP CRM, with an emphasis on the financial services and leasing industry. With a background in technical and functional consulting, he has contributed to many successful SAP CRM projects worldwide.
You may contact the author at olivier.lempert@ecenta.com.
If you have comments about this article or publication, or would like to submit an article idea, please contact the editor.


