Discover how to create ActiveX Dynamic Link Library (DLL) in Visual Basic 6 (VB6) and call COM Class of VB.NET from VB6. Then use this VB6 ActiveX DLL from SAP ABAP with Object Linking and Embedding (OLE). Learn how to integrate Microsoft Excel and Outlook with SAP systems to create files and send emails with attachments using OLE. Learn how to send messages to mobile devices from SAP systems and find out the way to register ActiveX DLLs and COM Classes on different presentation servers.
Key Concept
ActiveX Dynamic Link Libraries (DLLs) are the set of instructions that can be written in different languages and can communicate with one another independent of language. They can contain one or more class modules and one class can have multiple methods. You can write an ActiveX DLL in Visual Basic and use it from SAP ABAP.
In many business scenarios you are required to generate a document, send an email attachment, or send a notification to mobile devices. Typically, you have to perform a lot of configuration for sending emails and mobile notifications. The simplest way to do this without any extra configuration is to use Object Linking and Embedding (OLE).
An example scenario is that you need to create payslips for employees in Microsoft Excel. You then want to send the payslips to employees’ email addresses as attachments. A notification then goes to the employee’s mobile device that his or her salary has transferred to the bank account and the payslip has been sent to the provided email ID. To do this, you need to follow this four-step process:
- Create and use the ActiveX DLL
- Integrate Microsoft Excel for generating a payslip
- Integrate Microsoft Outlook for sending an email
- Create and use ActiveX DLL and COM Class for sending mobile notifications
Before getting started, you need to meet a few prerequisites:
- Visual Basic 6 (VB6) and Visual Studio (for developers)
- Microsoft .NET framework 2.0 (for end users)
- SAP GUI for Windows (for both developers and end users)
- Microsoft Excel (for both developers and end users)
- Microsoft Outlook (for both developers and end users)
Create and Use the ActiveX DLL
This step involves four substeps:
- Create the ActiveX DLL project
- Test and debug the ActiveX DLL project from another Visual Basic EXE standard project
- Test and debug the ActiveX DLL project from the SAP ABAP program using OLE
- Create and register the ActiveX DLL
Create the ActiveX DLL Project
Open VB6 and follow menu path File > New Project. Select ActiveX DLL and click the OK button (Figure 1).
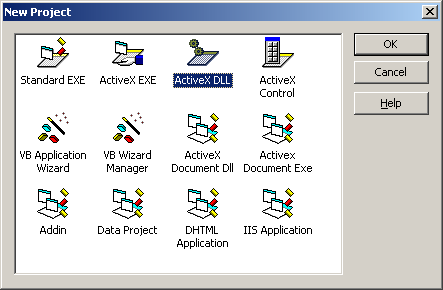
Figure 1
Select the project type as ActiveX DLL
The system produces the screen in Figure 2, which is the main window of the project. On the left side is a General toolbar, in the middle is the section where you write code, and on the right is the Properties window.
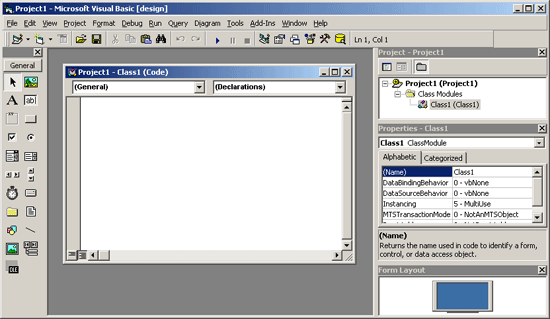
Figure 2
The main window of the project in VB6
There is one blank window in the main project window (Figure 3). Here you can write code for the class. You need to do this before writing the code that sets some properties of the project and the class in the Properties window on the right side.
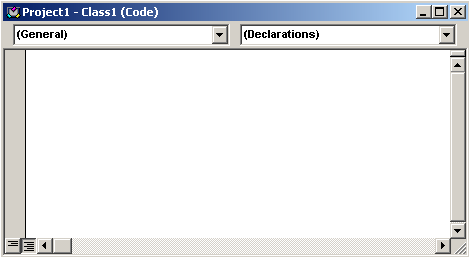
Figure 3
Add code for the class
From the Properties window on the left side of Figure 2, click the project and rename it as ZFSL_PROJ_TEST (Figure 4).
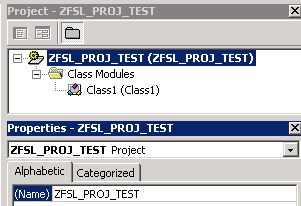
Figure 4
Change the name of the project to ZFSL_PROJ_TEST
Click the class name (Class1 [Class1]) under the Class Modules folder and change its name to ZCL_TEST (ZCL_TEST) (Figure 5).
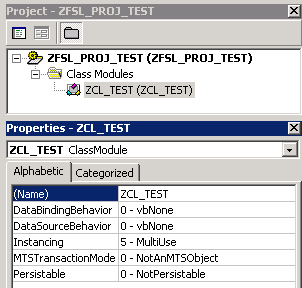
Figure 5
Rename the class as ZCL_TEST
Note
The project and class names together should not be greater than 39 characters. Otherwise, you may get an error message.
Now go to the Code window and add the code shown in Figure 6 (download it here). Then follow menu path File > Save Project to save it.

Figure 6
Code for method ZFSL_TEST_001 of class ZCL_TEST
Go to the path where you want to save the project (e.g., C:SAPProZFSL_PROJ_TEST). The system produces a pop-up window to save the class of the project. Leave the class name as is and click the Save button (Figure 7).
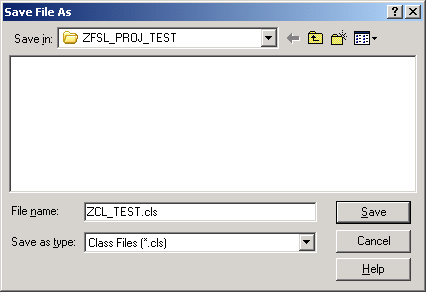
Figure 7
Leave the class name as is and save
Then save the project using the project name you’ve given it and click the Save button (Figure 8).
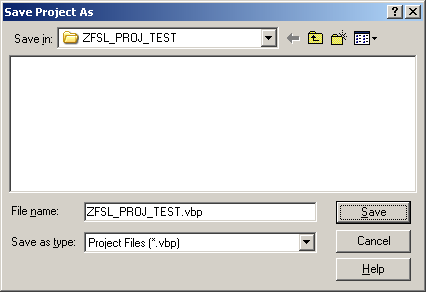
Figure 8
Leave the project name as is and save
From the menu, select Run > Start or press F5. In the next window leave the setting as is and click the OK button (Figure 9).
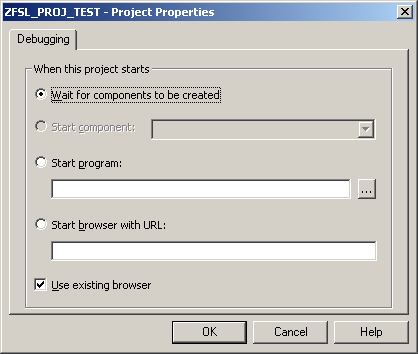
Figure 9
Click OK
You then see the project is in running state (meaning that it is being executed in memory) without any errors (Figure 10). Don’t stop the program; it should be in running state for the next step.
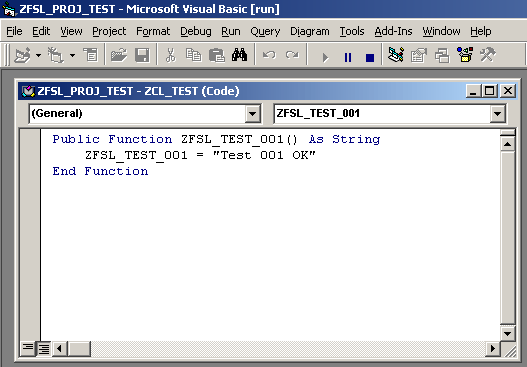
Figure 10
ActiveX DLL project is in running state
Test and Debug the ActiveX DLL Project from Another Visual Basic Standard EXE Project
While creating a new project in Figure 1, you selected ActiveX DLL. This time select the Standard EXE project type and click the Open button (Figure 11).
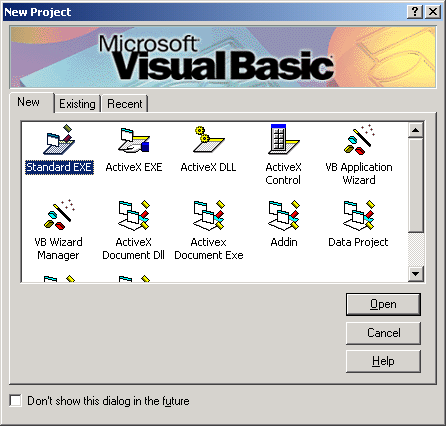
Figure 11
Click the Open button
You see a form (Figure 12). Drag and drop a text box and button from the general toolbar (Figure 2) onto this form. Leave the form open in the background before moving on to the next step.
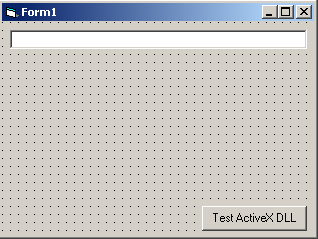
Figure 12
Put a text box and button on the form
Go to the Project menu at the top of the screen and select References. Click the Browse… button to add the reference (Figure 13).
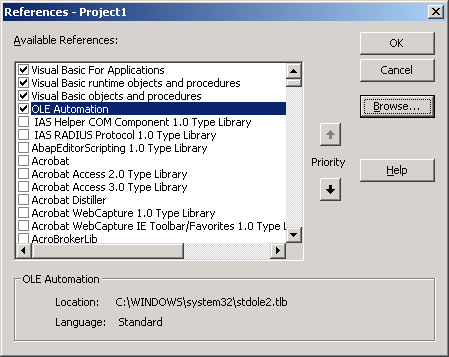
Figure 13
Click the Browse… button
From the Files of type drop-down field, select All Files (*.*) and select the ActiveX DLL project from the path you saved (Figure 14) and click the Open button.
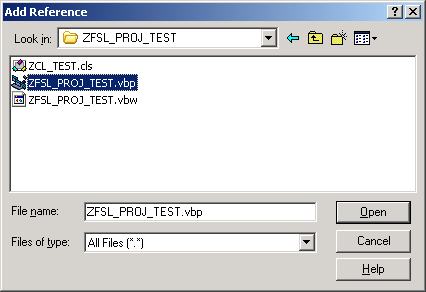
Figure 14
Select the project file ZFSL_PROJ_TEST.vbp and click the Open button
You can see the reference added in Figure 15.
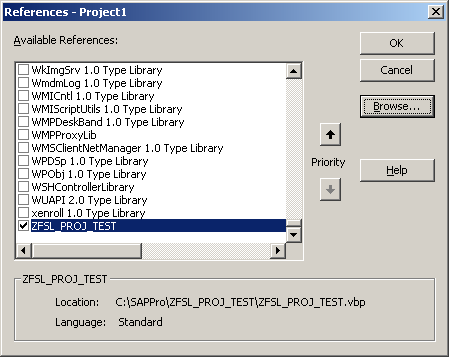
Figure 15
Reference has been added
Double-click the Test ActiveX DLL button on the form (Figure 12) and add the code shown in Figure 16 (download it here). The code communicates with the first project, gets a reply, and displays the reply in the text field.

Figure 16
Code added on the click event of the button
Now run your program by selecting Start from the run menu or pressing F5. The system pops up the form you just designed. Click the Test ActiveX DLL button and you see Test 001 OK in the text box (Figure 17). Up to this point, you have tested the ActiveX DLL project successfully.
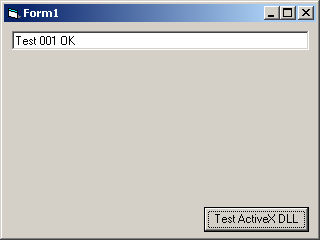
Figure 17
Click the Test ActiveX DLL button
For debugging, go to the ActiveX DLL project (which is in running state) and click the left side of the code. You see a circle and a highlighted line (Figure 18). This means the breakpoint has been set. You can remove the breakpoint by clicking the circle again.

Figure 18
Set up a breakpoint in the ActiveX DLL project for debugging
Now when you go back to your standard EXE project and run it, it goes into debugging mode (Figure 19).
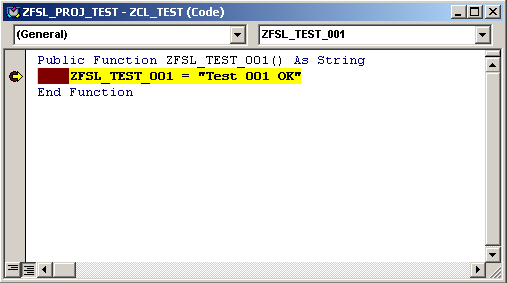
Figure 19
Debugging mode
You have tested the ActiveX DLL project successfully and also have learned how to debug it. Now let’s test the same ActiveX DLL project from SAP ABAP using OLE.
Test and Debug the ActiveX DLL Project from the SAP ABAP Program Using OLE
Your ActiveX DLL project should be in running state before you test it from ABAP. Create an ABAP executable program using transaction code SE38 or SE80 and paste the code shown in Figure 20 (download it here) in it.

Figure 20
Code for test ActiveX DLL from ABAP executable program
When you execute the program and see the following output with the Test 001 OK text (Figure 21), it means you have tested it from ABAP as well.
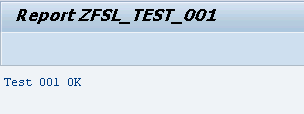
Figure 21
Output of the ABAP program
Note
When you stop the ActiveX DLL project while it is in running mode both the Visual Basic Standard EXE program and the SAP ABAP program give an error.
Create and Register the ActiveX DLL
After final testing of your ActiveX DLL project, make an ActiveX DLL file and register it for use. Go to the ActiveX DLL project and follow menu path File > Make ZFSL_PROJ_TEST.dll. You can save this DLL on any path but I am going to save it in the same folder where I saved the project to make it easy to find (Figure 22).

Figure 22
Click the OK button to create the DLL
Run the command prompt as administrator, execute the following command and make sure you are using the same path where you saved the ActiveX DLL; in your current example the command is
C:WINDOWSsystem32regsvr32 C:SAPProZFSL_PROJ_TESTZFSL_PROJ_TEST.dll (Figure 23).
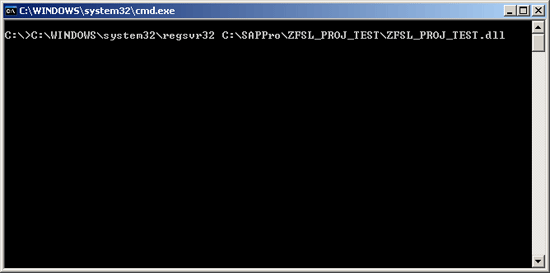
Figure 23
Enter the path where the ActiveX DLL is saved
You see a pop-up message for the successful registration of the DLL (Figure 24).

Figure 24
Pop-up message for successful DLL registration
Now you are ready to test your DLL without running the ActiveX DLL project. You do not need to change the ABAP code, but for testing from a Visual Basic Standard EXE project you need to add the DLL reference the way you added the reference of the project (Figures 13 to 15).
Integrate Microsoft Excel for Generating a Payslip
Create an ABAP program using transaction code SE38 or SE80. Enter the logical database name (here I use PNP) in the attributes window (Figure 25).
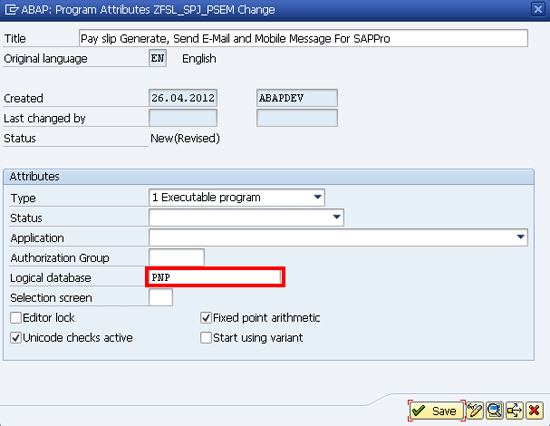
Figure 25
Give the logical database name as PNP
Copy the code in this download and paste it into the newly created program. Save and activate the program.
The selection screen shown in Figure 26 appears when you run this program.
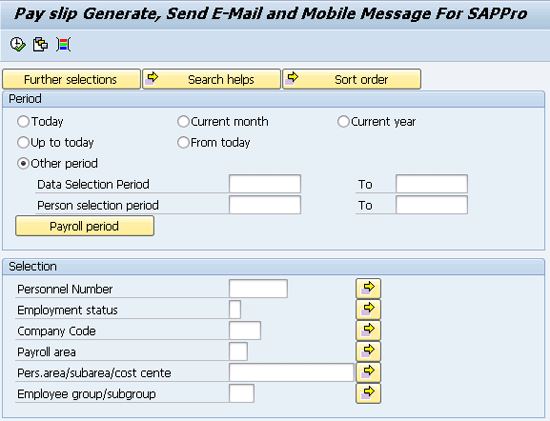
Figure 26
Default selection screen
Click the Payroll period button. Give the period and Personnel Number for your system (Figure 27). Make sure the period and Personnel Number you enter on the screen have the payroll results (you can confirm this using transaction PC_PAYRESULT).
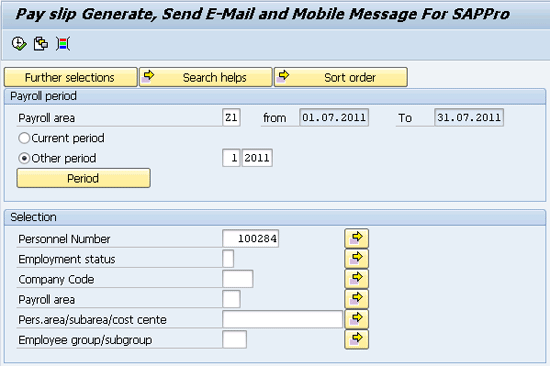
Figure 27
Fill the selection screen with your system’s information
Click the execute icon at the top of the screen to execute the program, and go to the path C:SAP HR Temp(today’s date). You see the Excel file that has the same name as the employee number (Figure 28).
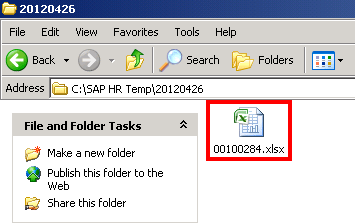
Figure 28
Locate the generated Excel file containing the payslip
Open the file for a preview as shown in Figure 29.
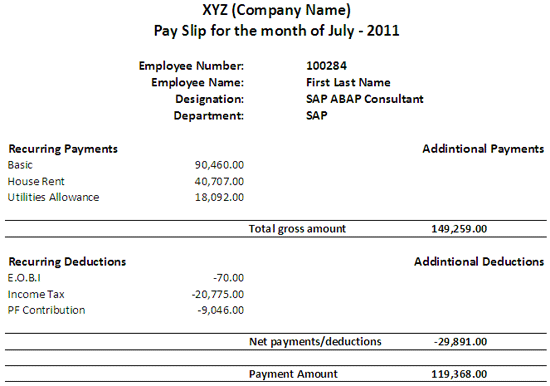
Figure 29
Payslip preview
Integrate Microsoft Outlook for Sending an Email
Copy the code shown in Figure 30 (download it here) and paste it at the end of the code for generating a payslip that you downloaded earlier. This code sends the email to the employee with a payslip in the attachment.
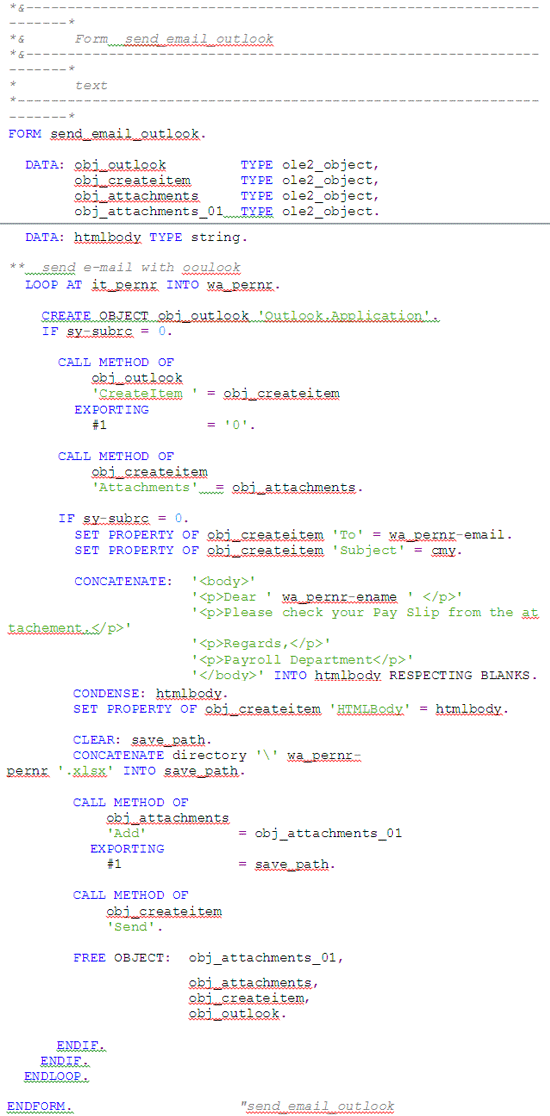
Figure 30
Code for sending email with attachment
Add the following line of code at the end of FORM end_of_selection in the code for generating a payslip that you downloaded earlier, as shown in Figure 31.
PERFORM: send_email_outlook.
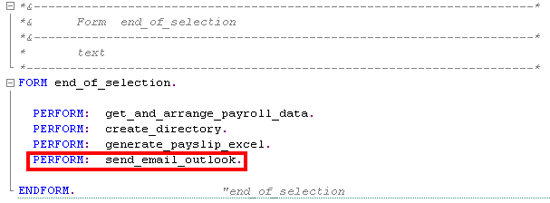
Figure 31
Added line of code at the end of FORM end_of_selection
Now run the program again as shown in Figures 26 and 27. After a few seconds of program execution you get an email at the address you are using to test. I entered my own email address in employee master data, so the email was sent to me as shown in Figures 32 and 33.
Note
Microsoft Outlook should be open and configured with the mail address from where you want to send mail before running the program.

Figure 32
The new email of the payslip
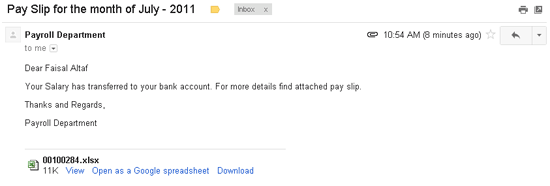
Figure 33
Detailed email with the payslip as an attachment
Create and Use ActiveX DLL and COM Class for Sending Mobile Notifications
Before creating ActiveX DLL you have to create a COM class in VB.net.
Create a COM Class in VB.Net
Open Visual Studio. (In my example, I’m using Visual Studio 2008.) Follow menu path File > New > Project…. Under Visual Basic, click Windows and on the right side of the screen select Class Library (Figure 34). Enter the project name and save it to an appropriate location.
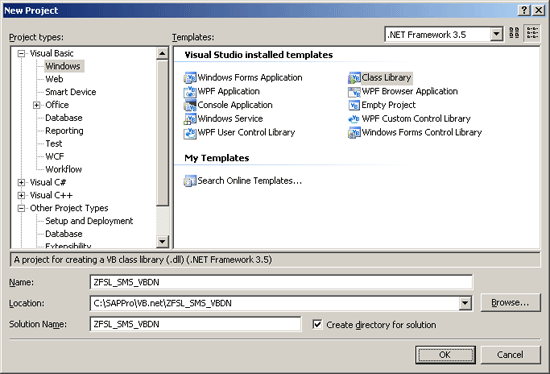
Figure 34
Select Class Library and give the location and name of the project
From the Solution Explorer screen, right-click Class1.vb and select Delete in the context menu (Figure 35). Click the OK button from the confirmation pop-up box. You delete this step because you do not use it, and instead use the COM Class that you add in the next step.
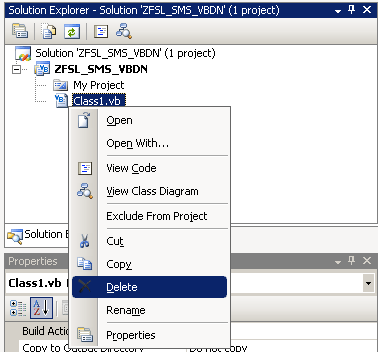
Figure 35
Right-click Class1.vb and select Delete
Follow menu path Project > Add New Item…. Select COM Class from the next window and click the Add button as shown in Figure 36.
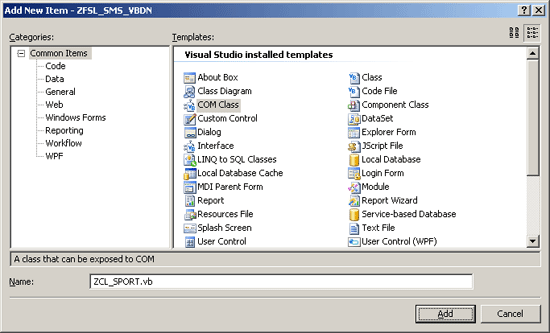
Figure 36
Select class COM Class and click Add
In the Solution Explorer screen, you see a new class has been added and some code is generated for this class as shown in Figure 37.
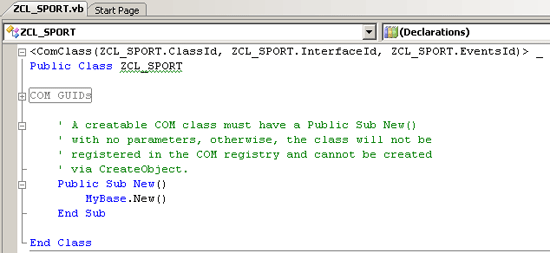
Figure 37
COM Class code view
Add the imports shown in Figure 38 (download it here) at the top of the code shown in Figure 37.

Figure 38
Add Imports at the top of class code
Add the code shown in Figure 39 (download it here) after end sub and before end class in the screen in Figure 37.
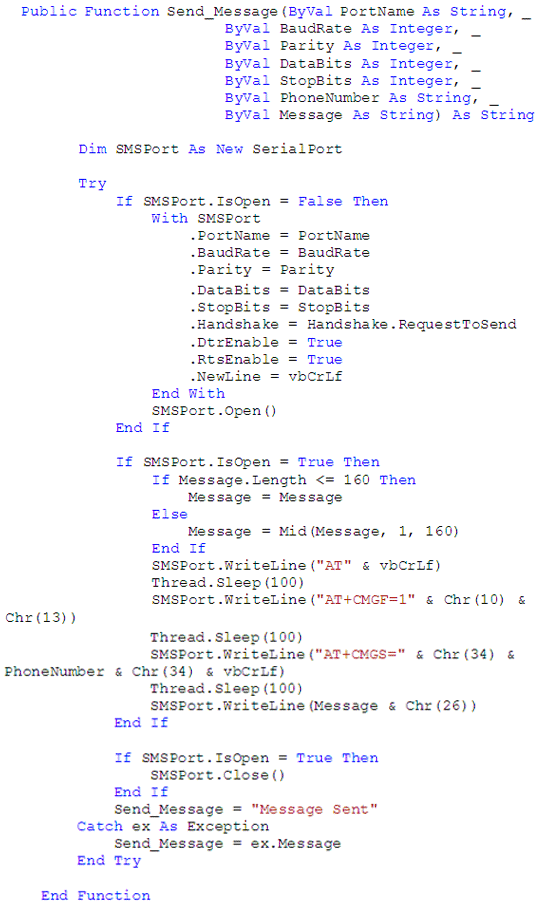
Figure 39
Code for sending SMS
Then follow menu path Build > Build Solution. All elements of the build process should be successful and you should not get any error messages.
Create ActiveX DLL in VB6
Follow the same steps in Figures 1 through 5 to create a new ActiveX DLL project in VB6. This time, give the project name (e.g., ZFSL_SMS_VB6) and rename the class as ZCL_SPORT. Go to the Add Reference window as shown in Figure 13 and click the Browse… button. Go to the path where you save the visual studio project, for example:
C:SAPProVB.netZFSL_SMS_VBDNZFSL_SMS_VBDNZFSL_SMS_VBDNbinDebug
Select file ZFSL_SMS_VBDN.tlb as shown in Figure 40 and click the Open button.
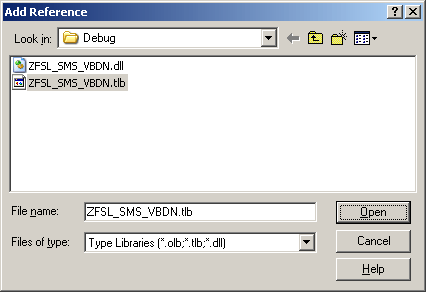
Figure 40
Select file ZFSL_SMS_VBDN.tlb
Copy the code shown in Figure 41 (download it here) and paste it in class ZCL_SPORT.
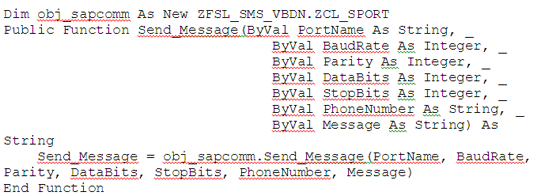
Figure 41
Code to send a mobile message
Save the project on any path (e.g., C:SAPProVB6ZFSL_SMS_VB6). Create the ActiveX DLL as you did before (Figure 22). Now that you are done with all programming of DLLs, you have to register the DLL on the system from which you want to send email and mobile messages. Otherwise, the system is not able to use the DLL, and therefore unable to send messages.
Register DLLs on Your System
Before testing from ABAP to any presentation server, you need to register three files on that machine. Copy these three files from the development system and paste them on the machine where you are going to test them and do the following to complete the registration process.
Find the ActiveX DLL from the project path. In my example, it is in the path C:SAPProVB6ZFSL_SMS_VB6. Copy this ZFSL_SMS_VB6.dll file to any path on your system where you want to test it and register as you did before (in Figures 23 and 24), but change the path. I am going to save this DLL on path C:SAPProZFSL_SMS_DLLs so my command for registration is shown in Figure 42.
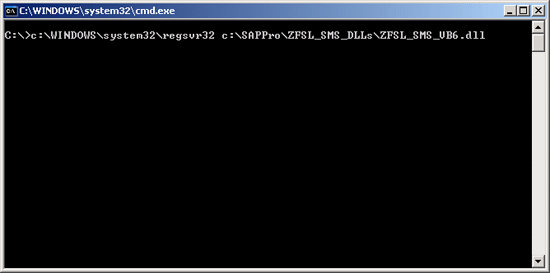
Figure 42
Registration of VB6 ActiveX DLL
Find both the .dll and .tlb files from the project path of Visual Studio. In my example, I can find these from the path C:SAPProVB.netZFSL_SMS_VBDNZFSL_SMS_VBDNZFSL_SMS_VBDNbinDebug. Copy ZFSL_SMS_VBDN.dll and ZFSL_SMS_VBDN.tlb to any path on your system where you want to test it. I am going to copy these files to the path C:SAPProZFSL_SMS_DLLs. Therefore my command for registration is (Figure 43): C:WINDOWSMicrosoft.NETFrameworkv2.0.50727regasm.exe c:SAPProZFSL_SMS_DLLsZFSL_SMS_VBDN.dll /tlb:ZFSL_SMS_VBDN.tlb /codebase
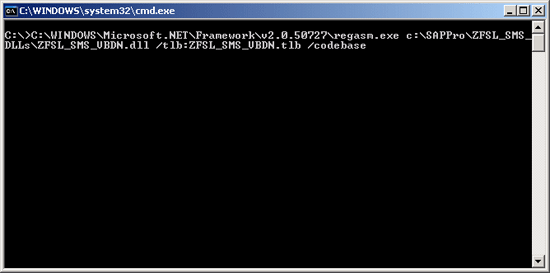
Figure 43
Registration of VB.Net DLL
Note
Run the command prompt as Administrator.
ABAP Code for Sending Messages
Copy the code shown in Figure 44 (download it here) and paste it at the end of the generate payslip code that you downloaded earlier. This code uses the ActiveX DLL you just created and sends the notification message to the employee.
Note
In this code change the COM Port number depending on the mobile phone or modem that you are using for sending message. In this example my device is connected on COM Port 27 so I am using #1 = ‘COM27’ in the code.
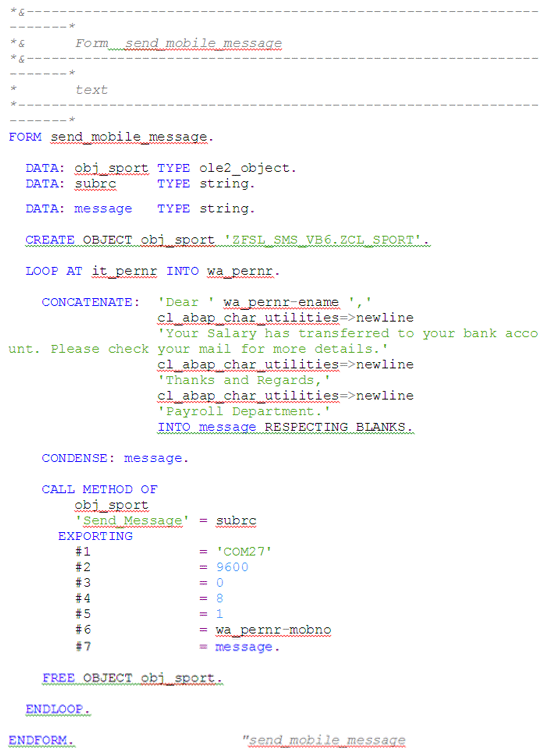
Figure 44
Code for sending a mobile message using ActiveX DLL
Add a line at the end of FORM end_of_selection in the generate payslip code you downloaded earlier, as highlighted in Figure 45.
PERFORM: send_mobile_message.
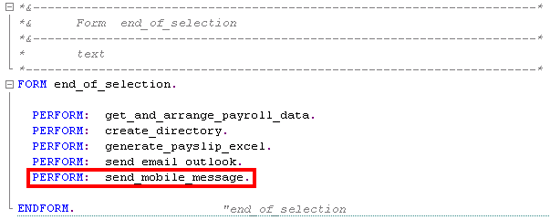
Figure 45
New code line added at the end of end_of_selection form
Now run the program again as shown in Figures 26 and 27. This time after running the ABAP program you also get the message on the mobile number you entered in the employee master as shown in Figure 46.
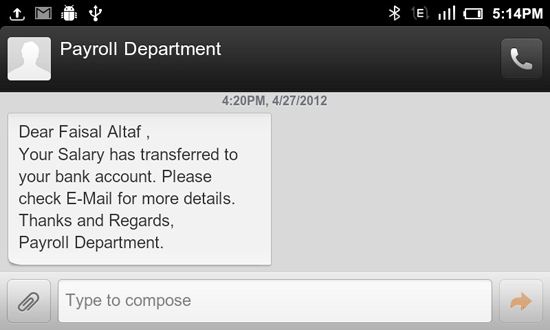
Figure 46
Preview of message on the mobile device
Faisal Altaf
Faisal Altaf is a certified development consultant. He has more than seven years of experience and currently is working with Al Yamamah Steel Industries Co., Saudi Arabia, as the SAP technical division head. He completed his MS in software engineering and intends to complete his Ph.D. in the field of SAP.
You may contact the author at faisalatsap@gmail.com.
If you have comments about this article or publication, or would like to submit an article idea, please contact the editor.


