Become familiar with the new component SAP Bank Communication Management, which allows you to better track the approval process of outgoing payments in your SAP ERP system. Understand the integration of this component into SAP ERP Financials and learn some key concepts to set up the batching and status tracking of payment flows as well as the configuration of release procedures.
Key Concept
SAP Bank Communication Management is a new component that became available with Enhancement Package 2 of SAP ERP 6.0 (formerly known as SAP ERP 2005). The application, which was until just recently called SAP Bank Relationship Management (the configuration entries still bear that name), allows cash and treasury managers to set up sophisticated release procedures, enabling rigorous controls of outgoing payments and avoiding any type of fraud. In addition, employees can track the entire life cycle of these payment flows in a status monitor.
Many enterprises today face growing pains in corporate-to-bank communication. They often have to maintain dozens of bank communication interfaces, each based on different protocols and technologies. This results in high total cost of ownership, a lack of payment-flow transparency, and significant working-capital inefficiencies. One goal of cash and treasury management departments is to reduce these complexities and inefficiencies, significantly improving straight- through processing rates and internal compliance.
Bank Communication Management enables companies to logically structure their individual payments into batches and to establish a comprehensive audit trail for payment approval decisions. Employees can implement digital signatures for internal audit purposes and set up multiple approval levels for outgoing payments. Full payment-flow transparency and automatic escalations of processing exceptions are additional features of this new application, which is tightly integrated with SAP ERP Financials.
I’ll describe some of the basic configuration of Bank Communication Management, starting with the general concept of payment batches by generating cross-payment run mediums. The idea of batching rules is key during the setup of the system and a core part in every implementation. In addition, I’ll demonstrate how you can define approval hierarchies that can vary in complexity. You’ll see the results of these settings in the approval and payment status monitors of Bank Communication Management.
Activate Bank Communication Management
Before you can use Bank Communication Management, you must activate the respective business function FIN_FSCM_ INTEGRATION within Enhancement Package 2. Business functions logically group the new features that are delivered with an Enhancement Package. You can activate business functions in the IMG under Activate Business Functions (transaction SFW5). You find two nodes: one for the former R/3 Enterprise extensions (ENTERPRISE_EXTENSIONS) and one for the new enterprise business functions (ENTERPRISE_BUSINESS_FUNCTIONS) in the Enhancement Packages of SAP ERP 6.0 (Figure 1).
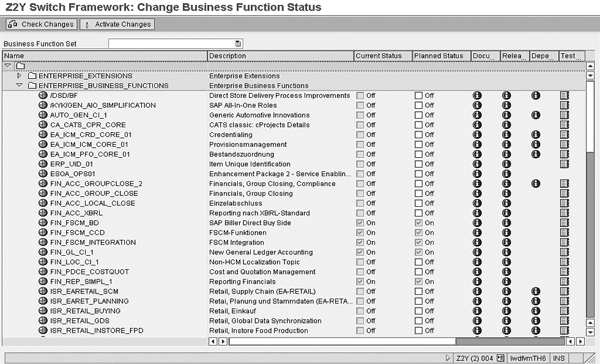
Figure 1
Activate enterprise business functions in SAP ERP 6.0
When you enter this transaction for the first time, the current status of the business function FIN_FSCM_INTEGRATION is Off. You can simply select this entry and click on the Activate Changes button to activate Bank Communication Management. The status switches to On and you now can view the configuration of Bank Communication Management in the IMG under Financial Accounting > Financial Supply Chain Management > Bank Relationship Management.
Collectors and Batches
Before I describe some key settings of Bank Communication Management, you need to understand the notion of batching. Batches are logically grouped payment instructions that could belong to multiple payment runs. This type of grouping can be useful if you want to instruct your bank to process payments in a similar way. For example, you might want to treat HR payments differently from treasury payments. The application allows you to select from various attributes to merge your payment instructions (e.g., payment method or payment amount).
You can use Bank Communication Management program SAPFPAYM_MERGE to group similar payments. These grouped payments are called collectors. To use this functionality, you have to reserve payment run IDs by entering transaction F110 in the user menu path Accounting > Financial Accounting > Accounts Payable > Periodic Processing > Payments. From there, follow menu path Environment > Payment Medium > Cross-Payment Run Payment Medium > Reserve Identification. Then click on the FI AP/AR payment program for customers and vendors button. You can also reach this transaction with transaction code OBPM5.
On the next screen, you can maintain your identifier (Figure 2). Check the boxes in column BRM to make sure that the system uses the batching functionality of Bank Communication Management. In my example, every payment run starting with the prefix JW is submitted to this process. Vendor or customer accounts are still cleared immediately but the system prevents the generation of payment files until the approval process in the application is successful.
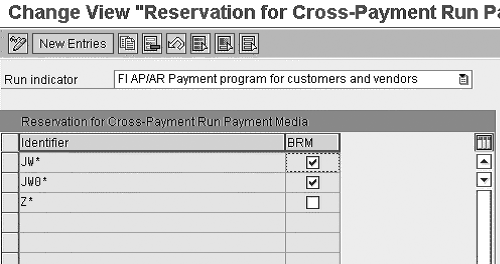
Figure 2
Reservation of payment run identifiers
You need to be aware of a couple of limitations for the functionality of the SAPFPAYM_MERGE program. First, you have to use the Payment Medium Workbench for all relevant payment runs. You can’t use Bank Communication Management with the classic RFFO* payment programs. You also need to reserve payment run identifiers before you start your payment run; it is not possible to apply the grouping process afterwards. Finally, there are two restrictions regarding the payment types that are assigned to a collector. You can only group HR payments with other HR payments; you can’t mix them with FI payments. You also can’t group payment instructions from company codes with different currencies in the same collector.
While collectors are more or less hidden from users, batches are not. They represent one of the most important objects in Bank Communication Management. A batch contains the individual payment instructions. The system automatically creates the batch and the collector. One collector might be split up into various batches. The split looks like a 1: fractional relationship. The number of batches depends on three factors:
- Settings of the different payment methods
- Target format associated with these payment methods
- Batching rules that are set up in the configuration
Priority is given to the payment methods and their assigned formats, which is logical because they ultimately influence the composition of the generated payment file.
You can define your batching rules by following IMG menu path Financial Supply Chain Management > Bank Relationship Management > Payment Grouping > Rule Maintenance. I’ll use a simple example to explain this feature. Let’s assume that you want to define three different batching rules: one for high- value, one for medium-value, and one for small-value payments. High-value payments should gather all payment instructions between $5,000,000 USD and $10,000,000 USD, while payments within a range of $500,000 USD and $4,999,999.99 USD should be assigned to the medium amounts bucket. All payments equal to or below $499,999.99 USD fall under the third grouping rule. Therefore, the first step is to define these three grouping rules (Figure 3).

Figure 3
Definition of batching rules
Because you might define multiple, potentially competing, rules, you can also assign a priority to each rule: The lower the value is, the higher the priority of a batching rule. In the next step, you can define for each of the grouping rules the respective values. You have to select your grouping rules one after another and click on the Rl.maint button in the fourth column for each respective rule. In the following pop-up window, you can select from a wide range of attributes (basically all fields that are available in the payment format). By double-clicking on one of the attributes on the left screen control, the attribute becomes visible for entering values on the right side of the pop-up screen. You want to ensure that the system selects batching rules with their amounts only if they correspond to certain payment IDs. Therefore click on the attribute Merge Id from the list on the left, in addition to the Amount paid in local currency attribute. In my example, I applied the batching rules to all collectors with the prefix JW (Figure 4), which means that you would enter JW000A to JW000Z as attribute values for Merge Id. The application allows you to combine various attributes with AND/OR relationships, enabling you to construct sophisticated rules.
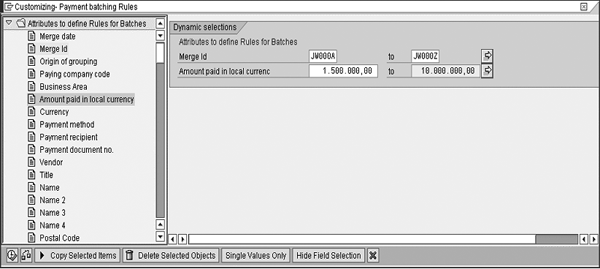
Figure 4
Configuration of batching rules
Definition of Release Procedures
Next you set up an approval workflow within the application. Bank Communication Management comes with four standard workflow templates:
- 50100021 (workflow for a one-step release procedure)
- 50100022 (workflow for a two-step release procedure)
- 50100023 (workflow for a three-step release procedure)
- 50100024 (workflow for a dynamic release process)
You can have a closer look at the existing templates by selecting Tools > ABAP Workbench > Overview > Object Navigator. Double-click on the package BCA_RELEASE_WORKFLOW in the Repository Browser and look under the Business Engineering > Workflow Templates node.
It is beyond the scope of the article to explain all the details of the workflow configuration, but I would like to point out the two release objects that Bank Communication Management uses: BNK_INI and BNK_COM. You use BNK_INI in the first approval step when users approve, resubmit, or reject batches and individual payments. You use BNK_COM for the follow-up approval steps when users can either approve batches or send them back to the first approver. They can’t remove payments from batches that a previous user has already approved.
You can assign three different release procedures to each of the release objects:
- Dual control with two processing steps (one creation of a batch or payment by the system and one release step by a user in the approval workflow)
- Triple control with three processing steps (one creation by the system and two release steps by two users)
- Quadruple control with four processing steps (one creation by the system and three release steps by three users)
You always assign BNK_INI as the first step to each of these release procedures. To do this, follow IMG menu path Financial Supply Chain Management > Bank Relationship Management > Release Strategy > Change and Release > Assign Role to Release Steps. In my example, I am setting up a simple approval process with two users. Therefore I enter the value 01 in the Rel column because 01 stands for dual control (Figure 5). SAP pre-delivers this logic and value and you can’t change them.
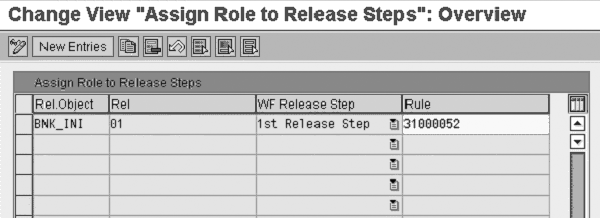
Figure 4
Release object BNK_INI with a dual control release strategy
You assign the release object BNK_COM to the release procedure by following menu path Financial Supply Chain Management > Bank Relationship Management > Release Strategy > Additional Release Steps > Define Procedure. Because you want to set up a dual approval process, select 01 from the drop-down box as the release procedure. This is just an example and you can of course maintain different release procedures to suit your business needs. You have four options for determining how the application should deal with the approval workflows (Figure 6):
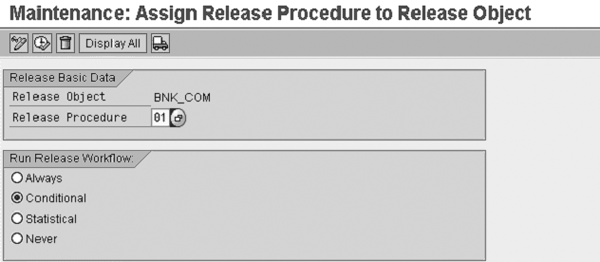
Figure 6
Options for the release object BNK_COM
- Always: The system forwards the release object every time to the dual approval procedure
- Conditional: The system only triggers the approval workflow to the second user under certain circumstances
- Statistical: The system sends only a certain fraction of release objects into the approval process
- Never: The system never forwards the release object to the second user
I recommend that you select the Conditional option because this gives you flexibility if you later want to maintain multiple batching rules. You can choose from eight attributes to determine the conditions, which you can see displayed under the Payment approval Release str. folder in Figure 7. You want to make sure that the system triggers the dual approval process only if the batch was created using one of your batching rules. Double-click on the Rule ID attribute and enter the range SMALL to HIGH (Figure 7).

Figure 7
Configuration of release object BNK_COM
Assignment of Users
Now that you have configured the dual approval process you can assign users (or even departments) to the two release objects. I’ll start with BNK_INI and go back to the IMG transaction Financial Supply Chain Management > Bank Relationship Management > Release Strategy > Change and Release > Assign Role to Release Steps. Mark the entry BNK_INI and click on the Display Rule button. On the next screen, click on the create responsibility icon circled in the top left corner of Figure 8. I advise you not to accept the default name that the system suggests. Enter a descriptive phrase instead. This makes it easier for you to supervise all the possible entries later. In my case, I am calling this responsibility DEFAULT because I don’t want to split responsibilities for this initial release step among different users.
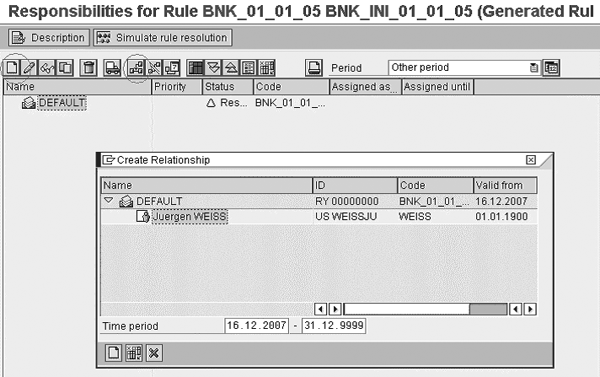
Figure 8
Assignment of users
In the second step, you can assign users or departments by clicking on the relationship icon next to the truck icon. In the pop-up screen that appears, you can select the type of relationship (e.g., the user) and determine what you want to enter (Figure 8). In my case, I assign my user as the responsible person. You can assign as many users as you want. I recommend you assign at least one because you don’t want to create unidentified workflows that are in limbo afterwards.
Now I will show you how to create relationships and assign users for BNK_COM. You can do this via menu path Financial Supply Chain Management > Bank Relationship Management > Release Strategy > Additional Release Steps > Assign Role to Release Steps. This time I am going to create two different responsibilities: one for large amounts between $5,000,000 USD and $10,000,000 USD and the other for amounts below that threshold. Therefore I can force the system to send workflows to two different approvers based on the value of the payments. By double-clicking on an entry, you can limit the trigger of that responsibility (Figure 9). You can choose from six attributes that are listed in the Name column of the Responsibility Specs area.
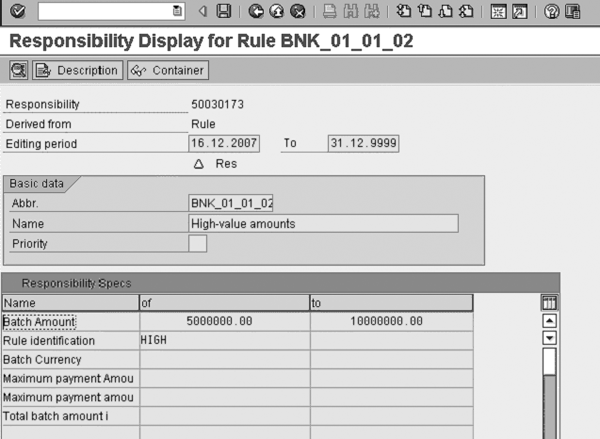
Figure 9
Limiting a responsibility
You can also assign priorities to each of your responsibilities. In case of a conflict, the system selects the one with the highest value. The application also provides you with a test transaction to check whether your settings deliver the expected outcome. If you click on the Simulate rule resolution button, a small pop-up screen appears and you can enter values for the attributes that I described before (Figure 10). Execute the test and the system displays the applicable users on the bottom of the screen.
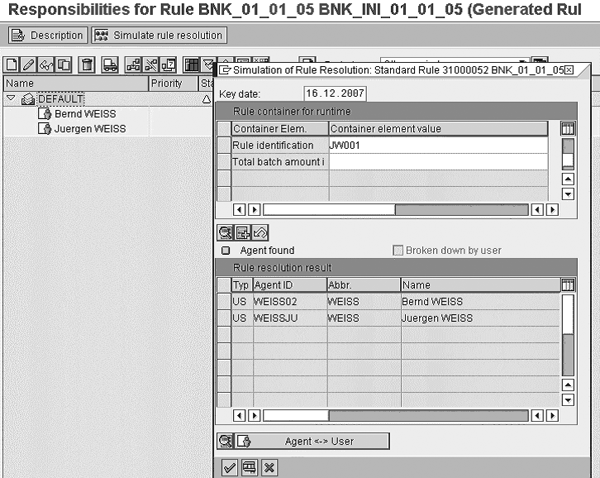
Figure 10
Testing correctly determined responsibilities
If you want your employees to digitally sign released payments or batches during the approval workflow, you have three options:
- A system signature with which employees can authorize themselves with their SAP user ID and password
- A signature with an external security product for immediate verification using the Secure-Store-and- Forward (SSF) interface
- A signature with an external security product without verification, which only makes sense for testing purposes
The method that you select depends mainly on your own preferences. System signatures are the most cost- effective way to establish the digital signature policy. On the other hand, the security level would be considerably higher with an external security product. You make these settings by following menu path Financial Supply Chain Management > Bank Relationship Management > Release Strategy > Digital Signatures > Specify Signature Method for Approval Using Simple Signature (Figure 11). The signature object is called BC_LOG (bank communication log) belonging in customizing to the application BANCO. For example, you can specify whether the users should be allowed to enter comments during the signature process. I won’t go deeper here because digital signatures are a special topic that would require much more explanation.
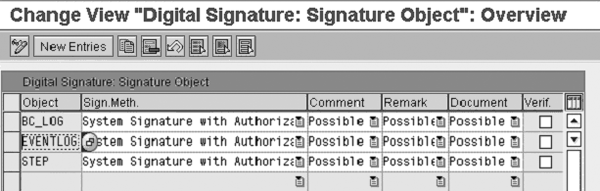
Figure 11
Create cross-payment run payment media
Checking the Configuration
Now it’s time to check whether the settings are correct. I create three payment runs: JW12 with $500,000 USD, JW13 with $6,000,000 USD, and JW14 with $2,500,000 USD. Then I execute the SAPFPAYM_MERGE program with the transaction Accounting > Financial Supply Chain Management > Bank Relationship Management > Processing > Merge Payments in the user menu (Figure 12). As you can see, several attributes limit the creation of collectors and batches. In this case, the execution date and the payment run identifications are sufficient. It is important that you enter the correct prefix (in my case, JW) to allow the application to pick up the correct batching rule.

Figure 12
Create cross-payment run payment media
The result of the batching is two batches grouped by applying the rules MEDIUM (because the payment in the payment run is $500,000 USD) and HIGH (because the payment in the payment run is $8,500,000 USD, which falls in the range of $5,000,000 USD and $10,000,000 USD). The first batch (with the number 10, which the system automatically assigns) contains only one payment, while the second payment includes two payments with an overall amount of $8,500,000 USD (Figure 13). The system assigns different approvers for the second approval step in the release procedure because of the different batch amounts.
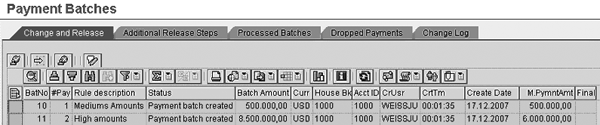
Figure 13
Approval of payment batches in the approval monitor
Juergen Weiss
Juergen Weiss works in the functional area of SAP Financial Supply Chain Management. As part of SAP’s product management team, he was globally responsible for the Financial Supply Chain Management applications, including Electronic Bill Presentment and Payment, Dispute Management, Collections Management, Credit Management, Treasury and Risk Management, Bank Relationship Management, and In-House Cash as well as Accounts Payable and Receivable.
You may contact the author at juergen.weiss@sepa-now.de.
If you have comments about this article or publication, or would like to submit an article idea, please contact the editor.