Learn how to add custom functionality to the Batch and Payment Monitor (transaction code BNK_MONI) report by using the Enhancement Framework, also known as enhancement points.
Key Concept
The Enhancement Framework, introduced in SAP NetWeaver 2004, greatly increased the flexibility of making enhancements to SAP-delivered programs by allowing custom functionality to be added to standard programs while the original objects remain unchanged (e.g., without making a modification). The Batch and Payment Monitor is the centralized report where users go to check the status of payments made from the SAP system when using the SAP Bank Communication Management module.
Continuing with the theme of payment processing in an SAP system that we started in our first article, “Using SAP Bank Communication Management: Enhancing SAP Functionality with Custom Developments,” we focus on using the Enhancement Framework to make changes to the SAP-delivered Batch and Payment Monitor (transaction code BNK_MONI) report. Because this is a key report, we add functionality to this report as a way to show users both aspects of the report and also provide information about using the Enhancement Framework. This article is the second of three that detail enhancing the SAP standard payment processing functionality with custom development.
Note
To add the enhancements mentioned in this article, an ABAP developer is needed. As ABAP code changes are being made, a developer’s key is needed. The ABAP team would normally have a developer’s key.
The Enhancement Framework has been available in SAP systems since the kernel release of SAP NetWeaver 2004. The Enhancement Framework allows additional functionality to be added to standard ABAP code while the original objects remain unchanged. The introduction of the Enhancement Framework was a huge breakthrough in allowing developers flexibility to make changes to SAP code. The Enhancement Framework allows much more flexibility about where custom code can be inserted.
It is important to note that enhancement points are not modifications, which are definitely discouraged. These enhancements remain unaffected during the application of SAP Notes, hot package implementations, and module upgrades, so there is no possibility of overwriting these custom defined objects (e.g., with SAP Notes, hot package implementations, and module upgrades). Within the Enhancement Framework, there are implicit and explicit enhancement points.
Our example focuses on implicit enhancement points. Implicit enhancement points can be entered at the following locations in SAP standard code or objects:
- Begin/End of form routine, a function module, or a method
- End of executable program, include module, function, dialog module
- End of a structure (similar to APPEND) or end of a class object
Note
SAP also has explicit enhancements, which do not have the restrictions listed above for implicit enhancements. We are not using explicit enhancements here and therefore these are beyond the scope of this article.
Within SAP Bank Communication Management, most of the interaction between the end user and the relevant payment information occurs within the Batch and Payment Monitor. As we mentioned earlier, to access this report, use transaction code BNK_MONI. This report provides several useful buttons on the toolbar that show information such as the payments included in the selected batch, the processing status history, the release (approval) history, and list of approvers, available by using the icons in Figure 1. Our custom enhancement, using implicit enhancement points, will add an icon to the toolbar that will show the detailed information on the payments in the selected batch. When you click the new icon, the system displays detailed information on each payment included in the batch selected.

Figure 1
SAP standard icons on the Batch and Payment Monitor
To provide additional functionality, you can add an icon to the toolbar that enables you to reference the given payment requests directly through the Display Payment Requests report (transaction code F8BT). The reason for this enhancement is the Display Payment Requests report displays all available information on the payment, many fields of which are not available through the Batch and Payment Monitor. In our enhancement we provide hover help when the cursor pauses over the icon, as shown in Figure 2.

Figure 2
Hover over the new icon
In our example, we add three enhancement points. All three enhancement points go into the same enhancement implementation. This enhancement is accomplished in a series of custom implementations (adding custom code) in three different includes as shown in Table 1. (For our example, we add one custom implementation that includes three object changes, as shown in Table 1.)
Table 1 outlines where the three enhancement points are added.
Enhancement point
|
Location of enhancement
|
| 1 – Catch when new icon is clicked |
In RBNK_PAYM_BATCH_UI_C01 at the end of method HANDLE_USER_COMMAND |
| 2 – Add icon to toolbar |
In include RBNK_PAYM_BATCH_UI_C01 at the end of the HANDLE_TOOLBAR function module |
| 3 – Determine payment request numbers in batch and call RFPRQSHW to display the payment details |
In include RBNK_PAYM_BATCH_UI_F01 file at the end of form pay_req_mgr_integ_hdr |
Table 1
Detailed information on the three enhancement points
Determining where enhancement points should be created can present a challenge to the development team. The easiest way to attempt to determine where enhancement points should be created is to become familiar with the objects and code executed when running through SAP standard functionality. There is not one go-to spot to determine all enhancement points. Determining where to put the enhancement points is beyond the scope of this article, as it is more technically oriented than can be covered here.
The First Enhancement Point
The first enhancement is part of SAP standard method HANDLE_USER_COMMAND. This method is called when the user clicks any button or icon on the screen. The logic of the enhancement point is to read the list of all batches on the output screen of the Batch and Payment Monitor and determine the one that was selected by the user. This enhancement is required in this location as this is where the logic determines what the user has selected and what will be done as a result.
To insert the first enhancement point, start at transaction code SE20 or follow menu path Tools > ABAP Workbench > Development > Enhancement Framework > Enhancement Builder, as shown in Figure 3. Select the Enhancement Implementation button and enter the name of the enhancement implementation to be created (for our example, the name is Z_BCM_APP_PAYREQ_MGR). Click the display icon  . (Note: It is not possible to create an enhancement implementation directly from transaction code SE20).
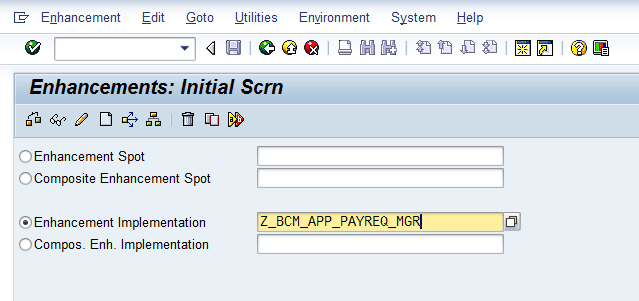
Figure 3
Display an enhancement implementation
The screen in Figure 4 is displayed. Click the enhance icon  to have the system show where in the code an implicit enhancement point can be added.
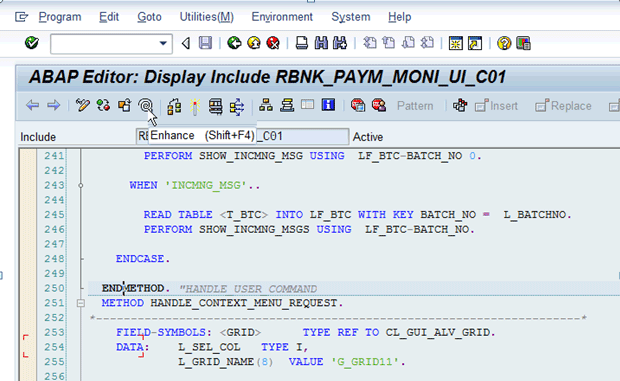
Figure 4
A possible enhancement spot in our enhancement implementation
From the top menu, select Edit > Enhancement Operations > Show Implicit Enhancement Options.
The SAP system then displays the screen shown in Figure 5 indicating that at lines 260 and 263 of the include file enhancement point code can be added.
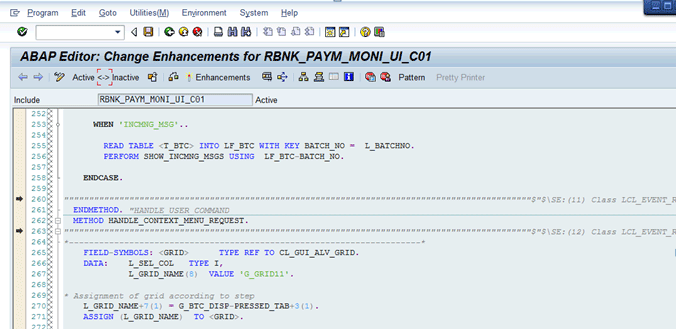
Figure 5
Possible locations for implicit enhancements
We want to add the Implicit Enhancement at line 260 of the code, which is at the end of the HANDLE_USER_COMMAND method. Place the cursor on line 260 in the screen shown in Figure 5 and select Edit > Enhancement Operations > Create Implementation from the top menu.
The system displays the pop-up screen shown in Figure 6 asking which type of Enhancement Mode should be created. Select the Code button, as we are adding ABAP code.

Figure 6
Select the type of Enhancement Mode
Next, the SAP system displays the pop-up screen shown in Figure 7. The Enhancement Implementation field defaults to the enhancement implementation entered in Figure 3. In the Short Text field, enter a short text description. The Composite Enhancement Implementation field should be left blank. Click the enter icon to continue.

Figure 7
Add the implicit enhancement to the enhancement implementation
You are then prompted to enter the object in a package, similar to the one in Figure 8. In the Package field, enter the appropriate package for Treasury custom code (the developer should know which package to use). No other changes are necessary. Click the save icon.
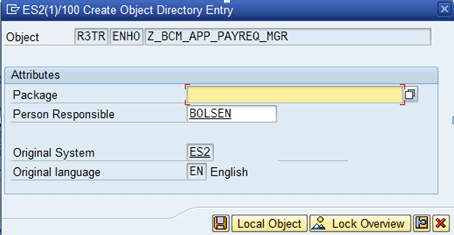
Figure 8
Add an implementation enhancement to the package
Next, the system displays a pop-up screen for a workbench transport in which you include the changes (Figure 9). In the Request field, enter or select the appropriate workbench transport. After you make a selection in the Request field, the Short Description field autopopulates. (If you do not have a workbench transport already defined, or want to use a new transport for these changes, you need to click the create icon to create a new transport.) Click the enter icon (the green check mark) on the bottom of the pop-up window to save your entries.

Figure 9
Add an implicit enhancement to a workbench transport
Now you can enter logic as the enhancement point is open for changes, as shown in Figure 10.

Figure 10
Add code for the first enhancement point
Insert the code displayed in Figure 11 between the ENHANCEMENT and ENDENHANCEMENT statements displayed in Figure 10.
ENHANCEMENT 1 Z_BCM_PAYREQ_MGR.    "active version
 *  Payment Request Manager integration to BCM
     CASE e_ucomm.
       WHEN 'PAYREQMGR'.   *  Determine the batch selected by the user.
         READ TABLE <T_BTC> INTO LF_BTC
                WITH KEY BATCH_NO =  L_BATCHNO.  *  Call the form pay_req_mgr_integ_hdr passing the batch number  *  selected by the user.
         PERFORM pay_req_mgr_integ_hdr USING lf_btc.
     ENDCASE.
 ENDENHANCEMENT.
Figure 11
Code for the first enhancement point
When done adding the code, click the activate Enhancements button shown in Figure 10.
The first enhancement point is now active. When the SAP functionality is run, and the HANDLE_USER_COMMAND method is executed, the custom code that was added is executed after the SAP standard functionality (because we put the enhancement point at the end of the method).
The steps above outlined how to add the first enhancement point. In the next section, we give specific information on the second and third enhancements. As the steps to insert the second and third enhancement points are the same as adding the first enhancement point displayed above, the screenprints to add the code to the second and third enhancement points are not displayed.
The Second Enhancement Point
The second enhancement is the logic that adds the overview icon  to the toolbar.
Note
The name overview icon refers to the icon, referenced in the fourth to the last line of code in Figure 12. In this enhancement, you specify the icon to be used (icon_overview), define the command for processing that occurs when the icon is clicked, and define the pop-up text that displays when the cursor hovers above the icon. The code for the enhancement point is shown in Figure 12.
ENHANCEMENT 2 Z_BCM_PAYREQ_MGR. "active version
* As part of the Payment Request Manager integration we will add
* an icon on the toolbar in BNK_MONI.
*
* Place a separator on the toolbar
MOVE 3 TO LS_TOOLBAR-BUTN_TYPE.
APPEND LS_TOOLBAR TO E_OBJECT->MT_TOOLBAR.
*
CLEAR LS_TOOLBAR.
* Add the internal command to be executed when the icon is pressed
MOVE 'PAYREQMGR' TO LS_TOOLBAR-FUNCTION.
* Add the icon to the toolbar
MOVE ICON_OVERVIEW TO LS_TOOLBAR-ICON.
* Add the text to be displayed when the cursor hovers above the icon
MOVE 'Payment Request Mgr' TO LS_TOOLBAR-QUICKINFO.
APPEND LS_TOOLBAR TO E_OBJECT->MT_TOOLBAR.
*
ENDENHANCEMENT.
Figure 12
Code for the second enhancement point
The Third Enhancement Point
The third enhancement is where the bulk of the new functionality is placed, which is triggered when the new button, which was added in the second enhancement point, is clicked. This is included in function RBNK_PAYM_MONI_UI_F01 because the logic cannot be included in the event HANDLE_USER_COMMAND as these are METHODS and not a location for a FORM declaration. The batch number has to be passed when the FORM routine is called. The passing of the batch number allows that value to be used to retrieve the payment information handled by the enhancement point 1. This third enhancement point is called from enhancement point 1, which is triggered when the user clicks the overview icon after selecting a batch. Note: If the user does not select a batch, the following message is displayed: “Mark exactly one line (not shown).” The code for the third enhancement point is shown in Figure 13.
ENHANCEMENT 3  Z_BCM_PAYREQ_MGR.    "active version *
 FORM pay_req_mgr_integ_hdr USING lr_btc TYPE bnk_btc_header_ui.
 *
   TYPES:  BEGIN OF typ_items,
             keyno   TYPE prq_keyno,
           END OF typ_items.
 *
 *
   DATA:  li_bnk_item  TYPE TABLE OF bnk_batch_item,
          lr_bnk_item  TYPE bnk_batch_item,
          li_pay_reqs  TYPE TABLE OF typ_items,
          lr_pay_reqs  TYPE typ_items,
 *        lv_keyno     TYPE prq_keyno,
          lv_exit      TYPE c.
 *
   DATA:  li_rsparams  TYPE TABLE OF rsparams,
          lr_rsparams  TYPE rsparams.
 *
 *  Since we have the batch number information, we need to look up the
 *  payments included in this batch as there could be multiple payments  *  in the batch.    *  Query for the payments included in the batch number.   SELECT * INTO TABLE li_bnk_item
      FROM bnk_batch_item
     WHERE batch_no = lr_btc-batch_no.
 * *  Make sure something is found.
     IF SY-SUBRC NE 0.
       MESSAGE s000(0k)
               WITH 'Nothing found for chosen entry.'.
       lv_exit = 'X'.
       EXIT.
     ENDIF. *
 *
 *  We also need to include cleared items as it is not a value that has
 *  a value of checked.
   lr_rsparams-selname = 'PAR_CLEA'.
   lr_rsparams-sign    = 'I'.
   lr_rsparams-option  = 'EQ'.
   lr_rsparams-low     = 'X'.
   APPEND lr_rsparams TO li_rsparams.
   CLEAR:  lr_rsparams.
 *
 *  Take the clearing document and look up the key number out of the
 *  PAYRQ table.
   LOOP AT li_bnk_item INTO lr_bnk_item.
 *
     REFRESH li_pay_reqs.
 *
 *
 *  The BNK_BATCH_ITEM can have a 1 to many relationship to payment
 *  requests so adjust our logic accordingly.
     SELECT keyno INTO TABLE li_pay_reqs
       FROM regup
      WHERE laufd = lr_bnk_item-laufd_o
        AND laufi = lr_bnk_item-laufi_o
        AND vblnr = lr_bnk_item-vblnr
        AND bukrs = lr_bnk_item-zbukr.
 *
 *  Grab the Keyno value from REGUP as we will use it to retrieve the
 *  corresponding documents from RFPRQSHW.
     IF sy-subrc EQ 0 AND li_pay_reqs[] IS NOT INITIAL.
       LOOP AT li_pay_reqs INTO lr_pay_reqs.
         lr_rsparams-selname = 'SEL_KEYN'.
         lr_rsparams-sign    = 'I'.
         lr_rsparams-option  = 'EQ'.
         lr_rsparams-low     = lr_pay_reqs-keyno.
         APPEND lr_rsparams TO li_rsparams.
         CLEAR:  lr_rsparams.
       ENDLOOP.
     ENDIF.
 *
   ENDLOOP.
 ** *  Now call the program RFPRQSHW to display the payment requests.
     SUBMIT RFPRQSHW
          WITH SELECTION-TABLE li_rsparams
          AND RETURN.
 *
 ENDFORM.                    "pay_req_mgr_integ_hdr
 ENDENHANCEMENT.
Figure 13
Code for the third enhancement point
After the three enhancement points have been added, you can execute transaction code SE20 to display them as shown in Figure 14.

Figure 14
Display the enhancement implementation
In Figure 14, you can double-click each enhancement point to view the associated code, as shown in Figures 15 to 17.
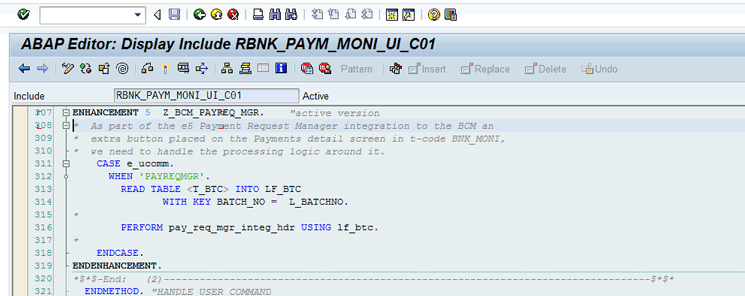
Figure 15
Display the first enhancement point
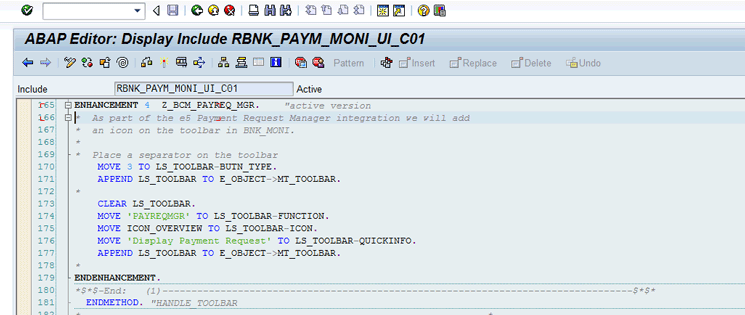
Figure 16
Display the second enhancement point
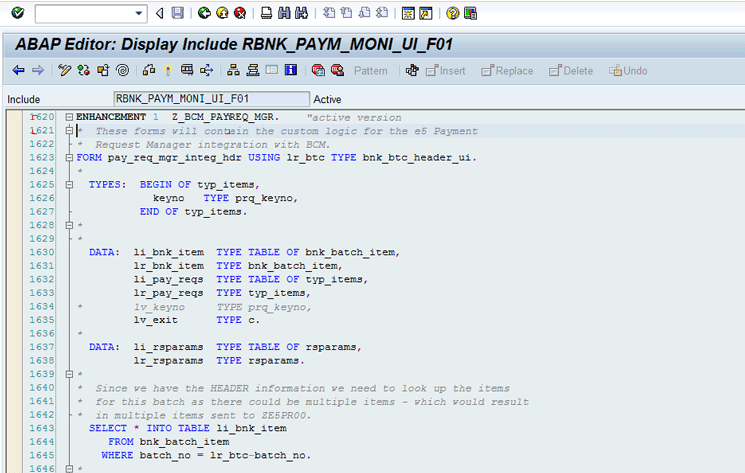
Figure 17
Display the third enhancement point
Note
The order of the implementations and the number that follows the enhancement are generated sequentially by the SAP system. You see the sequentially generated numbers in in Figures 10, 15, 16, and 17.
Now that the enhancement points are in place, you execute the Payment and Batch Monitor, select a batch, and click the newly added button to test to enhancement point functionality you have added.
Execute the Batch and Payment Monitor report. To narrow down the payments selected, enter the current date in the Due Date field, as shown in Figure 18. Click the execute icon.
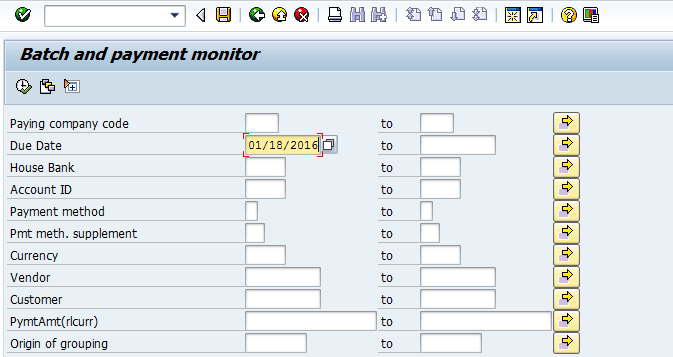
Figure 18
Run the Batch and Payment Monitor to view payment files
The output of running the Batch and Payment Monitor report is displayed in Figure 19.

Figure 19
Hover over the custom icon
In Figure 19, you can select the tab to the left of the batch and click the display payment request icon that was added above, to view the details of the individual payments included in the batch, as shown in Figure 20. (This is the same output as if the user ran transaction code F8BT and included just the payment request numbers included in the selected batch on the input screen.) From here, the user can drill into any of the payments and view all the payment information, as shown in Figures 21 and 22.
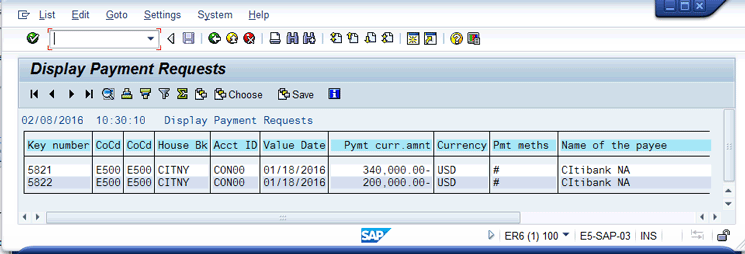
Figure 20
Payment requests included in the batch
Double-clicking a payment in Figure 20 shows the initial screen of the display payment request, shown in Figure 21.

Figure 21
Summarized information from display payment requests
Double-clicking the line in Figure 21 shows all the data relevant to the payment request, as shown in Figure 22. Thus, with the enhanced functionality, the user is able to go from the Batch and Payment Monitor to the detailed information on each payment displayed by the Display Payment Requests report (transaction code F8BT) by clicking the new icon added to the Batch and Payment Monitor.

Figure 22
Detailed information on payment
Mary Loughran
Mary Loughran has been specializing in the SAP Financials area since 1997 and has worked with numerous clients throughout North America and Europe in the areas of finance and treasury. She was employed as a consultant with SAP America and was a designated expert within SAP America for treasury before she left SAP in 2004. Mary’s expertise is in the areas of SAP Treasury and Risk Management, SAP In-House Cash, Liquidity Planner, Accounts Payable, payments from SAP in general, Cash Management, and Electronic Banking. Mary was an independent consultant from 2004 to 2016.
You may contact the author at loughran@gmail.com.
If you have comments about this article or publication, or would like to submit an article idea, please contact the editor.

Brent Olsen
Brent Olsen has been a developer and technical specialist in SAP systems since 1996. He has worked with numerous clients throughout North America. Since 2010 he has worked at e5 Solutions Group, where he has developed more of a focus on the SAP Treasury and Risk Management module.
You may contact the author at brent.olsen@e5solutions.com.
If you have comments about this article or publication, or would like to submit an article idea, please contact the editor.


