Learn the steps needed to leverage the Version Management feature of SAP BW objects. Using Version Management, a little-known SAP BW option, you can automatically or manually create different versions of SAP BW objects and perform version comparisons and version recovery. This allows you to restore an object to a prior state.
Key Concept
In the past, versioning for objects in SAP BW was very limited. Now, in SAP BW 7.3 and onward, versioning is a new full-featured, helpful offering.
A little-known SAP BW feature, Version Management of SAP BW objects, allows you to recover prior versions of BW Objects, like InfoProviders, data transfer processes (DTPs), and other objects.
Prior to version SAP BW 7.3, after you activated an SAP BW object you could not return to the previous settings of the object. The only exception was if the object was delivered by SAP. In this case, you could recover back to the SAP system’s original version, but not to an interim version created by you. As of the release of SAP BW 7.3, this is no longer the case. You now have the option to manage versions of SAP BW objects.
Starting in SAP BW release 7.3, you have a fully functioning version management system for SAP BW objects. These include basically all important objects such as InfoCubes and other InfoProviders, DTPs, and transformations. With Version Management, you can save any iteration of an object’s settings, including, for example, the mappings in a transformation or the InfoObjects contained in an InfoCube. After you have a saved version you can compare, import, export, delete, and, most importantly, restore the older version.
Note
In this article I use an InfoCube as the example object, but it works
the same way with other objects. The configuration involved references
CUBE, which is a reference to an SAP BW InfoCube.
I show the following SAP BW configuration steps for automatically creating historical versions of BW objects:
1. Review the starting point of an InfoCube that has an active and revised version (where the revised version is the same as the active version).
2. Show automatically created versions:
- Upon activation
- During transport
3. Make a small change and save this version of the object without activating.
4. Export an historical version to your PC and import a version from your PC back to the version database.
5. Compare a prior historical version (one that worked the way you want it to) to the currently active version.
6. Restore the historical version as the current revised version and then activate this revised version to fully restore the historical version to the active version.
Step 1. Configure SAP BW to Automatically Create Historical Versions of SAP BW Objects
Although this step is optional and manually saved versions (which I demonstrate later) are possible without it, in my opinion, this step is critical. Using this step enables you to create object versions that you may not need right now, but might in the future. Follow the configuration steps as follows.
Follow menu path transaction SPRO > NetWeaver > Business Warehouse > general settings, and choose the Create historical TLOGO versions automatically option as shown in Figure 1. In addition, you could choose the help text icon (circled in red) to open this pop-up window.
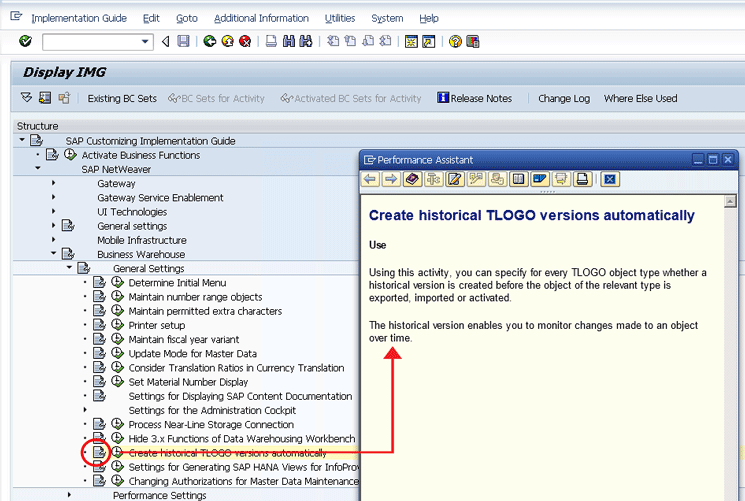
Figure 1
Optional configuration for automatically creating versions
Click the execute icon (Figure 1), then the New Entries button (this step is not shown), and the screen in Figure 2 opens, which shows the details of the configuration. Put your cursor in the Object Type field and press F4 and the pop-up window in Figure 2 opens with all the available object types. In this example, select CUBE as the Object Type and then tick all the check boxes (e.g., Before Export, After Import, and Before Activtn.). Click the save icon and then the back icon (or press F3).
This saves the entry for the desired configuration (e.g., just the CUBE object type configuration). You can see the saved entry details in Figure 3. In reality, when making these entries, I recommend entering an * (asterisk) in the Object Type field (and selecting the three check boxes). By using the * for this setting, along with selecting the three check boxes, you automatically set up the system to record an historical version at each possible time where objects could be significantly changed and for all possible objects (= *).

Figure 2
Select a specific object type to create automatic historical versions
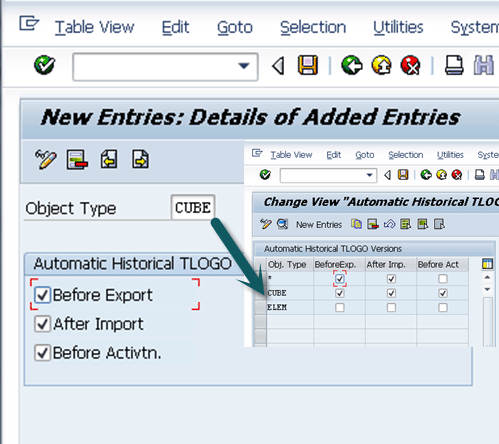
Figure 3
Create automatic historical versions of objects
Again, the example entry shown in Figure 3 (with CUBE and ELEM listed separately) assumes you just want specific objects to have historical versions created automatically for them. The * entry shown here conflicts with the detailed entry (e.g., CUBE). To ensure that this doesn’t happen, the easiest thing to do is to just use an * as the object type and never add or delete specific objects in the list (e.g., such as CUBE, in this example).
Creating different versions for all the objects (using the *), not just some specific ones (like CUBE), does take up some additional disk space, but I don’t think the amount of space used offsets the value in having different versions saved when you need to use them as fallbacks. For my setup (Figure 4) I just entered an * entry and deleted any other existing ones like the CUBE entry in Figure 3. The resulting configuration table is the way I recommend that you configure your system.

Figure 4
Preferred entries in the automatic historical versions configuration table
Step 2. Review the Current State of an Active Object and its Other Versions
Switch to change or display mode on your object, and click Goto in the ribbon of the screen in Figure 5. Select Version Management from the drop-down options to access the screen to enable the management and creation of object versions. The Version Management screen shown in Figure 6 opens.
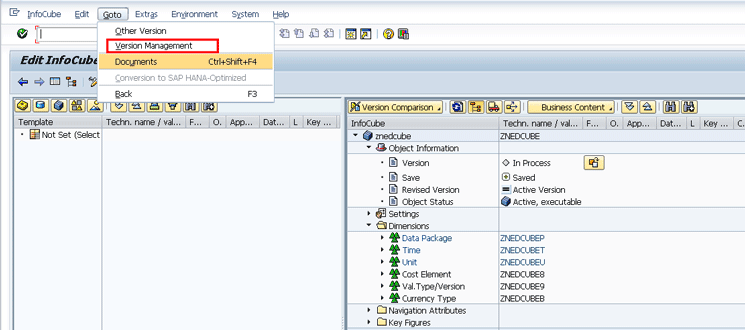
Figure 5
Access Version Management

Figure 6
The initial state of versions (no historical versions available)
It is important to note that the green (active) and yellow (revised) statuses of the versions are temporary. This means they are not historical versions that are persistent—they are the current versions that you can review on the object’s main maintenance window. If these versions are not saved as historical versions, they are lost after the next activation.
Although it is easier to review the active version of an object via the change or display path in transaction code RSA1, versions and their metadata can be displayed by selecting the version and choosing the magnifying-glass icon (highlighted in Figure 6). This results in a version display as shown in Figure 7, which, in this example, shows the Active Version.

Figure 7
The active version of an InfoCube displayed in Version Management
For your reference, review Figure 8, which shows the same object as it’s displayed in the normal SAP BW data warehousing workbench (RSA1). Pay special attention to the Cost Element dimension. This is the part of the object that is deleted and then restored in the following steps.
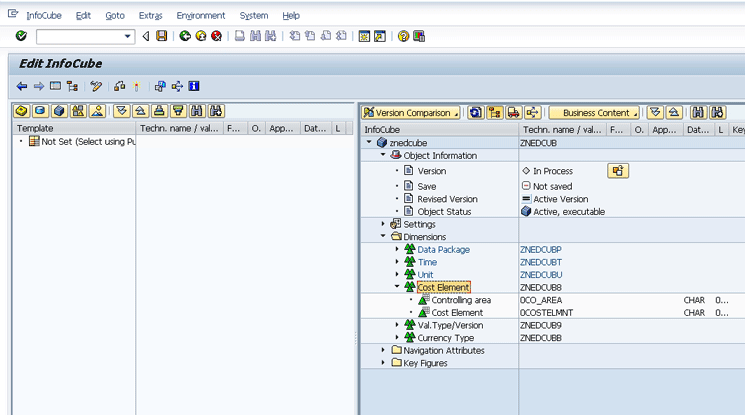
Figure 8
The normal display of a InfoCube and its active version
Step 3. Automatically Create an Historical Version of an Object
Although the InfoCube is already active, there is no historical version created on the first activation. Here I show the effects of the automatic historical versions setup you did in step 1. Returning to the maintain InfoCube screen, simply reactivate the existing InfoCube using the match-stick icon (e.g., the activate icon, not shown) as you would normally. This time, however, due to the configuration in step 1, the system automatically creates an historical version, shown in Figure 9.
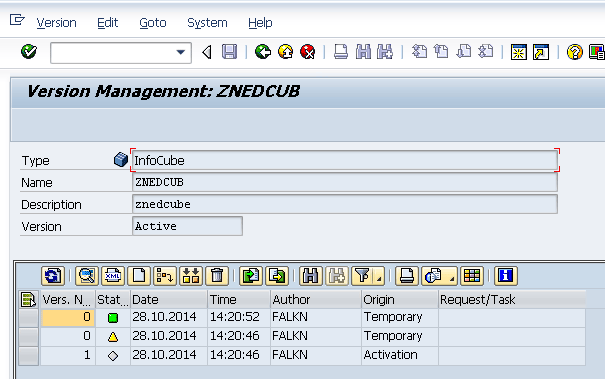
Figure 9
The historical version automatically created during activation
Continuing to show the effects of the configuration, I created and released a transport of the InfoCube as you would normally in SAP BW using the transport option in transaction code RSA1. (I do not show the entire process here as it is standard operating procedure.) Figure 10 shows the release of the transport. Pay special notice to the IMG Activity Create Historical TLOGO versions automatically entry. This log entry is due to the configuration (this time on export) from your development system.
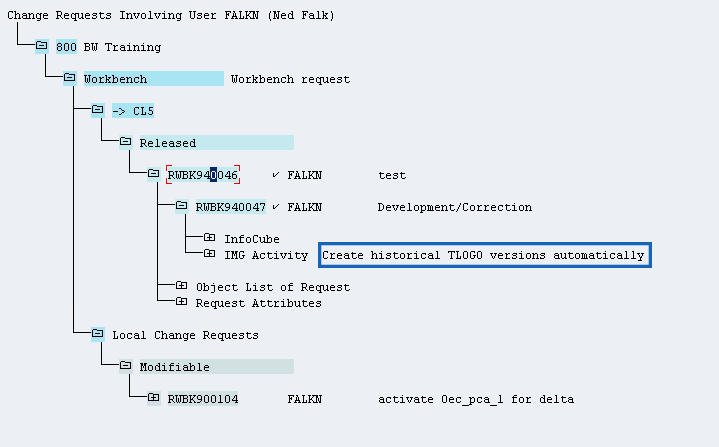
Figure 10
The Release log of the transport showing the automatic creation of historical versions
The result, a new historical version now can be accessed from the Version Management user interface (UI) of the InfoCube as you did before, shown in Figure 11 as version 4. Notice that the Origin is listed as Export; that means it was generated during the transport and release process.

Figure 11
The transport-/release-generated version 4 is automatically created
Note
The version numbers in the screenprint in Figure 11 are not
significant; they are recorded by the system in the order they are
created, but I am not presenting them in that same order.
That completes the discussion of how to automatically create versions. In the real world, however, the discussion would continue. After these steps, you would then have to import the changed object into a target production or test system, which would again create an historical version in the receiving SAP BW system.
Step 4. Manually Create Historical Versions
The last way a version can be created is to create one manually. Assuming the active versions are automatically created as historical versions (as discussed in the previous section), that leaves the revised version as the most likely temporary version to be saved as an historical version. To accomplish this task, simply right-click the revised version number and choose the Create New Version option from the context menu options (Figure 12).
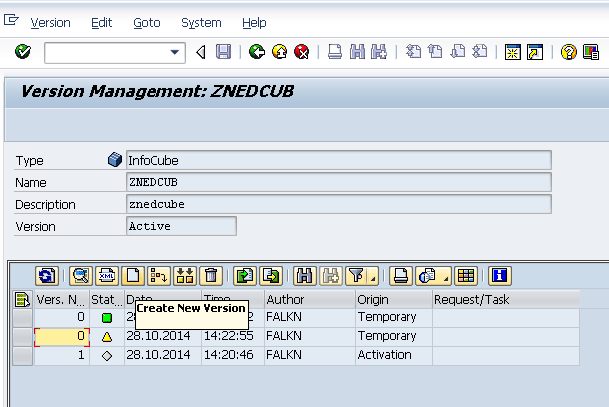
Figure 12
Creating a new version manually
In my example, I made a change to the InfoCube—I deleted the cost element dimension in its entirety—and saved the revised version, but did not activate it. This changed and saved the revised version selected and provides the basis of the historical version.
Figure 13 shows the result of these actions: a new version 2 with an Origin listed as Manual. Remember that this is the version in which you removed the cost element dimension, discussed in more detail later.
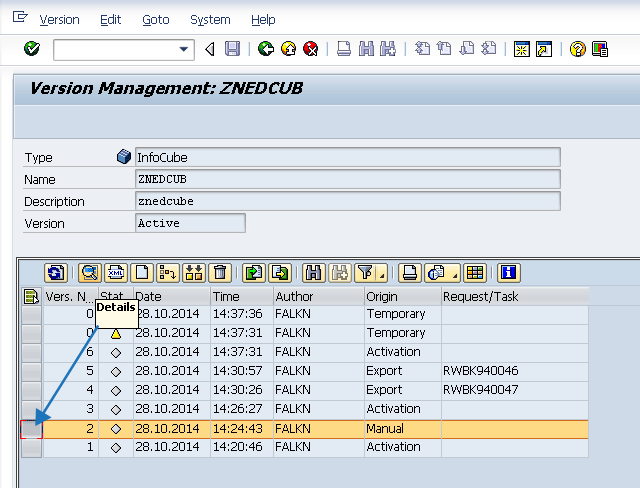
Figure 13
A new version (version 2) is manually created
Step 5. Export a Version to a File on a PC and Import it Back to the Database
Although this is not technically a replacement for the normal transport mechanism, sometimes it might be necessary to export a version to keep it offline (on your PC). This is easily accomplished by again selecting the version (e.g., click the gray box on the left side on the line with the version you want to select). From the menu options that open, choose Export (Figure 14).
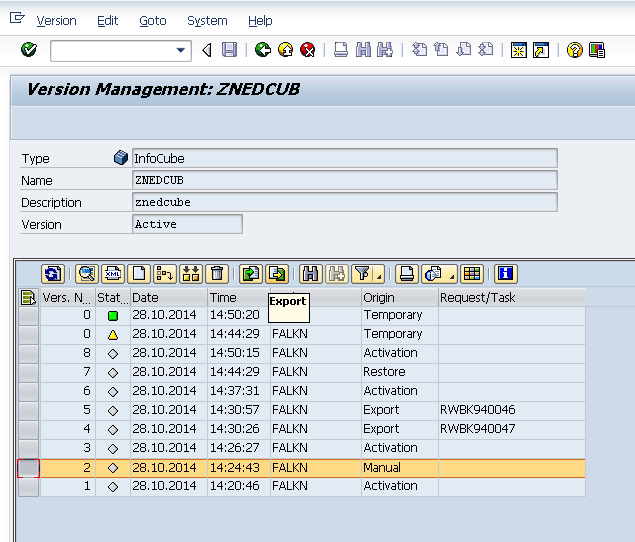
Figure 14
Export an historical version
The result of this export is a file stored in a path connected to your PC. In this example, the file is a specially formatted BXM file, CUBE_ZNEDCUB_2.bxm (Figure 15).

Figure 15
The BXM file created as a result of the version export
It is also possible to import a BXM file to create an historical version. Instead of selecting the Export option form the context menu, select Import. You are then prompted to select the BXM file from your PC, and to confirm. The result of the import is shown in Figure 16.
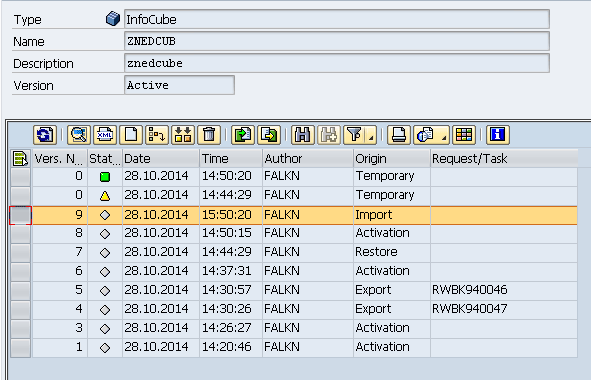
Figure 16
Import version 9 from a PC
Step 7. Compare Versions
Often, in the real world, changes are made to objects. As a result, sometimes things break or don’t work as expected. If you have saved an historical version of the object, you can compare the metadata of the active version (that might not be working as expected) with a prior version. The output of this version comparison is similar to the detailed view of a single version shown in Figure 7. The difference is that in this case a new column is added that allows for a detailed comparison between two different versions of an object.
Figure 17 shows the steps needed to perform a comparison between the active version (green icon) and the previously created manual version (version 2). Select both versions via the box on the left and the Ctrl key, then click the Compare Versions icon (as shown) to open the version comparison screen.
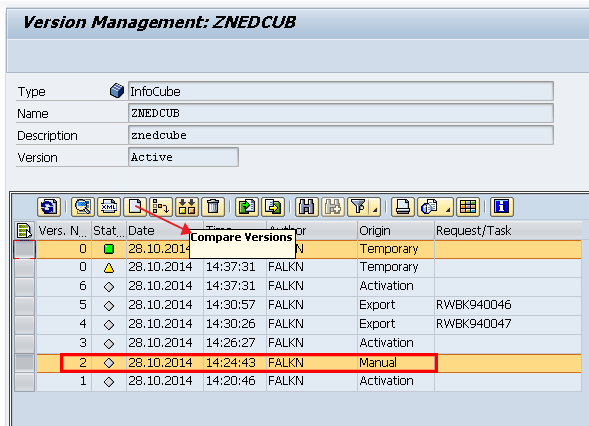
Figure 17
Compare the different versions of objects
The resulting version comparison shows every aspect of the object in an initially compressed yet expandable display with folders for each section of related metadata. In this example, Figure 18 shows the differences between the active version and the historical version 2 (shown as a split screen for clarity).
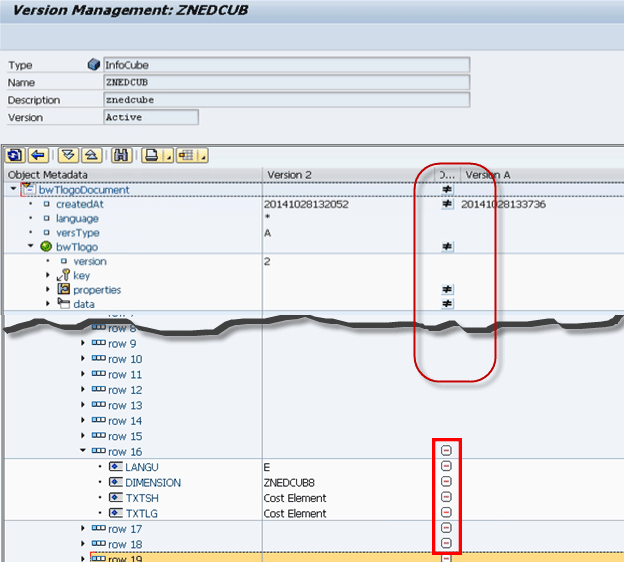
Figure 18
The result of the version comparison (the active version does not contain the cost element dimension)
The top of the screen in Figure 18 shows the metadata folders and, at a high level, that the objects are not equal (?). Drilling into the details by expanding the folders, you can see the reasons they are not equal. In my case the data folder shows that the cost element dimension does not exist in the active version, but does exist in historical version 2 (revealed by the red dashes). Looking at the current active version in the normal way, in transaction code RSA1, Figure 19 verifies that, in fact, the active version does not have the cost element dimension.

Figure 19
The active version shown without the cost element dimension
Step 8. Restore an Historical Version
Remember that both the revised version and the active version are temporary versions that are dynamically changing, and the historical versions are persistent. With this in mind, your goal now is to restore the previous historical version 2 to the active version. In order to do this, you first need to restore the historical version to the revised version, and then activate this version to create the new active version. This is set up this way because the SAP system is designed to reduce the chances of making a mistake.
To restore the previous historical version and make it the current revised version (and activate it), simply select the version you want to restore (in this case, version 2), and click the restore version icon, highlighted in Figure 20. In the pop-up window that opens, select the Yes button.

Figure 20
Restore an historical version to the revised version
As you can see, the process of restoring an historical version comes with a warning that you will be replacing the current revised version with the previously saved historical version. In this case, you want to get the cost element dimension back, so this is exactly what you want to do.
Once you click the Yes button, you have successfully restored the previous version to the revised version, as shown in Figure 21.

Figure 21
Display of the revised version with the optional menu path for additional comparison of the active version
Also shown in Figure 21 is another way to compare versions. With this option it is only possible to compare the active, revised, or content versions; it is not possible to compare historical versions. When you compare the active version to the revised version using this option (Figure 22), you can clearly see that the revised version as previously restored is different than the active version, as it includes the cost element dimension.
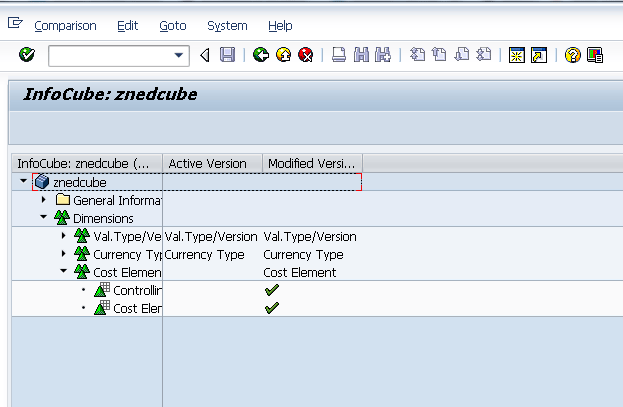
Figure 22
Verify that the modified (revised version) includes a cost element dimension (which is missing in the currently active version)
The final step is to activate just the revised (modified) version to overwrite the active version and include the new cost element dimension. To activate, click the activate icon. The final result (Figure 23) shows the InfoCube’s active version, which now includes the cost element dimension.
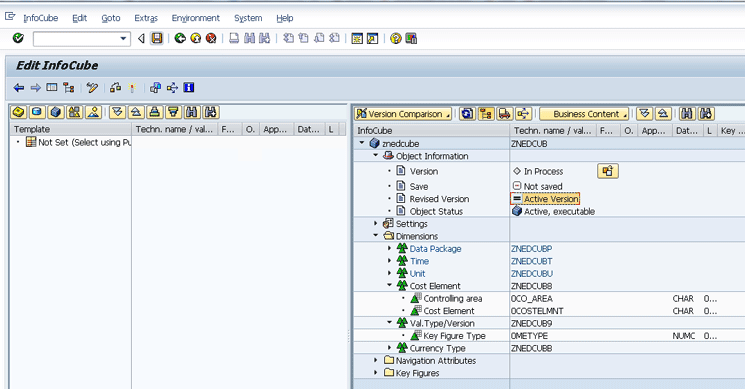
Figure 23
The InfoCube’s active version, including the cost element dimension restored from a prior historical version
Note
To find out more about the other new features of SAP BW 7.3 and 7.4 releases, attend SAP training class
DBW74.
Ned Falk
Ned Falk is a senior education consultant at SAP. In prior positions, he implemented many ERP solutions, including SAP R/3. While at SAP, he initially focused on logistics. Now he focuses on SAP HANA, SAP BW (formerly SAP NetWeaver BW), SAP CRM, and the integration of SAP BW and SAP BusinessObjects tools. You can meet him in person when he teaches SAP HANA, SAP BW, or SAP CRM classes from the Atlanta SAP office, or in a virtual training class over the web. If you need an SAP education plan for SAP HANA, SAP BW, BusinessObjects, or SAP CRM, you may contact Ned via email.
You may contact the author at ned.falk@sap.com.
If you have comments about this article or publication, or would like to submit an article idea, please contact the editor.


 Premium