Learn three methods for removing duplicate business partners in SAP CRM: SAP CRM 5.0’s BUPA_CLEAR transaction, SAP CRM 7.0’s Merge Accounts function, and SAP CRM 7.0’s Duplicate Check function. Also sample the functions in SAP CRM 7.0’s Data Quality Administration Framework.
Key Concept
Cleansing case management is a framework that helps you to effectively consolidate duplicate account and employee records and automatically archive the redundant records in the background.
Clean business partner data is vital to the success of any organization, especially in handling customer relationships. Although a company may maintain data that is relevant and current, corrupt or inaccurate records may exist owing to multiple means of data collection, incorrect data entry, or failure to check for preexisting records before entering a new business partner.
Companies must therefore identify incomplete, inaccurate, or irrelevant parts of the data, and they must then replace, modify, or delete them. This process is called data cleansing. You can identify duplicate records for accounts or employees, consolidate the duplicates into a single record, and archive redundant records, thus ensuring that your data is consistent. A single instance of potential duplicates that need to be cleansed is called a cleansing case.
SAP CRM has several tools for creating and executing cleansing cases, three of which are explained in detail in this article. These tools are the transaction BUPA_CLEAR in the SAP CRM 5.0 GUI and the Merge Accounts and Duplicate Check functions in the SAP CRM 7.0 Web UI. All three provide an effective way to remove duplicate business partners without purchasing third-party software. I also briefly mention the Data Quality Management functions in SAP CRM 7.0, but explaining how to use them step-by-step is beyond the scope of this article.
Create Cleansing Cases in SAP CRM 5.0
You can create data cleansing cases for potential duplicates using SAP CRM’s Business Partner search (transaction code BP). The system then sends duplicates to the data cleansing work list for further processing. Follow these steps:
1. Start transaction BP in the SAP GUI and search for all business partners in the SAP CRM 5.0 system for which you want to perform a cleansing case (Figure 1). In the By field, you can search based on various parameters such as name, postal code, city, and identification number.
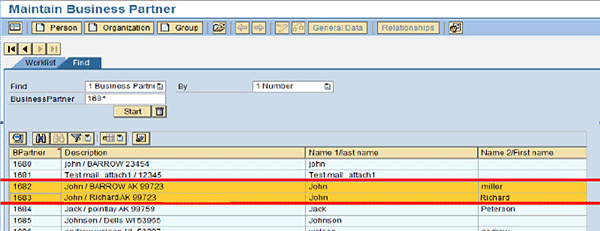
Figure 1
Search results in transaction BP
2. Select the business partners to be merged. Right-click the selection and choose the option Create data cleansing case (Figure 2).
Note
You can merge multiple business partners in SAP CRM. However, for simplicity I have selected only two business partners for merging. There is no change in subsequent steps even if you select more than two business partners for merging.
3. In the window that appears, you can enter the following additional control information for this case in the data cleansing dialog box (Figure 3):
- The name of the person who is to execute the data cleansing case you’ve just created
- A note for the executor with information related to the data cleansing case. This note is optional.
- The priority of the data cleansing case based on the importance of the business partner
Click the create icon (highlighted in Figure 3). You receive a message (not shown) stating that the duplicate cleansing case has been successfully created. Click OK.
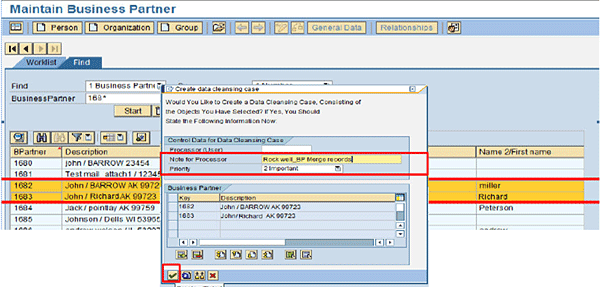
Figure 3
The Create data cleansing case dialog box
4. Exit transaction BP and start transaction BUPA_CLEAR in the SAP CRM 5.0 GUI. In the screen that appears, search for the created cleansing case. You can use various search parameters, such as the description of the case, processor, dates, and priority of the cleansing case, to find the cleansing case created in earlier steps.
5. Select the case and double-click it. A screen appears that asks if the system should start the determination of the referencing objects. Referencing objects are the transactions in which these business partners are involved. You must ensure that no transactions exist for the business partner being archived. Click Yes to determine all the related business transactions and to open both business partners side by side for comparison.
6. Both partners are now opened alongside each other. You can drag and drop data (such as transactions or sales orders) from one to the other (Figure 4).
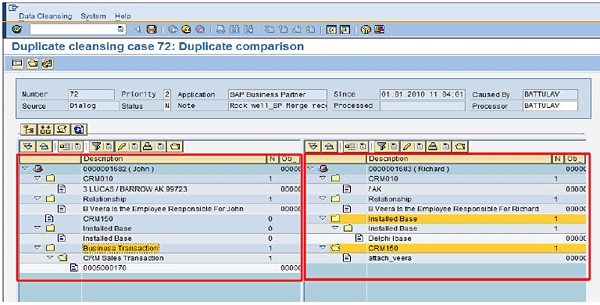
Figure 4
Duplicate comparison screen
7. After dragging and dropping the items as required, click the save icon. A pop-up window appears (Figure 5). In the status field, you can either enter S if the business partner is the source of the data transfer, or T if the business partner is the target. There can be only one target in a data cleansing transaction, but there can be multiple sources. Click the Save Final Version button.

Figure 5
Mark source and target business partners
8. Business partners marked S are flagged for deletion. In the window that appears, click the With Archiving button if you wish to have the deleted source business partners archived. Click Without Archiving if you do not (Figure 6). It is a good practice to choose the option With Archiving because the main aim of cleansing cases is to delete duplicate business partners. If the system attempts to use the archived business partner in a transaction, the system sends an error message stating that the business partner has been archived and cannot be used.
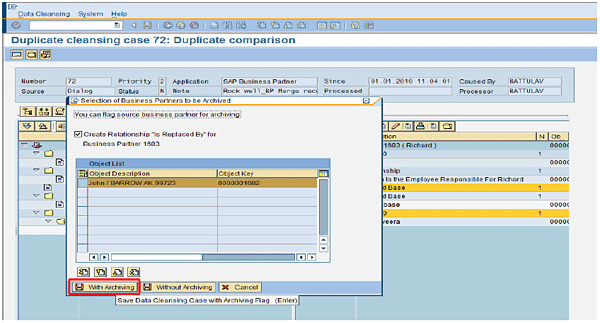
Figure 6
Select archiving options for business partners
9. Exit transaction BUPA_CLEAR. Use transaction BP to view the source business partner you marked in step 7. The system sends a message stating that the business partner has been flagged for archiving.
10. By marking the business partner as a source, you also cause the system to create the relationship Is Replaced By for the source business partner. Click the Relationships button at the top of the window. The relationship Is Replaced By displays for the source business partner. If you view relationships for the target business partner using the same method, you see the relationship Replaces (Figure 7).
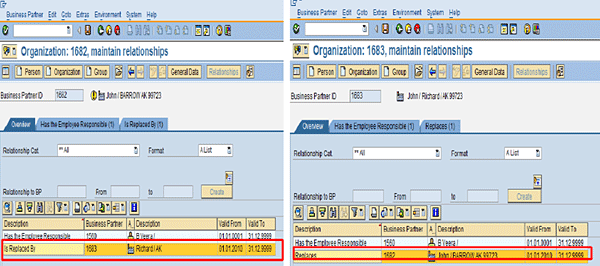
Figure 7
Relationships Is Replaced By and Replaces are displayed
Configuring Reference Objects for Duplicate Comparison
I now explain the settings behind the display of reference objects in the duplicate comparison screen (Figure 4). Use transactions BUSWU01 and BUSWU02 to configure the screen.
Transaction BUSWU01 is used to define structures. It is typically used for enhancing business partner table structures with additional business objects. It consists of where-used list views (these views show the dependencies between objects) to create or edit structures.
BUSWU02 is used to define views. Not all of a business partner’s dependencies are visible in the Merge Accounts view. Many of these dependencies can be reassigned automatically by a batch job.
BUSWU02 also determines which dependent objects are visible in the duplicate comparison view and which are merged automatically. In a standard SAP system, only a few dependent objects are visible in this view. Objects that are not visible do not appear, but are executed in the background. You can use BUSWU02 to customize which dependent objects are visible in the duplicate comparison view and which are not.
BUSWU02 has two view variants: CLEARING and CLEAR_REP. The dependencies in CLEARING appear in the duplicate comparison screen, so the user can decide how to move them (Figure 8). The dependencies in CLEAR_REP are handled in the background (Figure 9). Objects that are contained in both the CLEARING and CLEAR_REP variants are processed in the background, and do not appear for selection in the duplicate comparison screen.
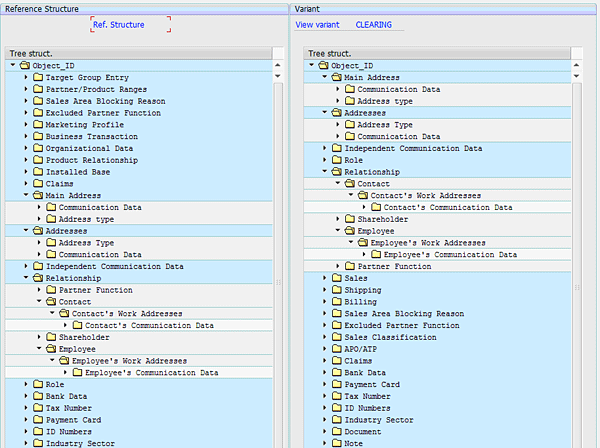
Figure 8
Structure of the BUSWU02 view variant CLEARING
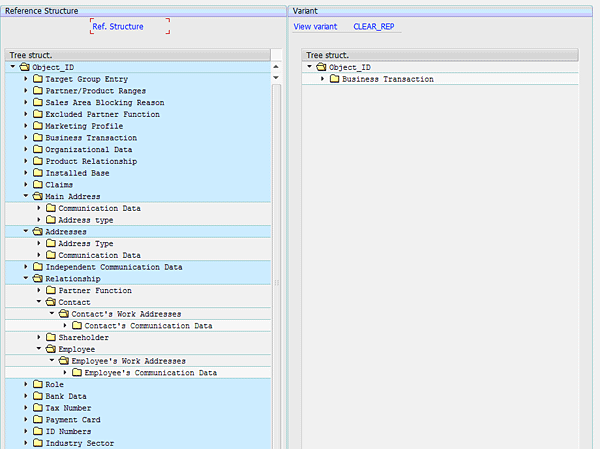
Figure 9
Structure of the BUSWU02 view variant CLEAR_REP
The Merge Accounts Functionality of the SAP CRM 7.0 Web Client UI
The CRM 7.0 Web Client UI has a different functionality for removing duplicate business partners, called Merge Accounts. The Merge Accounts function is useful for merging two business partners, if you have accidentally maintained the same business partner twice in the SAP CRM system.
- You can select at least one business partner to be a master account from the two records to be merged – that is, the business partner that remains in the system after the merging process. The system automatically selects the account with the most transactions in the system as the master business partner, although the user can also select this account.
- You have the option to select what information is transferred from the source business partner to the master business partner.
- Be careful transferring information from one account to another. For example, as soon as a sales order is replicated to the ERP system, the partner function sold-to party can no longer be changed in the SAP CRM system.
To use the Merge Accounts function, follow these steps:
1. Open the Web Client UI using the SAP standard business role Sales Professional. Open the account search function (from the Account Management Work Centre > Accounts). Select the two accounts to be merged (Figure 10).
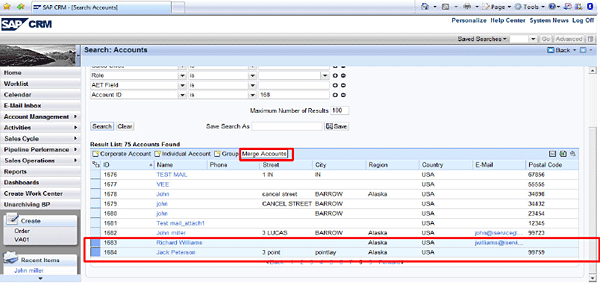
Figure 10
Select accounts to be merged
2. Click the Merge Accounts button at the top of the search results page. The Create Cleansing Case – Webpage Dialog box appears (Figure 11). Use the check boxes under the Master column to select the master account. Note the following restrictions:
- Accounts already flagged for archiving are flagged as a source; they cannot be the master account.
- If any of the accounts have sales orders associated with them, the system marks the target account with the most orders as the master account.
- If none of the accounts have sales orders, but do have other business transactions, the system marks the target account with the most transactions as the master.
- Only if none of these conditions apply, you can flag any one of the target accounts as the master using the check box in the dialog box.
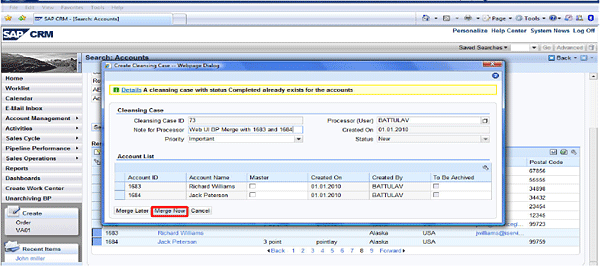
Figure 11
The Create Cleansing Case – Webpage Dialog box
3. Once you have selected the master account, you have two options for merging the accounts:
- Merge Now: You proceed directly to the cleansing case and merge the accounts.
- Merge Later: You only create the cleansing case, and can later search for it using the CRM Web UI’s cleansing case search function.
In this case, you click the Merge Now button, which takes you directly to the Cleansing Case screen.
4. You can assign a priority to the cleansing case using the drop-down menu found under Cleansing Case Details (Figure 12). You can also assign a status. Once you execute the cleansing case, the system automatically sets the status to Completed.
5. In the Accounts assignment block, set one account to Master and the others to Source in the Status field. Once you set an account to Master, the others are flagged for archiving by the system.
6. In the General Data assignment block, select information and transactions to be transferred from one account to another (Figure 12).
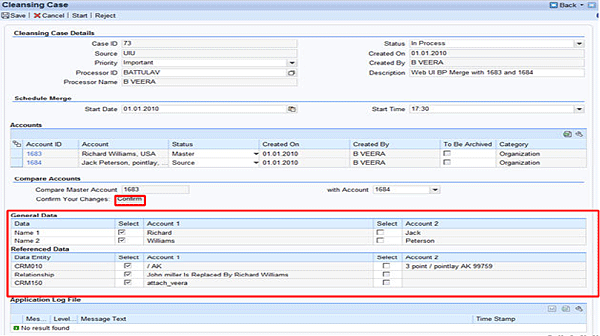
Figure 12
Transfer information in the General Data assignment block
Post Processing
A special post processing is done for non-master records (such as data from orders or billing). The final actions of the batch job Merge Accounts – which can be executed manually or automatically — are as follows:
1. Source accounts are flagged for archiving. The check box for the source account in the column To Be Archived is selected (Figure 13).
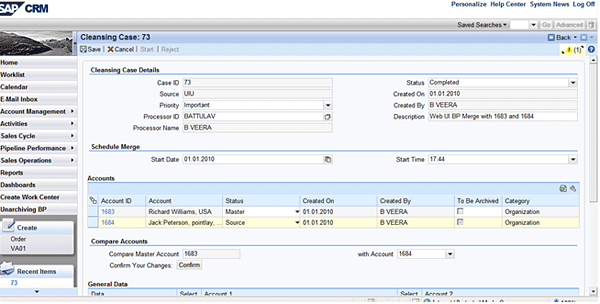
Figure 13
Select the To Be Archived check box for source accounts
2. The system automatically creates the relationship Is Replaced By in source accounts, marking them as replaced by the master account (Figure 14).
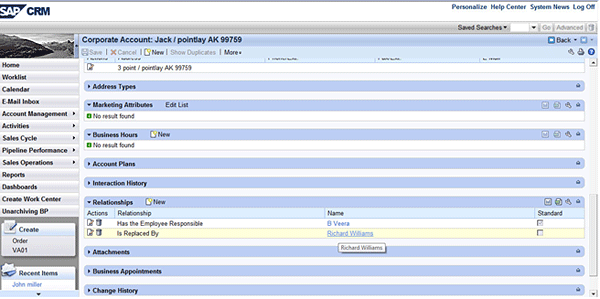
Figure 14
An Is Replaced By relationship is created in the source account
Limitations and Enhancements
The Merge Accounts functionality in SAP CRM 7.0 has some enhancements and limitations compared with the SAP CRM 5.0 SAP GUI transaction described earlier in this article:
- The procedure described in the previous section on the merge accounts functionality in SAP CRM 7.0 is one of two points of entry for creating and processing of a cleansing case. The other is the Duplicate Check functionality described in the next section.
- Accounts are not deleted immediately.
- Non-master records are flagged for archiving (field BUT000-XDELE).
- The flag can be evaluated either by archiving (transaction SARA) or deletion (transaction BUPA_DEL). Note that the archiving flag is not set directly by pressing the Merge Accounts button in the search results screen of the CRM Web UI, but by the batch report at the scheduled time.
Duplicate Check Functionality in CRM 7.0 Web Client UI
Beginning with SAP CRM 2007, there is an additional entry point to the Merge Accounts function, provided by the Duplicate Check pop-up in the CRM Web Client UI. This option is available only when Business Address Services (BAS) is active.
Whenever you create a new business partner in the CRM Web Client UI, the system automatically checks for duplicate addresses and sends a message if they exist. This process leads to a dialog where you can merge the duplicates. To show you how this process works, I describe a scenario in which you enter a duplicate business partner and go through the process. Figure 15 is an existing account. In Figure 16, you create a business partner with almost exactly the same information.
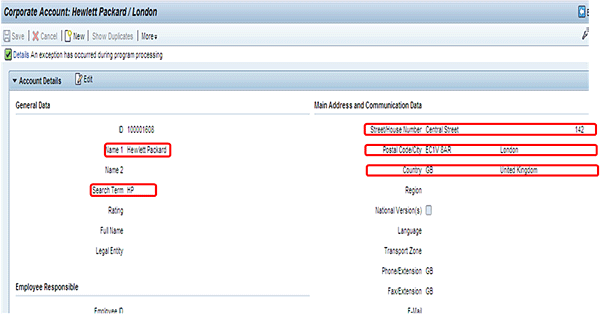
Figure 15
An existing account viewed in the CRM Web Client UI

Figure 16
A new account with information almost identical to the account in Figure 13
As soon as you enter the nearly duplicate account and press Enter, a message appears informing you that the new business partner is a duplicate (Figure 17).

Figure 17
A message about duplicate business partners
When this message is sent, click the Show Duplicates button at the top of the screen (Figure 18).

Figure 18
The Show Duplicates button
A window appears showing the percent similarity between the duplicate accounts (Figure 19). Click Merge to begin merging the two records. A dialog box appears where you can create a cleansing case for the duplicate records, assign it a priority, include a note for the processor, and select a master account (Figure 20). To search for cleansing cases in the CRM Web Client UI, click the Merge Later button at the bottom of the window.
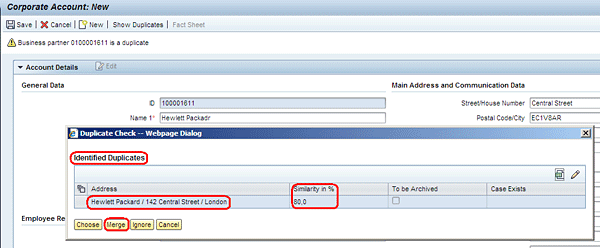
Figure 19
A dialog box showing the percent similarity between two accounts
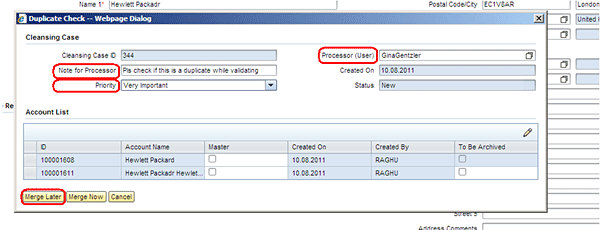
Figure 20
Create a cleansing case
Executing Cleansing Cases after Clicking Merge Later
Clicking the Merge Later button creates a cleansing case, but does not execute it. To find the cleansing case and execute it, follow menu path Account Management > Cleansing Cases in the Web Client UI navigation bar (Figure 21). This will take you to the window shown in Figure 22. You can search for cleansing cases according to a variety of criteria. In this case, search by the Processor. Selecting the result takes you to the cleansing case screen first seen in Figure 12, and the process continues in the same way as if you had clicked Merge Now.
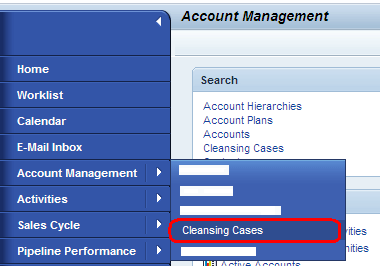
Figure 21
Find Cleansing Cases in the Web Client UI navigation bar
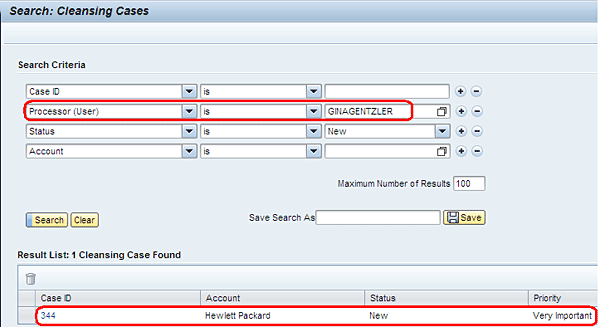
Figure 22
Search cleansing cases
An Overview of Data Quality Management (DQM) in CRM 7.0
With SAP CRM 2007 Support Package 02, SAP introduced a new environment for data checks and data clean-up, called the Data Quality Administration Framework (DQAF). In a standard SAP system, it is assigned to the SALESPRO role in the CRM Web UI.
The DQAF supports the following tasks for managing business partner data in SAP CRM:
- External Postal Validation
- External Content Validation
- Integrated Duplicate Check
- External Duplicate Check
An example of the Integrated Duplicate Check task, which can be accessed through the SALESPRO role in the CRM Web UI, is shown in Figure 23. It contains three steps: Identify Duplicates Internally, Create Cleansing Cases, and Merge BPs (automatically). Once DQM is activated in SAP CRM 7.0, the system checks the existing duplicate accounts in SAP CRM, creates cleansing cases for each, and automatically merges the duplicate business partners. If there are no errors in the DQM case, then its status field is marked as Completed.
Once a DQM case is created and executed, you have the option of analyzing the performance and job details in the DQM (Figures 24 and 25). Similar to the Merge Accounts function described earlier, a special post-processing procedure is done for non-master records. The final actions are:
- Setting the archiving flag
- Creating a relationship of the type Is Replaced By

Figure 23
Create a DQM case
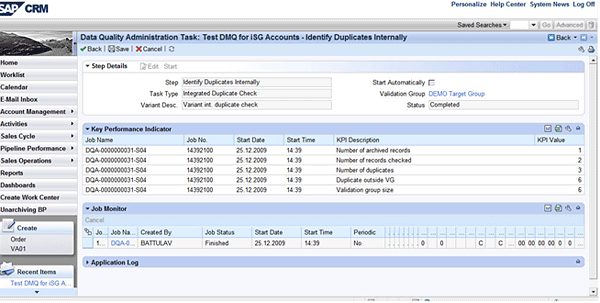
Figure 24
A DQM job analysis
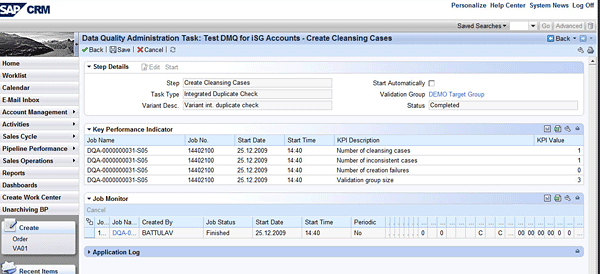
Figure 25
DQM job monitor
Veeranna Battula
Veeranna Battula is an SAP CRM senior technical consultant with more than six years of experience in design, development, and implementation of SAP CRM 5.0, 6.0, and 7.0 enhancement package 1. He has hands-on technical and functional experience in SAP CRM Lead, Opportunity, Activity, Business Partner, Base Customizing, Sales Order, Quotation, Pricing, Campaign, Target Group, External List Management, and Service processes, as well as CRM Web UI BOL programming.
If you have comments about this article or publication, or would like to submit an article idea, please contact the editor.


