Drop shipment can result in enormous cost savings by eliminating the need for physical inventory. Many companies are just discovering its benefits, as well as the supporting SCM resources they already have in place. Learn how to leverage these resources to get the drop shipment process running quickly and easily.
Key Concept
Drop shipment allows users to minimize inventory-carrying cost, mitigate risk on goods that aren't saleable, eliminate packing and shipping operations, and complement the range of merchandise they offer.
Although the drop shipment concept has existed for quite some
time, a growing trend toward outsourced manufacturing, specifically
in the high-tech industry, has sparked a recent increase in its
practice. Drop shipment is facilitated by all versions of R/3,
beginning with 3.1I. In the SAP ERP Central Component, drop shipment
is available in a preconfigured business scenario as "third
party with shipping notification" and "third party
without shipping notification." Many companies, therefore,
have had the systems resources in place, but they are inexperienced
at putting them to work. I offer a simplified approach to implementing
drop shipment processes and show you how to take advantage of the
standard features provided by SAP.
Getting Started
The first step for implementing drop shipment is to identify
a manufacturer or wholesale vendor that complements your product
offerings. Some important deciding factors could be the range of
merchandise offered, systems capability for EDI interfacing, market
spread and reach, and stability of the vendor. Once you've
chosen the vendors, the next step is to select the merchandise
list each vendor will offer as drop shipment. For example, a computer
manufacturer can offer printers, digital cameras, and other relevant
hardware.
You also need to determine the message standard for the EDI communication
and integration software for an enterprise-to-enterprise EDI interchange.
Examples of EDI message standards are ANSI X12, which is widely
used in the US, and UN/EDIFACT, which is used in Europe and other
regions. Examples of EDI integration tools are GENTRAN and Web
Methods.
System Settings
Step 1. Maintain the drop-shipment vendor. Create
the vendor master details. To define the vendor master centrally,
use transaction XK01. Use the SAP standard R/3
account group LIEF and choose the company code
and purchasing organization to which the vendor belongs. The
key fields here are Reconciliation account, Payment
terms, and Control data in the purchasing
data subscreen — for example, XWHOLESALE as
the drop-shipment vendor. Alternatively, use transaction MK01 to
define the purchasing data and transaction FK01 to
define the company code data for the vendor.
To automate conversion of vendor-assigned purchase requisitions
to purchase orders (POs), check the Automatic purchase order box
in Control data (Figure 1).
Additionally, check the Automatic purchase order box
in the material master purchasing view.

Figure 1
Vendor master settings
Step 2. Create a partner profile for EDI communication
with the vendor. In transaction WE20,
enter the vendor number for the partner number and set the
partner type as LI (vendor). You should also
set the agent and position for workflow notifications. The
agent notifies the user of any processing errors in the document.
Position is a possible agent authorized to process the workflow
documents. Use transaction PPOM to define
the agents.
Once the partner profile is set, the inbound and outbound parameters
should be set for communicating the various message types. Before
getting into the details of setting up these parameters, I will
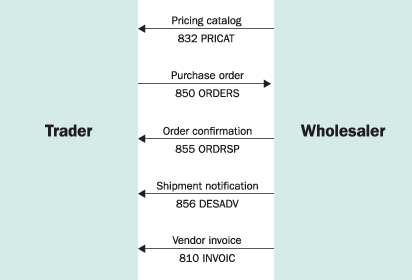
discuss the main EDI message types involved (Figure 2).
The 832 PRICAT message type, for pricing catalog,
synchronizes the pricing and material data between your (the
trader's) and the wholesaler's systems.

Figure 2
EDI message types
Tip!
Use transaction WEDI for easy access to the EDI and IDoc settings transactions.
For setting up message type 850 ORDERS (PO
outbound message), use the output condition type NEU.
The condition type and the EDI message type are tied together
in the Partner profiles> Outbound parameter>Message
Control settings (Figure 3). The standard
processing code for outbound POs is ME10 (Figure
4). Type 850 messages are SAP-standard
for the exchange of documents between vendors and suppliers in
SAP and can be transmitted real-time or can be processed collectively
by setting the outbound mode accordingly in the outbound options.
The trader can choose to collect the IDocs over a period and
then send them to the wholesaler by running the standard R/3
program RSEOUT00 in the background.

Figure 3
Partner profile and Message type settings

Figure 4
Message Control settings tab
The standard R/3 processing codes for processing the inbound parameters
are:
| Message type |
Processing code |
| DESADV |
DESA |
| INVOIC |
INVM |
| ORDRSP |
ORDR |
| PRICAT |
PRICAT |
Similar to the outbound messages, the inbound messages can
also be processed immediately or collectively, based on the settings
in the inbound options. The program used to process them in the
background is RBDAPP01.
Step 3. Maintain the trading material. The
next logical step is to create the trading materials that the
trader will sell. The standard R/3 material type for defining
trading materials is HAWA. Use transaction MMH1 to
create trading materials. Set the Item category group in
the sales organization data as BANS (Figure
5 ).

Figure 5
Set Item category group to BANS
Step 4. Tie the vendor and material together. Once
you have defined the material and vendor masters, link them by
maintaining the Source list and Info
Record. They tie together the vendor, material, purchasing
organization, and the plant.
The transaction for maintaining the source list is ME01.
Select the Fix check box to automatically assign
the vendor in the purchase requisition created (Figure
6), which in turn can be automatically converted into
a PO. Use transaction ME05 to automatically
generate source lists for a range of materials and plants.

Figure 6
The Fix indicator automatically assigns a vendor to a purchase requisition
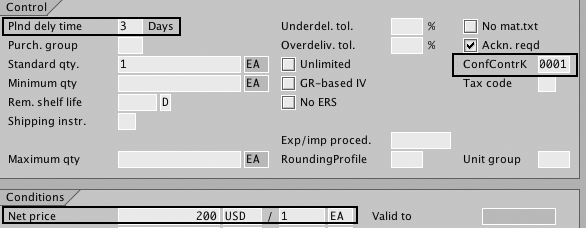
The transaction for maintaining the purchasing info records is ME11.
The key data maintained here are the confirmation control key, planned
delivery time, and net price (Figure 7).

Figure 7
Purchasing information record settings
The confirmation key determines which confirmation categories
are intended for the PO line item. Type in confirmation control
key 0001 for receiving order acknowledgement (AB confirmation
category) and shipping notification (LA confirmation
category) from the wholesaler.
The planned delivery time indicates the number of days required
to procure the material from the wholesaler. This value is used
in calculating the delivery date on the sales order. The Net
price is the price at which the trader buys the material
from the wholesaler. Use transaction MEMASSIN to
mass-change specific values of a range of purchasing information
records.
Tip!
Purchasing org. is a standard SAP term to denote the organization structure for purchasing. If a single purchasing org. is used for different plants, the purchasing information record can be maintained at the purchasing org. level with the plant as blank. This way the information record can be made available for all plants.
SAP Process Flow
After setting the master data, the next step is to understand
the process flow and the data flow between your company and the
wholesalers. Once you receive the order from the end customer,
the item category is defaulted in the sales order line item as TAS,
which automatically creates a purchasing requisition assigned
to the vendor, XWHOLESALE in my example. Use
transaction ME59 to convert the purchase requisition
into a PO, running the transaction either in the foreground or
periodically in the background to create the POs. Use the release
date to ensure that once purchase requisitions are due, they
are converted into POs.
Once the PO is created, the 850 message is
sent to the wholesaler. The wholesaler receives the 850 message
and sends the order acknowledgement, 855 ORDRSP,
back to you. The system then processes the order acknowledgement
message that creates an AB confirmation on the
PO, shown in Figure 8 in the Confirmations sub
screen.

Figure 8
PO Confirmations sub screen
The wholesaler prepares the shipment, ships it to the end customer,
and sends the shipment notification. This creates an inbound delivery
step (LA) confirmation and creates an inbound delivery.
You then create a receivable invoice and receive the payment
from the customer. The wholesaler sends an 810 INVOIC message
with the value payable, which creates a Logistics Invoice Verification
(LIV) in the your system. You then pay the wholesaler based
on the LIV, thereby completing the supply chain cycle.
Tip!
Use the inbound delivery creation to trigger a delivery confirmation to the end customer through an email or other type of notification.
.
Ganesh Sundaramoorthy
Ganesh Sundaramoorthy is a logistics consultant with more than seven years of consulting experience. He holds a bachelor’s degree in chemical engineering and a master’s degree in business administration. He has worked in high-tech manufacturing, the watch industry, and retail.
You may contact the author at ganesh_s01@infosys.com.
If you have comments about this article or publication, or would like to submit an article idea, please contact the editor.


