Learn how SAP’s Liquidity Planner module for actuals determination works. Discover the advantages and uses of the module.
Key Concept
SAP’s Liquidity Planner module for actuals answers questions such as how much cash came in related to customer receipts this week or how much was spent on payroll this month. Having quick, up-to-date access to this type of data is important for all organizations. Liquidity Planner reports on pure cash transactions.
Liquidity Planner is the SAP module that calculates cash actuals. Cash actuals are the uses and sources of cash. They include both revenue and expenditure actual cash posting data, and are in the form of liquidity items that map to company-specific buckets or categories. One of the main benefits of using Liquidity Planner for actuals determination is that it is very easy to set up in comparison to the benefits its reporting provides. I describe the Liquidity Planner for actuals determination functionality. See the “Key Terms” section if you are not familiar with the terminology in Liquidity Planner.
Note
Liquidity Planner originally supported both the determination of actuals and the tracking of planned data in Strategic Enterprise Management (SEM). The solution allowed SAP system users to do actual versus plan reporting. Through time, SAP has decommissioned the tracking of planned data in SEM, but the determination of actuals has always been supported with SAP ERP Central Component (ECC) standard functionality.
There is no additional licensing needed for the Liquidity Planner functionality within ECC, and the good news is Liquidity Planner has been repackaged by SAP as the Cash Flow Analysis report in the Liquidity Management component of SAP Cash Management powered by SAP HANA, and liquidity items are a main element in the Cash Operations component of SAP Cash Management powered by SAP HANA. (There is nothing to “activate” in ECC to use Liquidity Planner. There is some configuration required.)
Key Terms
Table 1 includes definitions of Liquidity Planner key terms.
| Term |
Definition |
| Actuals |
The actuals are the uses and sources of cash. They include both revenue and expenditure actual cash posting data and are in the form of liquidity items that map to the general ledger (G/L) categories. |
| Assign Info Accounts (FLQINFACC) |
The Assign Info Accounts (transaction code FLQINFACC) table maps the final G/L account to a liquidity item. (By final G/L account, I mean the G/L account that is used to determine the liquidity item to be used for the posting. The final G/L account is the G/L account that drives the assignment.) If the further indicator is selected, the program does not stop on that liquidity item, but continues to try to derive a final liquidity item for the cash posting. |
| Liquidity items |
Liquidity items define the buckets or categories in which the cash flows are tracked for cash forecasting. |
| Initial liquidity items |
The initial liquidity items are INIT_IN and INIT_OUT. When the actuals determination program (FLQAD or FLQAF) is run, the SAP system reassigns the initial liquidity item to the final liquidity item based on the rules set up in the system. |
| Final liquidity item |
The liquidity items mapped to revenue and expense G/L accounts
Info accounts |
| Info accounts |
The G/L accounts that drive the liquidity item assignment |
| FLQAD |
FLQAD is the transaction code to the actuals determination program to analyze all cash postings in the specified date range. The analysis is done in transaction currency. |
| FLQAF |
FLQAD is the transaction code to the actuals determination program to analyze all cash postings in the specified date range. The analysis is done in local currency. In addition, FLQAF can populate the additional fields in the extension include FLQ_EXTENSION. (See SAP Note 1826731.) This allows users to track data elements such as cost centers, profit centers, and funds along with the liquidity items. |
| Actual accounts |
SAP refers to cash accounts as actual accounts. Liquidity Planner assumes all house bank accounts defined are cash accounts, as well as any accounts marked as other cash accounts using transaction code FLQC4 or by following configuration menu path Financial Supply Chain Management > Cash and Liquidity Management > Liquidity Planner > Basic Settings: Liquidity Calculation > Define Other Actual Accounts. |
Table 1
Liquidity Planner key terms
Liquidity items describe the uses and sources of cash and are defined as part of the implementation configuration. How a company defines the liquidity items may depend on the company’s business, but here are a few examples:
- Payroll
- Overhead
- Customer receipts
- Prepaid expenses
- Purchases of property and equipment
- Proceeds from sales of investments
- Purchases of investments
- Bond payments
Types and Levels of Assignment
Liquidity Planner for actuals determination has four types of assignment programs shown in
Table 2. The assignment rules drive how the actuals are determined (at which the cash postings are categorized into pre-defined buckets or liquidity items). Any combination of the following four mechanisms can be used.
| Transaction code |
Description
|
| FLQAB |
At the bank statement transaction level |
| FLQAC |
First step, typically at the customer or vendor level |
| FLQAD or FLQAF |
Up to and including the final general ledger (G/L) posting level (revenue or expense) |
| FLQAM |
Manually assign a cash posting to a liquidity item |
Table 2
Liquidity Planner actuals determination programs
Figure 1 shows the assignment programs. To get to the screen shown in
Figure 1, follow menu path Accounting > Financial Supply Chain Management > Cash and Liquidity Management > Liquidity Planner > Assignment or execute transaction code FLQMAIN > Assignment. Executing transaction code FLQMAIN takes you to the Liquidity Planner application-side transaction codes.

Figure 1
Liquidity Planner assignment programs
Here is a high-level explanation of how each of the four programs works.
At the bank statement level, the assignment program uses information from the bank statement such as the BAI (Bank Administration Institute) code and note to payee information to determine the liquidity item. For example, rules are defined that contain conditions to assign a cash posting with the BAI code for bank fees to the liquidity item BANK_FEES.
At the customer or vendor level, cash postings related to certain customers or vendors can be tagged to a liquidity item. For example, if a company uses a specific range of customers and vendors for intercompany transactions, any cash postings to customers and vendors in this range can be assigned to the IC_PAYMENTS liquidity item.
The next level is at the expense or revenue G/L account level. An example is any cash posting that had an original expense G/L account interest expense can be tagged with the INT_EXPENSE liquidity item.
The final way to assign a liquidity item to a cash posting is by manually doing so using transaction code FLQAM. This option should be used only as a last resort. It is best to have a design that is as automated as possible. I will not discuss this option further.
How Liquidity Planner for Actuals Determination Works
After Liquidity Planner is configured, all subsequent postings to cash accounts are assigned an initial liquidity item such as INIT_IN (incoming cash flow) or INIT_OUT (outgoing cash flow).
Note
A cash account is determined to be any G/L account used in the definition of a house bank account (SAP table T012K) and any accounts marked as other cash accounts using configuration transaction code FLQC4 or by following configuration menu path Financial Supply Chain Management > Cash and Liquidity Management > Liquidity Planner > Basic Settings: Liquidity Calculation > Define Other Actual Accounts. Use transaction code FLQCUST to get to the Liquidity Planner configuration menu.
The liquidity transactions can be displayed by running the Liquidity Calculation: Line Item List (transaction code FLQLI). This action displays the screen shown in
Figure 2.
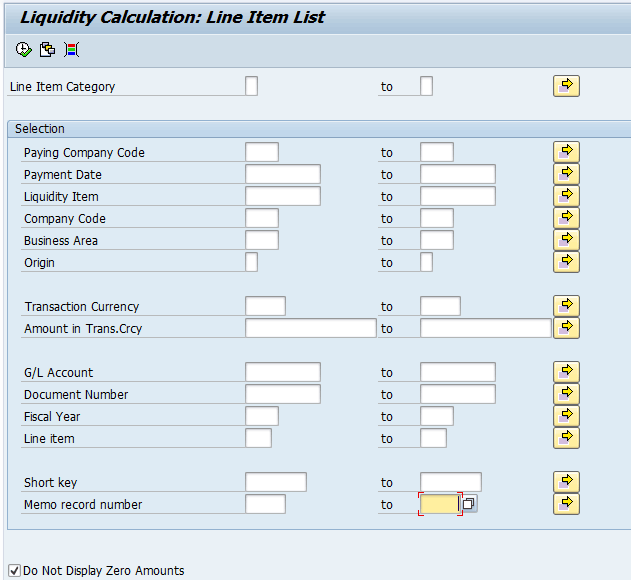
Figure 2
The input screen to liquidity calculation: line item list
Clicking the execute icon in the input screen displays the individual liquidity items (cash postings) shown in
Figure 3. At this point, all the liquidity transactions have an initial liquidity item assigned as shown in the Liquidity Item column in
Figure 3.
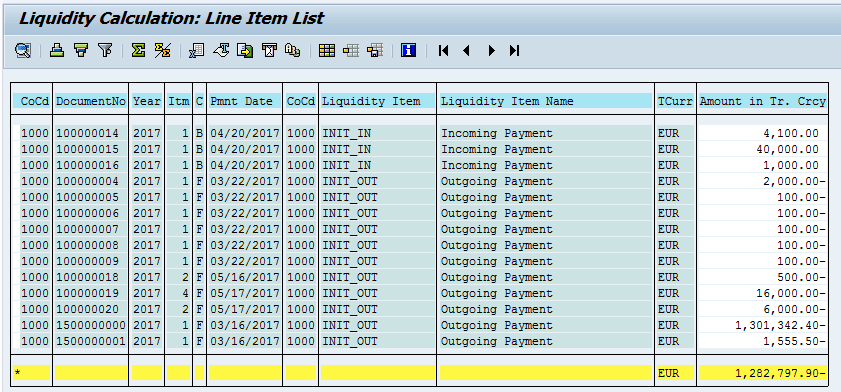
Figure 3
Initial liquidity line items
I describe how the actuals determination program FLQAD functions, as this is the most used and most comprehensive way to assign the cash postings to liquidity items. Using FLQAD is the most comprehensive method because when you run FLQAD, FLQAC is run as well. Thus, it should be possible to assign all cash postings this way. This approach allows for a number of different ways to categorize cash transactions and is consistent and easy to maintain on an ongoing basis.
When the actuals determination program is run, the program starts at the actual cash posting and moves along the document chain until a rule is found for the cash posting and a liquidity item is determined, at which point it stops processing that cash posting and moves on to the next line item or posting. Because Liquidity Planner traverses the document chain for each cash posting, for best results the postings and clearings in the SAP system should follow SAP best practices. If, for example, bank statement cash clearing accounts, one example being the outgoing ACH cash clearing account, are cleared by clearing a number of unrelated postings together, this may affect the results, as this does not follow SAP best practices for clearing bank clearing accounts.
Figure 4 shows a simplified example of how the actuals determination works. The cash postings for the example are on the left. How Liquidity Planner traverses the cash postings is shown on the right. In this example, after the actuals determination program is run, the cash postings have $100 assigned to liquidity item LI_RENT and $200 to LI_OVERHEAD.

Figure 4
An example of Liquidity Planner’s actuals determination (FLQAD)
Note
In the example in Figure 4, the result would be the same if you received one invoice for both overhead and rent. The actuals determination in Figure 4 would also work if you received partial payments.
As mentioned in
Table 1, Liquidity Planner for actuals determination has multiple ways to assign liquidity items. It is important to keep in mind when triggering the order in which the actuals determination programs run that once a cash posting has been categorized (a liquidity item has been assigned to the cash posting), the SAP system moves on to the next cash posting. If no rules are defined that match a particular cash posting, the cash posting remains with the initial liquidity item (e.g., INIT_IN, INIT_OUT).
Because Liquidity Planner for actuals determination starts at the cash accounts and traverses through the clearing documents until a final liquidity item is determined, only cash uses and receipts of cash are tracked. There is no risk of pulling in a non-cash item. There are no accruals that need to be backed out. This is an inherent benefit of using Liquidity Planner for actuals determination over using other ways of determining the sources and uses of cash.
Some Key Liquidity Planner Tips
At this point, I delve a little deeper into the Liquidity Planner for actuals determination functionality, again focusing on the actuals determination program FLQAD. Although I do not cover all configuration steps, I mention a few key points.
As a first step, you need to define the Liquidity items (transaction code FLQC1, which is found by following configuration menu path Financial Supply Chain Management > Cash and Liquidity Management > Liquidity Planner > Basic Settings: Liquidity Calculation > Define Other Actual Accounts). Liquidity items are the cash buckets or categories that you want to categorize for your actual expenditures and revenues. A liquidity item is a 10-character ID with a text field. In this step, only the liquidity items are defined.
To define a liquidity item, execute transaction code FLQC1 or follow configuration menu path Financial Supply Chain Management > Cash and Liquidity Management > Liquidity Planner > Basic Settings: Liquidity Calculation > Define Other Actual Accounts. This action displays the screen shown in
Figure 5. For my example, go to the Liquidity Item field and enter PAYROLL. In the Name and Description fields enter Payroll Payments. Click the save icon to save your data.

Figure 5
Define a liquidity item
You need to define a number of technical liquidity items defined including the following items:
- INIT_IN
- INIT_OUT
- INIT_TRANS
- BUFFER_ITEM
The INIT liquidity items are the initial liquidity items that are used before the actuals assignment is done. The buffer item liquidity item should be assigned to reconciliation accounts or other G/L accounts that do not contain enough detailed information to do the assignment to the final liquidity item. The buffer liquidity item is entered on the input screen to the actuals determination program FLQAD or FLQAF.
It is important to consider the naming convention and level of detail of the liquidity items based on a company’s use of the information. Decide on the level of detail to calculate the actual data (do you want to lump all vendor payments in one category such as VENDOR PAYMTS, or do you want to categorize the different types of vendor payments?). If the latter, then name your liquidity items in such a way that all the vendor-payment-related liquidity items can roll up to VENDOR PAYMTS.
If you are tracking plan or forecast data and want to do an actual-to-plan comparison, make sure that the actual buckets map to the plan or forecast buckets. (You want to be able to compare similar figures [i.e., apples to apples]).
The next key step is to populate the table using transaction code FLQINFACC, which maps the G/L accounts to associated liquidity items. (Follow menu path Accounting > Financial Supply Chain Management > Cash and Liquidity Management > Liquidity Planner > Settings > Info Accounts to get to FLQINFACC.) The G/L accounts that should be entered into this table are the originating revenue and expense G/L accounts that eventually trigger cash postings, such as payroll expenses, office supplies, and international customer receipts. Do not enter the bank account G/L accounts into this table. All customer and vendor reconciliation accounts should be entered in this table, and the corresponding liquidity item should be set to the BUFFER_ITEM. When the actuals determination programs FLQAD or FLQAF are run, the BUFFER_ITEM is entered on the input screen in the Buffer Item field, which tells the system to keep traversing down the document chain until finding a final liquidity item for the cash posting. The screen that the system displays after you execute transaction code FLQINFACC is shown in Figure 6.
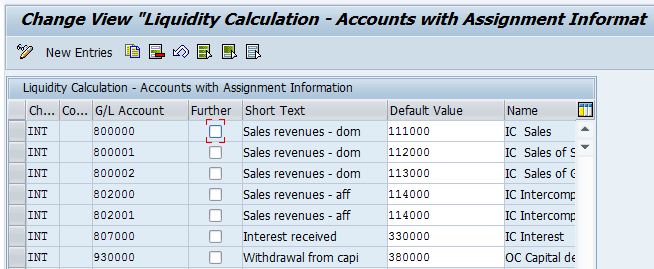
Figure 6
Use transaction code FLQINFACC to map G/L accounts to liquidity items
The screen shown in
Figure 6 is accessed from both the FLQAC level and FLQAC assignment programs.
Before dicussing the assignment programs, I explain Query IDs and Query Sequences. As mentioned above and shown in
Table 2, there are different assignment programs that make the liquidity item assignment at different levels—for example, at the bank statement level, at the customer or vendor level, at the revenue or expense level, or manually. By using Query IDs and Query Sequences at the C-level (e.g., at the customer or vendor invoice level), you can easily assign all cash postings related to specific customer and vendor criteria to a specific category or liquidity item. This can be used, if, for example, you have a vendor or group of vendors that will be assigned to a specific category, such as tax payments, or intercompany payments. You can easily make the assignment for the vendor or group of vendors by defining Query IDs and assigning them to a Query Sequence. The Query Sequence is then an input field to the assignment programs FLQAC and FLQAD.
To define a Query ID, execute transaction code FLQQC1 by following menu path Accounting > Financial Supply Chain Management > Cash and Liquidity Management > Liquidity Planner > Settings > Assignement from FI > Edit Query. In the Query ID field of the screen the system displays (
Figure 7), enter a name for your Query ID.

Figure 7
Define a Query ID
Press the Enter key to open up the other fields. Populate the Query CoCd (query company code), Name, Description, and Liquidity Item fields, as shown in
Figure 8. If the Query CoCd field is left blank, it applies across all company codes. (If a user is not authorized for all company codes, then the queries need to be defined by company code.)
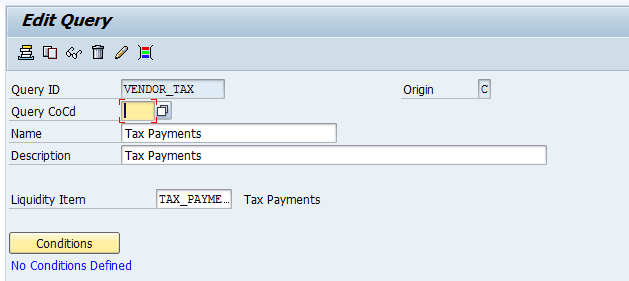
Figure 8
Define a Query ID for Tax Payments
Next, click the Conditions button to specify the condition the assignment applies to in the screen in Figure 9. There are many fields available to be used for assignment. Open the Accounting Document Segment folder on the left side of Figure 9, and double-click the Account type and Vendor fields. These fields then appear on the right side of Figure 9 and can be used in the condition. Enter K in the Account type field (to indicate vendors) and enter the vendor number or vendor number range in the Vendor field. To add multiple vendors, click the yellow arrow icon to the right of the Vendor field. Once you add more than one vendor, this yellow icon will have a green dot on it, signifying that multiple vendors exist.

Figure 9
The condition of the Query ID
Now click the save icon on the buttom of
Figure 9. This Query ID has been defined. You can define an unlimited number of Query IDs.
Before the Query IDs can be used, they need to be assigned to a Query Sequence. The Query Sequence holds the Query IDs that should be used in the actuals determination run. To define an FI Sequence, execute transaction code FLQC8 by following configuration menu path Finanical Supply Chain Management > Cash and Liquidity Management > Liquidity Planner > From Invoices > Define FI Query Sequences, and click the New Entries button. Populate the fields for the Query Sequence, as shown in
Figure 10.

Figure 10
Define a Query Sequence
Lastly, you need to attach the Query IDs to the C-level Query Sequence that you created above. To complete this step, use the Set Up Query Sequence program (transaction code FLQQC5, which is found by following configuration menu path Accounting > Financial Supply Chain Management > Cash and Liquidity Management > Liquidity Planner > Settings > Assignment from FI > Set Up Query Sequence). After you execute transaction code FLQQC5, select the tab to the left of the Query Sequence VENDORS defined (not shown), and then double-click the Queries folder (Figure 11). Click the display > change icon  and then you see a new button called New Entries.

Figure 11
The Vendor Query Sequence
There is a number to the left of the Query ID. This number is used to drive the order in which the Query IDs are used. Again, remember that Liquidity Planner processes each cash posting and executes the rules setup until it finds a rule that applies to the cash posting. Once an assignment is made, the SAP system moves on to the next cash posting. Keep this logic in mind when assigning the numbers on the left of the Query IDs. The numbers are driving the order the Query ID is used for assignment.
Figure 11 shows the Vendor Query Sequence with two Query IDs assigned. If you decide you do not want to use a Query ID, select the check box under the Inact (inactive) column after the Query ID. This newly created query sequence should be entered in the first derivation step when running the actuals determination program.
You are now at the point when you can run the actuals determination program Delta Assignment Based on Invoice (transaction code FLQAD). This program goes through the actual documents in the liquidity calculation and attempts to determine the liquidity item of the document on the basis of information in the line items of accounting documents. This is done in two steps.
The first step is the same as running the actuals determination program FLQAC. The program evaluates the customer and vendor line items in payment documents, as well as payment-related G/L account line items that have been declared as information carriers (FLQINFACC).
The second step is applied if the result of the first step belongs to one of the buffer liquidity items defined in the Buffer Item field. In this case, the program continues traversing the accounting clearing documents until it finds line items with G/L accounts with liquidity item assignments in FLQINFACC. If this happens, the buffer liquidity item derived in the first step is replaced. If not, the buffer liquidity item remains assigned. Figure 12 shows the input screen of FLQAD, as well as some helpful information about some of the inputs to the program. Be sure to scroll down and select the Detail List radio button.

Figure 12
The FLQAD actuals determination program input screen
The different levels are described in
Table 2. Refer to the “Types and Levels of Assignment” section for more details on the different levels.
After populating the inputs, click the execute icon. The output screen shows the results of all the cash positngs (
Figure 13). The first field on the output screen is the new liquidity item for the cash posting.

Figure 13
Output to actuals determination programs
The fields below the Query ID column in the output screen indicate how the SAP system made the mapping from the new to the old. When EXIT is in the Query ID field, this means the assignment was done in a user exit. When the G/L account is displayed, that means the mapping came from the G/L mapping table (transaction code FLQINFACC).
When you are satisfied with the assignments, click the green arrow icon to go back to
Figure 12. Deselect the Test Run check box, and click the execute icon to re-execute the program. The system then updates the liquidity items assigned to the cash transactions from the INIT liquidity item to the final liquidity item.
After you have run FLQAD, in non-test run mode you should run FLQLI – Line item List to verify there are no items remaining in INIT_IN and INIT_OUT. Also, you should verify that the total dollar amount in INIT_TRAN is zero.
When you are getting started, I recommend doing the basic configuration and then working with a few cash documents. Test these documents until you get the results you expect. Only after that should you move on to full days of cash postings.
The final step is for business users to use the report FLQREP to view the final assignments, such as the sources and uses of cash by company-specific buckets for specific date ranges (a specific week, month, or year). It doesn’t make sense to run the report over an indefinite amount of time. Companies want to be able to answer questions related to a specific time period. For example, a company may want to know what dollar amount of customer receipts it received this month, or how much it spent in travel and expense this quarter.
Once the cash actuals are determined, they can be used to create reports such as planned versus actual reporting, as well as month-over-month and year-over-year reporting on cash expenditures and receipts. These custom reports can be created in ECC or in SAP Business Warehouse (SAP BW).
Table 3 outlines the process flow once Liquidity Planner for actuals determination has been rolled out to production.
| Frequency |
Description of step
|
| Daily as bank statement postings are made to the SAP General Ledger (assuming the bank statements are imported daily) |
An initial (default) liquidity item of INIT_IN or INIT_OUT is created for all postings made daily to a cash account. Bank posting outflows are initially assigned an INIT_OUT liquidity item. Bank posting inflows are initially assigned an INIT_IN liquidity item. After Liquidity Planner has been configured, this step happens automatically as cash postings are made.
A cash account is determined to be any G/L account used in the definition of a house bank account (transaction code FI12, SAP table T012K) and any accounts marked as other cash accounts using transaction code FLQC4 or by following configuration menu path Financial Supply Chain Management > Cash and Liquidity Management > Liquidity Planner > Basic Settings: Liquidity Calculation > Define Other Actual Accounts |
| Scheduled daily |
The actuals determination program (FLQAD or FLQAF) is run on a daily basis and attempts to assign a final liquidity item to any INIT_IN or INIT_OUT liquidity items. When the actuals determination programs run, they reassign the initial liquidity item to the final liquidity item based on the rules set up in the system. This step should be scheduled sometime after the bank statement postings have been made or at the end of each day. |
| Periodically |
Periodically someone in accounting should check for any liquidity items that have not been assigned. They should assign the liquidity item to the posting manually using transaction code FLQAM, and then implement a change to the setup so that any similar future postings are automatically assigned. (The goal should be to have as few manually assigned transactions as possible.) |
| Periodically |
Reporting on the actuals can be done using a number of reports such as transaction codes FLQREP or FLQLI. |
Table 3
Production process flow
Table 4 shows the Liquidity Planner transaction codes described in this article.
| Transaction code |
Usage
|
| FLQINFACC |
The G/L account mapping to final liquidity item is done using transaction code FLQINFACC. FLQINFACC is the application-side transaction code for FLQC7, which is configuration. |
| FLQAD |
Run FLQAD to generate the actuals for the date range. |
| FLQLI |
Line item list report that shows the individual liquidity transactions |
| FLQREP |
SAP-delivered report to view the actuals |
| FLQAM |
Any cash postings that could not be mapped to a final liquidity item may need to be investigated and manually assigned using transaction code FLQAM. |
| FLQT1 |
To transfer postings between liquidity items, use transaction code FLQT1. |
| FLQQC1 |
Define C-level Query IDs, which are another type of assignment mechanism. |
| FLQQC5 |
Assign C-level Query IDs to a C-level Query Sequence. The Query Sequence is then assigned as an input to the actuals determination programs. |
| FLQMAIN |
Use FLQMAIN to get to the Liquidity Planner application-side transaction codes. |
| FLQCUST |
Use FLQCUST to get to the Liquidity Planner menu of configuration nodes. |
Table 4
Liquidity Planner transaction codes
Mary Loughran
Mary Loughran has been specializing in the SAP Financials area since 1997 and has worked with numerous clients throughout North America and Europe in the areas of finance and treasury. She was employed as a consultant with SAP America and was a designated expert within SAP America for treasury before she left SAP in 2004. Mary’s expertise is in the areas of SAP Treasury and Risk Management, SAP In-House Cash, Liquidity Planner, Accounts Payable, payments from SAP in general, Cash Management, and Electronic Banking. Mary was an independent consultant from 2004 to 2016.
You may contact the author at
loughran@gmail.com.
If you have comments about this article or publication, or would like to submit an article idea, please contact the
editor.


