Securing information within an SAP BW system is necessary, but it can be difficult because of the massive volumes of sensitive data that are stored in the system. Learn how to develop authorization restrictions for InfoObjects via transaction RSSM so end users can access only relevant data.
Key Concept
SAP BW has two types of authorization objects. The Business Information Warehouse authorization object (RS) restricts BW users from completing certain functions such as creating queries or assigning them to roles. BW provides all the required authorization objects for this classification type so there is no requirement to create custom objects in this category.
The other type of authorization object, Business Information Warehouse — Reporting (RSR), restricts users from seeing certain data. BW does not provide standard RSR authorization objects so you have to create them yourself using transaction RSSM.
You can roll out SAP BW information to an end-user community in a variety of ways. The most widely used and effective means, however, is to empower users to access BW and run queries themselves. This requires the implementation of authorizations so users see only the data to which they should have access. For instance, you must protect HR data to ensure that only the head of an IT department can see the salaries and personal information for the employees within that department. You could also add authorizations so cost center managers only see the cost and spend figures for the cost center for which they are responsible.
I’ll walk you through the process of developing data authorization restrictions for InfoObjects within BW. I’ll also detail the process of implementing authorizations for both characteristics and key figures and point out when the process differs for each. I’ll focus on how to use the BW reporting authorization object RSR. In the characteristic authorization example, I’ll configure the system so that users are only allowed to see cost center CC00000010. For the key figure authorization example, the setup I’ll explain here allows users to view only the key figure 0AMOUNT.
Authorization Restrictions Overview
The steps to develop authorization restrictions are:
Step 1. Make an authorization-relevant InfoObject
Step 2. Create an authorization object
Step 3. Incorporate the authorization object into a role
Step 4. Set up the data restriction
Step 5. Apply the data restriction to InfoProviders
You use the BW-specific transaction RSSM to create authorization restrictions for characteristics, hierarchies, and key figures. Unless otherwise noted, the process is the same for restricting both characteristics and key figures. Creating authorization restrictions for hierarchies is outside the scope of this article. Figure 1 shows a characteristic and key figure query prior to the addition of authorizations. The user has access to all the data.
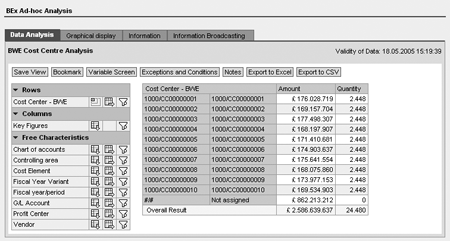
Figure 1
The query prior to the authorization restriction
When restricting characteristics, users can view only the category or categories of the characteristics to which they have access. If users try to run a query with categories to which they do not have access, the query returns with an authorization error that does not allow them to view any data. After adding characteristic authorizations to the query in Figure 1, you would see the data only for the single cost center that has been hard coded into the authorizations (cost center CC00000010). The screen would display both key figures, Amount and Quantity.
Key figure restrictions work slightly differently. When entering the restriction value for key figures, you enter the key figures that users are allowed to see. When users run a query with key figures to which they don’t have access, the query returns an authorization error message. When the users select OK, the query runs and returns data for the key figures to which the users have access. However, any key figures in the report to which users do not have authorization appear blank.
After you implement key figure authorizations for the query in Figure 1, the query would have the same structure, displaying all cost centers and a column for each key figure. The authorization would blank out the key figures to which the user does not have access. In this example, users would see a blank Amount column and a blank Quantity column.
Step 1. Make an Authorization-Relevant InfoObject
This part of the process is required for characteristic authorizations and not for key figure authorizations because key figures have a standard object that defaults as authorization relevant. This example is based on a characteristic that has already been created. However, it is possible to make an InfoObject authorization relevant during the process of creating an InfoObject from scratch.
To complete this step, run transaction RSD1 and maintain the InfoObject on which to base your characteristic authorization. I use cost center object ZCCBWE in Figure 2. Select the AuthorizationRelevant check box located on the Business Explorer tab of the InfoObject maintenance screen. When you have completed this, activate the InfoObject.
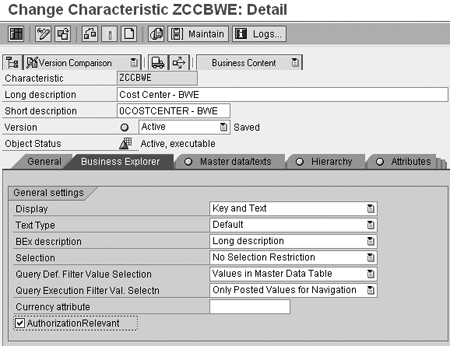
Figure 2
Select the AuthorizationRelevant check box
Step 2. Create an Authorization Object
For characteristic restrictions, BW provides standard authorization objects that restrict BW users from completing certain functionalities with the BW system and BEx/Web applications. However, no standard authorization objects exist for data restrictions, so you need to create them. The authorization object I’ll create is based on the InfoObject from step 1.
Go to transaction RSSM (Figure 3). To set up a characteristic authorization, enter the name of your authorization object, ZCCBWE in my example, in the Authorization Object field. Select the Object button, click on the create icon, and a screen pops up. Enter a description of the authorization object in the field provided and click on the enter icon (a green check mark) and Figure 4 appears.

Figure 3
Enter your authorization object’s name

Figure 4
Enter a description of your authorization object and bring InfoObject ZCCBWE to the left
Now highlight ZCCBWE (the InfoObject that you made authorization relevant in step 1) on the right side of the screen in Figure 4, use the arrows to bring it over to the left side, and save. The right side of the screen provides a listing of all the InfoObjects that have been made authorization relevant and some standard BW objects.
For key figure restrictions, InfoObject 1KYFNM allows you to restrict the viewing of any available key figures. Unlike characteristic restrictions, where you select a specific authorization-relevant InfoObject (e.g., cost center, organization unit, profit center), all key figure restrictions use the same authorization object, 1KYFNM. You select the key figures you want to restrict at a later stage.
Go to transaction RSSM and enter ZCCBWEKYF, the name of the authorization object (Figure 5). Select the Object button and click on the create icon. Add a description of ZCCBWEKYF in the Authorization Object field and click on the enter icon. In the screen shown in Figure 6, highlight InfoObject 1KYFNM on the right side of the screen, use the arrow to bring it to the left side, and save.

Figure 5
Enter the name in the Authorization Object field

Figure 6
Describe the authorization object and bring InfoObject 1KYFNM to the left
Step 3. Incorporate the Authorization Object into a Role
Now that you’ve created the authorization object, the next step is to assign the authorization object to the profile of a role. You need to use a role that already has all the relevant authorizations to run a query from a functionality standpoint and then add the new authorization object you have created to the profile of this role.
First, edit the role to add the authorization object to the profile (Figure 7). Enter transaction PFCG, type the name of the role (ZBWE in my example), and select the change icon (a pencil). Next, go to the Authorizations tab and select the change icon next to Change Authorization Data to change the profile (Figure 7).
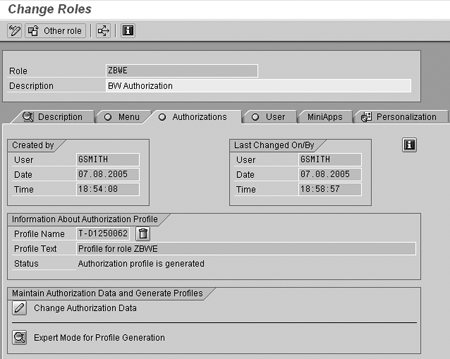
Figure 7
Edit the profile of the role by selecting the change icon on the Authorizations tab of role ZBWE
In the resulting screen (Figure 8), click on the Selection criteria button to add the authorization object restriction to the profile of the role. This takes you to the Change role: Insert authorizations screen (Figure 9). Expand the SAP Business Information Warehouse – Reporting folder. The authorization object ZCCBWE is displayed in this folder (Figure 9) and ZCCBWEKYF is displayed in this folder in Figure 10.

Figure 8
Click on the Selection criteria button to add an additional authorization restriction to the role’s profile

Figure 9
Insert the characteristics authorization object, ZCCBWE (Cost Center BWE Authorization Object), into the profile of role ZBWE

Figure 10
Insert the key figure authorization object, ZCCBWEKYF (key Figure Restriction for BW Expert), into role ZBWE
Click on the red minus sign to the left of your authorization object to change it to a green plus sign. Insert the authorization into the role using the Insert chosen button at the top of the screen. This is illustrated in Figure 9 for characteristic authorization (ZCCBWE) and Figure 10 for key figure authorization (ZCCBWEKYF).
Step 4. Set Up the Data Restriction
Now that you’ve added the authorization object into the role, create the data restriction for the role. Use the change icon to the left of the authorization object to select the value for the authorization (Figures 11 and 12).

Figure 11
Choose the change icon for the Cost Center authorization object

Figure 12
Choose the change icon for the Key figure authorization object 1KYFNM
Figure 13 shows the selection box that appears when you have selected the change icon next to the authorization object. Select the correct authorization value by typing in the value or selecting the value from the drop-down list. Select the correct value or values and save the authorization. This adds the restriction to the role (Figure 14).

Figure 13
Select the characteristic authorization value and save
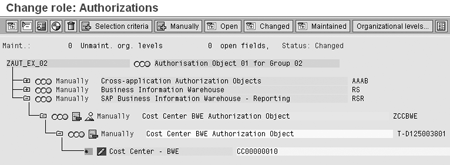
Figure 14
The profile screen after entering the characteristic restriction value
Figures 15 and 16 show the same process of selecting the value for restricting which key figures may be viewed. Enter the key figure or figures to which the user has access. As with the characteristic restriction, you can either type in the values or select them from the drop-down box.

Figure 15
Select the key figure authorization value and save

Figure 16
Users with access to this role are only able to see the 0AMOUNT key figure
After you’ve added the data restriction, you must generate the profile using the red and white disk icon at the top of the screen. This also saves any changes.
Use the green back icon to go back to the maintain role screen. Click on the User tab and enter thename of the user who will be running the query.
Once you have added the user to the listing, complete a user comparison to update the user's profile. Select the User comparison button and the system displays a pop-up box. Select the Complete comparison button and save the role.
Use the back icon to return to the role maintenance screen. Save the role if prompted at any time.
Step 5. Apply the Data Restriction to InfoProviders
Assign the authorization object to the InfoProvider. Return to transaction RSSM and enter the name of the authorization object (Figures 17 and 18). Select the Check for InfoCubes button. Click on the change icon.

Figure 17
Select the Check for InfoCubes button for authorization object ZCCBWE

Figure 18
Select the Check for InfoCubes button for authorization object ZCCBWEKF
Now select the InfoProviders for which the authorizations object should be in effect (Figures 19 and 20). Save to make the authorizations effective for the selected InfoProviders.

Figure 19
Select the InfoProviders for which characteristic authorization object ZCCBWE should be in effect
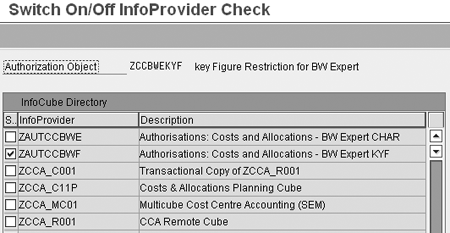
Figure 20
Select the InfoProviders for which key figure authorization object ZCCBWEKYF should be in effect
Execute the Queries
Now that you’ve set up the authorizations, run queries to ensure you get the correct result. For characteristics, users need to restrict the query in relation to the authorization restriction you just configured, CC00000010 (Figure 21). You could either hard code the query in question by a variable entry or by creating an authorization variable. It’s more flexible to use variables, because if authorization restrictions are hard coded, you have to maintain a query for each authorization restriction.

Figure 21
The restricted query
Once you have made the correct restriction in relation to the authorization, the query should bring back only authorized values. If the incorrect value is displayed an error message appears and the query displays no data, only the message “No Authorized Data.”
For the restriction of key figures, no additional work is required. Simply run the query and you are allowed to view the only key figures to which you have access according to the restriction, 0AMOUNT in my example. A warning appears informing you of the restriction in place (Figure 22). All key figures except 0AMOUNT appear blank in the query. The role in Figure 22 allows the user to view the amount field. The other key figure columns to which the user does not have access appear blank in the report.
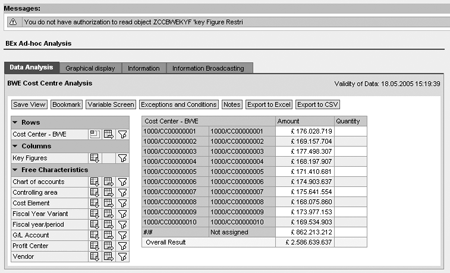
Figure 22
Key figure warning message
Graeme Smith
Graeme Smith is an SAP-certified lead BW consultant with the UK-based Unilog Group. He has over seven years’ experience implementing data warehousing and business intelligence solutions and also has much exposure to data management applications, including SAP MDM. Since early 2002, Graeme has focused on implementing projects involving SAP Business Information Warehouse and during this time has undertaken a number of key roles within these projects such as lead BW developer, project lead, and program release manager. Graeme has specialist knowledge in BW, HR, and authorizations. You may meet him in person in the UK delivering training for the Unilog Group.
You may contact the author at graeme.smith@unilog.co.uk.
If you have comments about this article or publication, or would like to submit an article idea, please contact the editor.


