More and more countries in the EU are allowing electronic declaration of Value Added Tax (VAT) reports. See the configuration and technical settings you can implement in your SAP system to enable you to electronically submit VAT to tax authorities.
Key Concept
Within SAP systems, the most common method for the VAT declaration is VAT report RFUMSV00. This report provides the information used to make the VAT declaration to tax authorities. It is a manual exercise to enter the data from the SAP system into the tax authorities system. Some countries now offer the possibility to send the VAT declaration electronically directly from your SAP system.
For companies in the EU, the main way to do a Value Added Tax (VAT) declaration is to run VAT report RFUMSV00 (or to use transaction S_ALR_87012357). This report provides the VAT information that is to be used for tax declaration. However, this information needs to be copied manually into the final VAT declaration.
Since 2005, SAP has provided the possibility to send VAT electronically to the tax authorities. This is not yet supported by all tax authorities, but it is in countries such as Germany and the Netherlands. The number of countries supporting the electronic VAT declaration is expected to increase in the coming year.
The principles for setting up the electronic VAT declaration are the same for all countries, but in this article I’ll explain how to do it for the Netherlands. This article applies to SAP ERP Central Component (SAP ECC) 6.0 systems.
Principles of Electronic Declaration
I’ll first explain the principles used for the declaration and then explain what you need to do in the system. The declaration has three parts of information:
- The general information about the organization making the declaration (e.g., name, address, and period of the declaration)
- The amounts involved in calculating VAT. These are called the base amounts. For example, VAT is calculated based on the revenue charged to a customer. When the revenue is €1,000 and the VAT percentage is 20%, then the base amount is €1,000 and the VAT amount is €200. Often, the base amounts of different types are added together. For example, the base amounts for low- and high-rate VAT are aggregated. In the previous example, say there is also invoiced revenue of €500, which is to be charged with a VAT percentage of 8%. Then the total base amount would be €1,500, even though it is made up of two different kinds of base amounts.
- The VAT amounts. Like the base amounts, this can be a combination of several kinds of VAT. In the above example for the base amount, let’s say that the VAT amount to be reported is €240, which is the total of €200 for 20% VAT and €40 for the 8% VAT.
The rules determining the base amounts and VAT amounts are country specific. The tax authorities provide the information on how to aggregate base amounts and VAT amounts.
It is also possible that VAT amounts are reported more than once. For instance, this is the case in Belgium. Also, the way amounts are aggregated could depend on whether the amounts are debit or credit amounts. As with the manual procedure, you gather the declaration information in the SAP system by using standard VAT report RFUMSV00. Instead of printed information, though, the electronic information is sent to the tax authorities as an XML file. Now I’ll discuss the configuration necessary in your SAP system before explaining some technical settings.
Configuration
The configuration in the SAP system is mainly focused on gathering three parts of information. In addition to the configuration, you also need to perform the technical settings to create the XML file.
Step 1. Set Up the Parameters for Electronic Communication
The electronic communication with authorities is the general information that you need to send to the tax authorities. This information is country specific. In Figure 1 you can see two screenprints: one for a German company and one for a Dutch company. As you can see, the information for Germany includes more parameters than the information for the Netherlands.
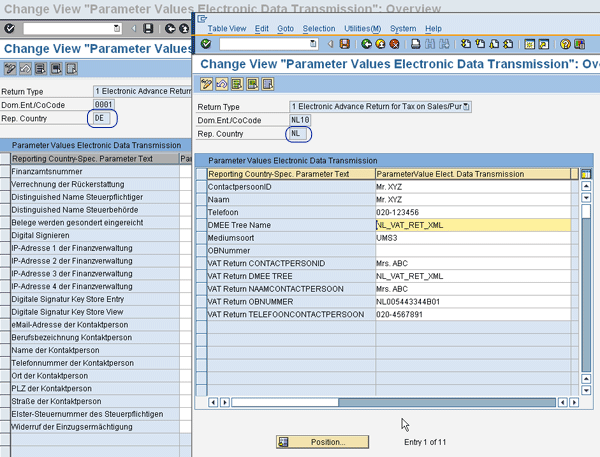
Figure 1
Parameters for the VAT declaration in Germany and the Netherlands
You can find the transaction to set up the parameters by following IMG menu path Financial Accounting (New) > General Ledger Accounting (New) > Periodic Processing > Report > Electronic Communication with Authorities > Define Parameters for Electronic Communication with Authorities. When you start this transaction, you first see the pop-up screen shown in Figure 2. Select the Return Type as 0001 for the tax declaration and then enter the appropriate country code in the Dominant Enterprise/Company Co field, as well as the appropriate country in the Country of Reporting Authority. I’ll explain the dominant company code later.

Figure 2
Selection parameters for electronic communication with the authorities
Step 2. Define Tax Base Amounts
Now you set up the grouping of the base amounts. Use transaction OBCG or follow IMG menu path Financial Accounting (New) > General Ledger Accounting (New) > Periodic Processing > Report > Sales/Purchases Tax Returns > Group Tax Base Balances. When you start this transaction, a pop-up screen appears in which you enter the reporting country and a tax grouping version. The version is only used for Portugal and you can use it to define several ways of grouping the base amounts. This transaction can be useful when the grouping for the next year is changed, but you still need to use the old grouping for your tax reporting. Although the SAP Help information says to make no entry except for Portugal, for the electronic declaration you must enter EDCL in the grouping version.
Figure 3 shows an example of the settings for the Netherlands — the settings may differ per company, as companies may use different codes for the VAT. Figure 3 shows several columns for the settings:
- Tx: The VAT code to report
- Description: The description of the VAT code. It is defaulted from the settings of VAT code, but it can be changed.
- Trs: The transaction key to report. The VAT is calculated using a condition schema. This schema is built up by several three-letter transaction keys. Normally only one transaction key is used per VAT code, but for some tax codes two transaction keys are used.
- Bal.: A distinction between debit and credit amounts. When left blank, it means the value is both a debit and a credit. This is for situations relevant for Belgium and Germany.
- Tx.bs: The group number. It determines in which table item the total amount is stored. The tax authorities specify in which group an amount must be stored. The group number is used in the XML file definition (which I’ll discuss later).
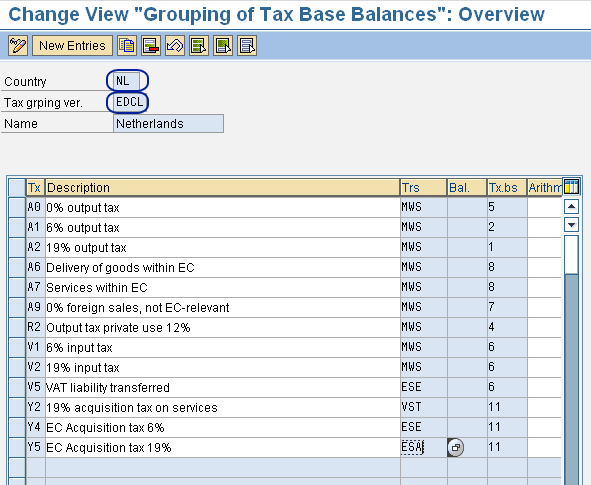
Figure 3
Grouping of the base balances
Step 3. Define Tax Balances
In addition to the base amounts, you need to set up the way you want to report the tax amounts. Use transaction OBCH or follow IMG menu path Financial Accounting (New) > General Ledger Accounting (New) > Periodic Processing > Report > Sales/Purchases Tax Returns > Group Tax Balances. As with the previous transaction, when you start this transaction a pop-up screen appears in which you enter the reporting country and a tax grouping version. Once again for the electronic declaration, you enter EDCL in the grouping version.
Figure 4 shows an example of the settings for the Netherlands. The columns have the same meaning as for the tax base amounts. In the example, you can see that it is possible to have the same VAT code reported in two places. In this case, the VAT code Y5 is reported in groups 61 and 56. Prior to electronic tax declaration, only Belgian and German tax authorities defined group numbers for their reporting. Companies had to report, on paper, that the amount in group 61 equals xxx, the amount in group 56 equals yyy, and so on. For electronic tax declaration, SAP has adapted this way of working for other countries as well.
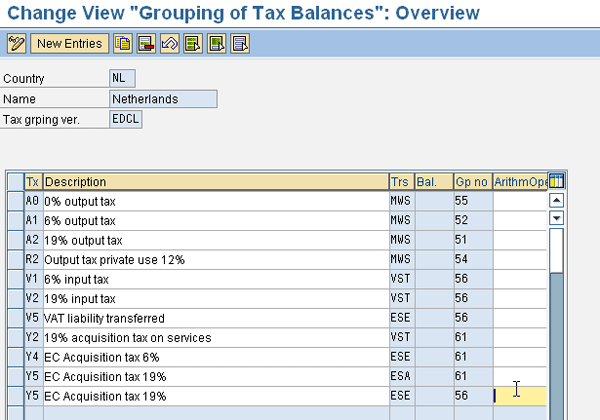
Figure 4
Grouping of the tax balances
Step 4. Define Taxes on Sales/Purchase Groups
This setting is only required if you have a fiscal unity in a country, meaning several company codes combine for the tax declaration. Use transaction OBCF or follow IMG menu path Financial Accounting (New) > General Ledger Accounting (New) > Periodic Processing > Report > Sales/Purchases Tax Returns > Define Tax on Sales/Purchases Groups. Use this transaction to see an overview of all existing groups. Go to the detail screen for the entry (Figure 5). You must assign a dominant entity/company code in the Dom.Ent./CoCode field. This identifies the company code dealing with the tax authorities.
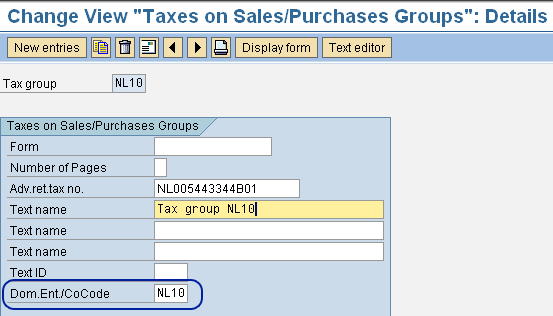
Figure 5
Define taxes on sales/purchases groups
Step 5. Assign Company Codes to Taxes on Sales/Purchase Groups
This setting goes together with the previous setting. Use transaction OBCF or follow IMG menu path Financial Accounting (New) > General Ledger Accounting (New) > Periodic Processing > Report > Sales/Purchases Tax Returns > Assign Company Codes to Tax on Sales/Purchases Groups. When you start this transaction, you’ll see all existing entries. You only need to enter the appropriate tax group for the company code. In this example, I entered NL10 for company codes NL01 and NL10, where company codes NL01 and NL10 have been assigned to tax group NL10 (Figure 6).

Figure 6
Assign company code to tax group
You’ve completed all the functional configuration necessary, so now it’s time to move on to the technical settings.
Technical Settings
The technical settings are necessary to set up the communication between the SAP system and the tax authorities. In the Netherlands, direct communications with the tax authorities is not possible, so you need to set up only the file download. For countries with direct communications with the tax authorities, you need to set up this communication as well.
Setting 1. Set Up the Electronic Communication with Authorities
This setting is required to indicate the frequency you communicate with the tax authorities. Follow IMG menu path Financial Accounting (New) > General Ledger Accounting (New) > Periodic Processing > Report > Electronic Communications with Authorities > Make Settings for Electronic Communication with Authorities.
When you start this transaction, a pop-up screen indicates the Return Type, which reflects what kind of information you are communicating. In this case, you must enter return type 0001. (The pop-up screen is similar to Figure 2.) You are then transferred to an overview screen with all the existing settings. When you double-click a line, you see the detail screen shown in Figure 7. You must choose the transfer type and the period. For the transfer type, you can choose between using SAP NetWeaver Process Integration (SAP NetWeaver PI, formerly called SAP NetWeaver Exchange Infrastructure [SAP NetWeaver XI]) and a download. For the Netherlands, you can’t use SAP NetWeaver PI because the tax authorities don’t permit it. You must choose download.

Figure 7
Detail screen for settings electronic data transmission
The Netherlands has monthly VAT reporting, so in this example I set the period to Month. You can also choose quarterly or yearly for other countries. The Joint Transfer indicator enables you to combine several returns.
Setting 2. Define Data Medium Exchange (DME) Formats for Tax Reporting
You must define the format of the XML file to send to the tax authorities. You can download the XML files from the SAP Support Portal in the SAP Service Marketplace. You then upload the XML file with transaction DMEE.
Figure 8 shows part of the Dutch XML file format (unfortunately all the text is in Dutch). The figure shows the details for the line called OmzetVerlegd. On the right side of the screen, you can see that field BAS06 from the structure RFUMS3_TAX_ITEM is the source of OmzetVerlegd. This is related to settings made for the base value in Figure 3. VAT codes V1, V2, and V5 are allocated to group 6, which is the same 6 that is in BAS06.
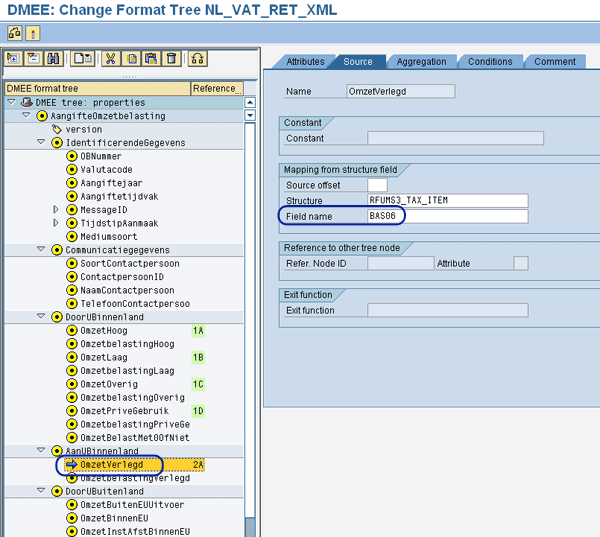
Figure 8
XML file for the Dutch tax declaration
Setting 3. Activate Business Add-In (BAdI) FOT_VAT_DECL_NL
Use transaction SE19 to activate the BAdI FOT_VAT_DECL_NL, which is required to create the XML file (Figure 9). You enter the tax values in the fields called STExx in the structure RFUMS3_TAX_ITEM, where xx stands for the group number used in Figure 3.

Figure 9
Activate BAdI FOT_VAT_DECL_NL
Note
I needed to correct the DMEE structure manually because the SAP documentation wasn’t correct. The group numbers as indicated in the documentation didn’t match with the numbering in the DMEE tree.
Declare VAT in the SAP System
When you have finalized all the settings, you can prepare the VAT declaration. The declaration process starts with the standard VAT report RFUMSV00 (or transaction S_ALR_87012357). You can start this transaction by following the user menu path Accounting > Financial Accounting > General Ledger > Reporting > Tax Reports > General > Advance return for Tax on Sales/purchase. Figure 10 shows the selection screen of this report. You must enter either the company code or the tax group in the Taxes on sales/purchase gro field. In this case, it is the tax group NL10.
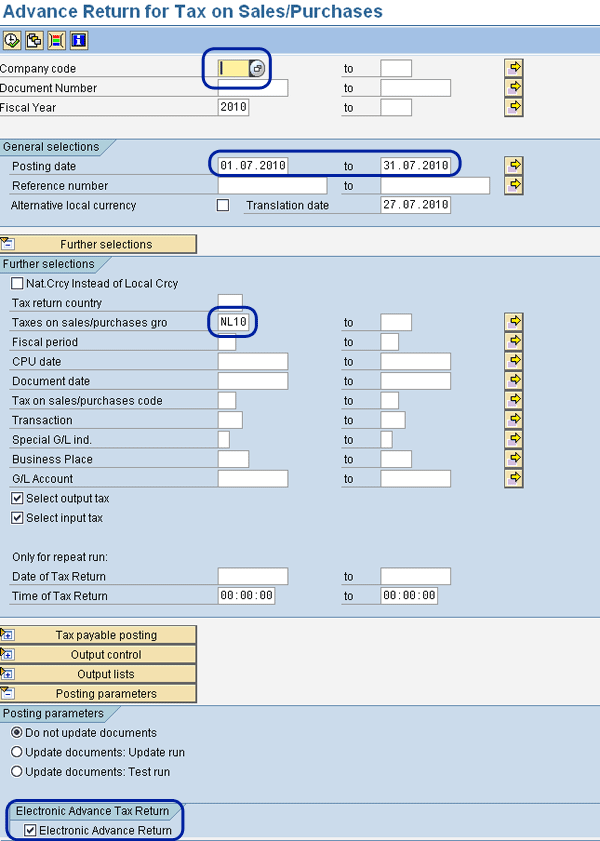
Figure 10
Selection screen for the VAT declaration
Select the reporting period by entering the first and last day of the month. The system checks that you accurately chose the correct dates. You cannot use the fiscal period. Select the Electronic Advance Return check box at the bottom of the screen.
Although this report has other parameters, they are not relevant for the creation of the XML file so I won’t discuss them. After executing the report, at the end of it you see a remark that the electronic declaration has been prepared (Figure 11).

Figure 11
Notification that electronic tax declaration has been prepared
After running the report, you can download the XML file. Use transaction FOTV or start this report by following user menu path Accounting > Financial Accounting > General Ledger > Reporting > Electronic Communication with Authorities. Figure 12 shows the selection screen of this report. Enter the (dominant) company code, the return type (1 for VAT), and reporting country. Moreover, you can select the reporting period and year. If you don’t select the periods, all periods for the reporting year are downloaded.
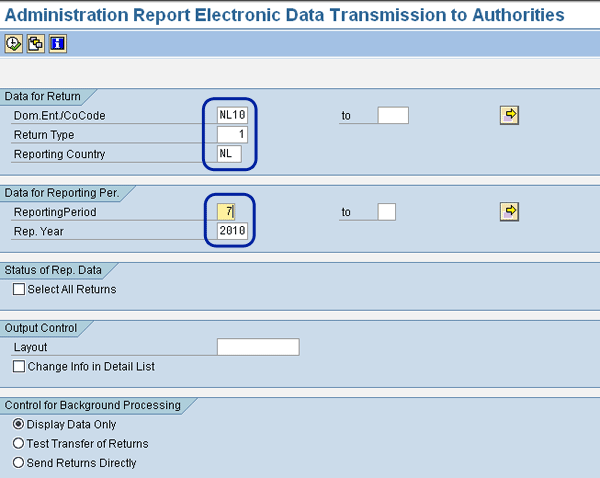
Figure 12
Selection screen for transaction FOTV
Execute the report (Figure 13). It indicates data is available for company code NL10 for period 7, year 2010. The status indicates that it is New.
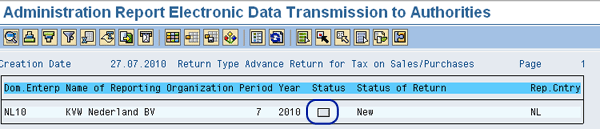
Figure 13
Result of transaction FOTV
You now must select the data by either double-clicking the line or placing the cursor on the line and clicking the select icon. The status changes into ready for data transfer status (Figure 14). Download the data into the XML file by clicking the download icon. The transaction then shows the XML file, which you can download via the menu XML > Download (Figure 15).
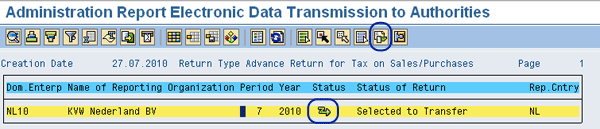
Figure 14
Data ready for data transfer
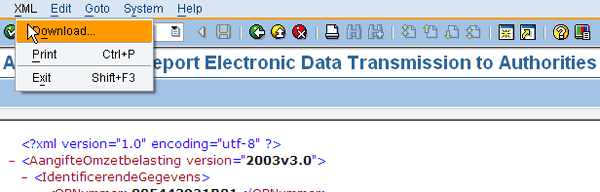
Figure 15
XML file ready to be downloaded
This concludes the VAT reporting from an SAP point of view. You can now send the VAT declaration to the tax authorities. This procedure is country specific; in the Netherlands you require additional software to send the declaration to the tax authorities.
Note
SAP Note 820687 has additional information for electronic VAT declaration.
Kees van Westerop
Kees van Westerop has been working as an SAP consultant for more than 25 years. He has an MBA degree in mathematics and a degree in finance. Kees has been concentrating on the financial modules, especially in general ledger accounting, cost center accounting, and consolidation. He also has a great deal of experience with rollouts of kernel systems and integrating finance and logistics.
You may contact the author at keesvanwesterop@hotmail.com.
If you have comments about this article or publication, or would like to submit an article idea, please contact the editor.