Learn how to alter field controls to make a field required, optional, or display only, as well as how to suppress unnecessary fields to reduce the clutter in vendor master views. Find out how to control vendor master fields in three ways: by account groups, transaction codes (i.e., create or change vendor), and purchasing organizations.
Key Concept
Vendor master fields are maintained in various vendor master views. The address fields, such as vendor name, street, and zip code, are maintained in the address view. Some views, such as purchasing data and partner functions, are relevant for procurement. These views contain fields such as order currency, payment terms, buyer, and vendor contact person.
Although the vendor master has several views and fields available by default in SAP ERP Central Component (SAP ECC), you do not need to display them all. Unused fields clutter the screen for the business user. Follow the procedures detailed in this article to control the fields available for data entry by account group, transaction code, or purchasing organization.
Control Field Display by Account Groups
Account groups are used to classify vendors. For example, account group 0001 is used to classify purchasing vendors and 0002 is used to categorize goods suppliers. You can control fields by account group by following the steps in this section.
Step 1. Identify the account group of any vendor that has been set up in SAP ECC for which a field has to be suppressed. In this example, follow menu path Logistics > Materials Management > Master Data > Business Partners > Vendor > Change > Complete. Input any vendor number and purchasing organization, select the Purchasing Data checkbox, and press Enter. After pressing Enter, you are taken to the purchasing data view of the vendor master. At the top, select the tab Extras and go to Administrative Data. You see the Account group for the vendor master data screen (Figure 1).
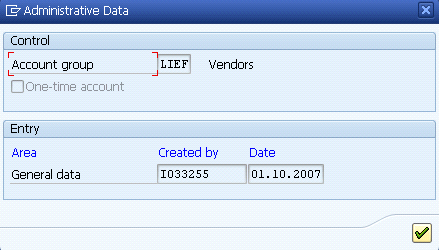
Figure 1
Identify Account group LIEF for Vendors
Step 2. Identify the field to be suppressed for Account group LIEF. Let’s assume that you want to suppress the seldom-used field Order optim.rest. (order optimizing restrictions) in the Purchasing view. To navigate to this screen, follow menu path Logistics > Materials Management > Purchasing > Master Data > Vendor > Purchasing > Display (MK03) or enter transaction code MK03. Input the vendor number and purchasing organization and press Enter to get to Figure 2.
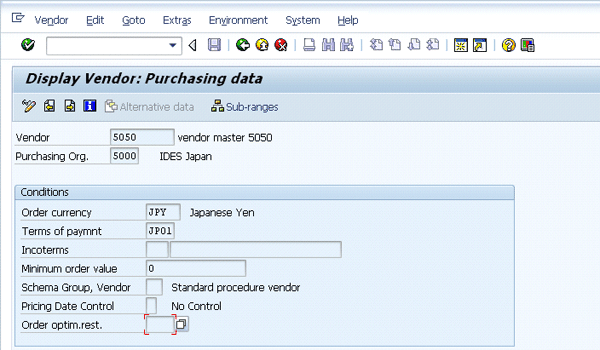
Figure 2
Vendor master purchasing screen
Step 3. Find the Field Status that contains the field you wish to suppress. To select the account group (LIEF) for which the fields have to be suppressed, follow the configuration menu path SPRO > Logistics General > Business Partner > Vendor > Control > Define Account Group and Field Selection for Vendors. Double-click LIEF in the Account Group field to get to its controls (Figure 3). In the Field Status section, the fields are grouped together by General Data, Company Code Data, Purchasing Data, and so on based on the different views available in the vendor master. The group Purchasing Data, for example, contains all the fields in the Purchasing view in the vendor master, including the field Order optim.rest.
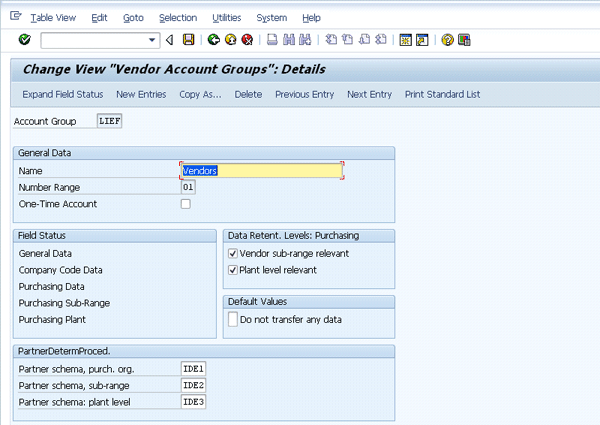
Figure 3
Account group LIEF details
In the Field Status section, double-click Purchasing Data. Then double-click the group Purchasing Data to get to Figure 4. In this screen, you can control the display options for all the fields in the Purchasing data view.
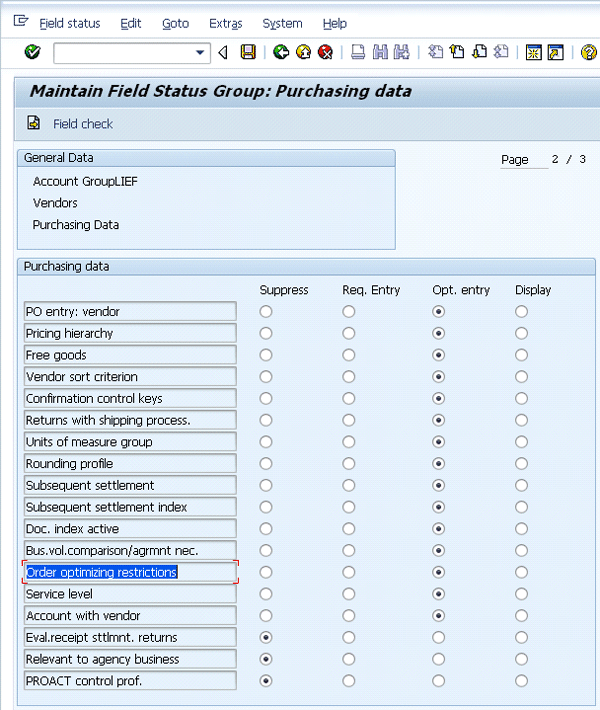
Figure 4
Account group LIEF details
Step 4. Suppress the unnecessary field. Select the Suppress radio button for the field Order optimizing restrictions. Press the save icon to confirm new settings.
Step 5. Confirm that the changes have been made in the vendor master. To navigate to this screen, follow menu path Logistics > Materials Management > Purchasing > Master Data > Vendor > Purchasing > Display (MK03). Input a vendor number and purchasing organization and press Enter. As you can see in Figure 5, the Order optim.rest. field no longer appears.
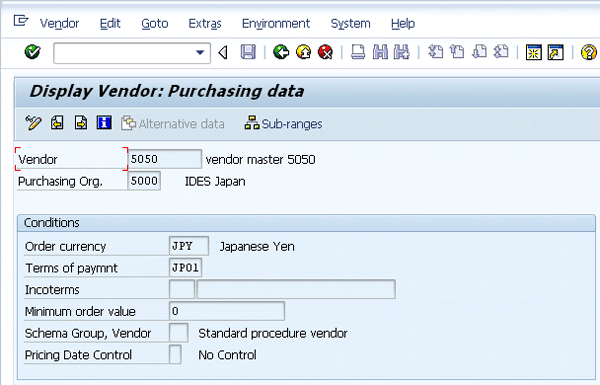
Figure 5
Account group LIEF details with the field Order optimizing restrictions suppressed
Control Field Display by Transaction Codes
Sometimes you may want a field to appear when you’re creating a vendor record, for example, but not when you are changing or displaying that vendor record. This step is done by controlling the vendor master display by the transaction codes.
Note
Transaction codes are codes used to represent the various business activities a user may be doing on a day-to-day basis such as creating or changing a vendor. Creating a vendor is transaction code MK01, and changing a vendor is transaction code MK02.
Let’s say you’re creating a vendor record in which you must be able to enter the tax information for the vendor. After you create the vendor record, however, you don’t need to change that tax information. In such a situation, the tax information field should be required when you create the vendor, but after you create the vendor, it should be display only (i.e., uneditable).
To achieve this result, set up the Tax Number 1 field as a required entry when you create the vendor and set it to Display when you change the vendor by following the steps in this section
Step 1. Identify the view in which Tax Number 1 is located. Follow menu path
Logistics > Materials Management > Purchasing > Master Data > Vendor > Purchasing > Display > Display (MK03) or enter transaction code MK03 (Figure 6). Because this field is located in the Control view of the vendor master, you need to suppress the field in the Control Tab of the create vendor transaction (MK01).

Figure 6
Identify the view in which the field Tax Number 1 is located for account group LIEF
Step 2. Set the Tax Number 1 field, available in the Control view of the vendor master, to be a required field when you create a vendor. Follow menu path SPRO > Logistics General > Business Partner > Vendor > Control. Click the execute icon for Define Transaction-Dependent Screen Layout to get to Figure 7. Double-click Create vendor (Purchasing) to get to Figure 8.
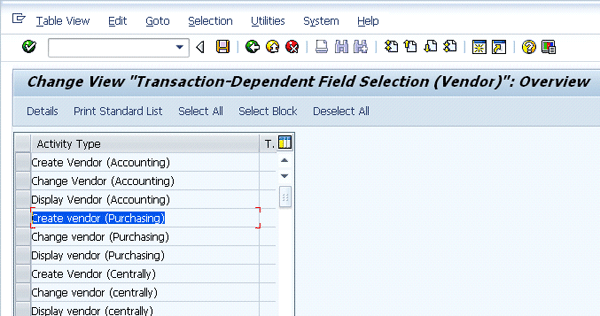
Figure 7
Control the vendor master by transactions (creating or changing vendor)
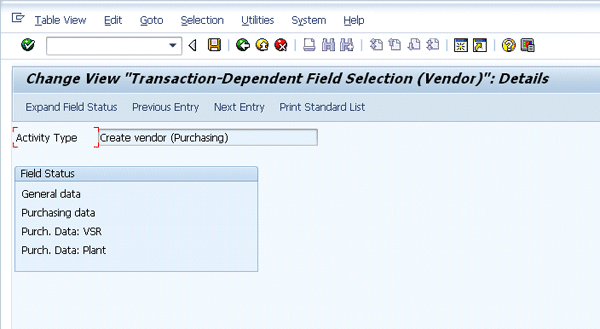
Figure 8
The control data screen for Create vendor
Step 3. Double-click General Data in the Field Status section to get to Figure 9.
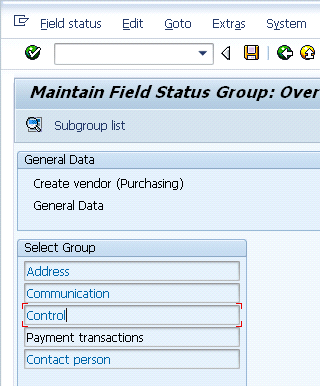
Figure 9
The Select Group section for Create vendor
Step 4. In the Select Group section, double-click Control to get to the Create vendor screen field settings (Figure 10). Change the field Tax code 1 from Optional entry to Required Entry. Click the save icon.

Figure 10
Create vendor control options
Step 5. Confirm that Tax Information 1 is now a required field when you create the vendor. Follow menu path Logistics > Materials Management > Master Data > Business Partners > Vendor > Purchasing > MK01 – Create. Input a vendor number and Purchasing organization and press Enter. Enter the required fields for address information and go to the control screen (Figure 11). The field Tax Information 1 is now a required entry (designated by the background color yellow) when you create a vendor.

Figure 11
The modified Control screen that now requires an entry in the field Tax Information 1
Step 6. Now set the same field Tax Number 1 as a display-only field for Change vendor. Follow menu path SPRO > Logistics General > Business Partner >Vendor > Control > Define Account Group and Field Selection for Vendors > Define Transaction-Dependent Screen Layout. Click the execute icon for Change Vendor (Purchasing). Double-click General Data. Double-click Control. Change the field Tax Code 1 to display the entry and save the changes.
Step 7. Confirm that Tax Information 1 is a display field when the vendor is changed. Follow menu path Logistics > Materials Management > Master Data > Business Partners > Vendor > Purchasing > MK02 – Change. Input a vendor number and purchasing organization. Press Enter. Enter the required fields for address information and go to the control screen (Figure 12). The Tax Number 1 field is now grayed out and no entry can be made.
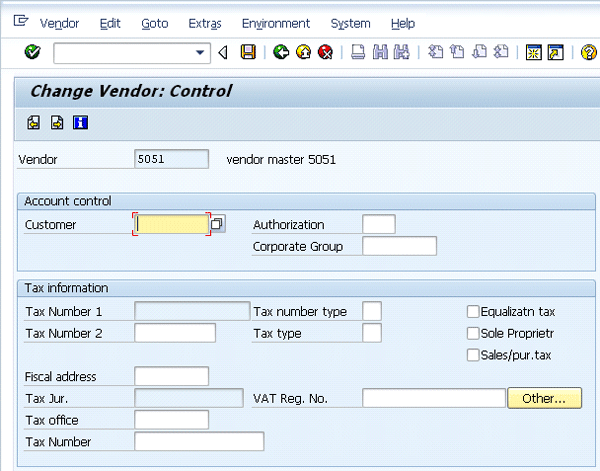
Figure 12
The modified Control screen in which the field Tax Information 1 is now display only when a vendor is changed
Control Field Display by Purchasing Organization
Note
A purchasing organization represents a procuring unit in a legal sense. The purchasing organization can represent one organization that buys across all the units in a company or, alternatively, it can be specific to only one unit such as a plant or a company code.
In addition to account groups and transaction codes, the vendor master can also be controlled by the Purchasing organization (i.e., the procuring unit). Let’s say you want to make the field Minimum order value in the Purchasing view of a vendor a required field for Purchasing Organization 5000. This can be done by following the steps in this section.
Step 1. Identify the view in which the field Minimum order value is located by following menu path Logistics > Materials Management > Purchasing > Master Data > Vendor > Purchasing > MK02 – Change (current) (Figure 13).
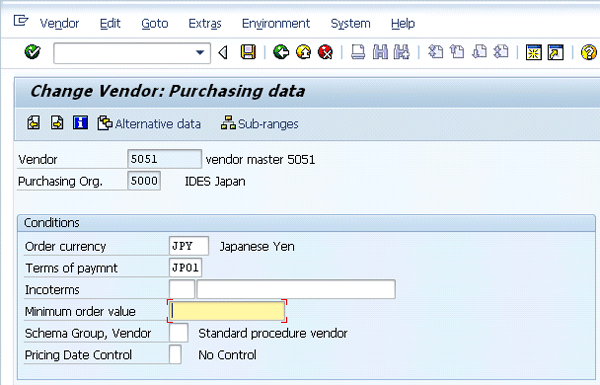
Figure 13
The Minimum order value field located in the vendor master’s Purchasing view
Step 2. Specify the purchasing organization in which you want to suppress the field Minimum order value. Follow menu path SPRO > Logistics General > Business Partner > Vendor > Control. Click the execute icon for the Define Screen Layout specific to the purchasing organization. Select the New Entries button to define field settings for Purchasing Organization 5000. Enter 5000 in the Purchasing Org. field so that the field settings are applicable only to that purchasing organization (Figure 14). Save your entry.
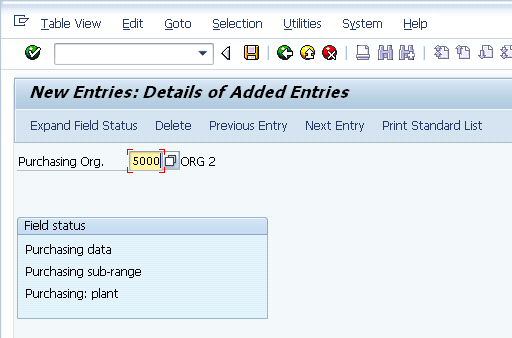
Figure 14
Create a new entry for Purchasing Organization 5000
Step 3. Suppress the field Minimum order value. Using the same process as in the first two sections of this article, suppress this field in the Purchasing view by double-clicking Purchasing Data in Figure 15 and selecting the Suppress radio button for Minimum order value. Click the save icon to confirm new settings.
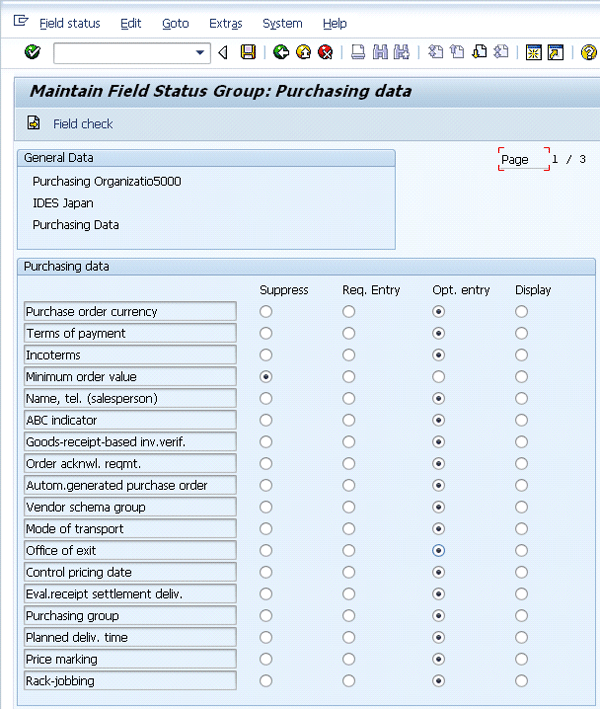
Figure 15
Suppress the Minimum order value field for Purchasing Organization 5000
Step 4. Confirm that Minimum order value is suppressed when a vendor is created in Purchasing Organization 5000. Follow menu path Logistics > Materials Management > Master Data > Business Partners > Vendor > Purchasing > MK02 – Change (Figure 16). Input any vendor number and Purchasing organization 5000. Press Enter. The Minimum order value field no longer appears for Purchasing Organization 5000.
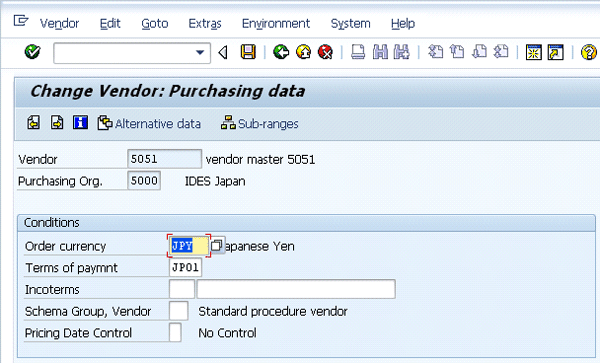
Figure 16
The modified Purchasing data screen that no longer displays the Minimum order value field
Suresh Veeraraghavan
Suresh Veeraraghavan is a senior manager with Capgemini, a leading management and IT consulting firm. He works in the technology service group. He has 14 years of experience delivering SAP implementations in various capacities. Prior to joining Capgemini, he worked with Hewlett-Packard as a supply chain architect, managing and implementing SAP supply chain projects on a $26 billion platform. His expertise is in implementing best practices in supply chain management, specifically procure-to-pay and order-to-cash. He is a certified project management professional (PMP) and CPIM certified.
If you have comments about this article or publication, or would like to submit an article idea, please contact the editor.


