In the second of a two-part series about viewing and maintaining Organizational Management (OM) structures in SAP HR, the author covers the Expert mode of maintenance. Using screenprints, he explains the Expert mode's functionality as well as its benefits and drawbacks.
The following is the second of a two-part series on viewing and maintaining Organizational Management (OM) structures in SAP HR. In part one of this series, the Organization and Staffing mode of object maintenance was discussed. This month’s article details the Expert mode of maintenance.
During the HR 2004 conference in Las Vegas, I spent a considerable amount of time speaking with SAP HR professionals from around the world, giving advice and answering questions on organizational management (OM) and other topics. One thing that became apparent to me as I spoke with people about SAP OM was the disparity in the knowledge of objects and structures and the tools provided within R/3 to build and change them.
Some users strongly preferred the Organization and Staffing mode of maintenance and were comfortable with its intuitive screen and icon-driven functionality. These users grasped the concept of object orientation but, for the most part, were not as familiar with the more technical aspects of object relationships and structure formation. They preferred “drag and drop” because, as one attendee told me, she didn’t have to remember which relationships were required to link one object to another. Ease of use was the overriding theme for those who declared this method to be their preference.
On the other side of this split were the users who seemed to speak a different language when they talked about OM. They spoke of relationship codes by name and could recite PD infotype numbers. These users prefer the Expert mode and its more hands-on approach to building and changing structures. If Organization and Staffing mode is so easy to use and icon-driven, what are the benefits of the Expert mode’s more detailed approach to object and structure maintenance? Is one approach better than the other? This article attempts to answer these questions by explaining the functionality that exists in the Expert mode of maintenance.
The Two Components of Expert Mode
One of my colleagues told me recently that he prefers the Expert mode because he is “old school.” All kidding aside, this comment applies to many seasoned SAP users simply because before there was a graphical interface like Organization and Staffing, the Expert mode was the primary method of maintaining objects and hierarchies in OM. Users who have been working with OM since the earlier days of the HR module were trained in the more manual methods of creating and changing structures and have carried that training with them as a preference today, even as new, more user-friendly interfaces have been developed.
The Expert mode consists of two primary tools to edit and change OM objects – Simple Maintenance and Infotype Maintenance. When combined, these two tools provide users with the necessary functionality to create and modify objects and structures, plan and perform “what if” scenarios, and use SAP structural graphics to view hierarchies. In other words, everything that you can do in Organization and Staffing can be done with Expert mode. One caveat for newer or less experienced users is that because it is less graphical than the Organization and Staffing mode, the Expert mode requires users to be more familiar with not only their own organizational structures, but also OM object orientation concepts in general.
Simple Maintenance
Simple Maintenance was originally created for quick creation and maintenance of structures for applications that did not require as much detail or functionality as full OM would require. For example, many early workflow applications were built in systems that either did not have a productive organizational hierarchy (or an HCM module at all) or required a set of object structures that could not be accommodated by the existing HR organizational framework. While Simple Maintenance allows users to quickly build and modify structures for those applications, it also supports more robust OM structures.
Simple Maintenance transactions can be found via standard SAP menu path SAP Menu>Human Resources > Organizational Management > Expert Mode > Simple Maintenance. The separate transactions for each possible activity are PPOC_OLD (create), PPOM_OLD (change), and PPOS_OLD (display).
The Simple Maintenance screen consists of two sections – the standard OM object manager containing the search and selection sections on the left side of the screen, and the work area to the right. The object manager allows you to define and save your own search variants and to choose objects to maintain from a selection list. The functionality of the search and selection sections of the object manager was covered in detail in part one of this series.
The selection screen of the Simple Maintenance work area (Figure 1) allows you to specify an Organizational unit and an Editing period. The editing period, like the key dates in Organization and Staffing, is critical to your success in using this tool. The editing period you choose is compared to the validity dates on your organizational objects, so only those objects that are valid in the specified date range appear in your structures.
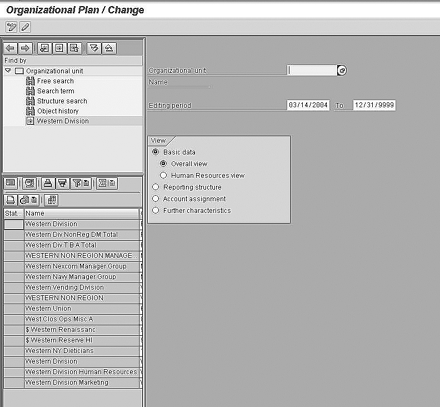
Figure 1
Simple Maintenance selection screen via transaction PPOM_OLD
Below Editing period is a box called View. The two main Basic data views in Simple Maintenance are detailed in Table 1. The Human Resources view allows you to work with standard tasks involving organizational units, jobs, positions, etc. The Overall view is used for workflow activities and contains additional functionality for workflow design. Other views available are Reporting structure, Account assignment, and Further characteristics.
| Overall |
Tasks
Standard tasks
Workflow tasks
Workflow templates
Roles |
Human
Resources |
Tasks
Standard tasks |
|
|
| Table 1 |
Basic data views used in Simple Maintenance |
|
|
The Basic data view of Simple Maintenance displays the organizational unit you have selected and its related subordinate units (Figure 2). From within the Basic data view, you can perform a full range of object maintenance, from creating new organizational units and positions to delimiting objects and changing object ending dates. The Staff assignments button opens the structure to show the current positions and persons related to the unit you have selected and allows you to move objects in your structure or create new objects and assignments. At any time within any of the Simple Maintenance views, you can switch to another view by selecting Goto on the menu bar at the top of the screen and selecting the view or Infotype Maintenance function you wish to see.

Figure 2
Basic data view of Simple Maintenance screen
The Reporting structure view default output contains the objects directly related to the organizational unit you have selected (Figure 3). Within the reporting structure view, you have the ability to manage your object relationships and perform “what if” scenarios on your structures. In addition to the direct linkages to the other views, you can use the create chief icon to define a chief relationship from one of your positions to an organizational unit in the structure. You can also remove chiefs by using the delete chief icon. The Elevate and Subordinate buttons create reporting relationships between positions in your structure. To elevate, you select a position to be elevated, and then choose positions from the resulting pop-up window that you wish to have report to that position. To subordinate, you select a position and then choose to which other position in your structure that selected position should report. The Reporting structure view is a fast and easy way to maintain the supervisory and chief relationships between your objects that are necessary for other applications such workflow and structural security.

Figure 3
Reporting structure view of Simple Maintenance. Note the create chief and the delete chief icons at the top left of the screen.
The Account assignment view displays the selected organizational unit and related objects in a screen that allows you to maintain master cost center assignments, configure extensive cost distributions for each unit, and see detailed account assignment features of each unit in the hierarchy. By clicking on the account assignment button or by clicking on the account assignment icon to the right of the organizational unit name on your screen, you see a pop-up box (Figure 4) that contains the account assignment values that are also stored in PD infotype 1008. From this pop-up, you can maintain your account assignment values that are directly tied to the unit you are editing and also view any values that are assigned as the result of inheritance from a superior organizational unit.

Figure 4
Change Account Assignment Features pop-up box in the Account assignment view
The last view of Simple Maintenance is Further characteristics. This view displays additional attributes assigned to your selected unit and its subordinates, such as the department/staff flag and work schedule rule defaults. Select a unit in the hierarchy and click on the characteristics button to view this data. This view also contains a link to required positions for quota planning. Quota planning allows you to have defined planning cycles for managers to maintain and staff the positions that report to them and also to flag certain positions as required for the planning cycle. The required positions button allows you to maintain the position detail necessary for quota planning.
A final characteristic of Simple Maintenance is the ability to use structural graphics to view your organizational hierarchies. From within each view in Simple Maintenance, you can select the icon that contains a picture of a bar chart. That icon opens the structural graphics window (Figure 5). SAP structural graphics allows you to customize organization charts to meet your own needs. From within structural graphics, you can change the look and feel of the charts by defining shapes, colors, and line styles to be used. You can also control the output of the chart by changing the chart style and depth. Finally, you can send copies of org charts directly to other users or to Internet mail addresses if your technical system configuration allows. This last function is particularly useful when you are performing “what if” scenarios and need to route proposed structures for approval. “What if” scenarios typically contain organizational changes created in alternate plan versions and are designed to demonstrate the impact of the restructuring on your active organizational plan.

Figure 5
SAP structural graphics from Simple Maintenance
Infotype Maintenance
None of the techniques for OM maintenance are mutually exclusive. In other words, there are links between each type of maintenance, and the data keyed or changed in one view directly impacts the others. All of the data maintained on structural objects, including relationships such as chief and supervisory, account assignment, short/long description, hierarchical indicators, etc., are stored in PD infotypes. Thus, the Infotype Maintenance portion of the Expert mode consists of transactions that lead to detailed infotypes containing the object values and relationships that are created via Organization and Staffing, Simple Maintenance, or directly in Infotype Maintenance itself.
The transactions that make up Infotype Maintenance are listed in Table 2. They can be found via the standard SAP menu path SAP Menu>Human Resources> Organizational Management>Expert Mode. Each of the transactions allows maintenance of a specific object type except for PP01, which allows you to specify which object you want to maintain. Any objects that are maintainable through basic transactions can be selected in PP01.
| PO10 |
Organizational unit |
| PO03 |
Job |
| PO13 |
Position |
| PO01 |
Work center |
| PFCT |
Task catalog |
| PP01 |
General |
|
|
| Table 2 |
Infotype Maintenance transaction codes |
|
Note
The current transactions for Simple Maintenance, PPOC_OLD, PPOM_OLD, and PPOS_OLD, are derived from transactions used in early SAP HR releases for the same purpose. Prior to the introduction of the Organization and Staffing mode, the original transactions PPOC, PPOM, and PPOS were primary methods of accessing standard OM maintenance. Since the advent of Organization and Staffing mode, you now have the ability to control whether the original transactions above will bring the user to the Simple Maintenance screen or to the Organization and Staffing screens. By default, the original transactions will point to the Organization and Staffing mode. However, you can change the default to point to Simple Maintenance by assigning a value of “X” for user parameter PPOM for a given user. If you assign the PPOM parameter with no value (blank), the system default is used. User parameters can be set via system transaction SU3.
From within Infotype Maintenance (Figure 6), you can maintain data for a specific object in any of the applicable infotypes. When viewing Infotype Maintenance, you can tell which infotypes in the list have current records stored for your selected object by looking for the green check mark next to the object name. An infotype without a check beside it has no active records in the selection period. As in all OM screens, the time period is important because only infotype entries whose validity dates fall within your time period selection dates appear on your screen. A common mistake of new users is to fail to properly set the time period dates, which can lead to incorrect or incomplete infotype displays.

Figure 6
Infotype Maintenance for transaction PP01
Infotype Maintenance allows you to create entries directly into active status or to create planned changes that are submitted for approval. Table 3 defines the five different status values within Infotype Maintenance. Most entries take place directly in active status. In fact, all entries you make in Simple Maintenance must go directly to active status because you cannot specify a status there. However, if you wish to make structural or object changes and have them reviewed or approved before they reach your active status, you can enter these changes directly into the planned status by selecting the Planned tab in Infotype Maintenance.
| Active |
You can add, change, and delete entries in this status. Infotype entries in active status are the current productive entries. |
| Planned |
You can also perform additions, deletions, and changes in planned status, but the changes are not productive. |
| Submitted |
You cannot modify infotype changes in submitted status. |
| Approved |
You cannot modify infotype changes in approved status, but once an item has been approved, you can change the status back to active where it can be become productive. |
| Rejected |
Rejected entries cannot be edited or modified. However, they can be changed to planned status if you need to go through another round of revisions. |
|
|
|
| Table 3 |
Infotype Maintenance status descriptions |
|
To change the status of an individual entry, select the object, infotype entry to be changed, and appropriate time period for review. Then select edit followed by status change from the menu bar at the top of your Infotype Maintenance screen. Highlight the appropriate type of status change and you are presented with the infotype entry. Clicking on the save icon moves the change to the status you selected. The status change process is useful when preparing for reorganizations or for audit purposes if you require additional approval for certain types of changes.
Tip
If you need to change the status of multiple entries at the same time, you can execute the Change Object Status report RHAKTI00 via transaction code RE_RHAKTI00. This report allows you to select entries from various statuses and uses standard PD selection criteria for identifying the appropriate organizational objects to be included in your report.
Both components of Expert mode described in this article are closely linked. From within Simple Maintenance, you can toggle back and forth between several different PD infotypes stored in Infotype Maintenance. Because you can accomplish many of the same functions in Simple Maintenance as Infotype Maintenance and even Organization and Staffing, the primary driver pushing you to one particular method of OM maintenance varies depending on your skill set, preferences, and workload. While the Expert mode generally appeals to those with more experience, if you are like most users, you will end up using a mixture of approaches depending on your task at hand.
A.J. Whalen
A.J. Whalen has successfully combined more than two decades of global business expertise with in-depth experience in the strategic development, management, and delivery of large-scale projects and education for SAP ERP HCM. Prior to his current role as SAP Marketing Director at Velocity Technology Solutions, he served as lead consultant for several global SAP implementations and engagements as well as an SAP Conference Producer for Wellesley Information Services. A.J. has been invited to speak at nine annual SAP educational events and holds an MBA degree from the Stern School of Business at New York University.
You may contact the author at whalen.aj@gmail.com.
If you have comments about this article or publication, or would like to submit an article idea, please contact the editor.