Learn about the processes involved in purchasing using configurable products. Get details about the master data to be maintained in the system along with the main customizing settings available for this solution.
Key Concept
Configurable products are useful when a company needs to purchase, manufacture, or sell numerous combinations of parts that form a product.
- Drastically reduction of master data maintenance
- Workload reduction
- Storage costs reduction
- Maintain every possible end product variant
During the pre-cutover and realization phases of a configurable product project, you need to check that all purchasing settings have been transported correctly. I explain how to write a procedure for pricing and assignment to a configuration profile for a configurable material. This complete description of a purchasing cycle using configurable products lets you replicate these concepts in your own SAP environment. In addition, the integration aspects with other major SAP logistics modules are covered.
In this article, I use as a configurable product a crate for a pump and for its characteristics, a different type of crate (such as cardboard, wood, metal, and plastic).I describe two types of business activities: master data preparation and transactional processes.
Master Data Preparation
In this section, I introduce the main master data objects that are relevant and necessary to the purchasing department to post purchasing transactions for configurable products.
Create the Reference Characteristic
With this step, you create the reference characteristic that the system uses to pass the variant’s condition values to purchasing documents. To create a characteristic, you can either execute transaction code CT04 or follow menu path Cross-Application Components > Classification System > Master Data > Characteristics.
In the screen that appears, click the Addnl data (additional data) tab. Enter MMCOM (the technical name of the table that is used for communication between MM and variant configuration) in the Table Name field and VKOND (variant condition) in the Field Name field (Figure 1).
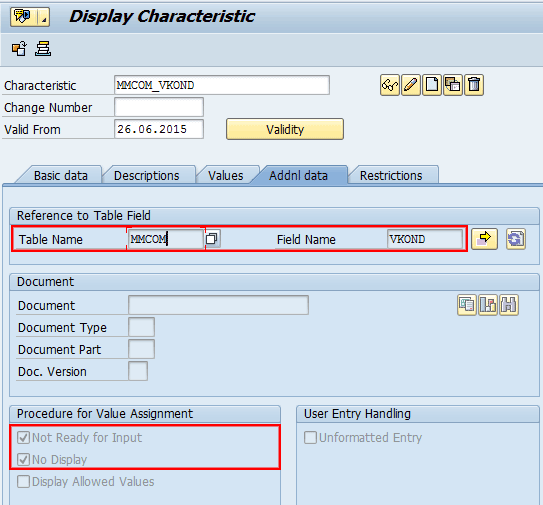
Figure 1
Create the reference purchasing characteristic
In the Procedure for Value Assignment section, make sure that the Not Ready for Input and No Display indicators are selected. In my example, the characteristics are not ready for input and not visible during the data entry. Click the save icon to save your entries.
At this stage, the formatting data is automatically populated from the object master to the characteristic in the Basic data tab. Click the Basic data tab and populate the Description and Chars Group (characteristic group) fields. In the Status field, select 1 Released from the drop-down list of options (Figure 2) as these details are retrieved from the entries specified in Figure 1. Click the save icon to save your data.

Figure 2
Display the reference purchasing characteristic in the Basic data tab
Note
An SAP system transfers values from the configuration to the application using reference characteristics with write access to table fields. In my example, you use table MMCOM and field VKOND for transferring variant-dependent surcharges or discounts on prices to the purchasing documents.
The system knows these variant keys were passed from variant characteristics and only interrogates those condition types flagged as variant conditions. These reference characteristics are stored in the configuration data and read by the function module V45CU_GET_VARIANT_KEYS, which contains CEI0_GET_CONDITIONS. V45CU_GET_VARIANT_KEYS and CEI0_GET_CONDITIONS look up all the values assigned to the VKOND references for the appropriate purchasing documents.
Create a Variant Characteristic
In this step, you create the variant characteristic to use to classify the type of packaging. To create a characteristic, you can execute transaction code CT04 or follow the menu path Cross-Application Components > Classification System > Master Data > Characteristics. In the initial screen that appears, click the create icon  . Click the Basic data tab and populate the fields as shown in Figure 3.

Figure 3
Create basic data for the packaging characteristic
After you click the save icon to save your data, the system sends a message to indicate that your characteristic has been saved (Figure 4).

Figure 4
Create allowed values for the packaging characteristic
Click the Values tab and enter data for the characteristics’ values and their descriptions (Figure 4). Note that in the Descriptions tab, you can enter different descriptions of the characteristic based on the language key, while in the tabs Addnl data and Restrictions tabs, you can specify additional restrictions and validations such as table field and class validation.
Create a Variant Class
In this step, you create the Variant Class that is used to group the packaging characteristics. To create a variant class, execute transaction code CL02 or follow menu path Cross-Application Components > Classification System > Master Data > Classes. In the initial screen that appears, click the create icon and then in the Basic Data tab, specify the data as shown in Figure 5. After you have populated the fields in Figure 5, click the Char. (characteristics) tab.
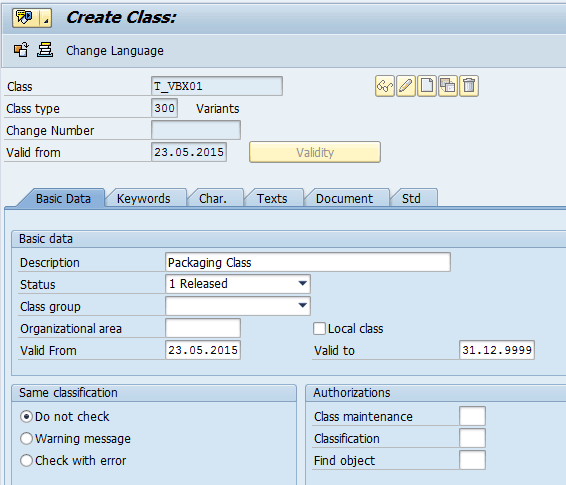
Figure 5
Create basic data for the packaging class
This class must contain the reference characteristic and an additional characteristic named T_PAC_01 that describes a type of packaging material that you need to purchase. After you click the save icon, the system confirms the creation of the class type in an information message as shown in Figure 6.

Figure 6
Link characteristics to the packaging class
Create a Variant Product
To create a variant product, execute transaction code MM01 or follow menu path Logistics > Materials Management > Material Master > Material > Create > Immediately. This action opens the screen shown in Figure 7. To define the product as configurable, click the Basic data 2 tab and select the Material is configurable indicator. Click the save icon to save your data.
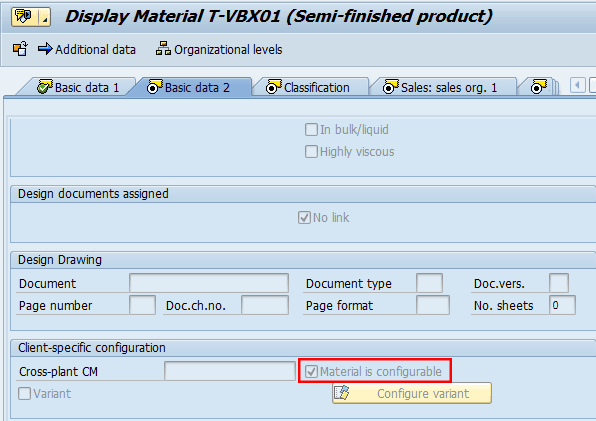
Figure 7
Define the product as configurable
In the next screen, you can classify the product by assigning the variant class type 300 to the packaging class and characteristics. To do that, click the Classification tab shown in Figure 7. Enter T-VBX01 in the Material field and 300 in the Class Type field (Figure 8). Click the save icon to save your data.

Figure 8
Classify the configurable product using class type 300
Note
You simulate costing in the configuration simulation. Choose Logistics > Central functions > Variant configuration > Environment > Configuration simulation. In the screen for characteristic valuation, choose Environment > Costing.
Create the Information Record for a Variant Product
The purchasing department is responsible for creating an information record (info record) and ensuring that the document has the right logistics and financial information, such as tax code, price, terms, and conditions. To create the info record and assign variant conditions, execute transaction code ME11 or follow menu path Logistics > Materials Management > Purchasing > Master Data > Info Record > Create. This action displays the screen shown in Figure 9.
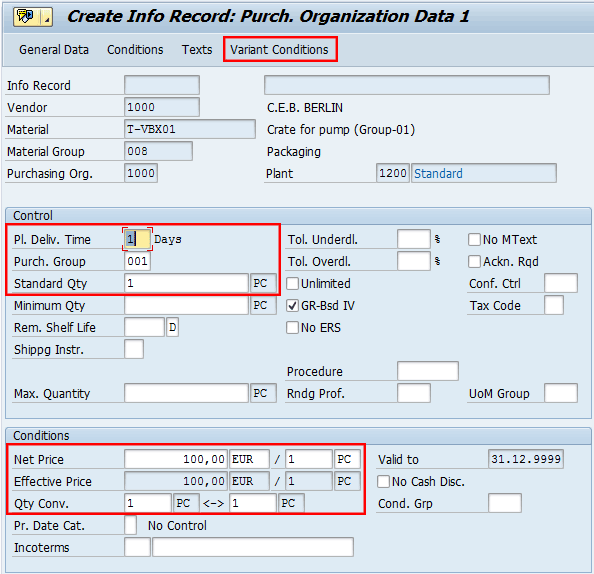
Figure 9
The Variant Conditons option for the purchase info record
Enter data in the Vendor, Material, Purchasing Org., and Plant fields as shown in Figure 9. Select Standard for the info record in the field to the right of the Plant field. In the Organization Data 1 view of the document, enter data that is relevant for your organization’s needs in the Control and Conditions sections. The data I use for my example is circled in red. Click the Variant Conditions button or use the option Extras > Variant Conditions (CTRL +F6).
After you click the Variant Conditions button, a pop-up screen appears (Figure 10). Enter the name of the variant condition (e.g., B0101) and click the Choose button.
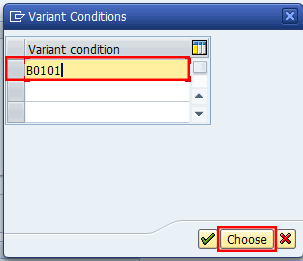
Figure 10
Define the variant conditon name
In the next screen (Figure 11), select the condition type that will be used as the variant condition in the info record and subsequent purchasing documents. Click the Choose button.
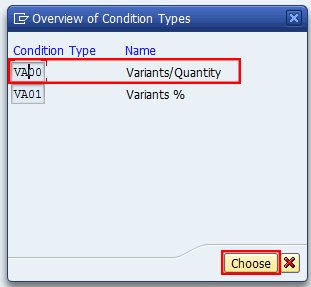
Figure 11
Select the appropriate condition type
This action displays the screen shown in Figure 12. Note that you can choose between two condition types based on either quantity (VA00) or percentage (VA01). For my example, choose the condition type VA00 as it is more commonly used.
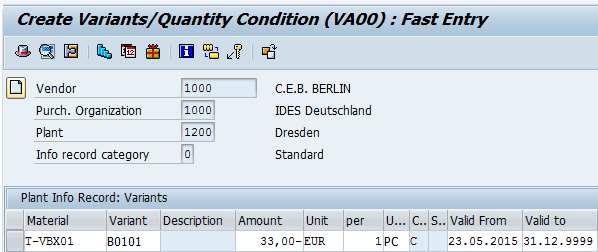
Figure 12
Condition’s value definition for the first condition’s variant
In the next screen, specify the condition’s values according to the selected condition variants. For my example, populate the fields as shown in Figure 12. Click the save icon to save your entries.
Just for demonstration purposes, define the other three condition variants, as shown in Figures 13, 14, and 15. The other condition variants enable you to manage different variants of the same product.

Figure 13
Condition’s value definition for the second condition’s variant

Figure 14
Condition’s value definition for the third condition’s variant

Figure 15
Condition’s value definition for the fourth condition’s variant
Note
The condition records for the condition type VA00 can also be maintained either by executing transaction code VK11 or following menu path SAP Menu > Logistics > Central Functions > Variant Configuration > Environment > Pricing > Create Condition.
Define a Variants Key
The variant condition keys are used to manage the variant condition. The purchasing department is responsible for creating variant keys and assigning appropriate descriptions to them.
To create a variant key, execute transaction code VK30 or follow menu path SAP Menu > Logistics > Central Functions > Variant Configuration > Environment > Pricing > Define Key. This action displays the screen shown in Figure 16.

Figure 16
Create variant keys
Enter the variants’ names for the condition and specify the entries as shown in Figure 16. Click the save icon.
Note
Variant names are case sensitive.
Write a Procedure for Pricing
In this step, you create a procedure for pricing and assign it to the configuration profile for configurable product number T-VBX01. To do so, you must create a configuration profile for the configurable product number T-VBX01 by executing transaction code CU41 or following menu path Create a configuration profile with a name of your choice for T-VBX01 > Logistics > Materials Management > Material Master > Environment > Configuration Profile > Create. This action displays the screen shown in Figure 17.

Figure 17
Maintain a configuration profile for the configurable product
In Figure 17, enter a profile name, (e.g., T_MM_PRICE_01), select the line item, and click the profile details icon  . In the next screen, (Figure 18) click the Dependencies button.
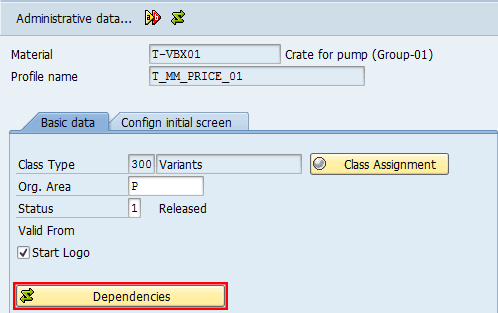
Figure 18
Maintain the dependencies for the configuration profile
In dependencies (procedures), use the variant key to assign the variant condition to the reference characteristic. Assign the dependencies to the configuration profile of the externally procured material using the appropriate syntax as shown in Figure 19. After you enter the syntax shown in Figure 19, click the check icon to verify that the syntax is correct. Check the syntax and click the save icon to save your entries. The system displays the information message shown in Figure 19.
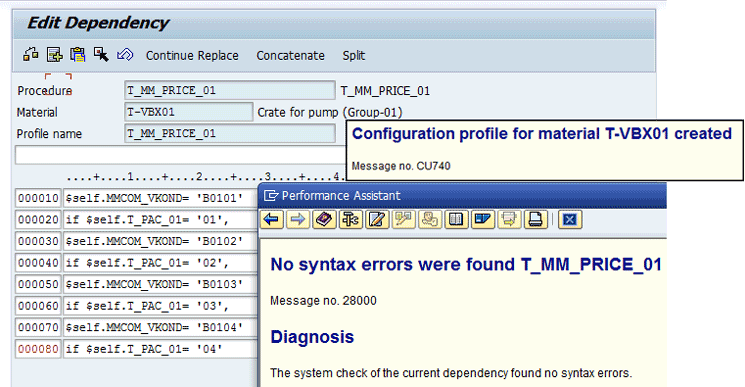
Figure 19
Define the configuration profile’s dependency for the configurable product
Transactional Processes
In the following steps, you can test the complete purchasing cycle for your configurable products and verify the correlations between the relevant master data and preceding documents.
Create a Purchase Requisition
In this step, you create a purchase requisition for the configurable product. To create a purchase requisition, execute transaction code ME51N or follow menu path Logistics > Materials Management > Purchasing > Purchase Requisition > Create > Vendor/Supplying Plant Known (Figure 20).
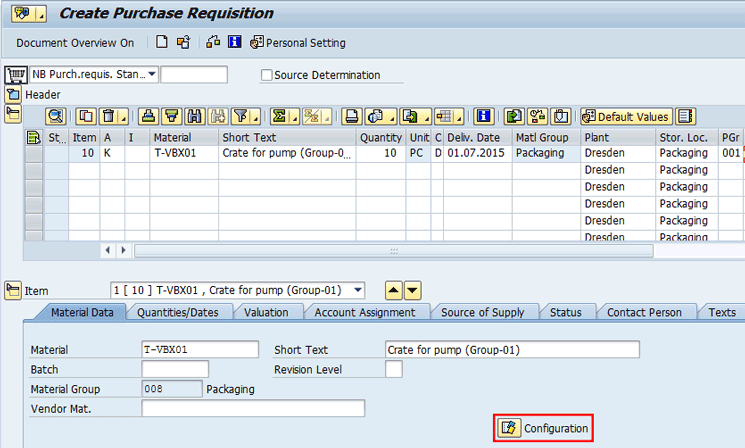
Figure 20
Create a purchasing requisition for the configurable product (item details)
Click the Configuration option highlighted in Figure 20. In the next screen, specify the appropriate characteristic’s value (e.g., 02 for wood), check the consistency of the document, and click the save icon. The system issues an information message with a document number (Figure 21).
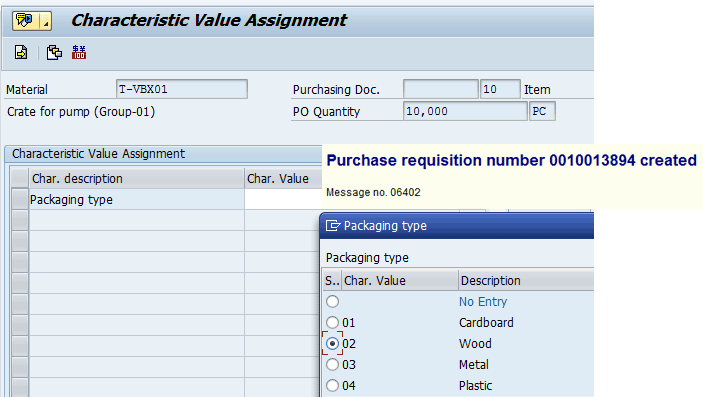
Figure 21
Specify the value of the characteristic of the configurable product
Create a Purchase Order
In this step, the purchase organization converts the purchase requisition into a purchase order. To create a purchase order for your configurable material, execute transaction code ME21N or follow menu path Logistics > Materials Management > Purchasing > Purchase Order > Create > Vendor/Supplying Plant Known. Use the purchase requisition created in the previous step from document overview and then drag and drop it to the shopping basket. All main logistics data from the purchasing requisition and the price conditions are taken from the condition’s variants that are defined in the info record based on the characteristic’s value as defined in the purchasing requisition (Figure 22).

Figure 22
Create a purchase order for the configurable product (item details)
Select the option Configurable in the Material Data tab and display the characteristic values defaulted from the purchasing requisition document along with its value (Figure 23).
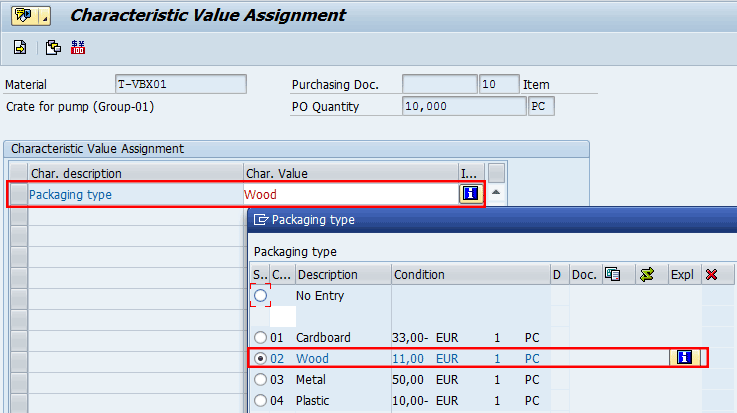
Figure 23
Verify the characteristic value in the purchase order (line item)
Now check your document for completion and click the save icon to save the data. The system provides an information message reporting the purchase document number (Figure 24).
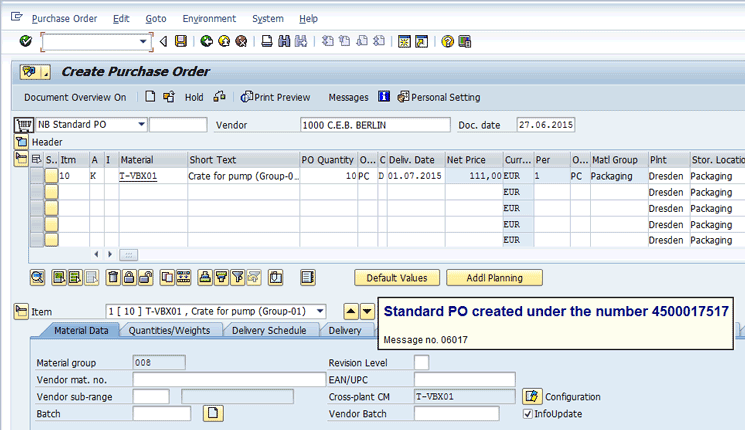
Figure 24
Verifiy purchase order completion and save it
Note
In case a purchase order is created with reference to a purchase requisition released against a sales order, which means having the account assignment category M - Ind. cust. w/o KD-CO, the price conditions are copied from the sales order, which represents the leading document for configuration data, including the price conditions.
During the purchase order creation, the net price is updated by the condition according to the value selected for the packaging material in the sales order. In case you change the price conditions manually in the purchase order, the configuration is decoupled from its origin.
This means that changes in the sales order or the material master no longer have any effect on this purchasing document. If you want to retain the link between the original configuration and the configuration in the purchase order, do not change price conditions directly in the purchase order.
Post the Goods Receipt
In this step, the warehouse organization performs a goods receipt of configurable products. The goods receipt can be done with reference to the delivery schedules or the purchase order by executing transaction code MIGO or following menu path Logistics > Materials Management > Inventory Management > Goods Movement > Goods Movement.
In the field to the right of R01 Purchase Order in the screen that appears, enter the purchase order that was created in the previous step and click the Check button to check the consistency of the data. After you finish checking the data, click the Post button to post the goods receipt. The system provides an information message reporting the goods receipt material document number as shown in (Figure 25).

Figure 25
Post the goods receipt with reference to the purchase order
Note
In case a configurable product is not handled in batches, the system allows you to classify the associated characteristics with qualitative values (not relevant for inventory). If you need to handle the configurable products in the inventory, then you have to handle the products in batches. In this case, the characteristic’s values are relevant for inventory booking.
Post the Logistics Invoice Verification
In this step, the accounts payable organization performs the invoice verification in the material management module considering the purchase order created for the configurable product. The posting can be done either by executing transaction code MIRO or following menu path Logistics > Materials Management > Logistics Invoice Verification > Document Entry > Enter Invoice. After entering the purchase order that was created for the configurable product, specify the tax and invoice amount.
Note that the price is taken from the purchase order document, and the quantity from the goods receipt document. Make sure the document’s balance is zero and save the data. Click the save icon to save your data. The system provides an information message reporting the material and accounting documents as shown in Figure 26.

Figure 26
Post logistics invoice verification with reference to the purchase order
Display the Purchasing Document History
This step is optional, but I include it to show that the complete purchasing cycle has been performed successfully except for the vendor’s final payment. To display the purchasing document history created for your configurable products, execute transaction code ME23N or follow menu path Logistics > Materials Management > Purchasing > Purchase Order > Display.
In the screen that displays, click the other purchase order icon  . In the pop-up screen that appears, enter the purchase order document number and then press Enter. Click the Purchase Order History tab. In the Purchase Order History tab, you can view the details shown in Figure 27.
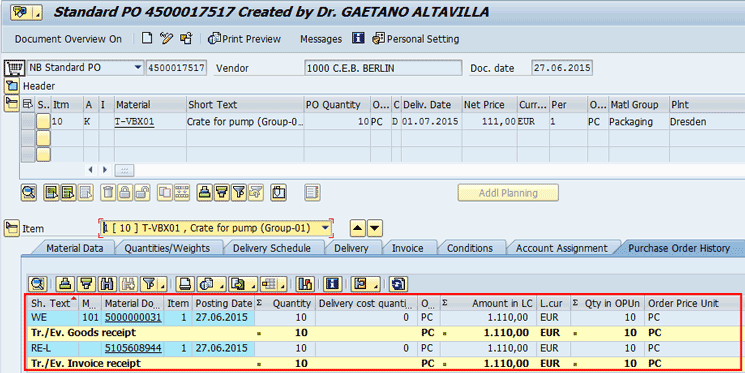
Figure 27
Display the purchase order document history
Customizing
The default customizing available in the standard system can be used to manage the procurement of the configurable products as it is without making relevant changes. For my example, apply the IMG changes that I describe in the “Variant Function Group” and “Dependency Group” sections in order to have more flexibility to quickly find objects created for specific purposes.
Variant Function Group
The variant function group is used to group together variant functions. It is a three-digit number that can be used as search criteria for finding a variant. To create a new entry, follow menu path SAP Customizing Implementation Guide > Logistics – General > Variant Configuration > Variant Functions.. In the screen that appears (Figure 28), click the New Entries button, enter data in the fields under Group and Description, and click the save icon.

Figure 28
Define a new variant function group
Dependency Group
The dependency group is used to group together similar dependencies, or the dependencies that belong to one knowledgebase. It is a 10-digit number that can be used as a search criterion for finding dependencies.
To create a new entry, follow menu path SAP Customizing Implementation Guide > Logistics – General > Variant Configuration > Dependencies > Define Groups. In the screen that appears (Figure 29), click the New Entries button, enter data in the fields under Dep. Group and Description, and click the save icon.

Figure 29
Define a new dependency group
Display Material Type (Configurable Flag)
In the standard system, the material type defined for configurable materials is KMAT, but you can also use any material type as configurable material as long as the Material is configurable indicator is selected. In my case, I use a Halb material type (semifinished goods).
Note that if this indicator is set, it is possible to assign a variant class to the material. This indicator can be set either manually in the master record or in customizing for the material master in the activity define attributes of material types. In this last case, the indicator is set automatically whenever you create a material of the corresponding material type. Then it is not possible to cancel the indicator manually in the material master record.
To define or display this flag in customzing, you can either use the IMG transaction code OMS2 or follow the menu path SAP Customizing Implementation Guide > Logistics – General > Material Master > Basic Settings > Material Types > Define Attributes of Material Types. Select the material type KMAT and choose the details option, or double-click the line item. The system displays the details shown in Figure 30.

Figure 30
Display the material type used for the configurable product
Display Condition Type (Variants)
In the standard system, the condition types used to manage the variants of the configurable products are VA00 and VA01 used respectively to define the quantity and percentage values. You can define or display a purchasing price condition by following the IMG menu path SAP Customizing Implementation Guide > Materials Management > Purchasing > Conditions > Define Price Determination Process > Define Condition Types (option: Define Condition Type). In the iniital screen that appears (not shown), Select VA00 and double-click it. The system then displays data shown in Figures 31 and 32. Note the classification of this condition type in the control data 1 and control data 2 sections.
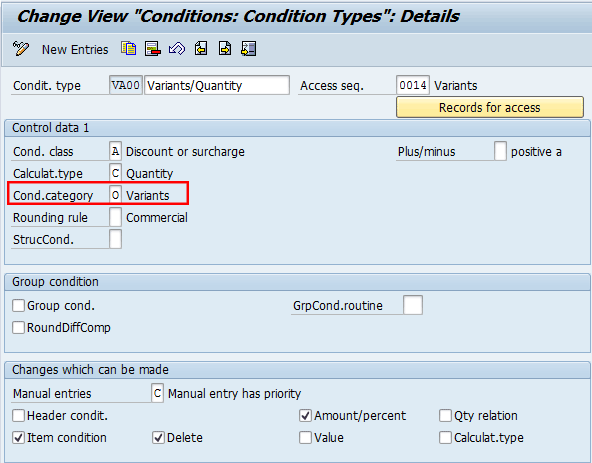
Figure 31
The condition type (VA00) in the Control data 1 view
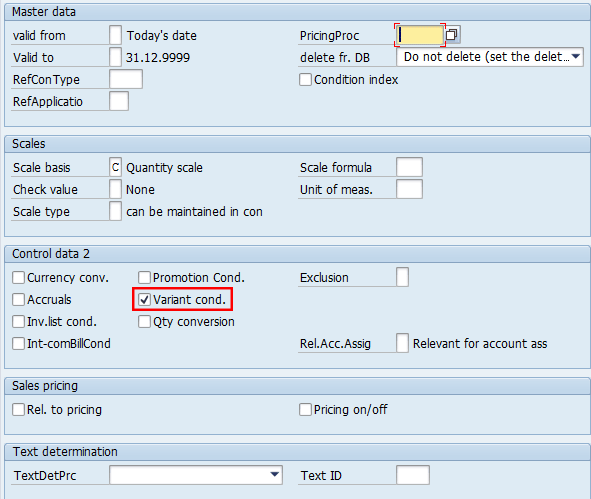
Figure 32
The condition type (VA00) in the Control data 2 view
If you need ad hoc behaviors for this condition type, you can copy it in a new condition (e.g., ZA00) and apply the changes (e.g., avoid manual entries).

Gaetano Altavilla
Dr. Gaetano Altavilla is a senior SAP practice manager. His focus is on pre-sales, delivery of SAP application solutions for large international corporations, and SAP knowledge management in Europe, the Middle East, and Africa (EMEA).
In his 18 years of SAP application experience working for many multinational companies, such as Procter & Gamble and Hewlett-Packard, he has covered a wide range of ERP logistic areas, focusing on the MM, WM, SD, LES, PP, PP-PI, PLM (QM, PM, PS) modules, as welll as CRM (TFM), SRM (EBP), SCM (SAP APO), and MES (ME) components.
Dr. Altavilla holds a degree with first-class honors in mathematics from the University of Naples and is certified in many SAP modules: SAP Logistics Bootcamp, SAP MM, SD, LE (SHP/WM/LE), PP, PLM (PM, QM, PS), SRM, CRM, SCM (APO), SCM (TM), FI, CO, and Solution Manager. He also has experience in ABAP/4 and application link enabling (ALE) and IDocs. He has participated in numerous industry conferences, such as the SAP Skills Conference in Walldorf at SAP SE.
You may contact the author at Gaetano_altavilla@hotmail.com.
If you have comments about this article or publication, or would like to submit an article idea, please contact the editor.


