Learn how to use the standard logic delivered by SAP within Time Management to build complex overtime rules and generate overtime and double-time wage types. Minimize custom rules by using the standard logic delivered by SAP and copying them to your own rules to build automatically-generated overtime wage types based on your requirements.
Key Concept
SAP Time Management schemas, personnel calculation rules (PCRs), time types, and cluster tables are standard SAP tools used to create and track balances within time evaluation so that complex overtime and double-time logic, and customer-specific rules can be built. For example, you can build custom logic for the Time Management system that automatically generates overtime pay after eight hours have been worked in a day, and double-time pay after 12 hours have been worked.
Time evaluation is made up of a time schema that contains all the rules of your organization. For example, an employee works 50 hours in a week that contains a holiday and also has a day of vacation banked. Time Management takes all this data from the respective infotypes and pays the appropriate wage types per the configuration of the time schema (in this case, 24 hours regular pay, eight hours vacation pay, eight hours of holiday pay, and 10 hours of overtime). In addition, depending on your organizational requirements, employees can be paid a different rate of pay for working different shifts. For example, an employee could be paid double the hourly rate for any hours worked on Sunday, or paid a shift premium of an extra $1 per hour for overnight hours.
I demonstrate how to use the standard logic delivered by SAP in the ERP HCM system to create your own overtime rules. As my example, I am using a company that wants overtime to be paid at a rate of time and a half (1.5X) to employees who work over eight hours in a day, and employees to be paid at double the regular rate (2X) for any time worked over 12 hours.
Overview of Standard SAP Schemas
By default the SAP ERP HCM system delivers a few different schemas in Time Management. In most instances, you should copy an existing schema and then make changes to it, creating your own custom schema. Here is a list of schemas:
- TM00 – Time evaluation with personnel time events
- TM01 – Time evaluation for work schedule deviations
- TM02 – Time evaluation for external services management
- TM04 – Time evaluation without clock times
The first decision you need to make is: which standard schema should you copy? If you have employees who clock in and out with time-recording terminals (time clocks), which would be the case for many organizations who want to create overtime rules, then the schema you should start with is TM00.
Create a Custom Schema
First and foremost, you need to copy the standard SAP ERP HCM schema to make a custom schema. To do this, follow these steps:
Execute transaction code PE01. This results in the Personnel Calculation Schemas: Initial Screen (Figure 1).
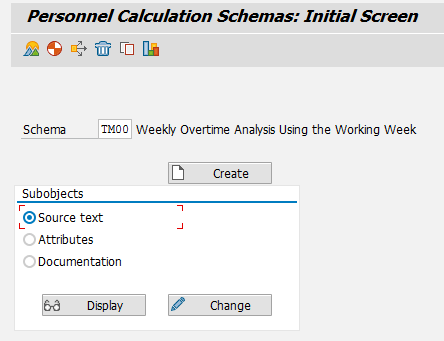
Figure 1
Create a new Time Management schema
Enter TM00 in the Schema field and select the Source text radio button; then click the copy icon .
In the screen that opens (Figure 2), enter a new schema name in the To schema field (e.g., the company namespace Z*), and click the green checkmark button. When the schema is copied, you get a success message.
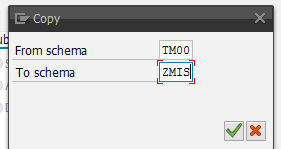
Figure 2
Copy schema from one schema to a new custom schema
SAP has delivered three different overtime sub-schemas that you can put in your schema. They are as follows:
- TW10 – This is used to determine the number of consecutive attendance days recorded for an employee in any week. For example, after an employee has worked for six consecutive days in a week, all the additional hours worked should be paid out as overtime.
- TW15 – This is used to pay overtime after an employee has worked X hours on any one day. For example, after an employee has worked eight hours in a day, all the additional hours should be paid out as overtime.
- TW30 – This is used to pay overtime after X hours have been worked in a week. For example, after an employee has worked 40 hours in a week, all the additional hours should be paid out as overtime.
The SAP system has already defined an existing place in the time schema to add these sub-schemas within the main schema for overtime processing. As shown in Figure 3, you can see the block defined by BLOCK BEG in the time schema along with the comment Determine Overtime and BLOCK END.

Figure 3
The standard Time Management schema block for overtime processing
To make additions to the standard sub-schema you need to execute transaction code PE01 (Figure 1). This time, in the Schema field, enter the schema name that you copied previously. Then select the Source text radio button and click the Change button.
Scroll down to the block where the SAP system has defined Determine Overtime (Figure 3).
Here you need to add new lines to enter the schema rules. In the Line column next to the Determine Overtime schema (Figure 4, an enlarged view of a section of Figure 3), enter 0i3660—this inserts three lines. Then press Enter.

Figure 4
Make changes to the copied schema
In Figure 5 you see that three new blank lines have been added to the screen. Here you can now enter all the data for the standard SAP ERP HCM schemas, and you can add descriptive comments for each in the Text column (Figure 6). Once you’ve made your changes, press Ctrl+S or the save icon to save your new schema. With these simple steps, you have put the standard Time Management schema logic into your custom schema

Figure 5
Add lines to the overtime schema

Figure 6
Time schema logic calling the standard SAP sub-schemas
Create a Custom Sub-Schema
Next, in order to accomplish the requirements of paying overtime after eight hours have been worked in a day, and paying double-time after 12 hours have been worked in a day, the first thing you do is to copy the standard SAP ERP HCM sub-schema for this functionality (e.g., sub-schema TW15) to a custom sub-schema. You do this because you need to adjust the logic to add your requirements, and you should never change an SAP ERP HCM schema rule directly. Follow the same instructions for copying the original schema (above), but instead of entering TM00, enter TW15.
Next you need to tell the schema to use the custom sub-schema instead of the standard one that we inserted in the previous step. To achieve this, follow these steps.
Go back into the schema in change mode. Execute transaction code PE01, enter the schema, and click the Change button. Next, go to the logic that contains the standard SAP sub-schema. In the comments area (Text column), delete the current comment and replace it with a new description for your custom schema—in this example, Overtime after 8 hours/day (Figure 7). This step is recommended in order to maintain a history and provide transparency to show that this sub-schema has been copied.

Figure 7
Time schema showing SAP logic in comments and call to standard logic
Now, make the necessary changes in the new sub-schema ZW15. First, take a look at the standard SAP ERP HCM system setup of sub-schema TW15. It consists of only two schema rules:
- TO01 – Determines the number of hours (X) after which overtime is paid.
- TO02 – Flags attendance times as overtime after the employee has worked hours (defined in rule above as 12 hours)
Next, you need to create a new time type to be used in the schema. This time type sets a variable in the time schema that stores the variable 12 to determine when to start paying hours at double-time. This is similar to the standard setup that the SAP system did for setting up overtime pay after X number of hours. To track this variable, the SAP system created time type 0900. You can create your time type with these steps.
Follow IMG menu path Time Management > Time Evaluation > Time Evaluation Settings > Define Time Types (Figure 8).

Figure 8
Select the standard SAP time type from which to copy
In the customer name space (anything above 1999), create the new time type. In this example, I copy time type 0900. You do not need to enter any balance formations because this time type should reset each day. Here you are creating a time type that holds balances that are tracked during time evaluation. In the table, navigate to the entry from which you are copying; in this case, 0900. Select the entry and click the copy icon (Figure 8). The SAP system automatically creates a new entry (as seen in Figure 9). All you need to update is the Time type number, to make it within the customer namespace (in this case, 9000), and the description (e.g., daily double-time after 12 hr). Then save your entries.

Figure 9
New SAP time type to track double-time hours after 12
Now that you have created a new time type, you can make updates to the schema rule to fill this time type as necessary.
First, copy the standard schema rule TO01 to a custom rule in the customer name space. Execute transaction PE02 and take the same steps as before, when you copied the SAP ERP HCM schemas and sub-schemas.
Then, delete the comment from the SAP system logic, which has a variable currently set to 99 for a non-holiday, scheduled work day. You can do this on lines 40/50 of the schema (highlighted in red in Figure 10). Here I am adding new logic to the rule and adjusting existing SAP logic as needed. For example, the command HRS=12 ADDDB9000Z tells the system to add 12 to the time type 9000, overwriting the logic that’s currently there.
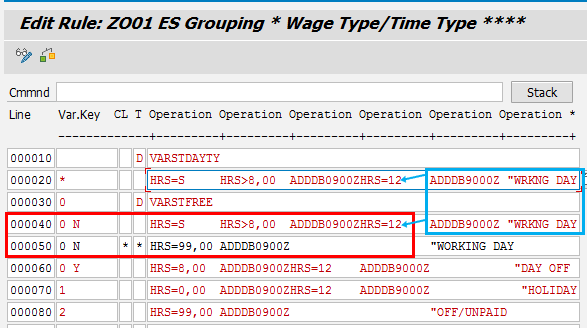
Figure 10
Add logic to time schema to fill the new time type
Next, change the constant to 12 and add it to the time type you created previously (e.g., ADDDB0900ZHRS=12, which tells the system to overwrite the current schema value with 12). This is done on lines 20/30 of the schema and is highlighted in blue in the figure.
You do not need to make any changes to the standard rule TO02. This is because, when looking at the rule, you see that it performs checks (based on the amounts that are in the SAP time type 0900) to determine when to change the processing class of the entry in the TIP cluster table to an overtime processing class. This is done using operation FILLPV.
At this point, the overtime logic should generate overtime after eight hours have been worked in a day. However, you still need to modify the logic to have double-time be paid for hours worked over 12. In order to do this, you need to create a new schema rule. You do this by copying schema rule TO02. After 12 hours, the processing type of the entry should be changed, but instead of basing this on SAP time type 0900, you base it on the time type you already created (9000). To achieve this, you need to make a few changes to the rules.
First, instead of looking for the S processing type (for regular hours), look for processing type M for hours that are overtime (Figure 11). ) In this example, I copied schema rule TO02 to rule ZDT1 using transaction code PE02. Next I add my own logic so that this rule only gets processed if the processing type is M. You can see this logic in Figure 11.

Figure 11
Create a new schema rule that checks processing type
Next, I change the check from HRS?D0900 to HRS?D9000 to check the time type in grouping PAYTP 1 (Figure 12). This is the logic within grouping 1 (PAYTP 1) which is routed from the previous rule. I am changing the logic to make the decision based on the value in the custom time type 9000.

Figure 12
Change the logic in the schema rule to check the custom time type
In this step, you are essentially telling the schema that after 12 hours have been worked, it should change the processing type of the TIP entry to Y for all hours worked above 12. For example, if an employee works 13 hours in a day, the processing type of the TIP entries should be changed as follows:
- 8 hours – Change to processing type S, which is paid at the regular rate of pay
- 4 hours – Change to processing type M, which is paid at the overtime rate of pay
- 1 hour – Change to processing type Y, which is paid at the double-time rate of pay
The last thing you need to do is to put the schema rule you created into your time schema. Execute transaction code PE01 and switch to change mode for the sub-schema that handles this piece of the overtime calculation—ZW15. You want to put your logic below standard rule TO02 because that is the rule that changes the processing type from S to M. This new rule is contingent on the processing type being M. Figure 13 shows what your logic should look like with these changes.

Figure 13
Add the custom rules to the time schema
Note that the appropriate corresponding wage types need to be created by the payroll consultant and that the appropriate wage type generation entries in table T510S need to be maintained. This is based on the fact that if the processing class is M, then overtime wage types are generated, and if the processing class is Y, then double-time wage types are generated. You can find more details about how to generate wage types using table T510S in this HR Expert article, “How to Use the Fields in Table T510S to Generate Time Wage Types,” by Venkat Dasika. [October 7, 2009]
At this point, all the necessary configuration has been done. Make sure to save all of your changes using the save icon. The next step is to run the time evaluation to test the new logic. Here are the steps to do this.
Execute transaction code PA61 to manually create employee clocking-in and clocking-out data for the system (Figure 14). (Depending on your system’s setup, you might be using Cross-Application Time Sheets [CATS], or infotype 2001, 2002, or 2011 for this step.) For the purposes of this demonstration, I am using infotype 2011 for click times.)
Execute transaction code PA61 and enter the Personnel number (in the top of the screen in Figure 14). Enter 2011 in the Infotype field or select Time Events from the drop-down options (at the bottom of the screen in the figure).
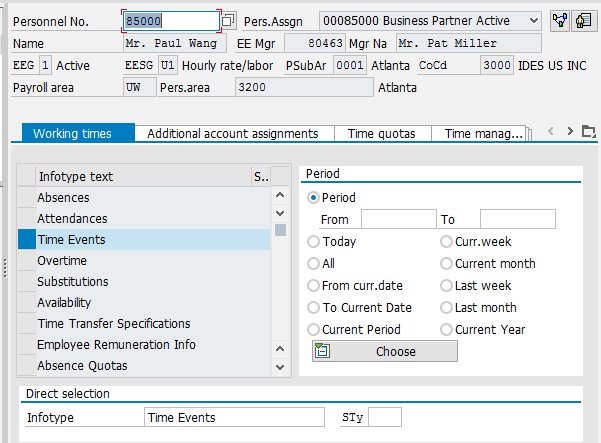
Figure 14
Transaction code PA61 screen to enter time events
Click the List entry icon in the toolbar (not shown) and add the Clock-in and Clock-out times (Figure 15). Then click the save icon.

Figure 15
Add clock times to infotype 2011
Next, execute transaction code PT60 to run time evaluation. In the screen that opens (Figure 16), enter the Personnel Number, the evaluation schema that you created in Figure 2, the appropriate dates, and select the Display log check box. Then click the yellow-arrow icon to go to the next screen (Figure 17).
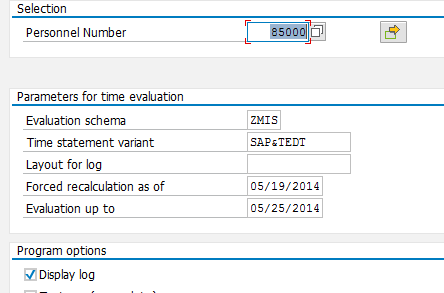
Figure 16
Transaction code PT60 main screen to run time evaluation
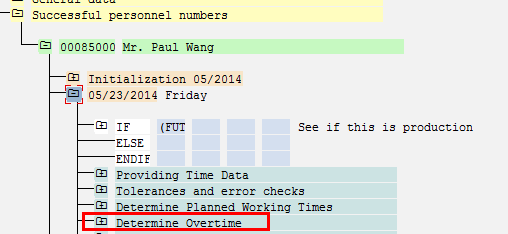
Figure 17
Schema log showing Determine Overtime block
Navigate to the day where you entered your time and to the Determine Overtime block of processing (Figure 17). You should now also see the rules from your schema (Figure 18). Click on each line to see the processing details.

Figure 18
Schema log logic showing the custom rules
According to the changes made above, rule ZO01sets time type 0900 to 8 and time type 9000 to 12 (Figure 19). These changes can be seen in the TES cluster table (at the bottom of Figure 19).
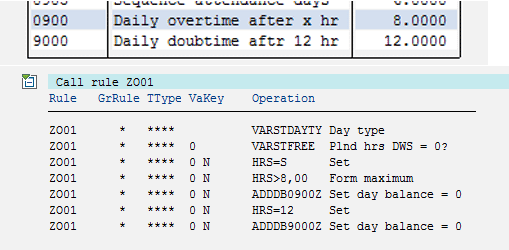
Figure 19
Values in the TES cluster table and custom schema rule processing
After eight hours have been worked, rule TO02 changes the TIP table processing class hours from S to M (Figures 20 and 21).

Figure 20
TIP cluster table before processing standard rule TO02

Figure 21
TIP cluster table after processing standard rule TO02
After 12 hours have been worked, rule ZDT1 changes the processing class of the TIP table entry from M to Y (Figures 22 and 23).

Figure 22
TIP cluster table before processing custom rule ZDT1

Figure 23
TIP cluster table after processing custom rule ZDT1
Now, as part of your table T510S setup, you should have a schema row for generating wage types (GWT) for wage types S, M, and Y (Figure 24).

Figure 24
Time schema logic to generate wage types
Once this has been configured correctly you should see the appropriate wage types generated in table ZL (Figure 25). Once these wage types are generated and configured correctly they are passed to payroll and paid out to the employee.
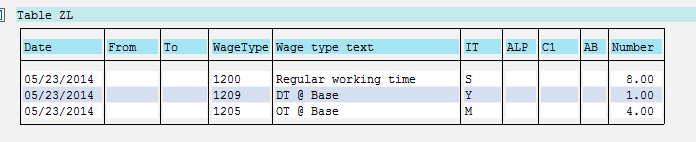
Figure 25
Table ZL after processing that shows the wage types that were generated

Imran Sajid
Imran Sajid is a Senior Education Consultant at SAP based in the Atlanta, GA, area. At SAP, he focuses on teaching classes in the HCM area within both SAP and SuccessFactors. Previously, Imran was a consultant who implemented and provided post-go-live support for more than a dozen different client systems spanning many industries, including manufacturing, automotive, retail, information systems, the public sector, and energy. He is the author of the book entitled, The Payroll Control Center for SAP ERP HCM and SAP SuccessFactors, as well as a frequent contributor to SAP Experts, where he has published almost a dozen articles. Imran is also frequent blogger on SAP Community Network (SCN). He graduated from the Georgia State University Robinson College of Business with a degree in Computer Information Systems. Imran can be found on Twitter @ImranSajidSAP.
You may contact the author at Imran.Sajid@sap.com.
If you have comments about this article or publication, or would like to submit an article idea, please contact the editor.