Learn how to efficiently transfer a batch’s characteristics values from the sender material’s batches to the receiver material’s batches to save time and cost. Implementing batch derivation eliminates the need to manually enter characteristics data, while automatically preventing redundant or even incorrect data entry.
Key Concept
Batch derivation is an efficient and effective way to automatically transfer the characteristics values of batches of sender materials to receiver materials to maintain end-to-end traceability of products.
Companies managing materials in batches — whether they are raw materials, semi-finished, or finished products — can use batch derivation to optimize their business processes. They can reduce data entry efforts while also ensuring greater visibility and traceability during the entire production process. For example, in the cold rolled coil (CRC) steel industry, there’s a requirement that no matter how many production processes the CRC coil passes through, the very first and unique characteristic value identification Mother Coil Number of hot rolled coil (HRC) must always flow into all production processes of CRC coils.
Whenever a batch-managed material is processed in the production process, its characteristics change, and the batch-managed material attains different physical and chemical attributes. These changed attributes are maintained as characteristics values of the batch-managed materials. With batch derivation, you can control how the system manages the characteristics values flowing from parent material to child material, which in my example is HRC to the CRC sheet.
I cover the basic configuration settings you need to activate batch derivation. I also cover the master data that you need to set up, including settings in material master, classification, and batch derivation-specific settings. Finally, I cover the end-to-end business process in which I show how the settings made for master data reflect in the batch derivation process. For ease of comprehension, I use the sender material’s description as raw material and the receiver material’s description as finished goods. Therefore, raw material as a sender is the parent material, whereas the finished goods receiver material is the child material.
Configuration Settings for Batch Derivation
You need to activate batch derivation in configuration settings. To do so, follow menu path SPRO > Reference IMG (or Press F5) > Logistics – General > Batch Management > Derivation of Batch Data > Activate Batch Derivation or use transaction code DVSP. In the screen that appears, select the radio button Derivation Active and save.
Classification in Material Master
In the material master of not just the raw material but also the finished goods, you need to maintain the classification view, wherein you can incorporate class type 023 that is specific to batch-managed materials. To maintain the classification view or make changes to the already-maintained classification view in material master, follow menu path Logistics > Materials Management > Material Master > Change > Immediately or use transaction MM02 (Figure 1).
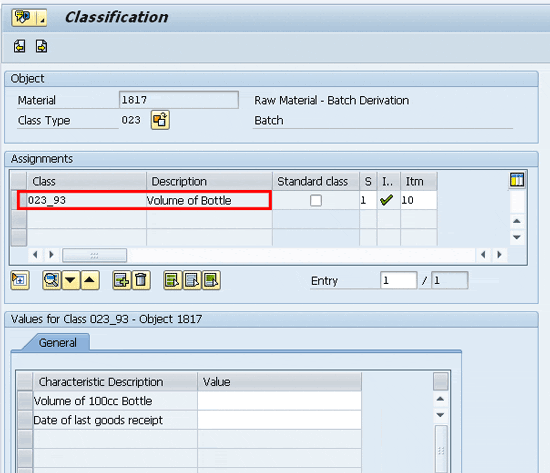
Figure 1
Classification view in the Material Master
Figure 1 consists of a Class 023_93 of Class type 023 (Batch) and has two characteristics whose descriptions are given as Volume of 100cc Bottle and Date of last goods receipt, respectively. On this screen, you only need to assign an already-created class, which in my example is 023_93. After you assign an already-created class, the system automatically assigns the characteristics associated with it. In my example I do not have to assign any specific value to the characteristics (in the value column) because I do this during the transactional data entry. Click the save icon or press Ctrl S to save your entries. For more information on class and characteristics, see the sidebar “Classification: Class with Characteristics.”
Note
The classification settings that you make for the sender material also apply to the receiver material, especially the common characteristics whose values you want the system to transfer during batch derivation. Although my example above shows classification details of the sender material 1817, I have made similar classification settings for the receiver material 1818.
Next, for comprehension purposes only, I show greater details of the class 023_93 consisting of both of the above characteristics, and how these relate to the material master 1817 in Figure 1.
Classification: Class with Characteristics
Although I do not cover how to create class or characteristics, it is important to understand how class and characteristics are linked together. To view the structure of class 023_93 and the characteristics associated with it, follow menu path Cross-Application Components > Classification > Master Data > Classes or use transaction CL02. In the initial screen that appears (Figure A), enter class 023_93 and also class type as 023 (for batch) and click the change icon (the pencil).
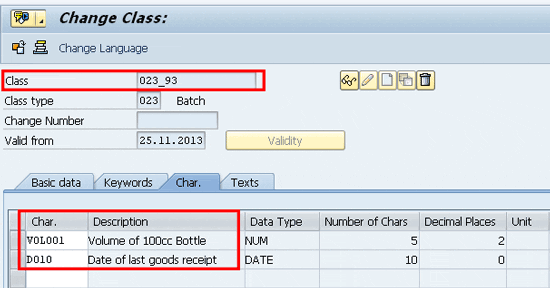
Figure A
Characteristics assignment in a class
Figure A consists of two characteristics whose only descriptions appeared or were visible in Figure 1. These two characteristics are VOL001 and D010. I describe several instances in which the system interchangeably displays the characteristics or their descriptions. The data type of the first characteristic, VOL001, is numeric and consists of five characteristics and two decimal places, whereas the second characteristic, D010, has a data type as date. Click the back icon to get out of the class screen. I now proceed to make the necessary batch derivation settings, first for the sender material and then for the receiver material.
Batch Derivation – Sender Material
To make batch derivation settings for the sender material, including the characteristics, use transaction code DVS1 (Figure 2). There is no menu path available in SAP ERP to navigate to this transaction.
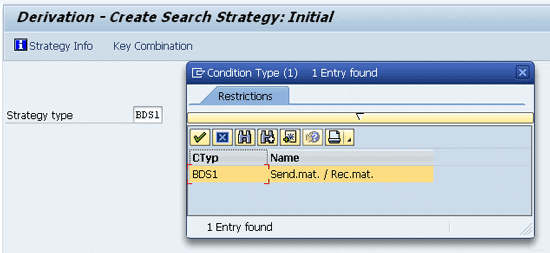
Figure 2
The initial screen for batch derivation (sending and receiving materials)
Figure 2 is the initial screen in which the standard strategy type option available is for the sender material or the receiver material key combination. This key combination enables the user to maintain not just the sender material’s information but also the receiver’s material. Place your cursor on the Strategy type field and press F4. The system brings up the condition type BDS1 to select. After you select BDS1 and press Enter, the system opens a pop-up screen (Figure 3).

Figure 3
Key combination of the sender and the receiver materials
Figure 3 provides radio buttons to enable the user to select a combination of both receiving and sending material information on the same screen, and only sender material number information. For my example, I select the first radio button (Receiving material + sending material) and click the continue icon (the green check mark).
In the next screen (Figure 4), enter 1818 in the Receiver Material field and also enter validity dates in the Valid From and Valid to fields. If you do not enter the validity dates, the system automatically selects the date of creation of the condition record until December 31, 9999. If you wish to use a different validity than what the system proposes, use the validity icon located at the bottom of Figure 4 (not shown).
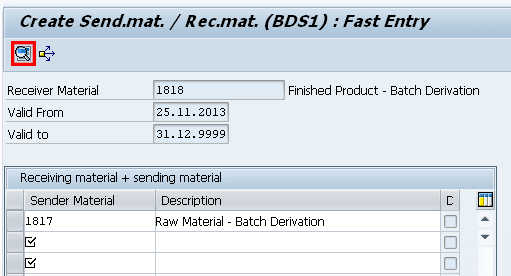
Figure 4
Define the sender-receiver relationship
Next, I enter the sender material number 1817 in the lower half of the screen. In this section of the screen, you can enter multiple sender materials for one receiver material. Select the sender material 1817 and click the details icon.
The next screen (Figure 5) consists of details not just about the sender material 1817 but also receiver material 1818. Enter the two characteristics VOL001 and D010 in the lower half of the screen. This data tells the system to send the characteristic values of these two characteristics from material 1817 (the sender material) to 1818 (the receiver material). These are the same characteristics that you previously maintained in the classification view of material masters 1817 and 1818 (Figure 1).
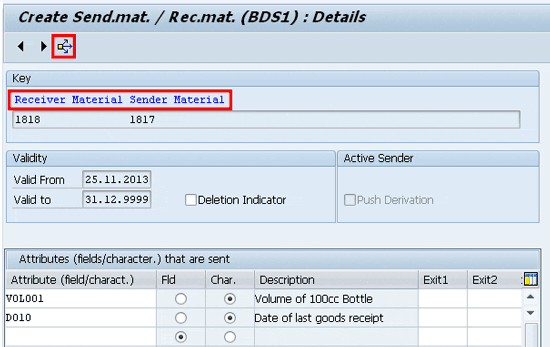
Figure 5
Attributes of the sender material
The next step is to define the event or the instance when the system performs batch derivation for the receiver material. Automatic batch derivation is possible at the time of release of a production or process order and goods receipt of a production or process order. It is also possible to perform manual batch derivation, if there is any such business need. Click the condition usage icon or press F7.
In the next screen (Figure 6), select Event 200 by clicking it once until it highlights to enable the system to perform batch derivation during the release of the process or production order. Later, I show you how to perform batch derivation in the production order screen after you release the production order.
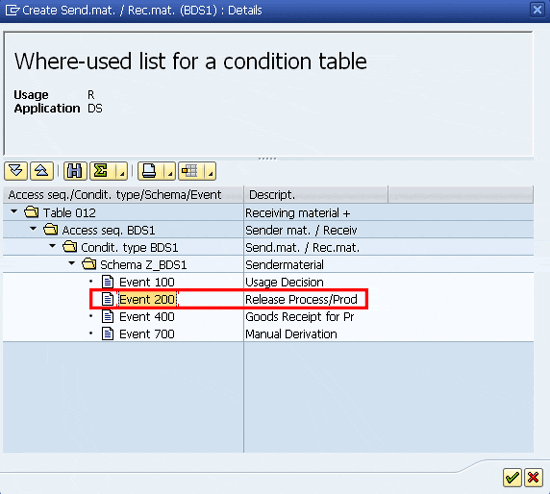
Figure 6
Event selection for batch derivation
So far, I have covered batch derivation for sender material, while associating it with receiver material. However, the setting for receiver material is significantly more elaborate than the setting for sender material, especially with regard to how the system responds in case it is unable to perform batch derivation on receiver material or when one of the characteristic values derived from batch derivation is missing.
Batch Derivation – Receiver Material
To make batch derivation settings for receiver material, including the characteristics, use transaction code DVR1 (Figure 7). There is no menu path available in SAP ERP to navigate to this transaction.
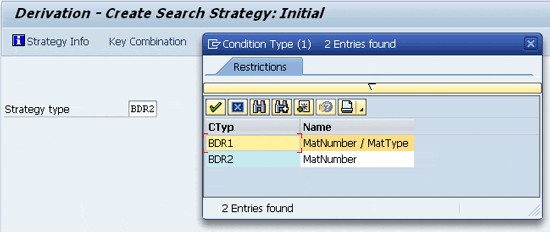
Figure 7
The initial screen for receiving material in batch derivation
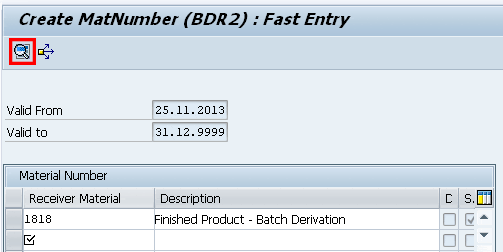
Figure 8
Enter the receiver material
In Figure 8, enter the receiver material 1818. In case you do not enter the validity dates, the system automatically selects the date of creation of the condition record until December 31, 9999 (infinity). If you wish to change the validity dates, the validity icon is available at the bottom of Figure 8 (not shown).
Next, select the receiver material 1818 and click the details icon (the magnifying glass). The system now displays the screen shown in Figure 9.
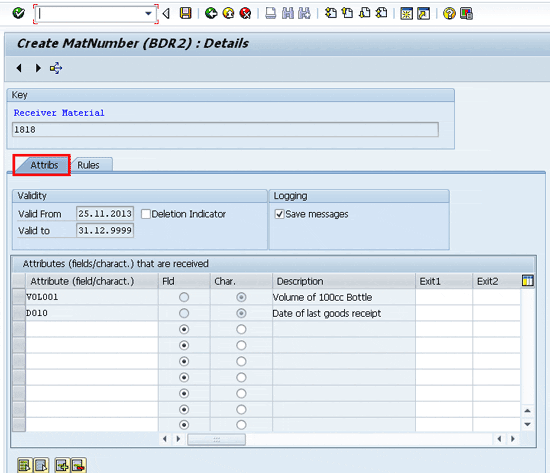
Figure 9
The Attribs (attributes) tab for characteristics of the receiver material
In Figure 9, enter the same two characteristics or attributes VOL001 and D010 of the class 023_93. Next, select both of these characteristics and click the Rules tab.
In the next screen (Figure 10), you can define the rules that the system needs to follow in case it is unable to perform batch derivation. You need to define the rules for every individual characteristic. In my example, I set the rules for first characteristic VOL001 in which I set the control level to warning in case the system finds the sender field empty. An empty sender field means that there’s no characteristic value in sender material’s classification, and therefore, nothing transfers to the receiver material during batch derivation. You can also turn these warning messages into error messages if you want to ensure that the user handles batch derivation-related issues as soon as an error message appears. The second control setting for the same characteristic VOL001 stipulates how the system reacts if it is able to previously find an already-entered value in the characteristic. If it is to overwrite this characteristic, you can indicate whether the system overwrites the characteristic with a warning message or brings up an error message that does not allow overwriting.
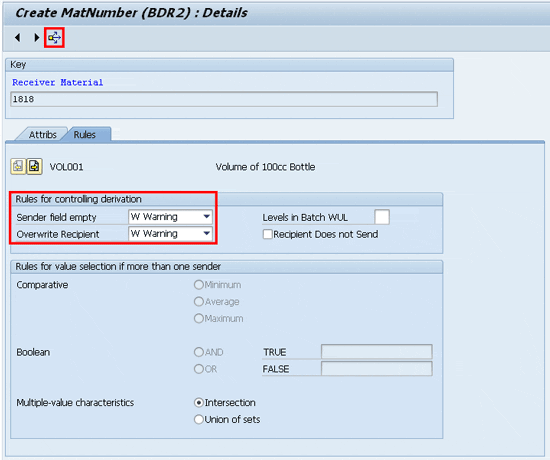
Figure 10
The Rules tab for characteristics of the receiver material
In my example, I set both of these control functions for the characteristic VOL001 as warning, and repeat the same steps for the second characteristic, D010. When finished with making settings for individual characteristics, I click the back icon once.
Now I click the condition usage icon or press F7 in Figure 10 and select Event 200 so that the system can perform batch derivation during the release of the production or process order. This is the same step that I had previously completed in Figure 6.
The next step is to perform goods receipt for the sender material and enter the values of a batch’s characteristics that eventually are sent forward to the receiver material during batch derivation.
Goods Receipt for the Sender Material
Although you have various ways of posting a material receipt in the system, such as posting a goods receipt against a purchase order or against another production order, the objective of this step is to increase the sender material’s inventory and at the same time manually incorporate the characteristics values that are then used with batch derivation.
For my example, I use the option to increase the sender material 1817 stock by using the direct quantity increase option using movement type 561 and without reference to any purchase or production order. To perform goods receipt for the sender material using movement type 561, follow menu path Logistics > Materials Management > Inventory Management > Goods Movement > Goods Receipt > Other or use transaction code MB1C (Figure 11).
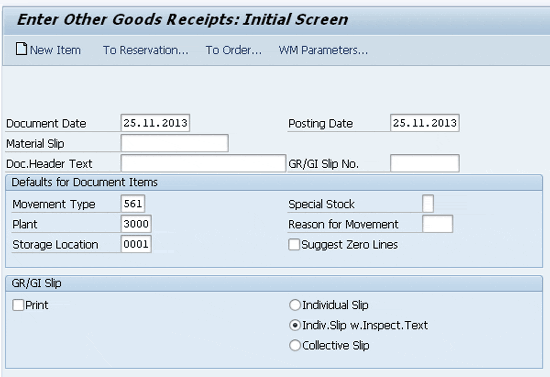
Figure 11
The initial screen for goods receipt
Figure 11 is the initial screen in which you enter the movement type 561, the plant 3000, and the storage location 0001 and press Enter once. In the next screen, enter the material number 1817 and quantity as 1. The system brings up the pop-up screen shown in Figure 12.
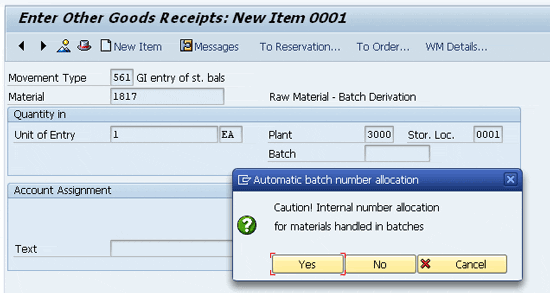
Figure 12
Internal assignment of a batch number for raw material goods receipt
Figure 12 informs you that the material is batch managed and that the system will allocate an internal number to this material. Click the Yes button.
In the next screen (Figure 13), the system creates the batch number 0000000408 and assigns it to material 1817, having batch class 023_93 with the same two characteristics that you saw in Figure 1. Manually enter the values of the two characteristics (VOL001 and D010, respectively) as 102.50 and 26.11.2013 (November 26, 2013). To save your entries click the save icon or press Ctrl and S.
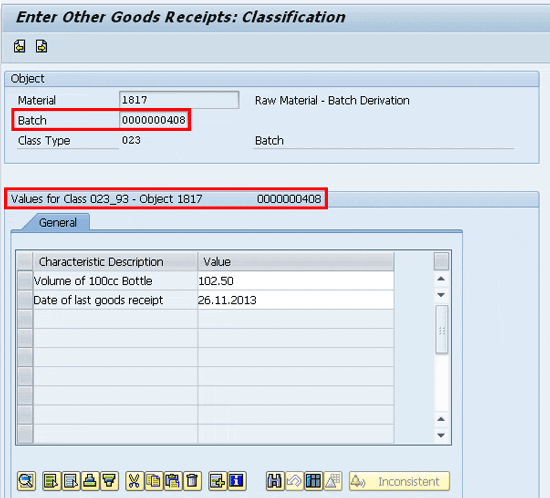
Figure 13
Manually enter characteristic values of raw material
Production Order and Sender Material Assignment
The next step is to create a production order for the material 1818 (the finished good) in which the system automatically assigns the material 1817 (the raw material) as its component. Assign the specific batch number 0000000408 of the material 1817 (as in Figure 13) and then perform batch derivation. In this way, the characteristics values of the sender material’s (1817) batch number 0000000408 automatically send copies to receiver material (1818) during batch derivation.
To create a production order, use menu path Logistics > Production > Shop Floor Control > Order > Create > with Material or use transaction code CO01. In the next screen (Figure 14) enter the sender material number 1818, the plant 3000, and the order type pp01 and press Enter.
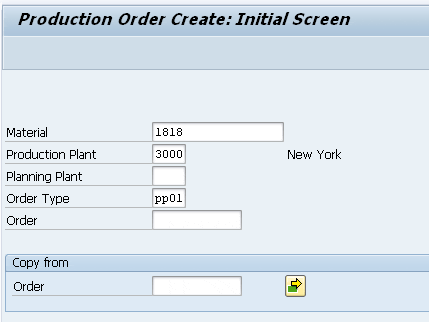
Figure 14
The initial production order creation screen
In the next screen (Figure 15), enter the production order quantity of 1 in the Total Qty (total quantity) field and select the current date from the list of options in the Type field in the Scheduling section. The system incorporates the date of creating a production order (today’s date). I also release the production order by clicking the release icon (the green flag). Next, click the components icon.

Figure 15
The general view of the production order creation screen
In the components view of the production order (Figure 16), the system has read the material’s bill of materials (BOM) of material 1818 and automatically incorporated the component 1817. In this screen, enter the batch number 0000000408 that you previously created (Figure 13). This way, the system refers to the characteristics values of sender material 1817 during batch derivation of receiver material 1818. Click the back icon once, and the system brings up the screen shown in Figure 15. This time, click the Goods Receipt tab in Figure 15.
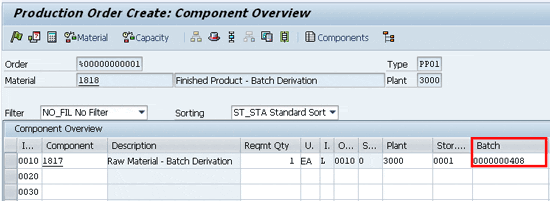
Figure 16
The component view of a production order
Batch Derivation in a Production Order
In the screen shown in Figure 17, which is a section of the Goods Receipt tab of the screen shown in Figure 15, click the new batch icon (the plain white icon) so that the system is able to create a new batch for the receiver material (1818). In my example, it created batch number 0000000409. Next, click the second icon, which is for batch derivation (the icon to the right of the white icon shown in Figure 17). Because all batch derivation settings are correctly in place, the system does not issue a message. Had there been any inconsistent batch derivation settings, the system would have either brought up a warning or an error message. Save the production order by clicking the save icon. In my example, the system generates production order number 60003610.

Figure 17
Option to create a new batch and also execute batch derivation
Goods Receipt for Production Order and Batch Derivation
The final step is to perform a goods receipt for the above production order number 60003610. You then see how the system automatically incorporates the characteristics values of batch number 000000408 of sender material 1817 into the batch number 0000000409 of receiver material 1818 via batch derivation.
Note
Another way to check if batch derivation is successful is to use transaction code MSC3N. On the initial screen, enter the receiver material number, the plant, and the batch number, but leave the storage location field blank. Press Enter and then click the Classification tab. In the Classification tab you can check to see if the system has automatically incorporated the characteristics values of the sender material’s batch number into the batch number of receiver material. This tip is especially useful if you have set the batch derivation event as 200 (refer to Figures 6 and 10 again).
To perform goods receipt for a production order, follow menu path Logistics > Materials Management > Inventory Management > Goods Movement > Goods Movement or use transaction code MIGO (Figure 18).
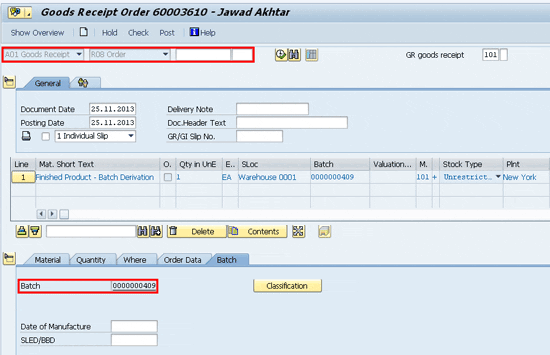
Figure 18
Goods receipt for a production order
In the screen that appears (Figure 18), select AO1 Goods Receipt from the list of options, choose RO8 Order from the list of options, and enter the production order 60003610 in the blank field in the top section of the screen. After you press Enter, the system shows the same finished goods 1818 batch number (0000000409) for the production order that was previously created during production order creation. Click the Batch tab at the lower end of the screen and click the Classification button.
The next screen (Figure 19) shows that the system automatically incorporated the values of the two characteristics derived using batch derivation.

Figure 19
Classification view of the batch-derived material 1818

Jawad Akhtar
Jawad Akhtar earned his chemical engineering degree from Missouri University of Science and Technology. He has 17 years of professional experience, of which nine years are in SAP. He has completed eight end-to-end SAP project implementation lifecycles in the areas of PP, QM, MM, PM, and DMS in the steel, automobile, chemical, fertilizer, FMCG, and building products industries. He also has worked as an SAP integration manager and an SAP project manager. He has been proactively involved in a business development and solution architect role for seven years. He is the author of Production Planning and Control with SAP ERP, it's filled with in-depth infomation on discrete, process, and repetitive manufacturing types. His profile on LinkedIn is at https://pk.linkedin.com/in/jawadakhtar. You may follow Jawad on Twitter @jawadahl. Currently, he is associated with AbacusConsulting as Head of SAP Delivery.
You may contact the author at jawad.akhtar@live.com.
If you have comments about this article or publication, or would like to submit an article idea, please contact the editor.


