System connections, authorizations, and a detailed description of the Solution Landscape are key to taking advantage of the Solution Documentation Assistant (SDA). Learn how to confirm that the solution landscape is properly described in the Landscape Management Database (LMDB), that communications between Solution Manager and managed systems are properly set up, and that the key authorizations are in place for both the Solution Manager and the managed systems.
The Solution Documentation Assistant (SDA) performs intelligent interrogations of your SAP solution landscape to create structured and standardized technical and process-related documentation in Solution Manager. In order for the SDA to perform its investigations, it must be able to communicate with the managed systems. The key to this communication is the proper setup of the Landscape Management Database (LMDB) in Solution Manager.
While the SOLMAN_SETUP guided procedure takes care of many aspects of populating the LMDB, some areas of the communications layer are often problematic. The two main areas where I’ve run into trouble in the LMDB at the connections layer are:
- Remote Function Calls (RFCs)
- Authorizations on both Solution Manager and the managed systems
First, let’s begin with confirming that the LMDB is properly set up for success with the SDA. Using transaction code LMDB, you launch the main entry point to the maintenance utilities for the solution landscape information stored in the LMDB (
Figure 1).

Figure 1
The LMDB start screen
This information is critical for Solution Manager to understand and navigate your SAP Solution Manager landscape. The LMDB contains enormous amounts of information about your managed systems and how they relate to one another in your enterprise landscape. Two key components in the LMDB that enable the SDA to do its magic are the RFC connections that enable Solution Manager to communicate with the managed systems and the logical components that provide a navigation map through the landscape.
Note
The setup of the LMDB in its entirety goes well beyond the scope of this
article. This article assumes that the technical and product systems
have already been maintained in the LMDB.
Figure 2Figure 3

Figure 2
Edit the managed system configuration in the LMDB
Click the Destinations row in
Figure 3 to show the RFC connections currently established between Solution Manager and the managed system chosen in the prior screen.

Figure 3
Maintain RFC connections between Solution Manager and the managed system
If the RFC connections have not yet been maintained, the right side of the screen is empty.
Click the RFC Maintenance button to open the RFC guided procedure, or wizard, shown in
Figure 4. The RFC wizard sets up the connections between Solution Manager and the managed system and standardizes the setup of the assigned users in the managed systems.
Note: Authorizations are critical in this step. You need to have user management rights (authorization to create users via transaction code SU01 and to maintain user roles via transaction code PFCG) in the managed systems to complete the wizard. Also, the SAP standard roles assigned to the users in the managed system by the wizard lack the key authorization objects S_RFC and S_RFCACL. Work with your security administrators to update the roles after you run the wizard or the invocation of the SDA will fail.
Tip!
As a general rule, I typically create a role with the S_RFCACL and S_RFC
authorization objects and assign it to every user. Your security team
probably already has a baseline role that it assigns to all users. You
can add these two authorization objects to that baseline role.

Figure 4
The RFC maintenance screen
In the connections maintenance screen (
Figure 4), select the row that has the client in the managed system for which you wish to set up RFCs. This action activates the RFC wizard in the bottom portion of the screen.
The following RFCs are available for creation and maintenance in the wizard:
- READ – Used by Solution Manager to read information from the managed system
- TMW – Used by Solution Manager for system changes to managed systems such as transports when the Change and Request Management (ChaRM) functionality is in use. TMW stands for Transport Management Workflow.
- BACK – Used by the managed system for sending information back to Solution Manager
- LOGIN – Used by Solution Manager to log in as the “solution manager” in the managed system to perform system functions
- TRUSTED – Two trusted RFCs are established to create a trusted relationship between Solution Manager and the managed system (one each way)
The bottom half of
Figure 4 shows a portion of the RFC - Standard Mode section of the screen. Here the standard RFCs with their current statuses are shown.
Figure 5 shows a more detailed view.

Figure 5
RFC – Standard mode section showing RFCs and their statuses
Select the check boxes next to each of the RFCs to be maintained and click the Execute button at the top of the RFC – Standard Mode window.
When prompted (
Figure 6), enter a user and password for the managed system that has user administrator rights on the managed system. This ID and password will be used when the RFCs are generated in the next steps. This step is required so that Solution Manager can create the user IDs to be assigned to the logical components in the managed systems and assign the proper roles to them. Remember to confirm that the users created in both the managed systems and the Solution Manager system have the authorization objects S_RFC and S_RFCACL included in their assigned roles.

Figure 6
Prompt for super user login for the managed system
After the wizard finishes running, you should see green lights by each of the RFCs displayed in the middle of the RFC Maintenance screen (
Figure 7).

Figure 7
Green status for primary RFCs
The RFC status view (
Figure 7) shows the status of only the four key RFCs needed for communication between Solution Manager and the managed system. To see all the RFCs, use transaction code SM59 and select connection type 3.
A total of seven RFCs are displayed in the Destinations View in the LMDB maintenance screen (
Figure 3). Six are used to create the bridge between Solution Manager and the managed system.
Figure 8 is a closer view of
Figure 3 where you can see that the Login RFC is listed twice with different purposes. One is listed as Unknown, and the other is listed as Test. If you execute transaction code SM59, you see that the Login RFC is really only one RFC.

Figure 8
Close-up view of the RFC destinations list in LMDB maintenance
Now that the RFCs are set up, it’s time to create the logical components for the managed systems. The logical components are like an address book for Solution Manager. They tell Solution Manager where in the system landscape to navigate when performing tasks on the managed systems.
Logical components tell Solution Manager which SID and client to navigate to for a given SAP product and version for a particular system role. I now define these terms.
Product: A single SAP product such as SAP ERP Central Component (ECC) or SAP Customer Relationship Management (CRM)
Version: The version of the SAP product running on the group of systems identified in the logical component. All the systems named in a single logical component must be running the same product and version.
System role: Identifies the purpose of the system being assigned to the logical component. Example system roles include Development, Training, Demo, and Production.
SID – This is the short name or identifier for a given system. For example, the ECC development system might have a SID of DEV, the quality assurance system QAL, and production PRD.
Figure 9 shows transaction code SMSY with a partially set up logical component for a system landscape running SAP ERP 6.0. The SID and client combinations are assigned for the development and production system roles (OMD:300 and OMP:300, respectively).
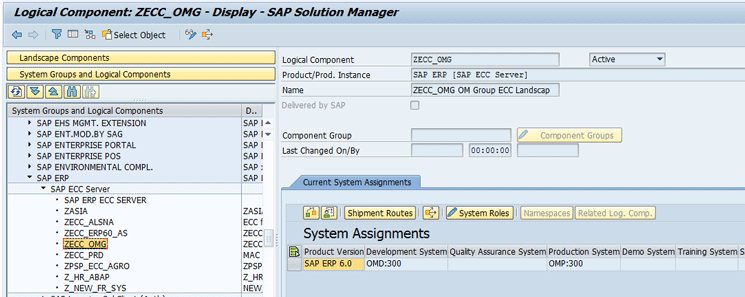
Figure 9
Logical component definition for an SAP ERP 6.0 system landscape
This logical component directs Solution Manager to SID OMD and Client 300 for any tasks that need to be performed on the SAP ERP 6.0 product for the development system role.
When preparing to run the analysis in the SDA, select the system role in the select systems step. See step 3 in
Figure 13 of the
SAP Professional Journal article “
Automate Your Business Blueprint Using RBPD and the Solution Documentation Assistant in SAP Solution Manager 7” by Marci Braybrooks. (
Figure 10 is a partial view of that figure.)
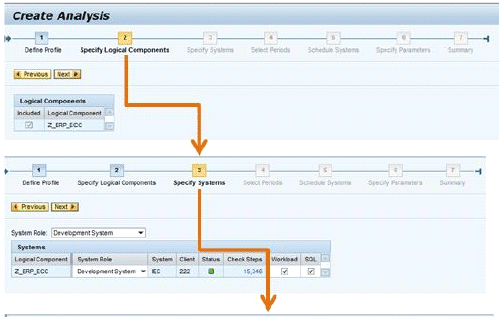
Figure 10
A partial view of the Create Analysis screen
Recap:
- The LMDB RFC connections and user authorizations are critical to successful execution of the SDA.
- S_RFC and S_RFCACL need to be added to user roles in both Solution Manager and the managed systems.
- Solution Manager and the managed systems must have a trusted relationship to establish the trusted RFCs.
- Logical components provide the map of the system landscape for Solution Manager.
There isn’t enough room in a single article to cover all the prerequisites for running the SDA, but I hope this information helps you avoid some of the challenges that I faced while performing my own analyses. For more information on technical prerequisites, see SAP Note 1683647 - Technical Prerequisites for SDA in SolMan 7.1.
As always, start in a development or sandbox environment and set up a very small analysis project that will run quickly while you’re getting all the configuration set up.
D. Russell Sloan
D. Russell Sloan, director of SAP solutions at Cognizant Technology Solutions, is a specialist in project and program governance. He focuses on the use of SAP Solution Manager for global rollout projects and has been implementing SAP software since 1996. Russell has degrees in accounting and information systems and has been a team and project leader for SAP projects for more than 14 years. He has been developing and deploying software systems for more than 30 years.
You may contact the author at
solmanruss@gmail.com.
If you have comments about this article or publication, or would like to submit an article idea, please contact the
editor.