Learn how to configure SAP Access Control (AC) 10.0 to integrate with the SAP Enterprise Portal. See how to use the Access Request Management (ARM) capability of SAP Access Control 10.0 to provision users and assign roles to the SAP Enterprise Portal. The ARM capability helps users keep the same access request process for ABAP-based SAP systems, such as SAP ERP Central Component (ECC), SAP Solution Manager, and SAP SCM, as well as Java-based SAP systems such as the SAP Enterprise Portal.
Key Concept
Access Request Management (ARM) can connect to ABAP-based SAP systems such as SAP ERP Central Component (ECC), SAP SCM, SAP CRM, SAP Solution Manager, SAP BusinessObjects Business Intelligence (BI), or SAP Business Warehouse (SAP BW) to create users and assign roles with predelivered ABAP-based programs. Enabling the same functionality with a Java-based system such as the SAP Enterprise Portal requires a different procedure and separate configuration. To connect to Java-based systems, you use predelivered Web services installed on the SAP Enterprise Portal for integration.
In a typical scenario, the SAP Enterprise Portal works in conjunction with the SAP ERP Central Component (ECC) system. Users need the portal role and corresponding ECC role to perform certain activities in the SAP Enterprise Portal. If either the portal role or ECC role is missing, users cannot perform any activity in the SAP Enterprise Portal. Companies prefer to have a single unified solution that provisions access to ECC and the SAP Enterprise Portal. I cover the steps to set up SAP Access Control 10.0 so that it can provision users and assign roles in SAP Enterprise Portal.
I also cover integrating the Access Request Management (ARM) capability of SAP Access Control 10.0 with the SAP Enterprise Portal. A step-by-step guide demonstrates the required configuration to integrate the SAP Enterprise Portal with GRC 10.0.
Enabling the ARM capability to provision users or roles to an SAP Java system (e.g., the SAP Enterprise Portal) requires installation of a plug-in (predelivered Web services) on the target system. The name of this plug-in component is GRCPIEP (GRC Plug-in for Enterprise Portal).
Here are the prerequisites for this integration:
- SAP Access Control 10.0 must be installed on SAP NetWeaver 7.0 enhancement package 2 Service Pack 06 or higher
- The SAP Enterprise Portal must be installed on SAP NetWeaver Application Server Java 7.02 Service Pack 06 or higher
After you install the GRCPIEP component on the SAP Enterprise Portal, go to the Web Service Navigator of the SAP Enterprise Portal to confirm the installation.
Enter this URL: https://<server>:<port>/wsnavigator/enterwsdl.html. (Replace the server and port with respective entries in your environment.) The system asks you to log in, but before you do, you must have administration access to the Web Service Navigator. Once you log in, you see the screen shown in Figure 1.

Figure 1
The Web Services Navigator of the SAP Enterprise Portal
You need to focus on the GRACAuthMgmtWebServiceBinding Web service for this integration. In Figure 1 click the + icon located to the left of GRACAuthMgmtWebServiceBinding. Now click the GRACAuthMgmtWebServiceOutBinding folder to implement this Web service (Figure 2).
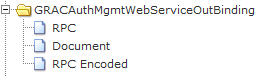
Figure 2
GRC AuthMgmt Web Service
Click the WSDL (Web Service Description Language) link located at the top of the next screen (below Overview) to display the WSDLs related to GRACAuthMgmtWebServiceBinding Web service (Figure 3).
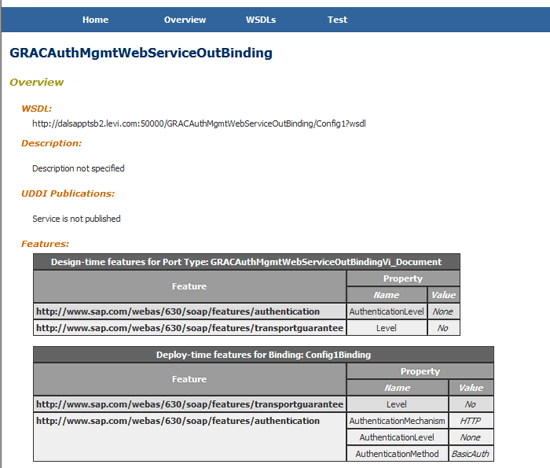
Figure 3
Definition of the Web service
In the next screen right-click the Standard link in the Document section (the third section from the top in Figure 4).

Figure 4
WSDLs for the Web service
In the pop-up list of options click the Copy Shortcut to copy the Web service WSDL URL to the clipboard. Here is the URL that you copy to the clipboard with the Copy Shortcut:
https://<server:port>/GRACAuthMgmtWebServiceOutBinding/Config1?wsdl&style=document
Go to the GRC system and execute transaction code SM59. Click the create icon to create a new Remote Function Call (RFC) destination (Figure 5).

Figure 5
Create an RFC destination
Enter a name for the RFC destination (e.g., GRACEPWS). Press the F4 key and select G in the Connection Type field in the pop-up dialog box (Figure 6) to create an RFC destination in the GRC system. The destination connects to Web services (WS) installed in the SAP Enterprise Portal system for authorization (AUTH) extraction and password generation. Call this the WS (Web service) destination.
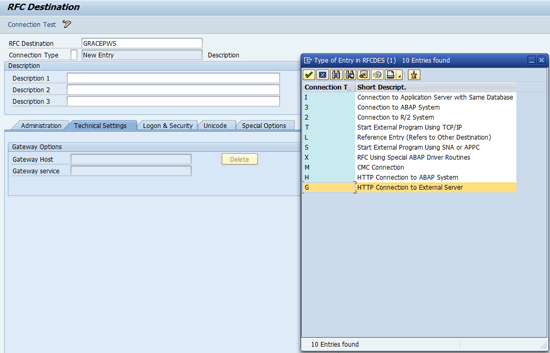
Figure 6
Select G – HTTP connection to external server
In the next screen enter a description for the RFC destination, the EP server address in the Target Host field, and the number of the port in the Service No. field (Figure 7).
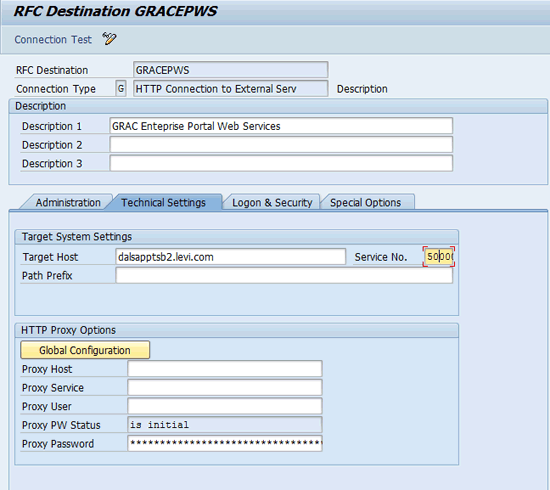
Figure 7
Create an RFC destination for the Portal Web Service
Click the Logon & Security tab and provide the User ID and password for the user with administrative privileges in the SAP Enterprise Portal system (Figure 8).

Figure 8
The Logon & Security tab of the RFC destination
Save the RFC destination by clicking the save icon located at the top of the window. Test the connection by clicking the Connection Test button. You then receive the results of this test (Figure 9).
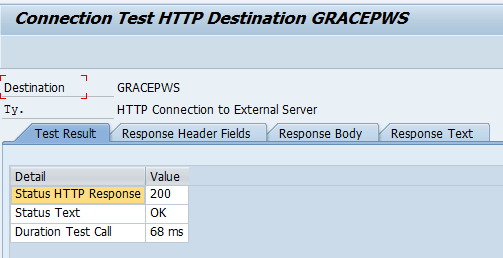
Figure 9
Test connection results
Go back to Figure 5 and click the create icon to create another RFC destination. Enter a name for the RFC destination (e.g., GRACEP_SPML) and select G in the Connection Type field. This action creates an RFC destination in the GRC system that connects to the SPML (Markup Language) service installed in the SAP Enterprise Portal system for provisioning (PROV).
Enter a description for the RFC destination, the EP server address in the Target Host field, and the number of the Port in the Service No field (Figure 10). The Path Prefix field is populated with /spml/spmlservice. Note that you only need to configure the path this way to make the integration work.

Figure 10
Create an RFC destination for SPML service
Click the save icon to save this RFC destination. Test the connection by clicking the Connection Test button. The results of the connection test are shown in Figure 11.
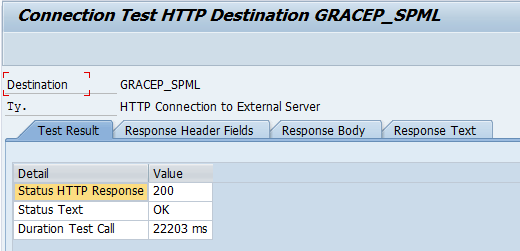
Figure 11
Test results for SPML RFC destination
You see both these connectors listed under the folder named HTTP Connections to External Server when you go back to the main screen of transaction SM59 (Figure 12).
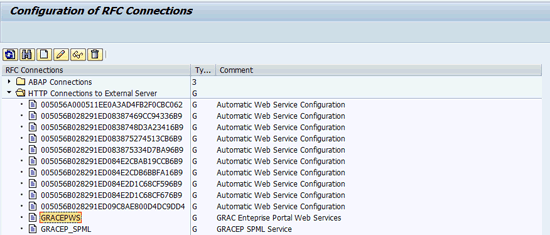
Figure 12
Both RFC destinations after creation
Execute transaction code LPCONFIG in the GRC system and maintain the logical port for WS Connector (GRACEPWS). Select the Proxy Class as CO_GRAC_AD_AUTH_MGM_WEBSERVICE (Figure 13).

Figure 13
Create a logical port
Populate the Proxy Class and Logical Port fields (Figure 14). The logical port name can be anything depending on naming conventions (e.g., LP_GRACEP). Click the create icon between the display icon (the glasses) and the delete icon (the trash barrel).
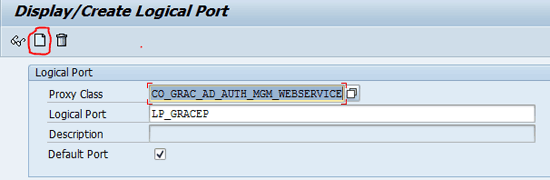
Figure 14
Click the create icon
Select the GRACEPWS (the connection to the Enterprise Portal Web services) connector for the HTTP Destination field (Figure 15).
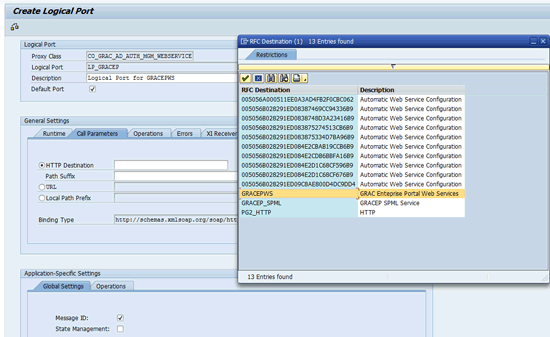
Figure 15
Populate the HTTP Destination
Populate the Path Suffix field with /GRACAuthMgmtWebServiceOutBinding/Config1?wsdl&style=document (Figure 16). Note that this path suffix came from the WSDL URL you copied (Figure 4).

Figure 16
Populate the path suffix
Click the save icon. Execute transaction SPRO (IMG) in the GRC system to start the configuration. Follow menu path Governance, Risk and Compliance > Common Component Settings > Integration Framework > Maintain Connectors and Connection Types.
Double-click the folder named Define Connectors and create a new connector for the Web service (GRACEPWS). Maintain the logical port to look at the LPCONFIG end point (LP_GRACEP) that you created earlier (Figure 17). I refer to this as the WS Connector. To save this connector, click the save icon.

Figure 17
The GRC Connector for Web Service
Create one more connector for the SPML RFC destination in the same screen and keep the logical port the same as the target connector. I refer to this as the SPML connector. Save the connector by clicking the save icon (Figure 18).

Figure 18
The GRC connector for SPML service
Now select the Web service connector (GRACEPWS) and double-click the Define Subsequent Connectors folder from the left navigation menu. In the next screen add the SPML connector (e.g., GRACEP_SPML) as a subsequent connector for the WS connector (GRACEPWS). To save this data select GRACEPWS and double-click the Define Subsequent Connectors folder under Define Connectors (Figure 19).
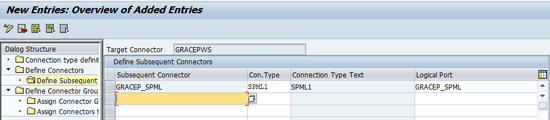
Figure 19
The SPML connector added to the WS connector
Double-click the folder named Define Connector Groups and add a new group for SAP Enterprise Portal if it doesn’t exist. Select the group and double-click the folder named Assign Connectors to Connector Groups (Figure 20).

Figure 20
Assign both the connectors to the Enterprise Portal connector group
Add the WS connector (GRACEPWS) to the SAP Enterprise Portal connector group that you just created (Figure 21). Click the save icon.
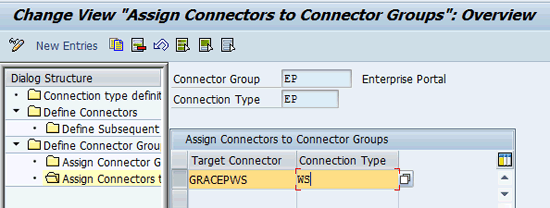
Figure 21
Add the WS connector to the Enterprise Portal connector group
Now follow IMG menu path Governance, Risk and Compliance > Integration Framework. Click the execute icon beside Maintain Connection Settings.
To select the integration scenario (in my example, I selected AUTH) click the search icon located next to the text field in the dialog box to determine a work area. Click the green checkmark to execute (Figure 22).

Figure 22
Select an integration scenario
Choose the Integration Scenario as AUTH and click the execute icon. Select AUTH and double-click the Scenario-Connection type Link folder (Figure 23).

Figure 23
The AUTH scenario
Confirm that the WS and SPML1 classes are attached to the AUTH scenario. If not, add them manually. To add these classes click the New Entries button and type in the information highlighted in Figure 24.

Figure 24
SPML and WS classes under the AUTH scenario
Double-click the Scenario-Connector link and add both the WS and SPML connectors to the AUTH scenario by clicking the New Entries button (Figure 25). Click the save icon and go back to the main screen of the GRC node in IMG.

Figure 25
Associate both the connectors to the AUTH scenario
Go to the Maintain Connection Settings again and select PROV as the integration scenario. Confirm that the classes shown in Figure 26 are attached to the PROV scenario. If not, add them manually.
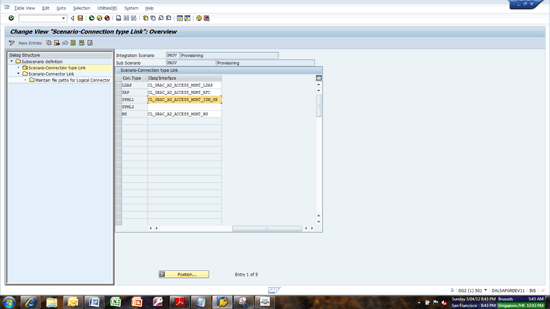
Figure 26
Check the class for SPML and WS under the PROV scenario
Click the New Entries button and then add both WS and SPML connectors to the PROV scenario (Figure 27). Follow the same procedure that I described for adding connectors to the AUTH scenario (Figure 23).
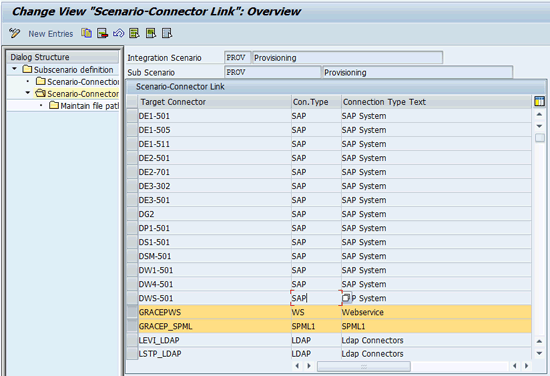
Figure 27
Associate both the connectors to the PROV scenario
Follow the same process that I described earlier and select ROLMG as the integration scenario. Confirm that the classes shown in Figure 28 are attached to the ROLMG scenario. If not, add them manually. You see the highlighted line in Figure 28. The name of the last column is Class/Interface. Both these rows should look exactly the same as the ones shown in Figure 28.

Figure 28
The ROLMG scenario
Click the New Entries button and add both the WS and SPML connectors to the ROLMG scenario (Figure 29).

Figure 29
Associate both the connectors to the ROLMG scenario
Go to Governance, Risk and Compliance > Access Control and execute Maintain Connector settings. Add both the connectors (GRACEP and GRACEP_SPML) and indicate that their environments are production (Figure 30). Click New Entries, add the connector, and select the environment as Production from the drop-down menu.

Figure 30
Mark both the connectors as Production connectors
Create group field mapping by going to GRC > Access Control > Maintain Mappings for Actions and connector groups. Select EP from the Connector Group (Conn.Group) column and double-click the Assign default connector to the connector group folder (Figure 31).
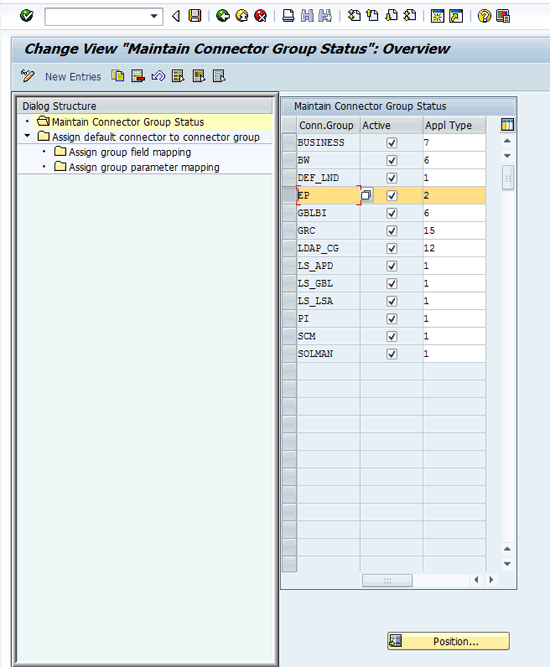
Figure 31
Select the connector group for maintenance of mapping
The default connector is the connector in which the GRC system retrieves details such as data related to the parameter field, user, or role. To associate the connector to actions 1 through 4 (Role Generation, Role Risk Analysis, Authorization Maintenance, and Provisioning), double-click Assign default connector to connector group (Figure 31) and click the New Entries button. Add the values as shown in Figure 32.
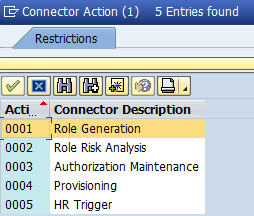
Figure 32
Associate actions to connectors
Add GRACEPWS four times and associate it to all four actions (Figure 33). Make sure to mark it as a default connector for each action.

Figure 33
Associate the WS connector to all four actions
Define the field mapping for the group applicable to all the systems in that group. This field mapping maps the fields in SAP Access Control with the Enterprise Portal fields. Select the entry with provisioning action (action number 4) and double-click the Assign group field mapping folder to start the mapping.
Click the New Entries button. Select the SAP Access Control 10.0 field by clicking F4 and putting the cursor in the AC Field Name. Click F4 when the cursor is in the System Fld Name field textbox to find the corresponding SAP Enterprise Portal parameter (Figure 34).

Figure 34
Choose the respective system field Names from the SAP NetWeaver Portal
Map as many parameters as you need. Once you are done with the mapping, you see the screen shown in Figure 35.

Figure 35
The configured Assign group field mapping screen
Double-click the Assign group parameter mapping folder to define technical group parameter mapping. Type the Parameter Name and Parameter Value as defined in the EP schema (Figure 36).

Figure 36
The configured Assign group parameter mapping screen
Synchronize the EP SPML schema by going to GRC > Access Control > Synchronization Jobs > Fetch the IDM schema. Select the SPML connector ID (GRACEP_SPML). From the drop-down list of options under Program, choose Execute in background F9 to run the job (Figure 37).
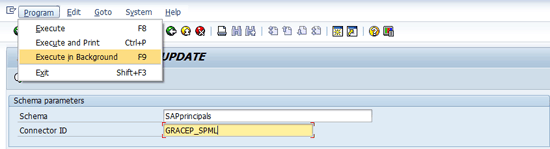
Figure 37
Import the SAP NetWeaver Portal SPML schema into the GRC system by running it via a batch job
Execute transaction SE16 to validate that the SPML schema is imported into the GRC system. Check the contents of the GRACIDMSCHEMABUF table. Select the GRACEP_SPML connector and click the execute icon (Figure 38).

Figure 38
Filter table entries for SPML connector
The entries from the database table are shown in Figure 39.
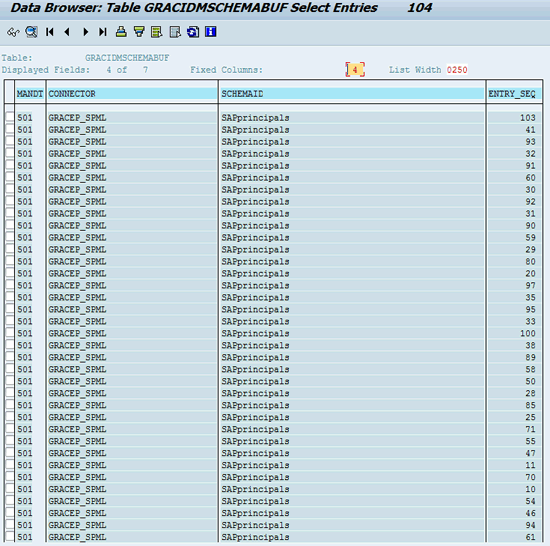
Figure 39
Schema entries
Bring Authorization data from the SAP Enterprise Portal into the GRC system by following menu path GRC > Access Control > Synchronization Jobs > Authorization Synch. Select the WS connector (e.g., GRACEPWS) as shown in Figure 40.

Figure 40
Bring Authorization data from the WS connector to the GRC system
Click the execute icon to run the program. A screen appears indicating that the authorization synchronization job is completed. Use transaction SE16 to validate that authorization data is synchronized into the GRC system. Check the contents of the GRACACTION table (Figure 41). The table is only populated with data if the job worked; otherwise, it is empty.

Figure 41
Validate the GRACACTION table to check Auth entries
To bring Users and Roles from the SAP Enterprise Portal into the GRC system follow menu path GRC > Access Control > Synchronization Jobs > Repository Object Synch. Use the WS Connector for the repository object. Schedule the background job to bring user and role information from the SAP Enterprise Portal into the GRC system (Figure 42).

Figure 42
Bring user and role information from the SAP Enterprise Portal to the GRC system
After you click the execute icon to run the repository sync for the WS connector, a screen appears indicating that the program was successful. Use transaction SE16 to validate that the user or role data is synchronized into the GRC system. Check the contents of the GRACUSER and GRACRLCONN tables (Figure 43).

Figure 43
The GRACUSER contains users for the GRACEPWS connector
Confirm that there is data for the GRACEPWS connector (Figure 44). Follow the same procedure you used before to validate data from the Auth Sync job.
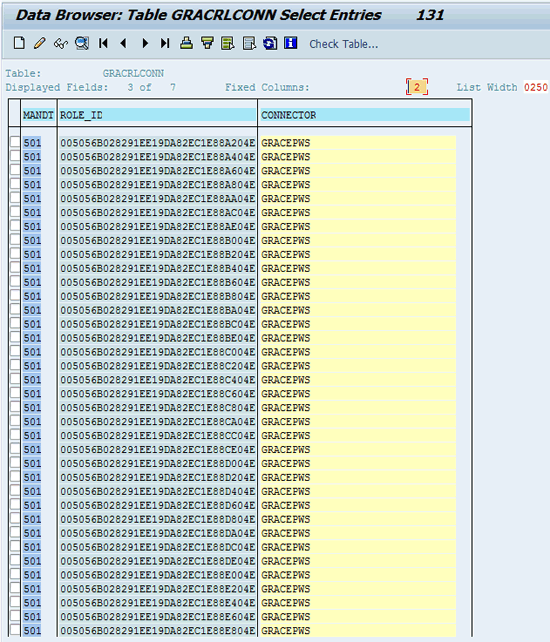
Figure 44
GRACRLCONN contains users for the GRACEPWS connector
Now, configure roles in GRC by importing EP roles into the GRC system. EP roles can only be imported by populating the role import. Log in to the GRC server by going to https://<server>:<port>/nwbc. Go to Access Management tab. Click the Role Import link located under the Role Mass Maintenance section.
After you open the Role Import screen, download the Role import template. Click the link named Click here to download attribute file template. Prepare the file as per this template and then choose the options as shown in Figure 45 to upload the file into GRC.

Figure 45
Once the file is prepared continue with role import process
Click Next and browse the Excel file you created in the earlier step (Figure 46).

Figure 46
Select and upload the role attributes file
Click Next and import roles via the template file. Complete the necessary workflow, provisioning, and other related configuration required to make ARM work before moving to the next step.
Note
The steps to set up workflow, provisioning, and other related configuration are beyond the scope of this article. This entire configuration is covered in the standard documentation and guides that SAP provides.
Create a request in the GRC system asking for the portal role (Figure 47).

Figure 47
Create a request for an SAP NetWeaver Portal role coming from the WS connector
Note
I assume that anyone trying to prepare GRC for request submission and provisioning knows how to set up and submit a request. Explaining this would be out of scope for this article.
Approve the request in the GRC system (Figure 48). Click the Submit button to approve the request.
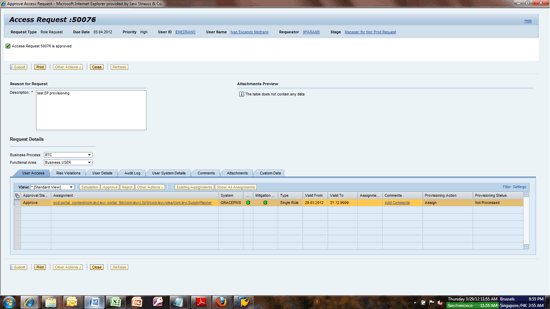
Figure 48
Approve the request
Check if the role is assigned to the user after the request is completed (Figure 49). The Submit button is grayed out after the request is approved.
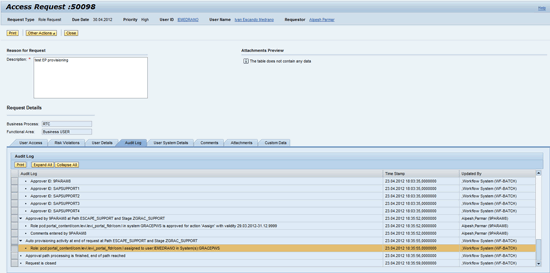
Figure 49
The audit log of the completed request
Check in user administration of the SAP Enterprise Portal to confirm that the role is assigned to the user (Figure 50).
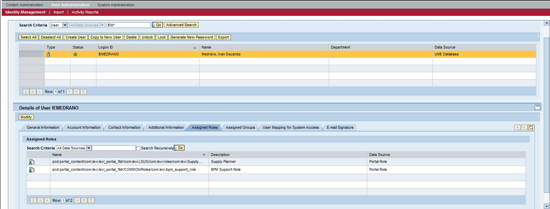
Figure 50
Assign the role to the user in the SAP NetWeaver Portal system

Alpesh Parmar
Alpesh Parmar is the managing partner at ultimumIT, Inc. He has over 11 years of experience in the IT field and led many SAP implementations. He is an internationally recognized and a renowned subject matter expert for SAP GRC solutions and has been speaking at different SAP conferences. His articles have been published in SAP forums, SAPinsider, and the SAPexperts GRC hub. Before founding ultimumIT, Inc., he was at Levi Strauss & Co. for almost three years serving as GRC architect/advisor. Prior to joining Levi, he was a manager at PricewaterhouseCoopers and led multiple SAP GRC engagements. He also served as implementation team lead at SAP Labs and as senior software developer at Virsa Systems. Alpesh holds a bachelor’s degree in control engineering (B.E.I.C.) from Gujarat University, in India, and a master’s degree in computer science (M.S.C.S.) from Monmouth University, in New Jersey.
You may contact the author at alpeshparmar@ultimumit.com.
If you have comments about this article or publication, or would like to submit an article idea, please contact the editor.