Archiving BW data reduces its volume, resulting in faster loads and queries. This first article of a three-part series explains the entire process to archive ODS or InfoCube data step by step.
Key Concept
Archiving is available with BW Release 3.0B and above. You can archive from InfoCubes and ODS tables, but currently you cannot archive with Persistent Staging Area (PSA) tables or master data. When archiving from ODS tables, the system only archives the active data. Therefore, you should ensure that you’ve activated all relevant data packages prior to starting the archiving run.
Any data warehousing system amasses and analyzes data at an increasing rate. As time progresses, companies face the dilemma of storing more and more historical data. This data tends to lose its daily relevance and users access it less frequently. At this point, you can consider archiving.
Archiving allows you to offload data to another storage medium while giving you the ability to reload this data into the BW system for reporting. Archiving data typically allows the system to achieve faster data loads and quicker query results by decreasing the volume of data in your BW system.
I’ll describe the complete archiving process from beginning to end in a series of three articles. Part 1 is a general overview of archiving in BW. In part 2, I’ll show how to reload the data that you have archived back into your BW system. In part 3, I’ll discuss the process and pitfalls of loading R/3 archived data directly into BW.
The archiving process I’ll describe in part 1 consists of two steps:
Write: Gather data from the InfoProvider and write this data to an archive file
Delete: Remove archived data from the InfoProvider
I’ll use the example of archiving an InfoCube, which is the same process you follow for ODS tables. I’ll explain how to select the object for archiving (in other words, choose the ODS or InfoCube), select the data for archiving, perform the archive function to gather the relevant BW data and write the archive file, and finally, delete the archived data from the system.
Note
Archiving is only one way to offload obsolete data from a BW system. You may find other ways of reducing or segregating data volume more advantageous based on your individual data-aging needs, such as near-line storage. See “Strategic Options in SAP BW Data Storage Compared,”
Note
Before you consider any archiving project, you need to establish a comprehensive data management plan. Various factors make up a data-aging strategy, such as cost of ownership; analysis reporting requirements; and legal, regulatory, and other retention requirements. A data-aging strategy could allow you to archive detailed data while retaining some aggregated values derived from this detailed data. For example, you could archive a document-level ODS while retaining a summarized InfoCube loaded from this detailed source.
Implement InfoCube Archiving
Since the overall process for archiving ODS tables and InfoCubes is similar, I will walk through the process for InfoCubes only. To archive an ODS, simply follow the procedure below using the option Edit ODS, rather than Edit InfoCube.
To begin the archiving process for an InfoCube and select data for archiving, go to transaction RSA1 (Administrator Workbench) and choose the InfoProviders tab. Locate the InfoCube you want to archive, right-click on it, and choose the option Edit InfoCube. Choose Extras from the menu at the top of the Edit InfoCube screen, and then select Archive (Figure 1). This archive settings area allows you to establish the parameters for archiving in this InfoCube. You must follow this procedure for each InfoCube you want to archive.
Figure 1
Select Extras>Archive to enter archiving settings
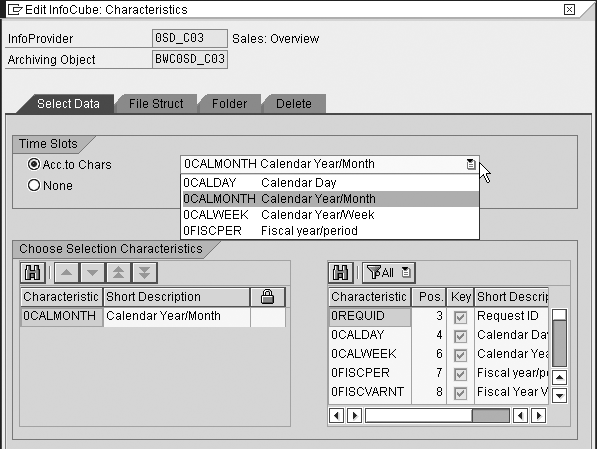
Four tabs in the archive settings screen of the InfoCube describe how to extract and save the data (Figure 2). With the Select Data tab, you establish settings to gather data from the InfoProvider to save for archiving. Simply put, whenever you perform archiving, the system takes a subset of the data in the InfoProvider. This screen allows you to set the parameters that the system uses to select that subset.
Figure 2
Choose the characteristics to use for archive data selection
The Time Slots section of Figure 2 allows you to choose a standard time characteristic to select data for archiving. You can choose only one standard time characteristic. For example, if you select CALMONTH, when performing archiving you are able to access data by calendar month to gather the data for archiving.
If you plan to gather data for archiving based on a particular time characteristic (which is the most popular way of archiving), you should choose that date parameter. The system automatically fills the date field in the bottom window and locks it for changes. Use this date option if date is the only selection criterion.
You can use another characteristic or combination of characteristics to select data for archiving. The bottom part of the screen labeled Choose Selection Characteristics allows you to choose other characteristics. The right side of the screen lists all characteristics; the left side lists characteristics chosen for selection. For example, if you want to gather data for archiving using calendar month and also by division, choose the characteristics 0CALMONTH and 0DIVISION by dragging them from the right to the left side of the screen. You may choose any InfoProvider characteristics. Once you run archiving for the InfoProvider, you cannot change these selection parameters.
Archive File Structure
The next tab, labeled File Struct, allows you to configure how to structure the archive file. The first section, Archive File Size, allows you to control the maximum size (in megabytes) of the archive file. Before the system writes an object to an archive file, it checks to see if the object exceeds the maximum permitted size. If so, the current archiving file closes and another opens to accommodate the object. Thus, the system creates multiple archive files. If a storage system connects to the SAP system, you must not exceed the maximum permitted size for the storage system. If you do not enter a value here, or if you enter a value that exceeds 2 gigabytes, the system automatically restricts the maximum size of an archive file to 2 gigabytes (Figure 3).
Figure 3
Select size and characteristics of the archive file
If performance of the archiving process is important — for example, you have a small time window to complete archiving — it is better to have many small files rather than fewer large files. The system can often use parallel processes to remove the data after it runs the archive process. The disadvantage is you have multiple files to store and manage. If performance and time are not critical, you can use larger file sizes.
You also can limit the size of the archive file by number of records by filling this value into the Max. Number of Data Objects field. Once the system reaches this number of records, the current archive file closes and a new one opens for the data object.
The next step is to set the layout of the fields in the archive file. Do this in the section Define Data Object (Cluster Key). The left side of the screen lists the characteristics available for archiving, and the right side shows the values that make up the file. Typically, you should archive all characteristics in the InfoProvider (Figure 3). The system does not save any characteristics that you do not choose for the archive file, so you cannot reload them if needed.
The system automatically chooses all key figure values in the InfoProvider for archiving and there is no way to limit the key figures in the archive file. For example, you cannot specify that a key figure is no longer relevant and that you want to bring over all key figures but the irrelevant one.
Archive File Location
In the Folder tab, specify where the system places the archive file after creating it (Figure 4). The logical file name is a platform-independent naming technique to determine a physical file location. In this example, the logical file name is ARCHIVE_DATA_FILE.
Figure 4
Set the location of the archive file using the logical file name, in this case ARCHIVE_DATA_FILE
Use the bottom part of the screen labeled Storage System only if you have a third-party archive storage subsystem such as IXOS, Filenet, or StorHouse. You purchase these from a vendor to help manage, track, and store archived files after you archive. Refer to the product’s recommendations to fill in these values.
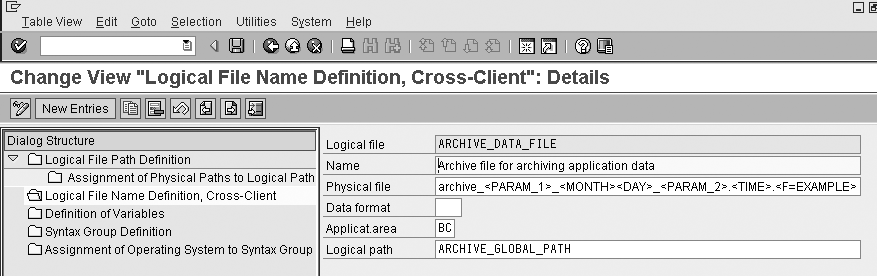
To see the physical location and file name for the archive file, use transaction FILE (Figure 5). Choose the folder on the left labeled Logical File Name Definition, Cross-Client. On the right side, choose the ARCHIVE_DATA_FILE logical name.
Figure 5
Transaction FILE shows logical file names
To see the parameters for the logical file name, double-click on the ARCHIVE_DATA_FILE logical name (Figure 6). The Physical file field contains the file name that the system uses. You can use reserved words that the system substitutes with the current values at runtime. Enclose reserved words in angle brackets. This allows you to make sure each file name is unique by adding parameters such as
Figure 6
Transaction FILE, detailed data shown for logical file ARCHIVE_DATA_FILE
Use the Logical path field to specify the file location of the archive file. The logical path determines the physical file location where the system puts the archive file. In this case, the logical path is ARCHIVE_GLOBAL_PATH.
To set the physical directory location for the logical path, use transaction FILE. On the left side of the screen, choose the option Logical File Path Definition and find your logical path (Figure 7).
Figure 7
Transaction FILE logical path definition
Once you’ve selected the logical path, click on the option Assignment of Physical Paths to Logical Path on the left. The system brings up a list of operating systems (Windows NT, UNIX). Double-click on your operating system. The system now displays the logical path details screen shown in Figure 8. Here you can choose the directory for the archived file in the Physical path. This field must also contain the reserved word <FILENAME> as a placeholder for the file name determined in the logical path in the steps shown above.
Figure 8
Physical directories shown in the Physical path field
Now that you have set the file name and directory location for the archive file, you are ready to establish the deletion parameters in the Delete tab of archive settings of the InfoCube (Figure 9). The parameter setting tells the system how to delete archived data after creating the file.
Figure 9
Parameters for the deletion job after archiving file is complete
You have three options for deleting the relevant archived data after the system writes the archive file: manual deletion, deletion after an event, or automatic deletion. I recommend manual deletion because you can look at the archived file to make sure that all data is properly archived and complete, and then start the deletion yourself. However, you can allow the system to automatically start the deletion job to remove the archived data once the system creates the archive file. If you would like to manually start the archiving job, choose the option Not Scheduled. If you want the system to start deleting, choose the option Start Automatic.
After the archiving settings are complete, activate the InfoProvider via the activate icon in the InfoProvider screen. Once you activate the InfoProvider, the system creates the archive settings and fills in the archiving object at the top of the Archiving screen in the InfoProvider, as shown in Figure 1. When archiving an InfoCube, the system puts the prefix BWC in front of the InfoProvider name. The system uses the prefix BWO if it is archiving an ODS. In this case, the InfoCube archiving object from InfoCube 0SD_C03 is BWC0SD_C03. The system uses this archiving object to track the archive settings for the InfoProvider.
Archive Administration
To perform the actual archiving process, enter Archive Administration. To find it, right-click on an InfoProvider in transaction RSA1. This option appears only after completing the archiving screens and activating the InfoProvider (Figure 10).
Figure 10
Find the Archive Administration screen by right-clicking on an InfoProvider after setting up archiving
Once you are in the Archive Administration screen, the system prompts you for the archiving object name. To find this, go into the archiving screen of the InfoProvider. In this case, the archiving object is BWC0SD_C03 (Figure 11). You perform three steps in Archive Administration:
Step 1. Create a variant Step 2. Create a start date and set spool parameters Step 3. Execute
Figure 11
Enter the Object Name
Step 1. Create a variant. This variant contains all the selection parameters and settings for the archiving session. Fill in a variant name in the Variant field and click on the Maintain button (Figure 12).
Figure 12
Name your variant
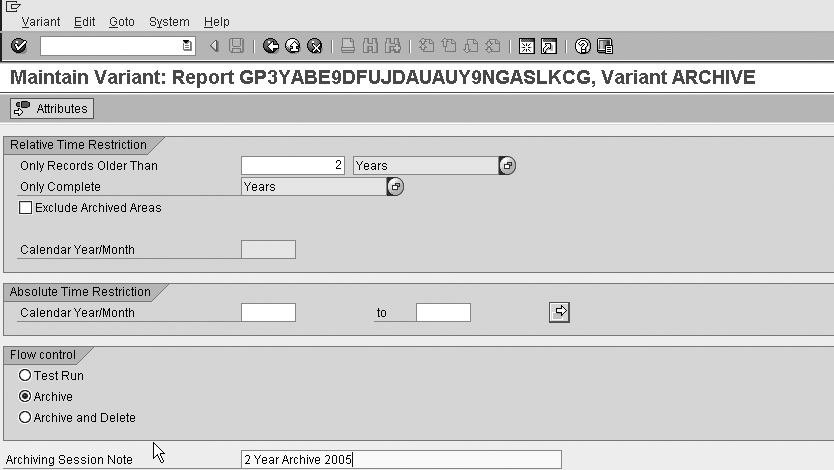
Populate the parameters for the archiving session (Figure 13). The parameters on this screen come from the settings in the archive settings in the InfoProvider Select Data tab. Use the parameters to choose what data to archive according to your archiving needs. For example, you could choose to archive data that is three years old or more. The first part of the screen Relative Time Restriction appears only if you chose a time characteristic in the Time Slots screen in the InfoProvider settings (Figure 2). This allows you to choose data older than xxx. The system selects data for archiving that falls into the parameters chosen on this screen.
Figure 13
Variant maintenance parameters in Archive Administration
The Flow control option on this screen specifies one of the following options: Test Run, Archive, or Archive and Delete. The test run allows you to see the data to archive and analyze this data to determine its validity. When it is time to actually run the archiving session, set it to Archive or Archive and Delete. The Archive setting creates the archive file but does not automatically delete the data. Archive and Delete can automatically kick off the delete job once the archive table is complete. Again, I recommend that you analyze the data after archiving and manually delete it.
You can also populate a text note that describes the content of the archive files in an archive session. In this note, you can choose archive parameters and time frames. This note appears in the overview of the archive sessions in Archive Administration.
Step 2. Create a start date and set spool parameters. Once you’ve created the variant, populate the fields Start Date and Spool Params. (Figure 12). The Start Date tells the system when to start the archive job, and the printer settings (Spool Params.) show any error message logs. To populate the start date and printer settings, use the buttons in Figure 12. You must fill the start date and printer settings before archiving can run. Otherwise, the system shows a red light next to that option and does not permit archiving. Once populated, the system shows green lights next to these buttons (Figure 14).
Figure 14
Archive variant, start date, and parameters ready for archive job to begin
Step 3. Execute. Click on the execute icon to start the archiving process. The system starts a new job in the background to extract the data to file. Transaction SM37 shows the job status and progress (Figure 15). Once the job is complete, you can use transaction AL11 to view the file.
Figure 15
View the archive job status
Delete Archived Data
The next step is to remove the archived data from the InfoProvider. This step can start automatically or manually (Figure 9).
The deletion step in the archive process uses the same selection criteria as the archive request. It does not look at the extracted data set to remove data, but instead considers the parameters for the archived data set to perform the deletion. If you added more data after archiving and before deleting, the deletion may not match the archive file. Usually, this is not a problem because you do not add data you’re archiving to new data loads. However, a clear data aging strategy allows you to prevent any lost data.
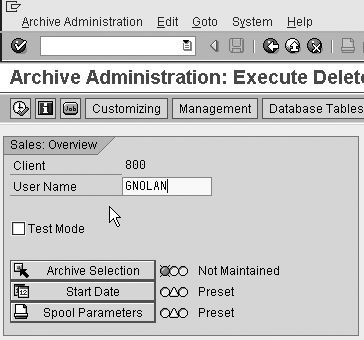
To begin the archive deletion process, as with the archive file creation process, you must complete the variant, start date, and print parameters (Figure 16). You are now ready to select the successful archiving run. Click on the Archive Selection button. The system presents you with all completed archive jobs pending deletion (Figure 17). Select the archive runs from the InfoProvider by selecting the check box next to each archive run’s data you wish to delete from the BW system.
Figure 16
Archive deletion parameters from Archive Administration
Figure 17
Selection option of available archives for deletion
Next, fill in the Archive Selection, Start Date, and the printer Spool Parameters (Figure 16). These settings tell the system when the archiving deletion will occur and where to send any error log file. Once you have completed this, the system shows green lights next to these buttons and the deletion process can begin. If they are not populated, the system shows a red light next to that option and does not allow deletion to take place. Click on the execute icon to start the archiving process. The system starts a new deletion job in the background. Transaction SM37 shows the job status and progress. Once this job finishes successfully, the archive deletion process is complete.
Tip!
When you archive data from an InfoCube, the system only removes the data from fact tables. That means you could have dimension tables with entries that do not have associated fact table entries. To fix this problem, use the function in transaction RSRV to remove dimension entries that do not have associated fact table entries. This improves InfoProvider performance.
Archive Status
To see the status of all archives (Figure 18), click on the Management button in Archive Administration (Figure 16). If the Archive File Is Accessible button in Figure 18 appears green, the system created the file and the deletion job ran successfully.
Figure 18
Archive Administration overview screen showing archive is complete
You cannot read archived data directly in BW queries. To report on archived data, you must reload this archived data into the InfoProvider. In my next article, I’ll show you how to do that.
Gary Nolan
Gary Nolan is an SAP NetWeaver BW-certified consultant and author of Efficient SAP NetWeaver BW Implementation and Upgrade Guide and Efficient SAP NetWeaver BI Implementation and Project Management. Gary specializes in gathering and evaluating requirements, configuring SAP NetWeaver BW, and providing project management, performance management, and data architecture and data modeling expertise. A former platinum consultant with SAP America, Inc., Gary has more than 20 years of SAP experience, working with SAP NetWeaver BW since version 1.2B.
You may contact the author at melvan.consulting@yahoo.com.
If you have comments about this article or publication, or would like to submit an article idea, please contact the editor.
Improve Your System Performance by Archiving Data in BW: Part 1
Reading time: 14 mins
Archiving BW data reduces its volume, resulting in faster loads and queries. This first article of a three-part series explains the entire process to archive ODS or InfoCube data step by step. Key Concept Archiving is available with BW Release 3.0B and above. You can archive from InfoCubes and ODS tables, but currently you cannot…
Access exclusive SAP insights, expert marketing strategies, and high-value services including research reports, webinars, and buyers' guides, all designed to boost your campaign ROI by up to 50% within the SAP ecosystem.
Always have access to the latest insights with articles, Q&As, whitepapers, webinars, and podcasts. Gain
the
inside edge. The SAPinsider Weekly helps you stay SAP savvy. Access exclusive bonus materials, discounts,
and
more.


 in the InfoProvider screen. Once you activate the InfoProvider, the system creates the archive settings and fills in the archiving object at the top of the Archiving screen in the InfoProvider, as shown in Figure 1. When archiving an InfoCube, the system puts the prefix BWC in front of the InfoProvider name. The system uses the prefix BWO if it is archiving an ODS. In this case, the InfoCube archiving object from InfoCube 0SD_C03 is BWC0SD_C03. The system uses this archiving object to track the archive settings for the InfoProvider.