Understand the concept of master data synchronization between your Accounts Receivable (AR) system and SAP Collections Management and learn how to replicate customers to business partners. Understand some of the key configurations of Collections Management and see how to transfer AR data to Collections Management to create work lists for collection specialists.
Key Concept
SAP Collections Management is an application that supports all phases of receivables management including the selection and prioritization of customers, the preparation of customer contacts, and the actual processing of outstanding receivables. The system provides collection specialists with an accurate daily work list of overdue customer accounts. Collections Management also offers employees a wide range of options for analyzing and handling these receivables.
Efficient receivables management is among the top priorities of many companies so they can reduce days sales outstanding (DSO). Employees who deal with receivables management face the challenge of processing an increasing receivables balance and look for ways to improve their operational procedures. Using SAP Collections Management, you can identify and prioritize overdue accounts in a proactive manner.
I’ll describe one of the most complicated issues during the setup of Collections Management: the synchronization of business partner master and transaction data between Accounts Receivable (AR) and Collections Management. This synchronization is mandatory because Collections Management makes use of business partner functionality, which is a generic component that several other applications use.
You need to convert customer master records into business partners and assign certain roles and profiles to these newly created business partners within Collections Management. I’ll also describe how you can transfer transactional data from AR to Collections Management, resulting in a work list of overdue accounts that collection specialists can use to process outstanding receivables. I’ll start by looking at some of the important business partner features and concepts.
Fundamental Concepts of SAP Business Partner
Collections Management does not make use of the customer master in R/3 or SAP ERP Central Component (ECC). The application requires the central business partner in the SAP system instead, which forms a fundamental part of other SAP components. A business partner can represent corporate bodies or individuals, or groups of either, in which a company has a business interest. The business partner functionality centrally manages all cross-application master data, such as names, addresses, and bank details (Figure 1).
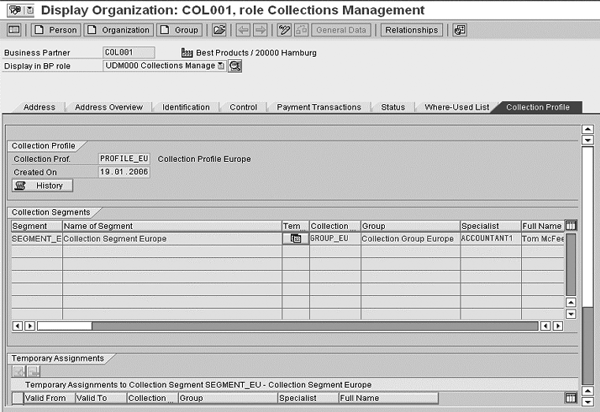
Figure 1
Business Partner manages cross-application master data in Collections Management
A business partner in the SAP system can have several roles at one time (i.e., one business partner can represent both a customer and a vendor). These roles are determined by role categories — for example, the payer, payee, or in this case the business partner for Collections Management.
A business partner can also possess several relationships with other business partners. Relationships are determined by relationship categories (e.g., “subsidiary of” or “contact person for”). You can assign multiple addresses to one business partner. The system categorizes these addresses with respect to usage type (e.g., delivery or mailing address). The system stores the various addresses of a business partner in Central Address Management. You can find all business partner configuration settings under the IMG menu path Cross Application Components > SAP Business Partner. After this brief overview of the SAP Business Partner functionality, which is necessary to understand the overall concept of this different master data concept, I would like to focus on the actual synchronization between the different master data.
Core Functions of Customer/Vendor Integration
To create work lists in Collections Management, you must replicate customer master data from your AR system to business partners in Collections Management. The central functionality to facilitate master data synchronization is called Customer/ Vendor Integration (CVI). It is sometimes also known as mini platform and was introduced with ECC 6.0.
CVI provides the following functions:
- The system replicates newly created customers to business partners and immediately assigns specific business partner roles to these business partners during the replication procedure.
- The system synchronizes changes of customer master data with the corresponding business partners. Although synchronization is possible in both directions, the leading master data for customers in Collections Management remains the customer master in your AR system.
- Because CVI works in both directions, the system could replicate your newly created business partners to customers and synchronize changes of business partners with the corresponding customers.
Let’s have a closer look at the relevant configuration to enable this functionality. You can find the customizing entries for CVI by following IMG menu path Cross Application Components > Master Data Synchronization > Customer/Vendor Integration.
Synchronization Cockpit and Post Processing Office
Before you can carry out master data synchronization, you need to make sure that your users have sufficient authorizations. You need to assign two authorization objects. One is MDS_LOAD, which includes the authorization for CVI Synchronization Cockpit and Post Processing Office (PPO). The other is CVI_CUST, which allows users to carry out customizing activities and to run the customizing report in CVI Synchronization Cockpit.
From the implementation guide, you can access the cockpit by following menu path Cross Application Components > Master Data Synchronization > Synchronization of Mass Data > Execute Synchronization Cockpit. You can also start it by using the transaction MDS_LOAD_COCKPIT (Figure 2). Synchronization Cockpit is a dedicated user interface in the SAP system for carrying out initial master data synchronization. PPO is an integral part of this cockpit, allowing you to analyze incorrect synchronization runs.

Figure 2
Synchronization Cockpit contains three work areas
Synchronization Cockpit is divided into three different work areas.
On the top-left side you see the Synchronization Process work area. This contains a list of all active synchronization processes, which link the source and target objects of the synchronization. For example, you can define that you want to synchronize the source object customer with the target object business partner. This would lead to a situation in which the system would also create every customer master record as a business partner and would reflect every change in the customer master record in the business partner master record as well.
You can toggle between the two views at any time by clicking on the icon circled in Figure 2. The system displays the inactive synchronization processes with a blue-shaded background. You should check in this context that the synchronization objects Customer and Business Partner exist and that respective synchronization options (from Customer to Business Partner and vice versa) are activated.
To do this, follow IMG menu path Cross Application Components > Master Data Synchronization > Synchronization Control > Synchronization Control > Synchronization Objects and Cross Application Components > Master Data Synchronization > Synchronization Control > Synchronization Control > Activate Synchronization Options, respectively. You can activate Synchronization Cockpit by double-clicking on one of the active processes. For Collections Management, you need to select the process Customer to Business Partner.
The second area on the lower left side is the Customizing Synchronization work area. It includes an overview of all the reports that you can use for the customizing synchronization. This work area allows you to synchronize master data-related customizing data between the customizing tables of the source and target objects to reduce the number of synchronization errors that could occur during a synchronization run. For example, you need to make sure that payment cards of the customer master records correspond to those of the business partners. For Collections Management, you need to select the report Customizing for Contact Person Attributes to synchronize the relevant data between customers and business partners.
The third work area is the Synchronization work area on the right side of the cockpit. The synchronization scope for Collections Management is Customers with Contact Persons. You can use the Processing and Monitor tabs either to prepare or monitor synchronization runs.
Under the Processing tab, you can configure several attributes for the master data synchronization (Figure 3):
- You can specify the Block Size of the synchronization run, which is the number of source objects (e.g., customer master records) contained in a data package. By default, the number of source objects is set to 50. You can change this value if necessary, but SAP recommends for performance reasons not to enter a higher value than 100.
- You can assign a Queue Name for the background process in which the system stores the data packages of the synchronization process. The system only assigns this attribute if you check off the Background Processing check box.
- You can specify the number of data blocks (e.g., customer master records contained in a data package) that the system processes in parallel during the synchronization in the Max. Processes field. You should not enter a value in this field greater than the number of batch processes you have defined in your system.
- Based on the synchronization process you have selected, you can define certain selection criteria for the source objects to restrict the data volume during a synchronization run. The available fields are dependent on the synchronization process. For example, you can choose the field customer number (KUNNR) if you have selected the synchronization process between customers and business partners. You then have to assign additional selection parameters (i.e., if you want to select customer master records between the values AAAA to MMMM) as shown in Figure 3.
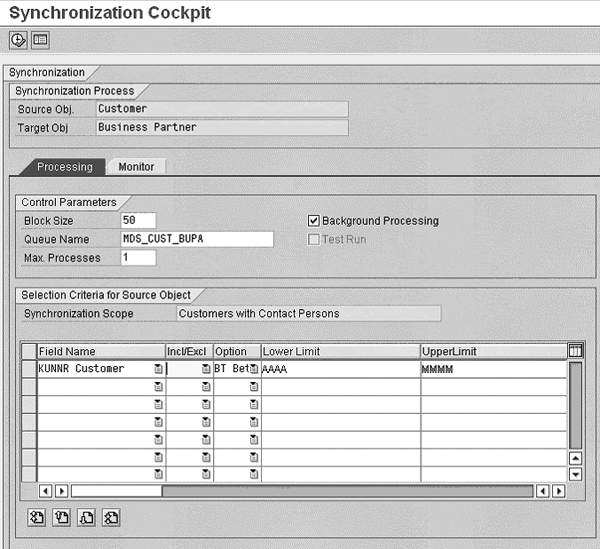
Figure 3
Process synchronization runs in Synchronization Cockpit
Under the Monitor tab, you can see the results of your synchronization runs (Figure 4). In the first column, you can see the Progress of your synchronization (green means that the process is finished), while you can see the Status in the second column.
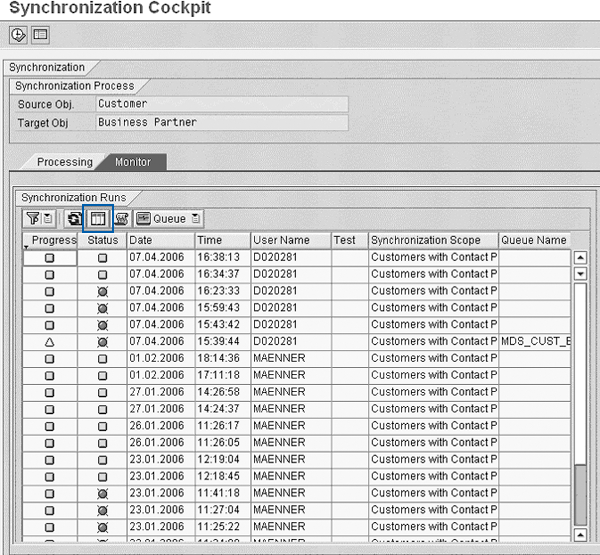
Figure 4
Monitor synchronization runs in Synchronization Cockpit
Click on the call PPO icon circled in Figure 4 to navigate to PPO. In PPO, you can analyze incorrect synchronization runs, process errors, and potentially restart the synchronization (Figure 5). You can also access PPO by using transaction MDS_PPO2.
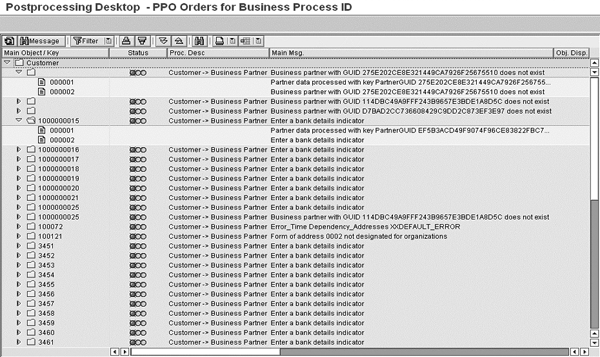
Figure 5
Manage synchronization processes in PPO
In the configuration, you can decide for which business objects (e.g., business partners) the system should write a post processing request in the PPO if synchronization errors occurred. This definition is not direction specific: The system always writes a request when it uses this business object as a source or target object during the synchronization.
You also have to activate the post processing orders CVI_01 (customer to business partner) and CVI_03 (business partner to customer) in the software component AP-MD. The system uses these in the synchronization process to carry out initial synchronization runs for Collections Management with Synchronization Cockpit (Figure 6). To activate the two post processing orders, follow IMG menu path Cross Application Components > General Application Functions > Postprocessing Office > Business Processes > Activate Creation of Postprocessing Orders. After you complete this configuration, all future changes happen automatically in the background without running any additional transfer programs.
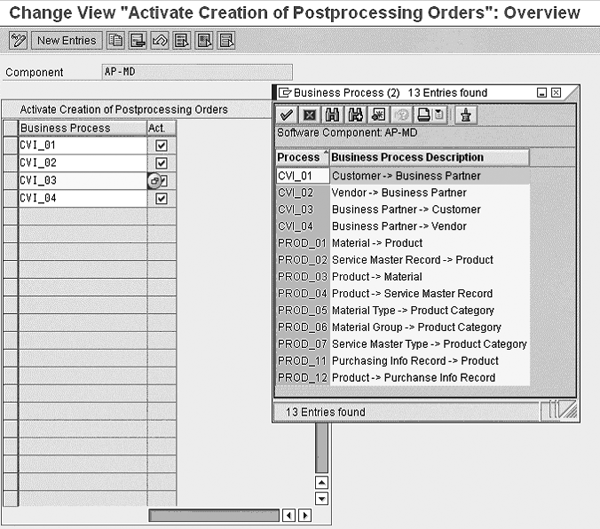
Figure 6
Maintain post processing orders
Configuring Customer/Vendor Integration
Now that you’re more familiar with Synchronization Cockpit and PPO, I’ll discuss the specific settings required for the synchronization between customers and business partners. You can find these configurations under IMG menu path Cross Application Components > Master Data Synchronization > Customer/Vendor Integration > Business Partner Settings > Settings for Customer Integration.
First, you should define the business partner role categories that you want to enable for customer integration. You define what method the system uses to create a corresponding customer in FI when you process a business partner. The relevant standard business partner role category for customers in AR is FLCU00.
You also need to define the replication in the other direction. That means you have to assign those business partner roles to the account groups that the system should have created if it has set up a customer master record. It’s usually sufficient to map the account group KUNA to the business partner role FLCU00, but you can also assign multiple account groups (i.e., sold-to) to the same or additional business partner roles (Figure 7). You can do this by using the IMG menu path Cross Application Components > Master Data Synchronization > Customer/Vendor Integration > Business Partner Settings > Settings for Customer Integration > Define BP Role for Direction Customer to BP. If you created or changed members of an account group, every entry would result in the creation or change of the respective business partner roles, which automates the synchronization process.
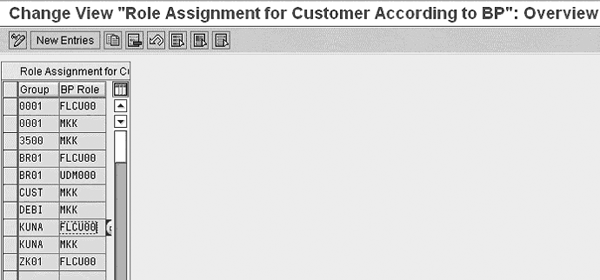
Figure 7
Assign business partner roles to customer account groups
Before these settings become active, you also have to assign appropriate numbering schemes for both replication directions (from business partners to customers and vice versa). You can decide whether you should create the customer master or business partner records with an identical number (which might make identification of the newly created business partners easier) and whether you want to have internal or external number assignments in the direction business partners to customers (Figure 8). To do this, follow IMG menu path Cross Application Components > Master Data Synchronization > Customer/Vendor Integration > Business Partner Settings > Settings for Customer Integration > Field Assignment for Customer Integration > Assign Keys.

Figure 8
Assign a number for the replication direction business partner to customer
The final steps include a couple of settings to harmonize master data between customers and business partners related to various attributes assigned to the master data, including payment cards and industries. Because Collections Management uses the contact person, you have to activate the contact person assignment as well by following the IMG menu path Cross Application Components > Master Data Synchronization > Customer/Vendor Integration > Business Partner Settings > Settings for Customer Integration > Field Assignment for Customer Integration > Assign Attributes > Contact Person. This flag ensures that both AR and Collections Management hold contact partner data in the customer master records synchronously. Figure 9 displays an example result of master data synchronization. Out of one customer master record with a contact person belonging to account group KUNA in AR, the system creates two business partners: one for the customer and the other one for the contact person. CVI automatically creates the respective relationship Has contact person/Is contact person for (BUR001) between these two business partners.
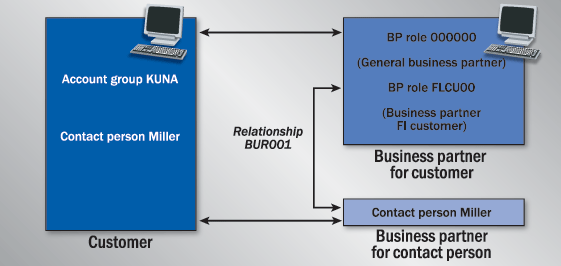
Figure 9
Example result of replicating master data
Before you can finally use the replicated business partners in Collections Management, you have to assign them the business partner role for Collections Management. You can either create your own role or use the standard one (UDM000). To create this role and assign a collections profile to the replicated business partners, run the report UDM_COLL_BUPA (assign/change business partner collection profile) or execute transaction UDM_BP_PROF. The upper part of the selection screen includes a number of selection criteria including business partners or business partner categories (Figure 10).
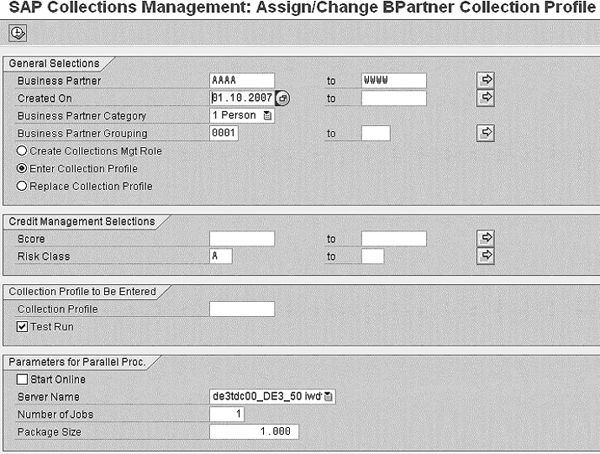
Figure 10
Create or assign collection profiles
The report offers various processing modes:
- Create Collections Mgt Role. In this mode, the system creates the selected business partners in the Collections Management role if they do not exist already. It then assigns a collection profile, which is a set of one or more collection segments that you assign to business partners in Collections Management. The purpose of this mode is to prepare the replicated business partners for Collections Management.
- Enter Collection Profile. This mode allows you to assign collection profiles to business partners, which already exist in the Collections Management role but don’t possess a collection profile yet.
- Replace Collection Profile. If you select this mode, the system changes the collection profile of the selected business partners. You can also use this option to update business partner data after an organizational change or to initialize the collection profile.
The collection profiles divide the company codes that are relevant for Collections Management into various geographical units. For example, you could define one collection segment for Northeast and one for Southwest customers. In the lower part of the report, you can enter the collection profile you wish to assign. If you implement the Business Add-In (BAdI) Determination of Profile for Business Partners, you could create your own rules for how to assign collection profiles to business partners. You can maintain collection profiles by following IMG menu path Financial Supply Chain Management > Collections Management > Basic Settings for Collections Management > Organizational Structure > Define Collection Profile.
Transfer Data from AR
Now that you have replicated customers to business partners, created them in the business partner role Collections Management, and assigned a collection profile, you can use the business partners in Collections Management. The business partners appear in the work lists of the collection agents if they meet your selection criteria. To enable the automatic creation of these work lists, you have to transfer data from AR to Collections Management by using report FDM_COLL_SEND_ITEMS, which you can also access by following menu path Accounting > Financial Supply Chain Management > Collections Management > Integration with Accounts Receivable Accounting > Periodic Processing > Distribution of Data to Collections Management.
The system provides you with three different data transfer scenarios (Figure 11):
- Periodic Data Transfer. This option results in the delta transfer of data changes to Collections Management that occurred since the last run. This does not apply to payments though. The system still transfers all payments a customer makes to Collections Management (which is of course necessary to provide agents using Collections Management with accurate data). You can only use this option if you have already carried out an initial data transfer.
- Initial Data Transfer. You should select this option if you want to transfer data to Collections Management for the first time or if you had significant changes in your system landscape (i.e., you connected a new company code to Collections Management).
- Data Tfr (transfer) According to Selectn (selection). With this option, you can limit the scope of the data transfer to certain customers or company codes.

Figure 11
Transfer AR data to Collections Management
The report FDM_COLL_SEND_ITEMS does not simply replicate open items to Collections Management. Instead, it only transfers selected key fields of open items (e.g., amount and document currency), customer master data, and the last payment data. During the transfer, the data is automatically enriched by the business partner number using the key mapping for business partners (master synchronization). In Collections Management, the system stores incoming data in four receiver tables:
- Open Items (UDM_COLL_ITEM). Contains open items of business partners with a reduced set of fields
- Business Partner Key Figures (UDM_COLLL_KEYFIG). Stores key figures of the business partners, such as customer number in AR
- Last Payments (UDM_COLL_LASTPAY). Contains information about the last payments of business partners
- Open Items with Dispute Case (UDM_COLL_ITEMCAS). Contains information about which open items of business partners were disputed
After the transfer of AR data, you can configure Collections Management (which is outside the scope of this article). This produces an individual work list for your collection specialists (Figure 12).
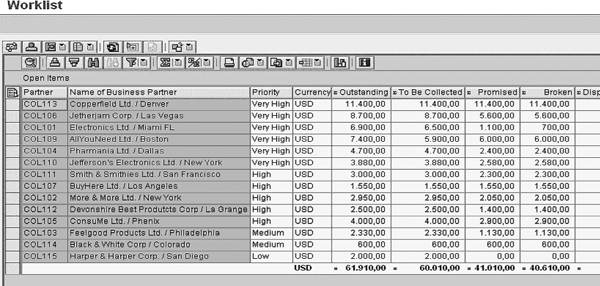
Figure 12
Collection work list in Collections Management
Juergen Weiss
Juergen Weiss works in the functional area of SAP Financial Supply Chain Management. As part of SAP’s product management team, he was globally responsible for the Financial Supply Chain Management applications, including Electronic Bill Presentment and Payment, Dispute Management, Collections Management, Credit Management, Treasury and Risk Management, Bank Relationship Management, and In-House Cash as well as Accounts Payable and Receivable.
You may contact the author at juergen.weiss@sepa-now.de.
If you have comments about this article or publication, or would like to submit an article idea, please contact the editor.