Enhance standard Project System (PS) hierarchy reports to meet common user requirements. Learn how you can make changes to commonly run hierarchy reports to provide added flexibility and improve efficiencies when analyzing data.
Key Concept
Forms are critical components of Project System (PS) hierarchy reports that specify the key figures and characteristics that appear on the reports. Key figures are statistics reflecting the way balances are stored, such as Overall $ in Controlling Area Currency. Characteristics are assigned to the key figures. For example, you may want to display plan costs. In this case, a form would use the key figure Overall $ in Controlling Area Currency, and the characteristics value type and plan version would be assigned to the key figure.
You can easily enhance Project System (PS) hierarchy reports using standard SAP transactions. Described below are steps that allow you how to revise standard hierarchy reports to meet three commonly requested enhancements:
- Changing the output type (classic versus graphical view)
- Adding fields to the selection screen (e.g., company code, reporting period, or currency)
- Adding columns (e.g., adding a budget column to a plan report)
You see all the relevant transactions for enhancing PS hierarchy reports by following menu path Accounting > Project Systems > Information Systems > Tools > Hierarchy Reports (Figure 1).

Figure 1
Transactions for enhancing PS hierarchy reports
Changing the Output Type
The output type controls how a report is displayed. There are two options for the output type in hierarchy reports: graphical report-output and classic drilldown. Most people prefer the graphical output because the report looks better on the screen. However, the classic layout can provide a higher level of performance — for example, when you have to analyze a large volume of data or download reports to Microsoft Excel.
By using transaction CJE2 (Change Report), you can allow users to select the output type when running a report. Go to the Output Type tab and select the Available on selection screen check box (Figure 2).

Figure 2
Select the available on selection screen check box
Adding Fields to the Selection Screen
You can add fields such as company code, period definitions, and currency to the selection screen to allow for a more refined set of data to be selected when running reports. To do so, you should follow a five-step process. In this example, I add from period and to period to standard report Plan/Actual/Commitment/Rem.Plan/Assigned (Report 12KST1C). A new report and an associated form are created by referencing the standard report and form.
Step 1. Create a new form by copying the standard form. Use transaction code CJE4. In this example, I create a new form Z12KST1CPER by copying standard form 12KST1C (Figure 3). Enter the ID and description of the new form and the ID of the form to be copied. Click the Create button.
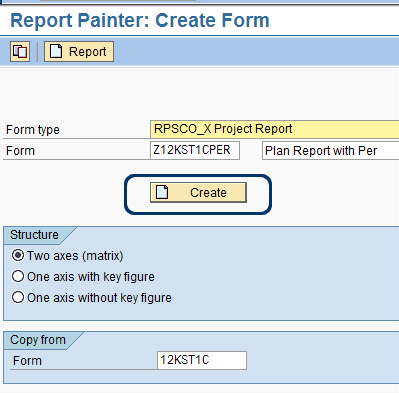
Figure 3
Create a new form
Step 2. The Report Painter: Create Form screen appears (Figure 4). Add characteristics to the form by updating the general data selections. Follow menu path Edit > Gen. data selection > Gen. data selection.
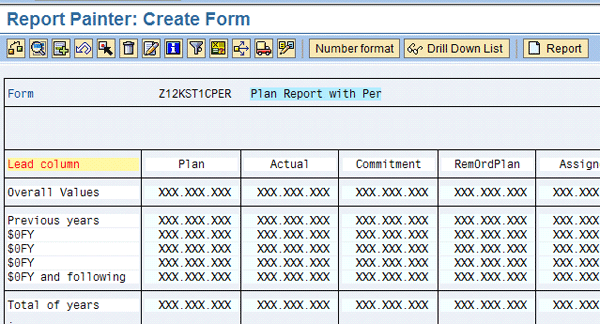
Figure 4
Create Form screen
By using the preceding menu path, I get the screen shown in Figure 5 to appear. Select from the list of available characteristics on the right side of the screen. In this example, I added Period/year from the available characteristics.

Figure 4
Select the appropriate characteristics
Next, add characteristic values. In this example, I added From period and To period. To do this, click the check box to the left of the From column. The variable selection screen appears (Figure 6). Select From period. Repeat for the To column and select To period. Click the green check button to continue.
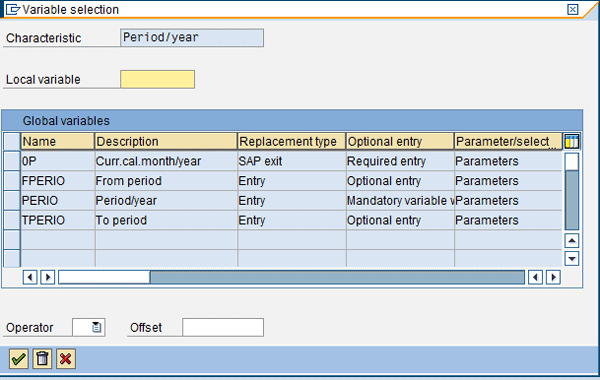
Figure 6
Add characteristic values
Step 3. You are now back to the Report Painter: Create Form screen (Figure 4). Create a new report and reference the new form. To do this, click the Report button. The Create Project Report: Initial Screen appears (Figure 7). Enter a report description in the field next to the Report field.
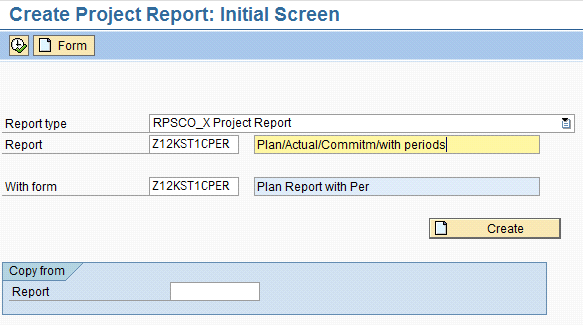
Figure 7
Create a new report
Click the Create button. The Create Project Report: Specify Characteristics Values screen appears (Figure 8).
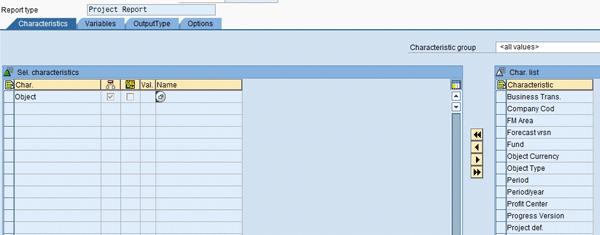
Figure 8
Create a New Report
Step 4. Add characteristics to match those that are used in the standard report. These are the navigation characteristics that appear on the left side of the report when you execute it. Open another session and use transaction CJE3 to reference the standard report to get these values.
Use the list on the right side of the new report to add the characteristics to the report. Figure 9 shows the characteristics that I added in this example.

Figure 9
Add characteristics
Step 5. Go to the Variables tab. The fields added to the General Data Selection in step 2 appear. Enter values that you would like defaulted on the report selection screen, if desired. In this example, I added default From period and To period dates (Figure 10).
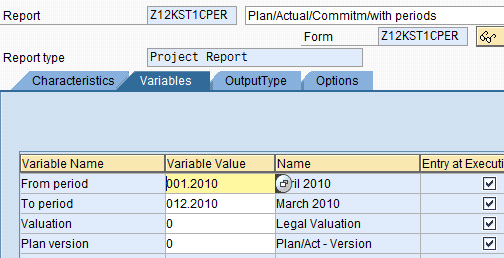
Figure 10
Add variable values
You then see the new fields on the selection screen of the report when it is executed. Figure 11 shows the fields I added in this example (From period and To period).
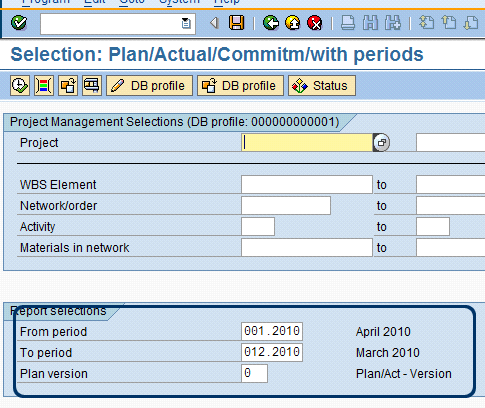
Figure 11
New fields added to the selection screen
Adding Columns
You can add columns to standard hierarchy reports (users often ask for hierarchy reports that include both plan and budget), but SAP does not deliver standard reports that meet this requirement. The reports include either plan costs or budget costs, but not both.
A column consists of a key figure and one or more characteristics. Key figures should be associated with characteristics. For example, for the key figure of plan costs, you assign the appropriate value types (VT 1 = plan, VT 10 = statistical plan). You obtain the information needed for adding the new column by referring to a standard report that already contains the column to be added.
In the eight-step example that follows, I add plan costs to a standard budget, actual, and commitment report (report 12KST1A). I create a new report and associated form by referencing the standard report and form.
Step 1. Create a new form by copying the standard form. Use transaction CJE4. In this example I create new form Z12KST1APLAN by copying standard form 12KST1A. Enter the ID and description of the new form and the ID of the form to be copied. Click the Create button (Figure 12).
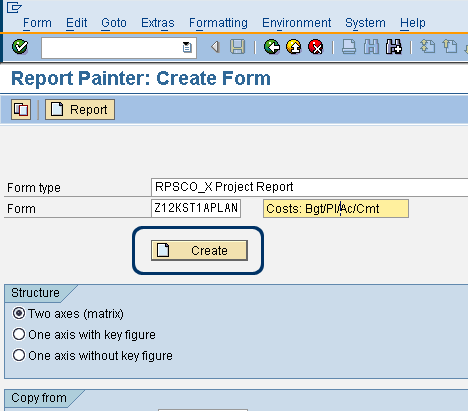
Figure 12
Create a new form
The Report Painter: Create Form screen appears. Double-click the description of the form (Figure 13) and revise the description in the pop-up window as needed (Figure 14).

Figure 13
Double-click the description
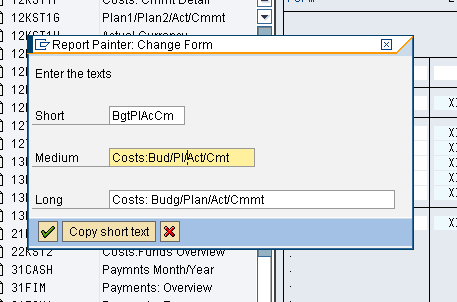
Figure 14
Edit the description
Step 2. Add the new column to the form. In my example I insert a column for plan costs between the Budget and Actual columns. Select the Actual column and click on the insert element icon  at the top of the screen (Figure 13). This produces a pop-up window. Press Enter, as you want to use the default selection key figure with characteristics. The Element definition screen appears (Figure 15).

Figure 15
Add characteristic values
Step 3. On the Element definition screen, add characteristic values for the new column. Use a standard form to determine what characteristic values to use. Open another session and refer to a standard form to get these values. In this case, I display standard form 12KST1C (Plan/Act./Cmmt/ResPl) via transaction CJE6 to find characteristics used for plan costs (Figure 16).
Figure 16
Use this form as a reference
Double-click the column header on the standard form to view the characteristic values assigned. In this case, I selected the data from the Plan column shown in Figure 16. The selected characteristics are shown in Figure 17.

Figure 17
Selected characteristics
Go back to the new form (Figure 15) and enter the reference characteristic and values found on the standard report (Figure 17). Click the Confirm button at the bottom of the screen (Figure 15) after all characteristics are added.
Note
Use the insert multiple lines icon (Figure 15) to add multiple lines for the same characteristic. Also note that Valuation View was included on the list of characteristics on the reference form (Figure 17), but I did not add it to the new form. This characteristic does not appear in the available characteristics list because it is already accounted for in the general data selections. General data selection allows you to select characteristics that apply to the entire form. To view this, follow menu Edit > General data selection > General data selection (Figure 4).
Step 4. While still on the Report Painter: Create Form screen, change the description of the new column header by overwriting the default description. In this example, the column header is changed from the default Ovl in CAC to Plan (Figure 18).
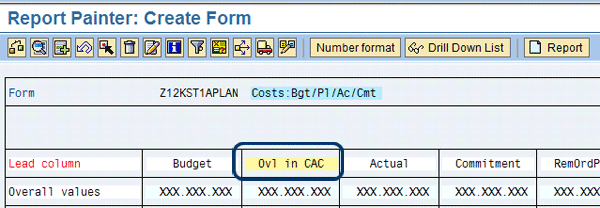
Figure 18
Change description on new column header
Step 5. The new column now needs to be added to the drilldown display. To do this, use menu path Extras > Drilldown Display > Select Rows/Columns. All columns and rows are highlighted except the new column.
Select the new column header and click the select/deselect icon at the top of the screen (Figure 19). Click the Save Selections button at the top of the screen. The Layout of Drilldown List pop-up window is displayed. Click Enter, and the new form should be complete.
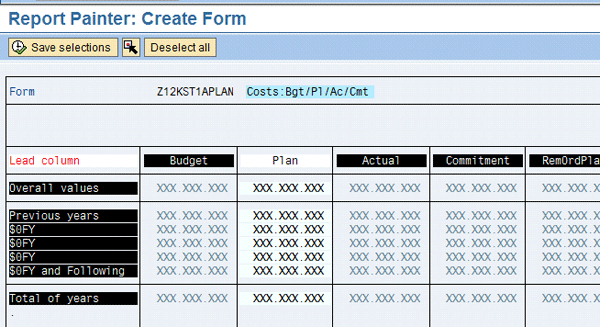
Figure 19
Select rows and columns
Step 6. Create a new report and reference the new form. From the Report Painter: Create Form screen, click the Report button (refer back to Figure 18). Make sure you save when prompted in the pop-up window.
The Create Project Report: Initial Screen appears (Figure 20). Enter a description of the new report in the field next to the Report field (Figure 20). Click the Create button. The Create Project Report: Specify Characteristic Values screen appears (Figure 21).

Figure 20
Create a new report

Figure 21
Enter the characteristic values
Step 7. Add characteristics to match those that are used in the standard report. These are the navigation characteristics that appear on the left side of the report when you execute it. Open another session and use transaction CJE3 to reference the standard report to get these values (12KST1A in our example). Figure 22 shows the characteristics on the standard report.
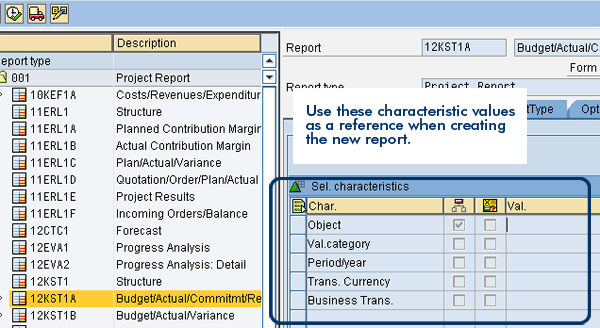
Figure 22
Characteristics on the standard report
Go back to the new report in Figure 21 and add the characteristic values from the standard report. Use the list on the right of the new report to add the characteristics.
Step 8. Go to the Variables tab and enter values that you would like to default on the report selection screen, if desired. In this example, I use plan version 0 as a default. Version 0 is the default with standard plan reports (Figure 23).

The report is now complete. Click the Save icon. Execute the report by using transaction code CJE0 and confirm that the new column is displayed.
Transporting Reports
When you are making the changes described in the previous section, the newly created reports and forms should be transported to other clients or systems. Forms can be transported via transaction CJE5 and menu path Form > Transport Form. Reports can be transported via transaction CJE2 and menu path Drilldown Report > Transport. If you wish to create a custom transaction code for a new report, use SE93.
Joe Hailstone
Joe Hailstone has more than 14 years of SAP experience and 16 years of business experience. He has provided SAP consulting services to clients in the energy, retail, insurance, telecommunications, and pharmaceutical industries. He specializes in project and asset accounting.
You may contact the author at jhailstone@deloitte.com.
If you have comments about this article or publication, or would like to submit an article idea, please contact the editor.