Learn how to troubleshoot compensation fields in SuccessFactors compensation worksheets when they are not updating data from the User Data File (UDF).
Key Concept
A User Data File (UDF) is a file in comma separated value (CSV) format that is usually handled by Microsoft Excel. This file is the main source of user data in SuccessFactors. The file is composed of header fields on top of the file, which generally describe the type of data (e.g., user name or country) each field contains. These fields are linked all over the SuccessFactors system so the different modules can obtain the data and execute it.
Compensation fields are essentially headers in the compensation worksheet. These structures are designed to hold or display data. As such, compensation fields are key elements in the SuccessFactors Compensation module. In many cases, the fields in a compensation worksheet display data that comes from the User Data File (UDF); however, there might be instances, especially with data-type date fields, when the data is not being updated after a new UDF is uploaded. An error like this can cause major issues in the SuccessFactors Compensation module, especially if it is in the middle of a compensation cycle.
For example, let’s say that Daniela Suaraz is the director for compensation at ACE Company, and she is planning to award stock grants for the senior leadership of the organization. Daniela launches the compensation form for all the recipients, and one of the fields is Date of Hire. This is because there is a business rule that prevents employees who have worked fewer than two years from being eligible for stock awards.
Let’s explore for a minute the impact that the Date of Hire field could have on a compensation form if it does not display the correct data. In this scenario, there could be employees who are eligible for stock awards, but the system invalidates them, or vice versa (e.g., employees who are not eligible for stock awards, and the system incorrectly validates them). In addition, there can be many custom formulas in the back end of the system to accommodate certain business rules, for example, a formula that calculates award amounts based on performance, goals, and time in the position. In this case, if this custom formula is referencing the field in question and there is incorrect or missing data (in the field being referenced by the formula), it would cause the formula to crash or generate an error.
A huge range of issues can be caused by bad data (or by not including all the data) in a single field.
The worst part of this scenario is that issues like this generally happen right about the middle of the compensation cycle in the live production environment. In this article, I provide HRIS and compensation directors with a guide to understand, analyze, and help them react quickly to resolve any compensation issues that might arise due to these types of errors. Using this structured guide, you can verify that all the configurations are correct. This guide is divided into four sections, as outlined below. Please note that the first two steps do not require as much skill and time as the third and fourth, as they are easier and take less time to analyze.
- An analysis of the compensation designer’s field configuration
- An analysis of the UDF
- An analysis of the XML template
- An in-depth analysis of the data type date
Note
For this article I am assuming readers know how to:
- Download and upload UDFs for the SuccessFactors Compensation
module. (For directions on how to do this, refer to the sidebar, “How to
Download and Upload a UDF,” at the end of this article.)
- Launch and open compensation worksheets.
(Steps 1 and 2 are
for testing purposes only. You have to do both every time you want to
test steps 3 and 4. Users must have this basic knowledge before
attempting to follow steps 3 and 4, below. Later in the article, for
each testing step, these two actions must be taken.
- Upload an updated UDF into the system.
- Launch a new compensation form.
An Analysis of the Compensation Designer’s Field Configuration
Check the RELOADABLE option in the configuration of the field in the design worksheet. (This is the first point that needs to be checked because, oftentimes, this is the cause of the issue.) To check this, follow these steps.
Log in to the SuccessFactors instance, go to Admin Tools, and click the Compensation button (Figure 1). This opens more options, such as Actions for all plans, Aggregate Export, and Compensation Home (Figure 2). Click Compensation Home.

Figure 1
OneAdmin screen in the SuccessFactors instance
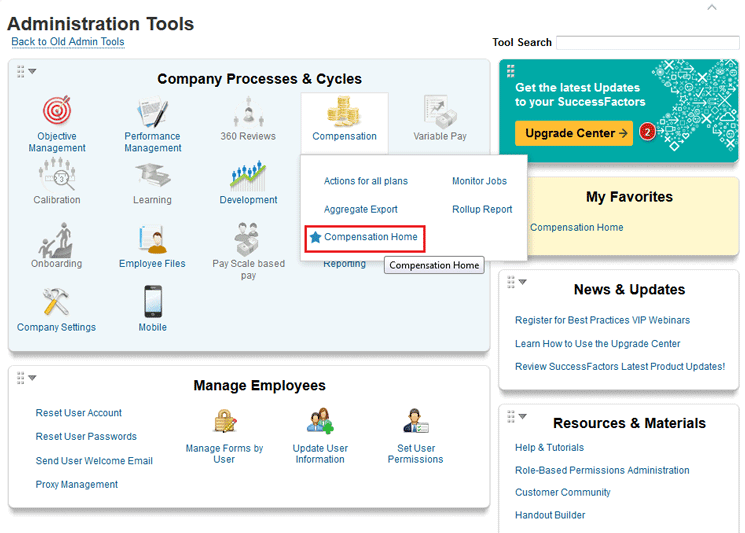
Figure 2
The SuccessFactors Compensation menu options
This opens the screen in Figure 3, where you can see Plans on the left of the screen. Here you look for the name of the template that has the issue and double-click to open it. In this case, I’m using the 2014 Compensation & Equity plan template as my example. In the screen that opens (Figure 4) click the Plan Setup option at the top.

Figure 3
Select the compensation plan template with the issue

Figure 4
Select the compensation plan summary
This opens the screen at the bottom of Figure 5, where you select the Design Worksheet drop-down option.

Figure 5
Select Design Worksheet
This opens the screen in Figure 6 where you look for the field that is not updating the data and double-click to open it. (In this example I am using a custom field called Test). Remember that you are looking for the field name that is experiencing issues in the worksheet. For example, when the compensation planners see the compensation worksheet and someone notes an error with the Date of Hire field, here you have to look for the field with the same name.
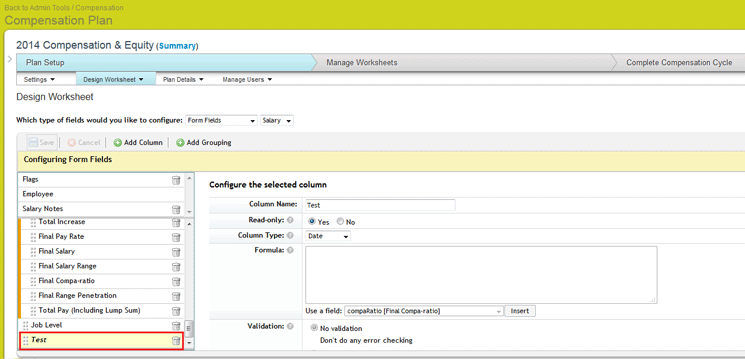
Figure 6
Worksheet designer
This opens the pane to the right in Figure 7. Make sure the Reloadable check box is ticked, and verify that the Import Key name is correct (in this case, Custom_Text). The Import Key can be any alphanumeric value that is used to make the UDF with the field. It is extremely important to make sure that the Import Key is exactly the same as the first row in the UDF (Figure 8); note that it is case sensitive. (See the sidebar, “How to Download and Upload a UDF” at the end of this article for more details about downloading the UDF from SuccessFactors).

Figure 7
The worksheet designer (with the Test field details)
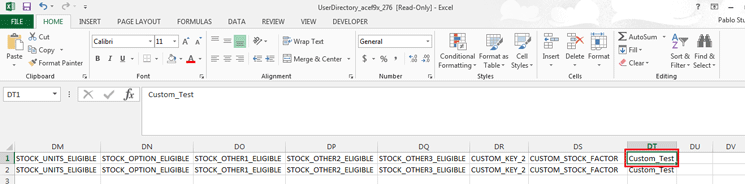
Figure 8
Verify the Import Key in the UDF
Now save your new file and take steps 1 and 2 (as discussed at the start of this article) to test the new field. Remember that at this point you are verifying that the field in the UDF is actually being linked to the compensation module in SuccessFactors. You have made sure that the field in question has the exact same name in the UDF and in the Import Key. This should always be the very first step at analyzing compensation fields as it is one of the most common sources of error.
An Analysis of the UDF
After you have made sure the Import Key in the configuration of the template is the same as the UDF (Figure 8), you need to make sure the rest of the file is correct. First, verify that the field contains actual data (Figure 9).

Figure 9
Display of the data for the Test field with the Custom_Test Import Key in the UDF
In this case I am using a data type date. To verify that the actual data is on the date type, click the required date field in the DT column in the UDF (the bottom of Figure 10). This opens the screen at the top of Figure 10, where you can check the data type. (In this case, the field changes from General to Date.)

Figure 10
Check the data type in the UDF
Again, make sure the first row of the field (under the DT column) is exactly the same as the Import Key. After you have made sure the correct data is populated and that the data type is correct, it’s time to test it. Refer to steps 1 and 2 at the start of this article to test.
Note
At this point, all the other fields should be populated correctly in the
SuccessFactors system. However, if this is not the case at this stage,
it is time to stop and perform a deeper analysis, which is beyond the
scope of this article.
An Analysis of the XML Code
In order to perform an analysis of the XML code, you need to have an XML editor such as Oxygen installed in your local computer. The first step is to download the template in XML format. Go to Admin Tools and click the Company Settings icon (Figure 11).
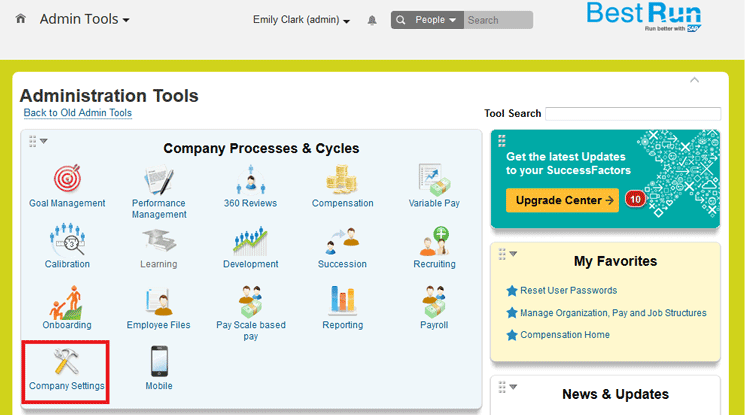
Figure 11
Open Company Settings
In the pop-up window that opens (Figure 12), select the Form Template Settings option.

Figure 12
Select Form Template Settings to edit
The Managing Form Template screen opens with a list of the templates (Figure 13). Look for the template plan you want to edit and click it. In this case I am using the 2014 Compensation & Equity plan as my example.

Figure 13
Choose the plan template you want to edit
Once you click the plan you want to edit, the screen in Figure 14 opens. Click the Download Form Templates button.
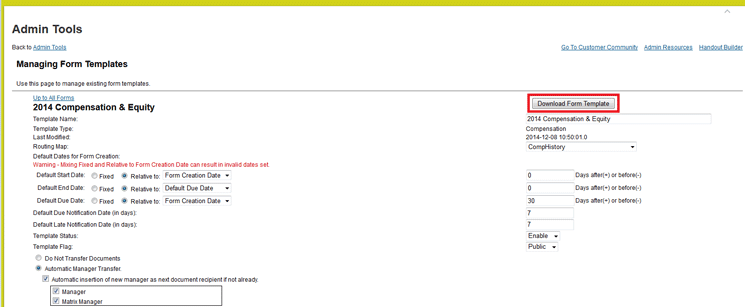
Figure 14
Download the template
A pop-up window appears (Figure 15) that asks how you want to open the file. Verify that it’s opening the correct file, then select the Save file radio button and then the OK button.
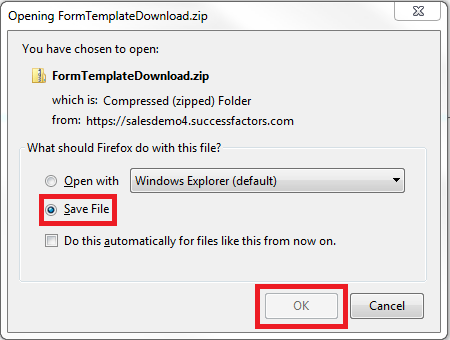
Figure 15
Choose if you want to open or save the download file
Once the zip file is opened, you see two files listed in the Name column: a text file and an XML document (Figure 16). Double-click the XML file to open it (using Oxygen). The data opens, as shown in Figures 17 and 18.

Figure 16
Open the downloaded XML file to edit it

Figure 17
The XML configuration for the template

Figure 18
An enlarged view of the relevant code in Figure 17
After you have opened the XML document, scroll down and look for the field that is not updating data. In this case, field name = “test” and field ID = “Custom_Test”.
Once you have identified the correct field, you need to make sure the values are correct for three very important attributes:
- Type = “date” – Make sure the data type is correct. In this case I am using a date type data field.
- importKey = “Custom_Test” – Make sure the import key is correct. This is the same import key used in the compensation designer (Figure 7) and in the top row of the UDF (Figure 8).
- reloadable = “true” – This is extremely important. This has to have a value of true; if it does not, the field will never update any information.
Once you’ve double-checked these three attributes, save the file. The next step is to upload the file to the SuccessFactors system, via PROVISIONING. Only certified consultants have access to PROVISIONING, however, so if you do not have access to this, contact your SuccessFactors consultant or Customer Success.
Note
For the purposes of this article, I am assuming that the person
performing the XML analysis knows how to manage the XML file, including
mapping the DTD file and uploading the file to SuccessFactors using
PROVISIONING; therefore those steps fall out of the scope of this
article.
An In-Depth Analysis of the Data Type Date
Date type fields can be very tricky if they are not understood and managed correctly. For the purpose of this analysis I am assuming that all the previous steps have been tried and the issue remains uncorrected. Therefore, if you have achieved unsuccessful results taking the above steps, try this.
It is very important to note that the date standards in the SuccessFactors system depend on the location (locale) and language. This means, for example, that if the system is set up in English and in the United States, the locale = en_US. The first two letters represent an abbreviation of the language, and the second two (capital) letters represent an abbreviation of the country.
For the United States, the date standard format is MM/DD/YYYY (e.g., in month, day, year format). Therefore, every kind of date entered in the needs to be in that format unless it is specified otherwise. Since I am talking about compensation here, you need to check a few items related to the date format. (For my example, I am using English.)
First, download the compensation template XML, as shown previously in this article. At the top of the file (Figure 19), right after the document’s declaration (the first line of code) there is a line that in all cases says something similar to this: <sf-form locale=”xx_XX”>.
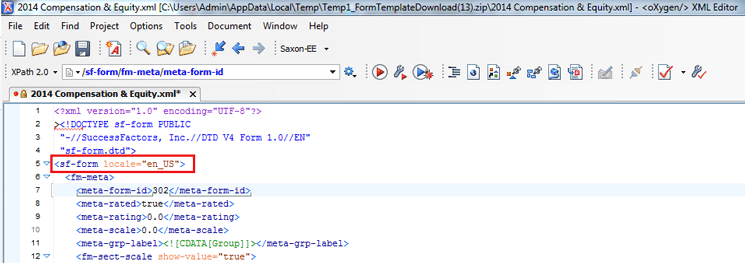
Figure 19
XML code for template showing locale
Note
Make sure you know what the locale
is and the date standard for that specific locale. You can find the
standards with just a simple Google search, but, based on my own
experience, you will know the date standards for your specific locale.
For example, if I am in Spain, when I open a template setup it would
look something like this: <sf-form locale=”es_ES”.
This is because the language is Spanish (Espanol) and the country is Spain (Espana).
After you have reviewed the locale used by your template and the date standard for that particular locale, open your UDF (Figure 20) and verify that the data is entered in the correct format (in this case, MM/DD/YYYY since it’s English).

Figure 20
Check the UDF’s date format
If by any chance the data was set up differently, for example in DD/MM/YYYY format (Figure 21), this type of discrepancy would definitely cause problems with the system.

Figure 21
The incorrect data format in the UDF
If the data is in the correct format, and you have tried all the previous steps to correct the issue, there is one last thing you need to check: your own personal machine.
What do I mean by this? Probably about 99 percent of SuccessFactors users manage UDFs in Microsoft Excel; not only that, but if you are working with a Microsoft Windows operating system, Microsoft Excel and Windows are designed to work with each other.
Without going into too much detail, you need to make sure your operating system’s date format is set up to match the format you are working on in the SuccessFactors system. For example, if my personal computer’s date is setup to be DD/MM/YYYY, but I am working with locale = en_US (MM/DD/YYYY), when I download the UDF from SuccessFactors and open it in MS Excel, all the date formats switch to match my computer preferences. As a result, the dates display in DD/MM/YYYY format even though they are stored in the SuccessFactors system in MM/DD/YYYY format.
This is extremely important to know because oftentimes the format set up in your local machine is the same as the locale you work in in SuccessFactors; however, there might be a local machine in the other side of the world that is responsible for uploading and maintaining data in SuccessFactors, and that local machine’s date format might be different. The date format in your computer has to match the format of the locale in which the template is set up. To check your local machine’s date format, take the following steps (in my example, I am using a PC with a Microsoft Windows 7 operating system):
From the Microsoft Start menu, click Control Panel (Figure 22). In the window that opens (the Adjust your computer’s settings screen), double-click the Region and Language option.

Figure 22
The Control Panel in the Microsoft Windows 7 operating system
This opens the Region and Language pop-up window showing the Short date and Long date format fields (Figure 23). Make sure the Short date format matches the standard format for the locale you are working with.

Figure 23
The Region and Language options for local computer
After you have made sure the format matches your locale, upload a fresh UDF and now the field should work just fine.
Sidebar: How to Download and Upload a UDF in SuccessFactors
Here’s a quick guide for downloading and uploading and a UDF for you to use.
First, to download, follow these steps:
1. Go to Admin Tools and click the Compensation button and then select Actions for all plans (Figure A).

Figure A
Select the action for the plan
2. In the screen that opens (Figure B) click Import/Export data > All Plans > Employee Data Export.
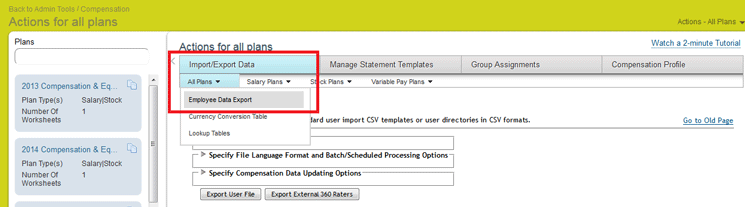
Figure B
Select the employee data to import
3. For the data export options, make the selections exactly as shown in Figure C, and then click the Export User File button.
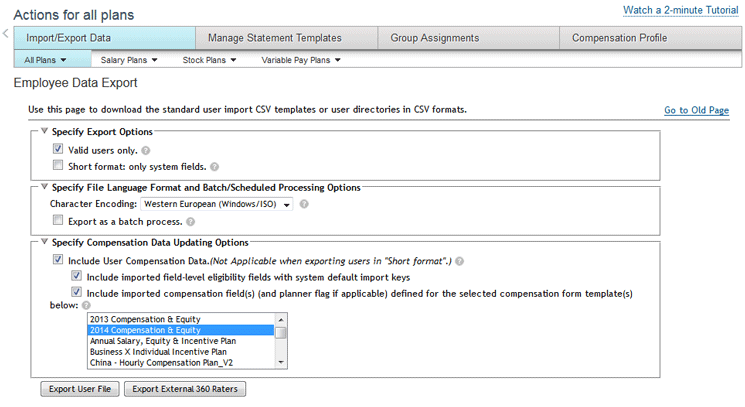
Figure C
Selections for exporting employee data
4. After you click the Export User File button, a zip file is downloaded to your local computer. In the screen that opens (Figure D) select the Save File radio button and then the OK button. This opens the zip file (Figure E).
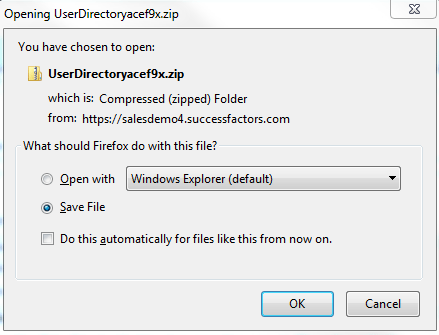
Figure D
Download the zip file

Figure E
The opened zip file
5. In the opened zip file there is a text document and a document in CSV format (Figure E).
If you’re using Microsoft Windows as your operating system, the default
would be for the file to be opened by Microsoft Excel. If you do not
have Microsoft Excel stored in your computer, any CSV editor software
will work. There are many free versions available online to download.
Next, to upload a UDF, follow these steps:
1. Go to Admin Tools (Figure F) and double-click the Compensation button and select Actions for all plans.
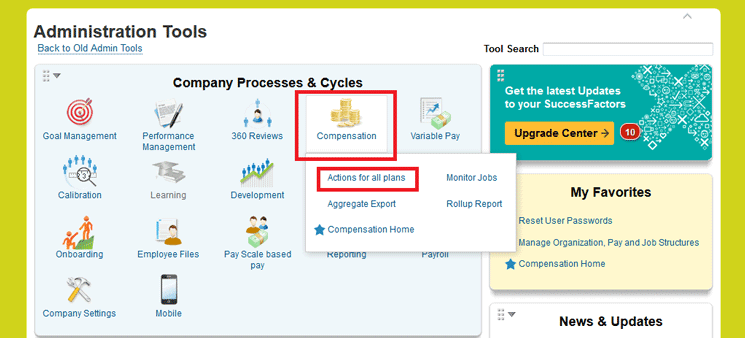
Figure F
Select the plan action
2. Click the Import/Export Data tab (Figure G) > All Plans > Employee Data Import, and the screen in Figures H and I opens.
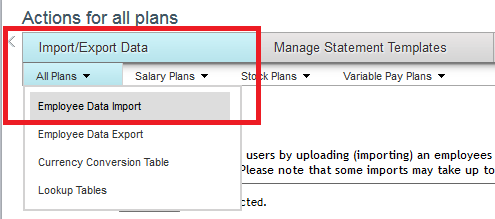
Figure G
Import the employee data
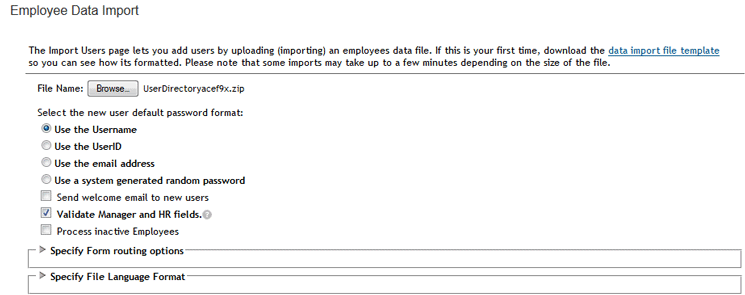
Figure H
The top portion of the Employee Data Import screen
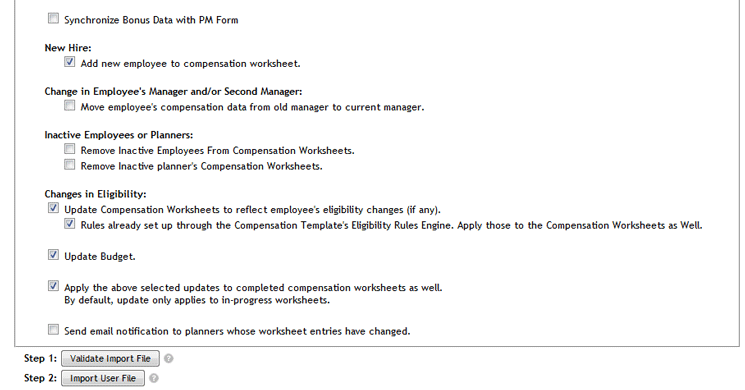
Figure I
The bottom portion of the Employee Data Import screen
3. For the import options, make the exact entries shown in Figures H and I,
making sure you are updating the correct plan (ignore the Specify Form
routing options and Specify File Language Format options as these do not
affect the upload process and they are outside the scope of this
article). After you’ve made your selections, click the Import User File
button (Figure I) and the file is loaded into the system. Now you are ready to proceed with any testing actions.
Pablo Stuardo
Pablo Stuardo is a SuccessFactors Senior Consultant at Ernst & Young. He focuses on the entire SAP SuccessFactors suite and has supported and implemented a wide variety of projects for different clients at a global level. A native Chilean, Pablo is fluent in Spanish, and graduated from Georgia State University’s Robinson College of Business with a dual degree in Computer Information Systems and Finance.
You may contact the author at pablo.stuardo1@gmail.com.
If you have comments about this article or publication, or would like to submit an article idea, please contact the editor.