Learn how to download, install, and use the standard Execution Steps (XSteps) library to create process instruction (PI) sheets. Learn how to use the standard XSteps to create a basic example to create a PI sheet to post a confirmation for a process order.
Key Concept
Process instruction (PI) sheets are the default option in the chemical and food industry to integrate and report actual data from the manufacturing process with external process control systems. PI sheets can be used to display process order data or to execute actions on the order, such as posting confirmations or goods movements.
Execution Steps (XSteps) are structures that facilitate PI sheet implementation and maintenance, as they allow master data reusability by means of a standard repository.
For a long time, process instruction (PI) sheets were created with characteristic-based process instructions that were very complex and difficult to maintain.
SAP introduced Execution Steps (XSteps) in the standard ERP system to speed up master data maintenance and facilitate the implementation of PI sheets on release 4.7. XSteps provides you with a standard repository to create a global template to be used in different scenarios.
In addition, SAP provides a standard XSteps library that can be downloaded from the SAP Store in an XML format and imported into the system. The XSteps provided in this library can be used as a starting point or even as a model for the creation of your own XSteps.
Downloading the Standard XSteps Library From the SAP Store
The first step is to download the standard XSteps library from the SAP Store. They are included on the SCN SAP Core Manufacturing Sample Application and Best Practices, which is provided by SAP and which can be downloaded for free from the SAP Store. The web address of the SAP Store is https://store.sap.com. The easiest way to find this package is by using the search option, as shown in Figure 1.

Figure
Search for the SCN SAP Core Manufacturing Sample Application and Best Practices package in the SAP Store
Download a file called Basic_Standard_XStep_Templates.zip. This file contains detailed technical documentation about the implementation of XSteps and a folder called XML_files_V_1_0 (the name may change if a new version is delivered) that contains XML files with the standard XSteps.
After downloading and extracting the content of the file, you are ready to import the library into the system.
Importing the Standard XSteps Library
To import the XML file containing the standard XSteps library, use transaction code CMXSV. After you execute transaction code CMXSV, define the plant by populating the field Plant field in the initial screen that the system displays (not shown). Click the execute icon or press the F8 key to access the XStep repository.
With the repository open, right-click the folder Standard XSteps and then choose the options Create and Folder to create a new folder to store the standard XSteps (Figure 2).

Figure 2
Create a new folder in the standard XStep repository
The newly created folder appears in the next screen with the description <Folder>. After you double-click this folder, you can change the description in the pop-up sceen that appears. For my example, change the description to Imported Standard XSteps, as shown in Figure 3. Click the X, as highlighted in Figure 3, to return to the previous screen.

Figure 3
Change the description of the folder to Imported Standard XSteps
The next step is to import the downloaded XML file containing the standard XSteps library to the newly created folder. To complete this step, right-click the folder you just created and select the option Import Standard XStep, as you can see in Figure 4.

Figure 4
Import a standard XStep to the Imported Standard XSteps folder
In the pop-up screen that appears (Figure 5), select the file named SXS Library BASICS V1_0.XML under the previously mentioned folder, XML_files_V_1_0, and then click the Open button.
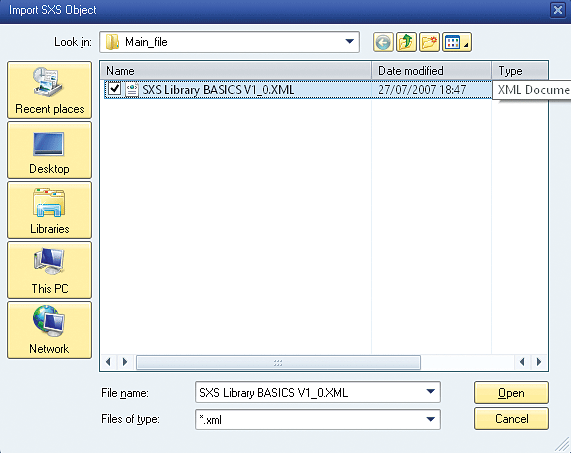
Figure 5
The pop-up screen to choose the XML file
After you import the standard XSteps library, you see a tree of folders containing the standard XSteps, as shown in Figure 6.
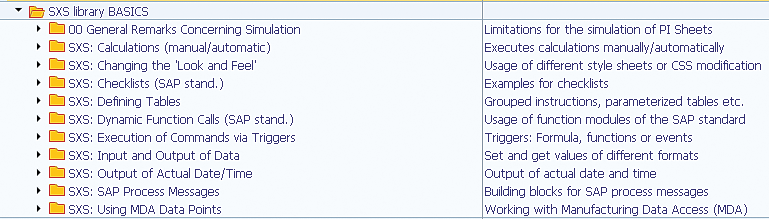
Figure 6
The imported XSteps library
There are several different standard XSteps in the library and, for my example, you use a standard XStep to post a confirmation for a phase of a process order.
The standard XSteps to post a confirmation can be found under the folder SXS: SAP Process Messages. This folder contains the XSteps with the basic functions of a process order, such as posting confirmations, goods issues, or goods receipts.
Expand the SXS: SAP Process Messages as shown in Figure 7. Note that in this folder the version 0001 exists for the standard XStep and that the current status is In Process. To use the standard XStep to create a PI sheet, the version must be released, and the first step to release it is to set the validity period.

Figure 7
Details of the XStep version
Double-click the version, and in the pop-up screen (Figure 8), select the validity period.
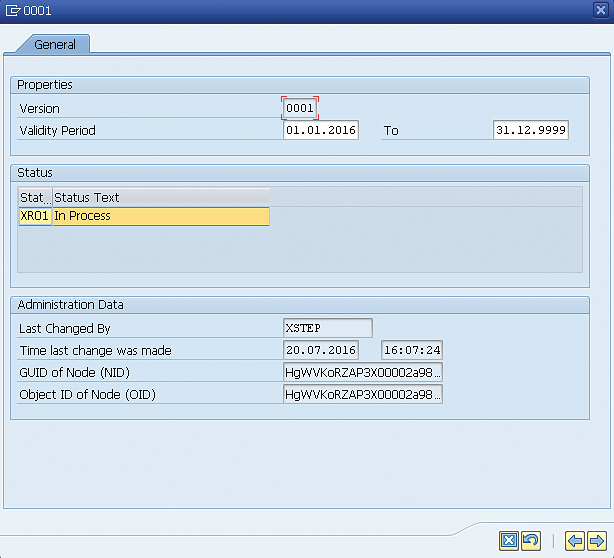
Figure 8
XStep version validity
To confirm the validity period in the pop-up screen, press the F12 key or click the X icon (refer back to Figure 8). Now go back to the previous screen in which you release the version. To release the version, right-click the version and then select the options Change Status and Approve and Release, as shown in Figure 9.

Figure 9
XStep version approval and release
After importing and releasing the XSteps, you can save the results.
Create a Standard XStep Reference in the Master Recipe
The XSteps should be now available to be used in a master recipe. The XSteps icon is available for the recipe during the master recipe creation via transaction code C201 or when changing an existing master recipe via transaction code C202, as shown in Figure 10. Click this icon or use the keyboard shortcut Ctrl+Shift+F8 to display the master recipe for your XSteps.

Figure 10
Click the XStep icon
This action displays the Master Recipe screen (Figure 11). Click the XStep Tree button to create the XStep tree.
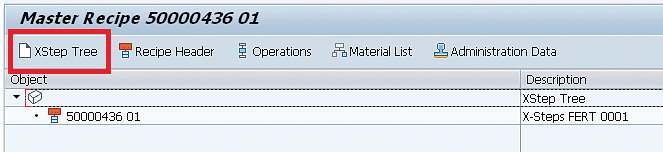
Figure 11
Create an XStep tree in the master recipe
After you click this button, the system displays the screen shown in Figure 12.
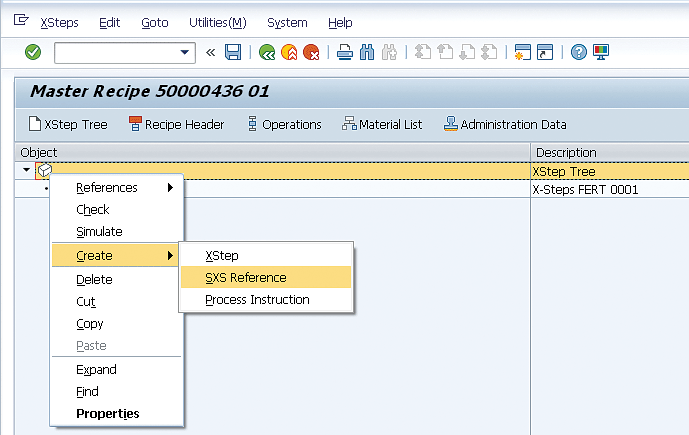
Figure 12
Create a reference to a standard XStep in the master recipe
Right-click the XStep Tree icon and then choose the options Create and SXS Reference. This action displays the screen in Figure 13.
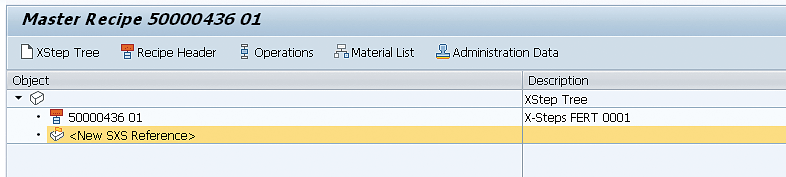
Figure 13
Display the new reference to a standard XStep
The greatest benefits of using the XStep are the possibility to have a central repository containing all the XSteps and the ability to easily import them when necessary. Now double-click the reference highlighted in Figure 13.
This action displays a pop-up screen in which you can change the description and select the actual reference in the standard XSteps repository (Figure 14). In Figure 14, note that all the standard XSteps that were not previously released (Figure 9) are grayed out and that they cannot be selected. After you double-click the released standard XStep, the Current Assignment field shows that this assignment has been created.
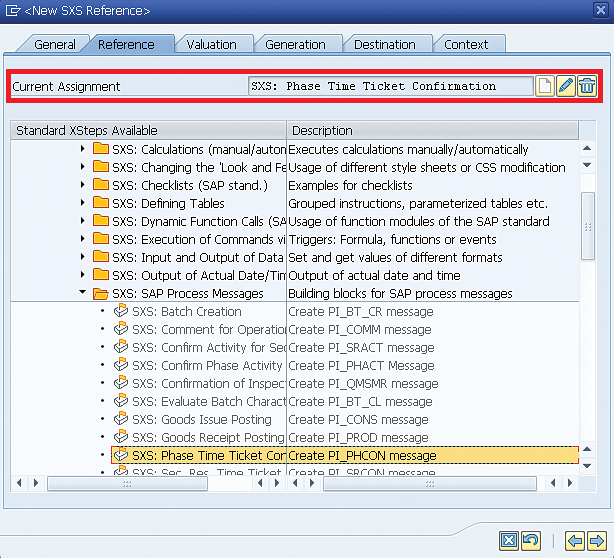
Figure 14
Standard XSteps available to be used as a reference during the creation of a new XStep on the master recipe
For my example, use the SXS: Phase Time Ticket Confirmation, which used the process message PI_PHCON to post a confirmation to a process order operation.
In the Destination tab, you need to also select a destination, which can be the same as used for the standard PI sheets (without XSteps).
Because this process message posts a confirmation for a specific phase, you must also set a reference for this phase in the Context tab. Select the Context tab and double-click the desired phase (e.g., Phase 0200). Your desired phase is then updated in the Current Assignment field, as shown in Figure 15.
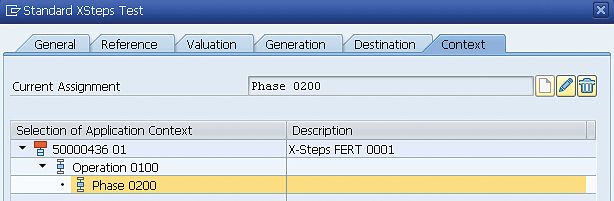
Figure 15
Context pointing the current assignment to Phase 0200
The maintenance of the XSteps is now finished and you can save the master recipe by going back to the previous screen and clicking the save icon (Ctrl+S).
Create a Process Order and Generate the Control Recipe
Now that you have a master recipe with a reference to the standard XStep, you can create a new process order and generate the control recipe.
You need to first create and release the process order via transaction code COR1 and then save the results, because generating a control recipe is not possible for orders with a temporary order number (%00000000001).
You can access the process order once it is created and then click the generate icon in the menu bar (or use the shortcut Ctrl+F9) to generate the control recipe (Figure 16).

Figure 16
Generate the control recipe
If you want to look at the XSteps and check if they were correctly created, click the XSteps button (Figure 16). This is an optional step and no action is necessary here, but if you click the XSteps button, you can see the process message and all the assigned characteristics (Figure 17). If the XSteps button is missing, SAP Knowledge Base Article (KBA) 1931910 explains how to activate it.

Figure 17
XSteps from the process order
As an alternative, you can also use transaction code COHVPI to mass generate control recipes.
Send the Control Recipe
Now that you have generated the control recipe, you can find it and also send it by executing transaction code CO53XT (Control Instructions/Recipes Monitor). This action displays the screen in Figure 18 in which you use the order number as an input parameter to enter in the Manufacturing Order field.
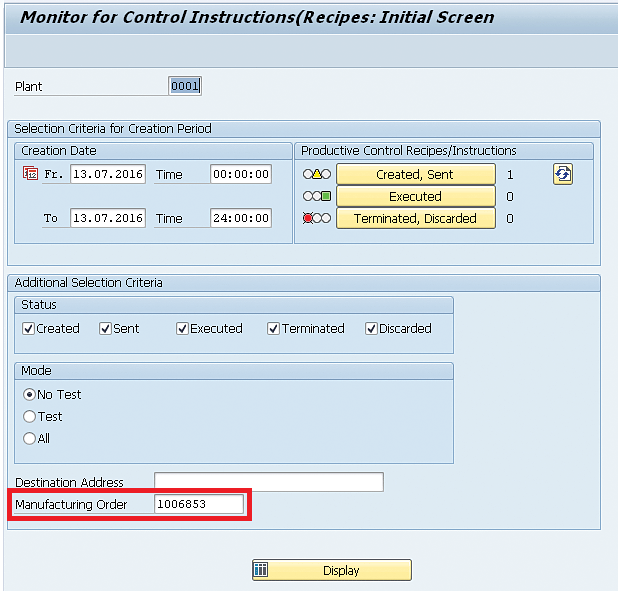
Figure 18
The initial selection screen to monitor control instructions or recipes
Click the Display button to see the control recipes generated in the next screen (Figure 19).

Figure 19
Options to send the generated control recipe after executing transaction code CO53XT
In Figure 19, you see the generated control recipe. You have two options to send this recipe. You can click the Start Send Job button to trigger program RCOCB006 on a background job and the control recipes or you can send the control recipe online by clicking the Send button.
Process the PI Sheet
After sending the control instruction, you can now process the PI sheet using transaction code CO60XT. This action displays the screen shown in Figure 20 in which you again enter a number in the Manufacturing Order field to be used as a selection criterion.

Figure 20
The selection screen to find work instructions
After you click the execute icon or press the F8 key, the system displays the generated work instruction, as shown in Figure 21.

Figure 21
Work instruction details
Select the row in which the work instruction details are displayed and click the edit Work Instructions button to process the PI sheet, as highlighted in Figure 21.
In Figure 22 you can finally see the PI sheet that was created based on the standard XSteps. You can see that the fields displayed in this PI sheet match the characteristics displayed in the process order XSteps from Figure 17. These are the parameters to post an order confirmation.

Figure 22
A PI sheet created with the standard XSteps
After filling the desired values in the PI sheet, click the Complete button to carry out the function. In this basic example you only use the Confirm Activity 1, Unit for Activity 1, Yield, and Status for Activity Confirm (the posting date is set by default with the current date).
After returning to the previous screen, you see that the status is changed to Completed, as shown in Figure 23. This status means that the process message PI_PHCON can now be sent and that’s when the confirmation is actually posted. Only after sending the process message is the confirmation actually saved on the table. The process order status then is updated to Confirmed or Partially confirmed.

Figure 23
Work instruction status changed to Completed
Send the Process Message and Save the Confirmation
To send the process messages, execute transaction code CO54XT. This action displays the screen in Figure 24. You can either provide your process order number and click the Message List button to see the messages from this specific order or click the To Be Sent button to see all the process messages to be sent. Because the process messages already sent are not relevant in this moment and there is only one process message to be sent, you can click the To Be Sent button.

Figure 24
The selection screen to enter criteria for process messages
As shown in Figure 25, you have the same options available after you execute transaction code CO53XT to start a job to send the process message in the background or to post it immediately online.

Figure 25
Process message with status To be sent
Programs RCOCB002 and RCOCB004 can be used as an alternative option to send process messages. They can be scheduled to be executed as periodic jobs. The difference between them is that the first one is cross plant, whereas the second one is plant specific.
Now that the process message was finally sent, you can find the details of the confirmation posted via transaction code CORS, as shown in Figure 26.

Figure 26
Details of the order confirmation
If you check the order again after executing transaction code CORT, you see that the process order status was updated to PCNF – Partially Confirmed, as shown in Figure 27. That’s because you have selected this option on the PI sheet in the Status for Activity Confirm field (Figure 22).
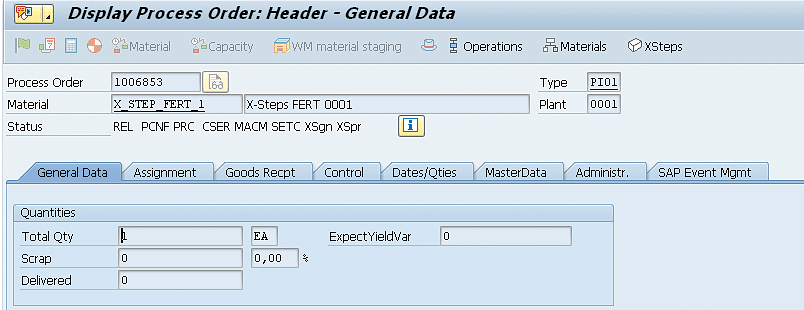
Figure 27
The Process Order status was changed to PCNF, as displayed on the header
You can also observe in Figure 27 that there is no delivered quantity yet because you did not post a goods movement without a PI sheet.
The standard XSteps library is an easy way to implement the process management for process orders and to create and maintain the master data. The XSteps were created with a strong focus in reusability, which can represent a faster implementation and a lower effort in maintenance.
This library contains a variety of functions to be executed on PI sheets and includes the most basic actions, such as posting goods issues of components or the final product goods receipt to more complex functionalities, such as material quantity calculation or the integration with QM or DMS.
You can combine multiple standard XSteps to create a single PI sheet and post several process messages at the same time to execute multiple functions, such as the goods receipt and the confirmation at the same time. This process is a great exercise to complement the example provided in this article.
Caetano Almeida
Caetano Almeida is a computer engineer with an MBA in IT management. He has more than nine years of experience in production planning, with the last six years working at SAP Support, where he supports SAP customers and writes documentation and correction notes.
You may contact the author at caetano.almeida@outlook.com.
If you have comments about this article or publication, or would like to submit an article idea, please contact the editor.