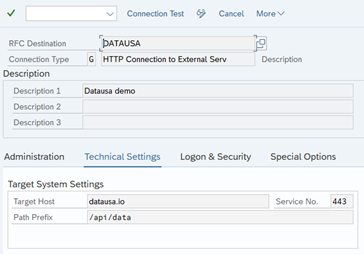
 In the “Logon and Security,” tab, we activate “SSL Protocol” and select “Default SSL Client.”
 We save our RFC Connection et voilá! Our connection is created! Let’s check if the connection works by clicking on the button “Connection Test.” In my case, I get an “ICM_HTTP_SSL_PEER_CERT_UNTRUSTED” error. Anyway, let’s continue reading!
 Download the SSL certificate from the site
As this is a new service that will be consumed, we need to add the SSL certificate to the system, so that the service and the ERP can communicate “in the same language.” To get this certificate, we run Chrome and type the URL that we want to consume, in this case,
Download the SSL certificate from the site
As this is a new service that will be consumed, we need to add the SSL certificate to the system, so that the service and the ERP can communicate “in the same language.” To get this certificate, we run Chrome and type the URL that we want to consume, in this case, 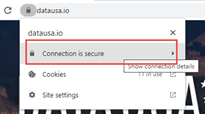
 The information of the certificate is displayed. But we are interested in the last tab (Certification Path), where we have an overview of the entire certificate chain. In my case, I can see 3 different rings and the one that we care about is the “root” that is on the top. We always need to upload the “root certificate” to SAP. We double click on “Digicert Baltimore Root” and a new window is opened with its information. We go to the second tab, which is “Details,” and we click on “Copy to file.” The exporting assistant is launched, and we must follow all the steps to obtain a copy of this certificate in our local computer.
Upload the certificate to SAP
For the moment, we have completed the first step, which is the connection definition, and the second, which is the download of the root certificate. Let’s upload this certificate to SAP. We quit Chrome and we return to the GUI and execute transaction STRUST. The screen is divided in two. On the left, we find folders. On the right, there is some information. We search for the folder “SSL Client (Standard)” (this should be the same reference when defined the RFC connection, section “SSL Protocol”) and we open it.
The information of the certificate is displayed. But we are interested in the last tab (Certification Path), where we have an overview of the entire certificate chain. In my case, I can see 3 different rings and the one that we care about is the “root” that is on the top. We always need to upload the “root certificate” to SAP. We double click on “Digicert Baltimore Root” and a new window is opened with its information. We go to the second tab, which is “Details,” and we click on “Copy to file.” The exporting assistant is launched, and we must follow all the steps to obtain a copy of this certificate in our local computer.
Upload the certificate to SAP
For the moment, we have completed the first step, which is the connection definition, and the second, which is the download of the root certificate. Let’s upload this certificate to SAP. We quit Chrome and we return to the GUI and execute transaction STRUST. The screen is divided in two. On the left, we find folders. On the right, there is some information. We search for the folder “SSL Client (Standard)” (this should be the same reference when defined the RFC connection, section “SSL Protocol”) and we open it.
 We click on the green dot, and the right side will be updated with all the certificates uploaded in this section. At the end of the right pane there is a button with a green arrow. When you place the mouse on it, the “Import certificate” message appears. We click on it and select the certificate that was downloaded in the previous step. If it is successfully imported, the certificate fields will be filled with the information got from the file that was read. To import it to the list, we click on “Add to certificate List” and a message so is displayed (“Certificate added to PSE”).
 We save the change, and another appears. To evaluate this step, we execute transaction SM59, and open the recent entry created called “DATAUSA.” We click on “Connection Test” and the result should be successful: HTTP/1.1 200 OK.
Code the program
Now we can start coding our program. To make this step easier, I have created a public repository in GitHub to copy + paste the source code. You can enter to the following URL to get it:
We save the change, and another appears. To evaluate this step, we execute transaction SM59, and open the recent entry created called “DATAUSA.” We click on “Connection Test” and the result should be successful: HTTP/1.1 200 OK.
Code the program
Now we can start coding our program. To make this step easier, I have created a public repository in GitHub to copy + paste the source code. You can enter to the following URL to get it:

1 minute read

Meet the Experts
Key Takeaways
What you need to know
Consuming an API can be a complicated process.
Before starting, you must know what parameters to add to your request and how to interpret the answer.
It is important to know how to troubleshoot potential issues.
In this article, you will find a step-by-step guide to implement and troubleshoot a basic API consumption with SSL connection.
How often do you get the order to consume a WS, establish an SSL connection and troubleshoot any possible incident? The simple task of consuming an API usually requires several technical teams to give support: programmers, basis, networking and security. It is usually not easy to align the planets with all the teams and give a solution or answer to quickly start testing the interface.
There are five steps in this process: To define the connection in SM59, we must define the URL that we want to reach according to the definition obtained in the API documentation. In case the endpoint changes, the only thing we need to do is to update our connection, defined in transaction SM59.
More Resources
See All Related Content
Case Study: Compressed air systems specialist migrates to global process automation to the cloudKaeser switched from SAP BPA on-premises to Redwood’s RunMyJobs SaaS to maintain familiar automation while reducing maintenance, streamlining global logistics, trade, and accounting workflows, and enabling a single automated process chain to centrally manage operations across more than 40 countries.

Enhancing FP&A by Integrating SAP Data with Databricks and SnowflakeTo enhance financial insights for FP&A teams, effective integration of complex SAP systems like S/4HANA with agile cloud analytics platforms such as Databricks and Snowflake is crucial, requiring specialized connectivity tools like those from CData that enable near real-time data access, harmonization across diverse systems, and stringent security measures.
3 minute read

SAP AI SDLC Assist (SASA): AI-Driven SAP DeliverySAP AI SDLC Assist (SASA) is an AI-powered platform that automates and accelerates the SAP Software Development Lifecycle by learning from organizational systems to generate technical documentation, code, and test cases, ultimately enhancing delivery speed, code quality, and governance.
1 minute read

From “Steampunk” to ABAP Cloud: How SAP Unified Its ABAP Extensibility StrategyThe transition from SAP’s 'Steampunk' era to the unified 'ABAP Cloud' model reflects a successful shift towards enforced cloud-native principles and API-first design for extensibility across SAP environments, ultimately streamlining development practices and enhancing upgrade stability.
4 minute read